
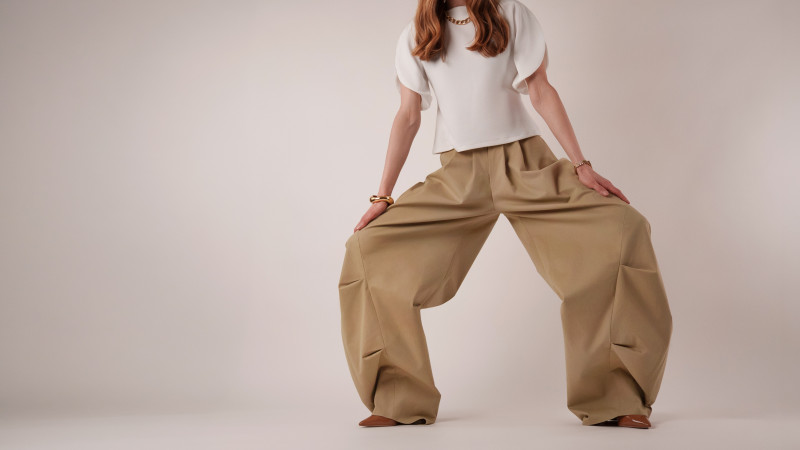
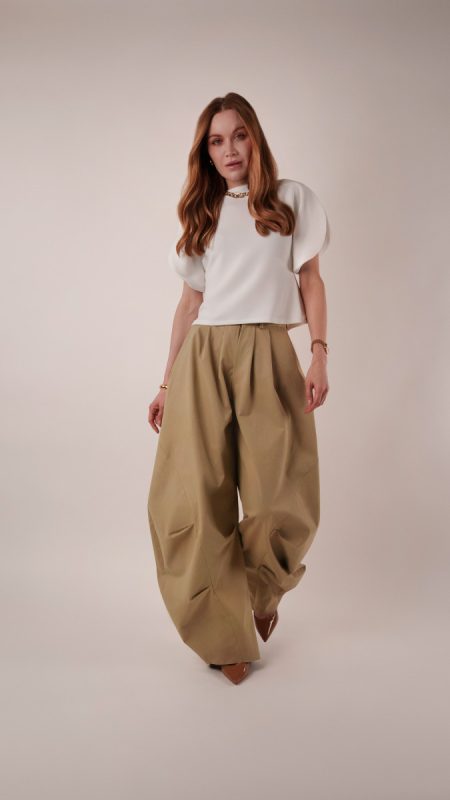
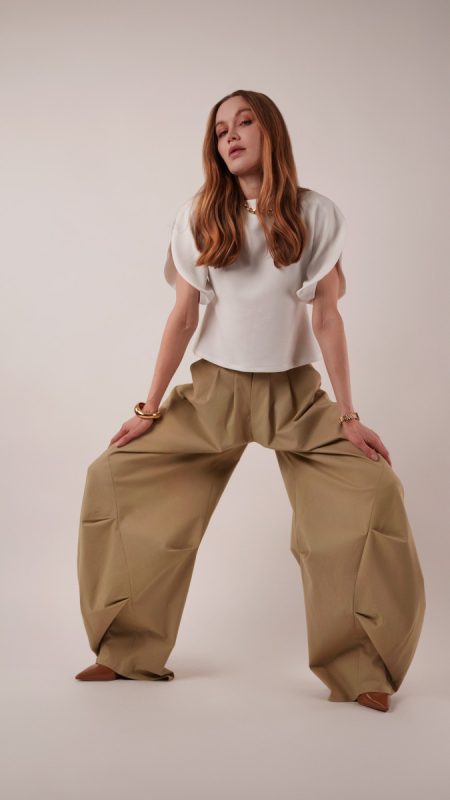
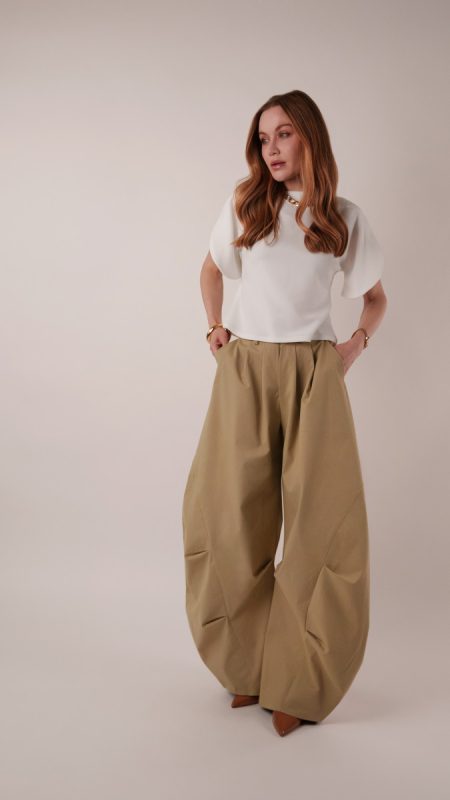
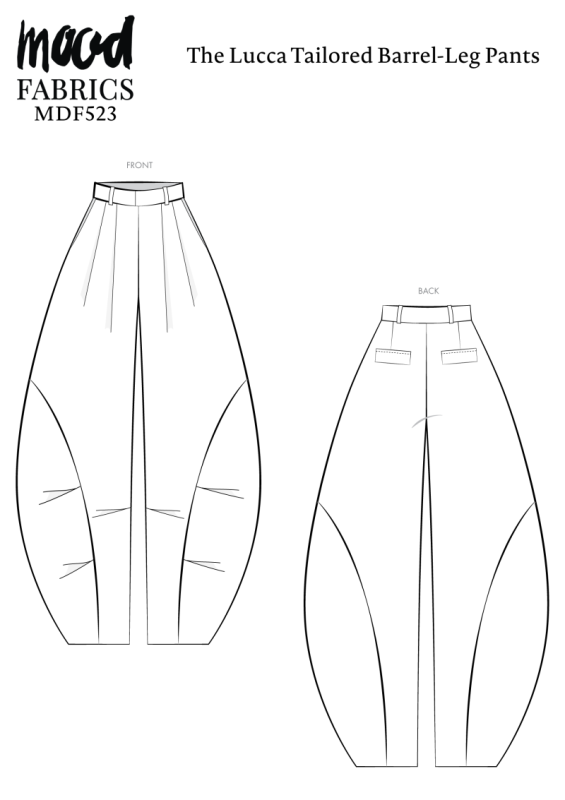
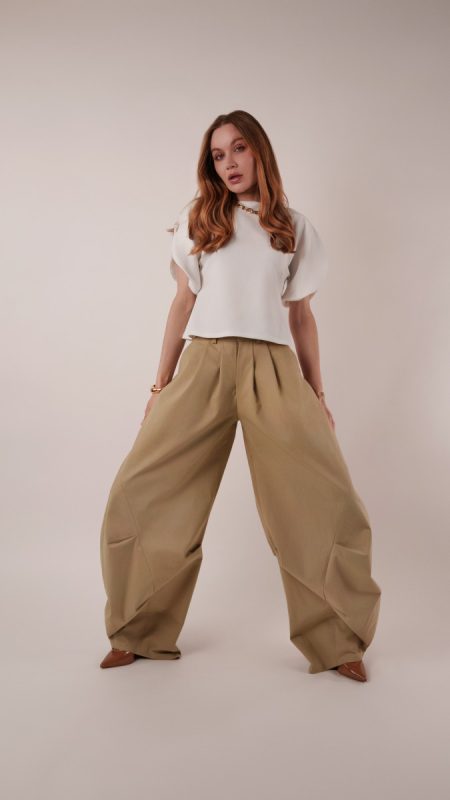
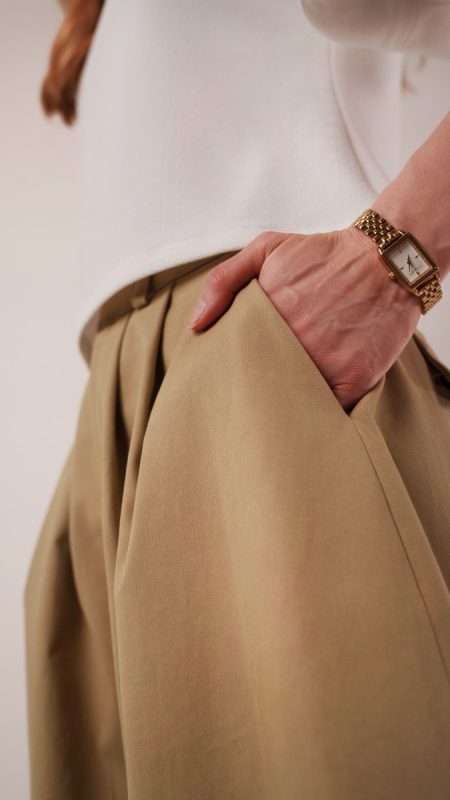
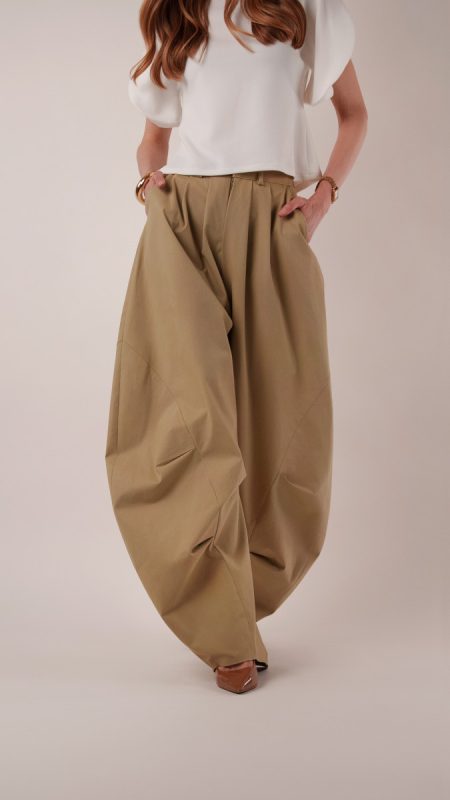
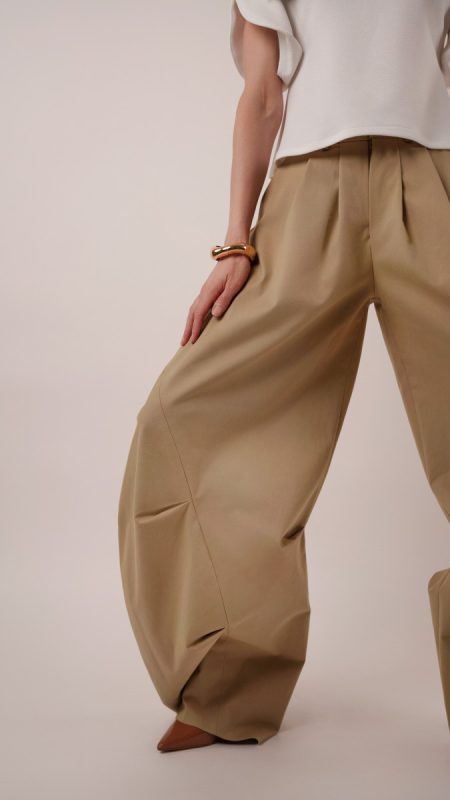
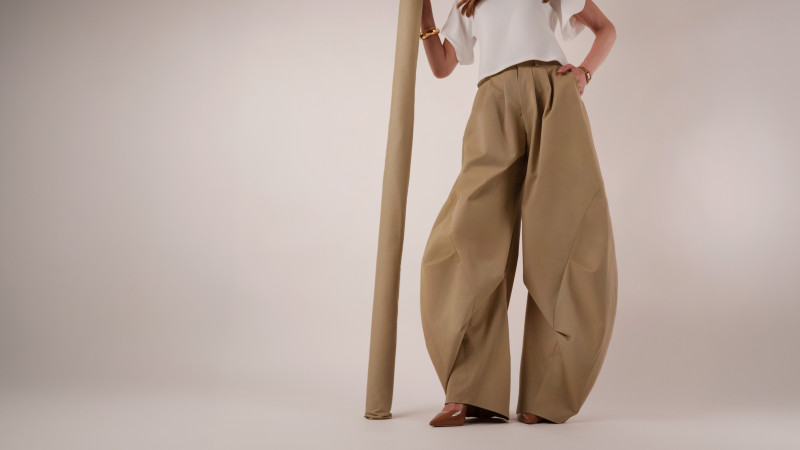
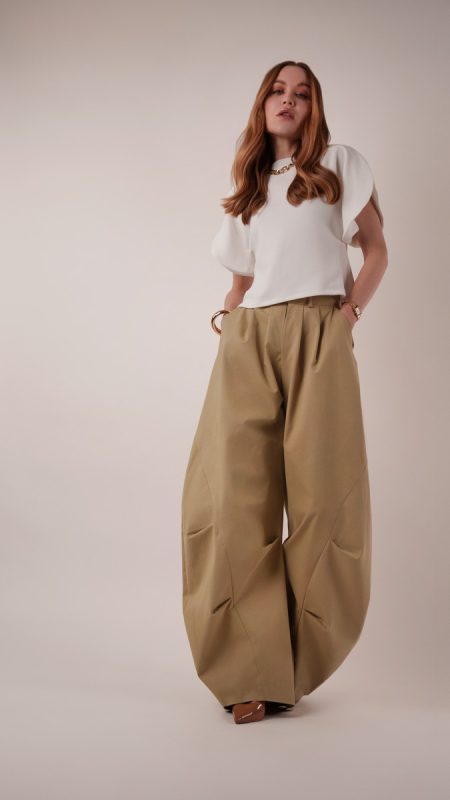
Barrel-leg pants are having a major moment, and the Lucca Tailored Barrel-Leg Pants are the perfect way to bring the trend into your handmade wardrobe. Made from a brushed stretch khaki twill with 15% weftwise stretch, these statement trousers combine structure, comfort, and dramatic volume in one unforgettable silhouette. The slight stretch helps the waistband sit comfortably and hug in all the right places, while the oversized barrel-leg shape creates a bold, fashion-forward look that feels both tailored and effortless.
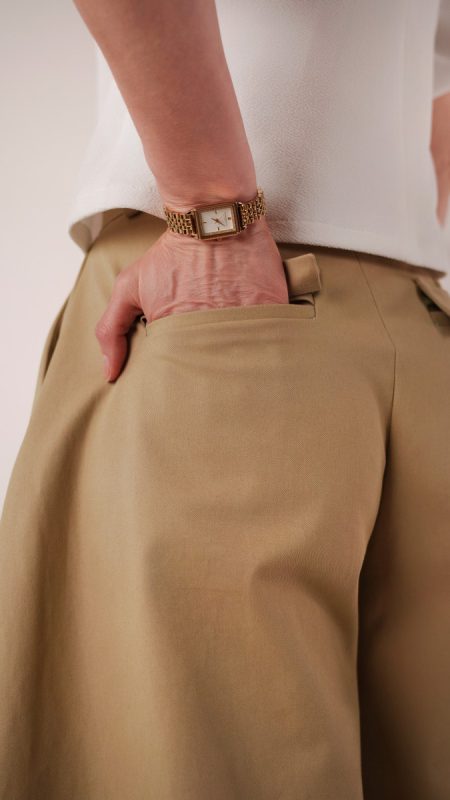
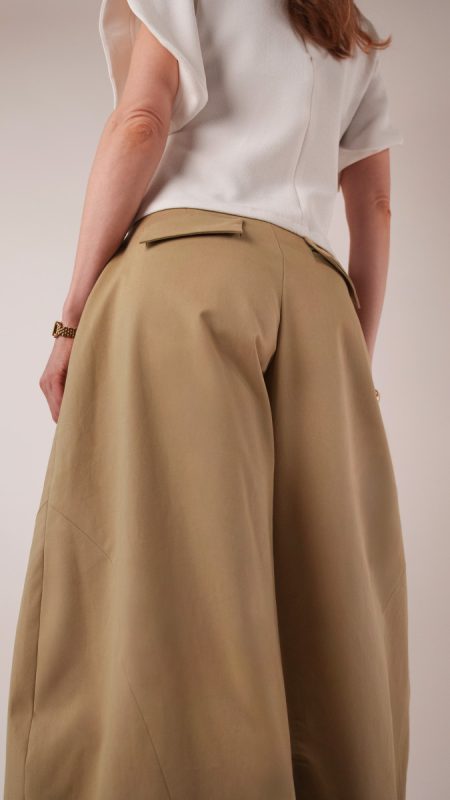
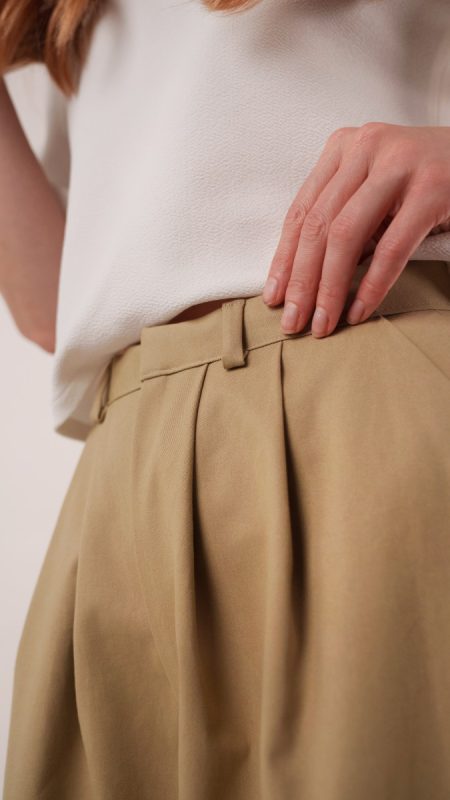
And yes, the details are just as impressive as they look. With ten pleats throughout the design, these pants are a true sewing project for anyone ready to flex their construction skills. Each fold adds shape, dimension, and that signature sculptural volume that makes the Lucca Pants so striking. Welt pockets and side seam pockets offer even more opportunities to show off your tailoring techniques, while the curved leg panels bring extra structure and create a silhouette that turns heads from every angle.
These are elevated streetwear at its best. Style them with a crisp button-down blouse for a polished workwear look, or pair them with a silky lace camisole and sandals for an easy summer outfit with major personality. If you’ve been looking for a rewarding spring-to-summer project, the Lucca Tailored Barrel-Leg Pants are ready for you.

Essential Materials & Sizing Guide for the Lucca Tailored Barrel-Leg Pants
Continue reading for a breakdown of what knowledge and materials you need for creating your very own tailored barrel-leg pants! We’ve got you covered with the recommended materials we used—if you want to follow along exactly—as well as a curated list of alternative fabric type recommendations if you want to customize your own version. The Lucca Tailored Barrel-Leg Pants free sewing pattern download includes technical drawings for seam and silhouette visibility, plus a size chart to help you find your perfect fit!
Purchase Products Used Below:
Quantities indicated are for sewing a size small* barrel-leg pants. Toggle the ‘SHOP THIS LOOK’ box to find quantity estimates for other sizes.
- 3.5 yards of Carbon Brushed Stretch Khaki Twill – Beige – Averill Collection
- 0.5 yards of Stretch Polyester Twill Lining – Beige – Josephine Collection
- 1 each of Dritz Black and Nickel Sew-On Skirt Hook & Eye Closures – 4ct
- 1 each of Regular Zipper 9″ by YKK – 896 Dark Khaki
- 1 each of Gutermann Sew All Thread 250m – 522 Dusted Pastel Green
- MDF523 – Lucca Tailored Barrel-Leg Pants Sewing Pattern (Free download below!)
Additional Products Used:
*Quick Tip! The ‘SHOP THIS LOOK’ box defaults to full-yard quantities. To order an exact half-yard quantity for any fabric, simply use the decrease quantity button (-) to subtract by the half yard. Then click “ADD TO CART” to add all materials to your cart. (Our system can only display full-yard quantities initially.)
Alternative Fabric Type Recommendations:
The Lucca Tailored Barrel-Leg Pants sewing pattern is best suited for medium weight fashion fabrics. Explore other fabric types or colors from our featured collections for your tailored barrel-leg pants with the links below.
Download Your Free Sewing Pattern
Submit your name and email in the form below to receive the download link for the Lucca Tailored Barrel-Leg Pants free sewing pattern directly in your inbox. Mood Sewciety Patterns will send your free download link via email with the subject line: ‘Your Free Download from Mood Sewciety – The Lucca Tailored Barrel-Leg Pants’ (in PDF format for A4 and letter-size printing).
© MoodFabrics.com / MoodSewciety.com – Mass production, resale, or distribution of this pattern in any form is strictly prohibited.
Find Your Perfect Fit
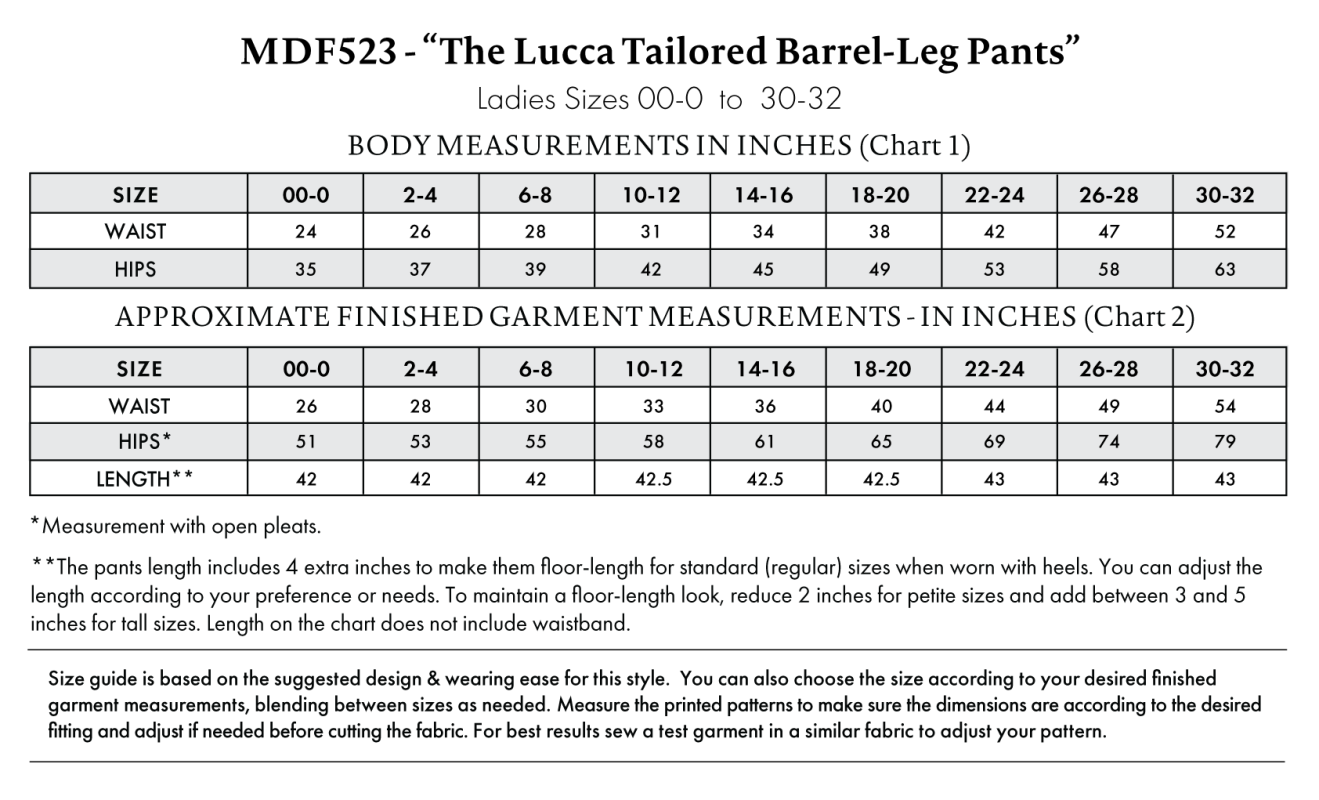
The Lucca Tailored Barrel-Leg Pants Sizing Guide is based on the suggested design & wearing ease for this style. You can also choose the size according to your desired finished garment measurements, blending between sizes as needed. Measure the printed patterns to make sure the dimensions are according to the desired fitting and adjust if needed before cutting the fabric. For best results, sew a test garment in a similar fabric to adjust your pattern.
Note: Always read all the instructions before cutting the fabric!
How to Sew The Lucca Tailored Barrel-Leg Pants
The instructions provided below are designed to guide you through sewing the Lucca Tailored Barrel-Leg Pants from start to finish.
3 Tips for Sewing with Brushed Stretch Twill
⇒ This fabric has a slight weftwise stretch, meaning it is critical that you make sure the grainlines of all your pattern pieces are positioned perpendicularly to the stretch of the fabric. You want to make sure the fabric stretches horizontally across the body, not vertically.
⇒ Wash and dry your fabric before cutting out your pattern pieces because this fabric will definitely shrink.
⇒ Turn your iron up to high heat. This twill is made from cotton, so your iron won’t burn it.
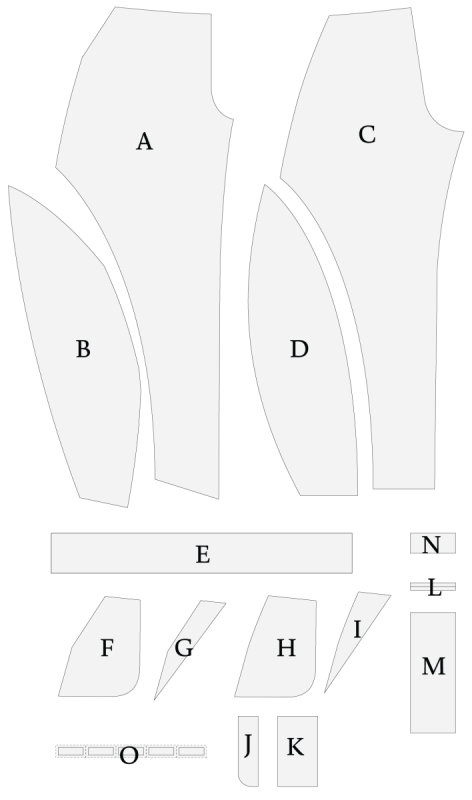
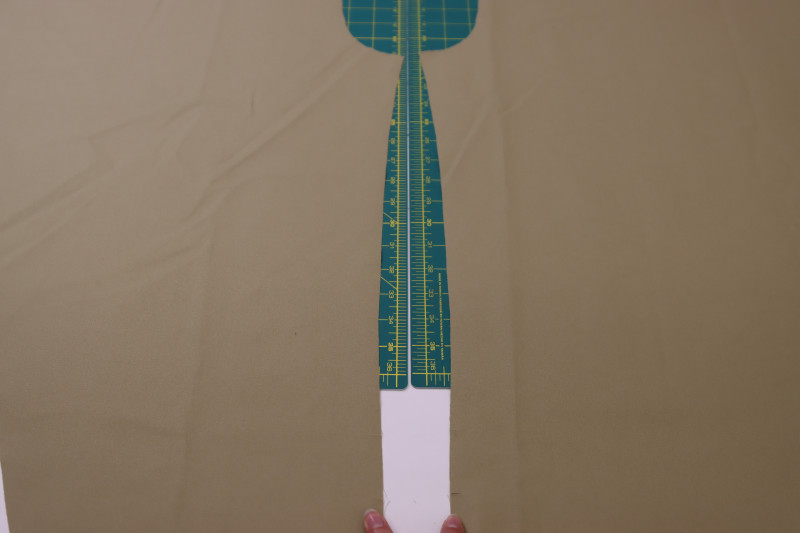
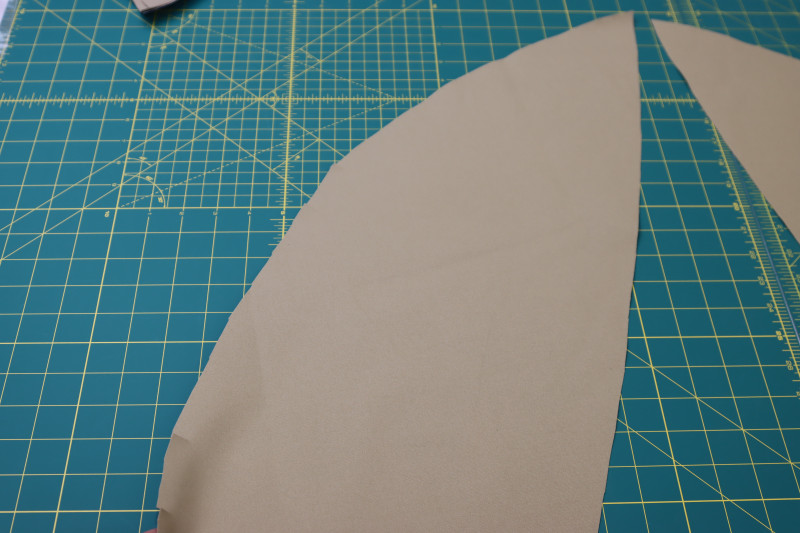
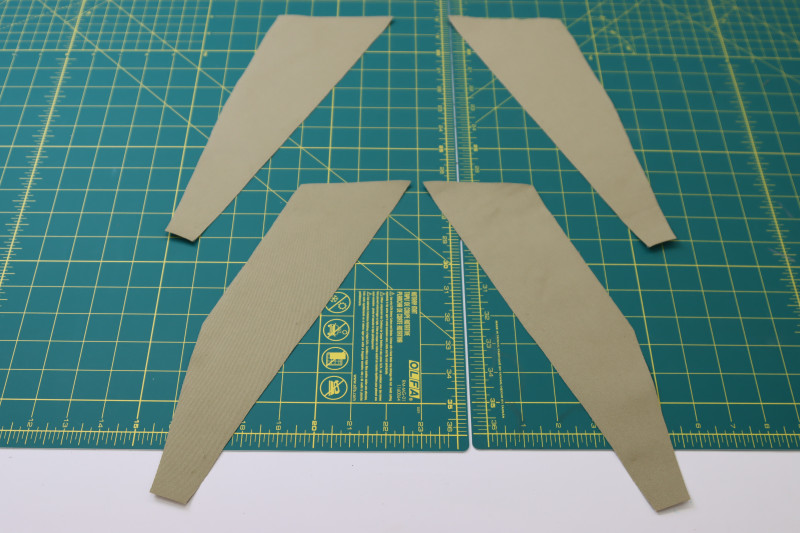
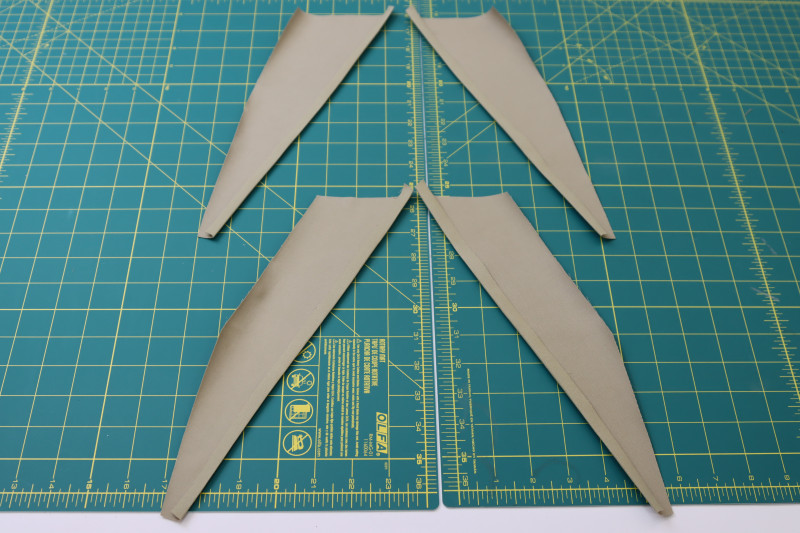
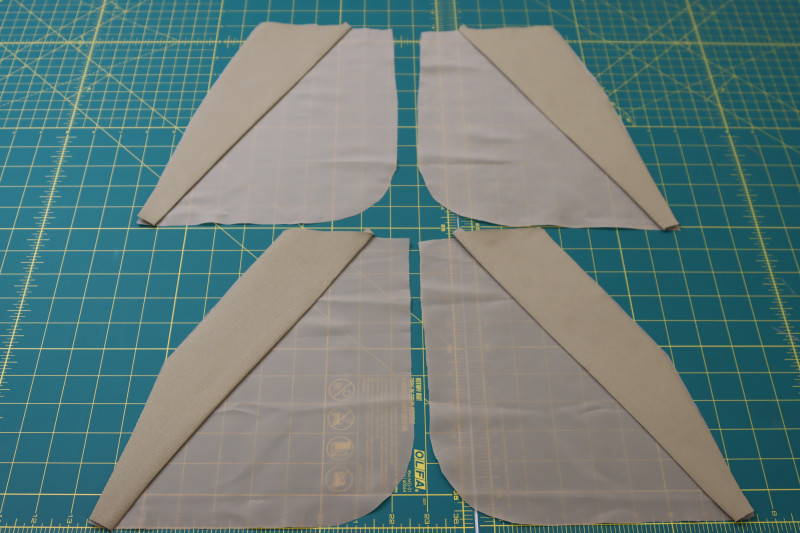
Pattern Pieces & Fabric Cuts Needed
- (A) FRONT
- Fabric – Cut 2 Mirrored
- (B) FRONT SIDE
- Fabric – Cut 2 Mirrored
- (C) BACK
- Fabric – Cut 2 Mirrored
- (D) BACK SIDE
- Fabric – Cut 2 Mirrored
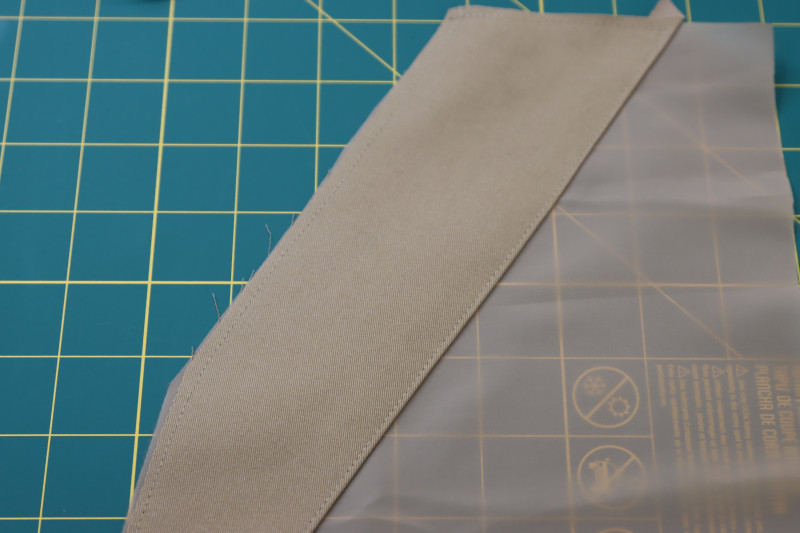
- (E) WAISTBAND
- Fabric – Cut 1
- (F) FRONT POCKETS (A)
- Lining – Cut 2 Mirrored
- (G) FRONT POCKETS (A) FACING
- Fabric – Cut 2 Mirrored
- (H) FRONT POCKETS (B)
- Lining – Cut 2 Mirrored
- (I) FRONT POCKETS (B) FACING
- Fabric – Cut 2 Mirrored
- (J) FLY
- Fabric – Cut 2 Mirrored
- (K) FLY SHIELD
- Fabric – Cut 1
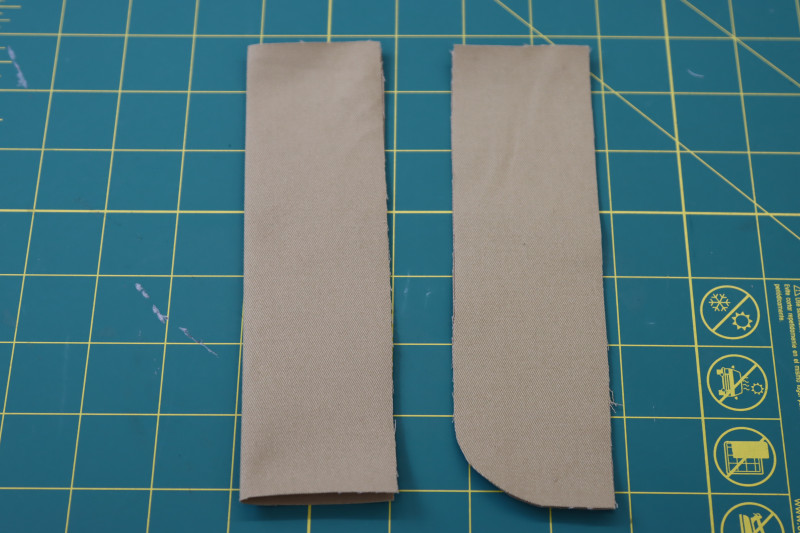
- (L) WELT
- Fabric – Cut 4
- (M) WELT POCKET BAG
- Lining – Cut 2
- (N) WELT POCKET FLAP
- Fabric – Cut 4
- (O) BELT LOOPS
- Fabric – Cut 1 and Divide into 5
Sew with a 1/2″ seam allowance for all seams unless otherwise specified.
Step 1
BACK DARTS
- Mark the back darts with tailor’s chalk.
- Fold the back pant pieces right sides together with the dart centered on the fold.
- Pin the chalk lines on either side of the fold together.
- Sew over the chalk lines.
- Press the darts towards the side seams of the pants.
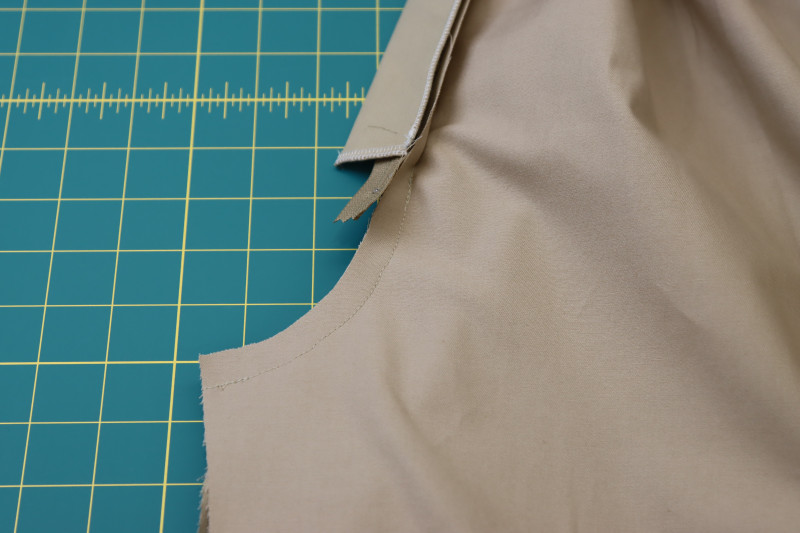
Step 2
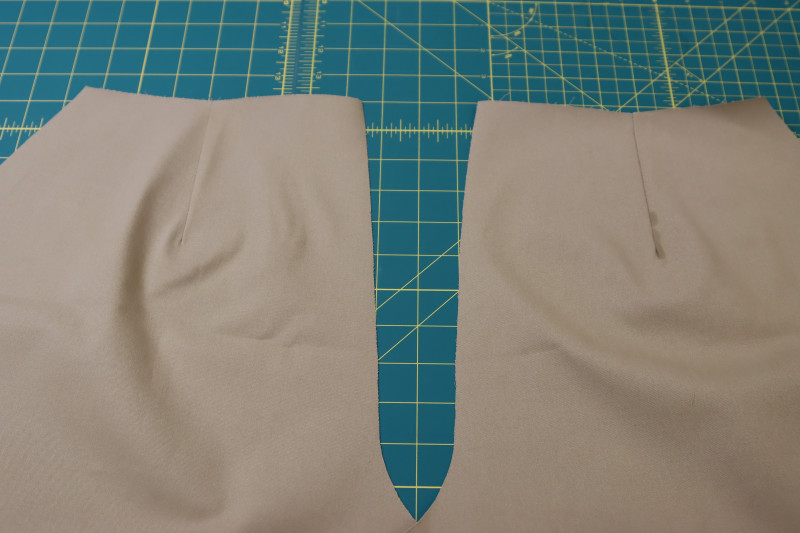
BACK PANEL
- Place the curved back panel piece right sides together with the curved cutout on the back pants pieces.
- Pin the curved edge of the back panel to the curved cutout of the back pants.
- Sew along the pins.
- Press the panel seam open and flat.
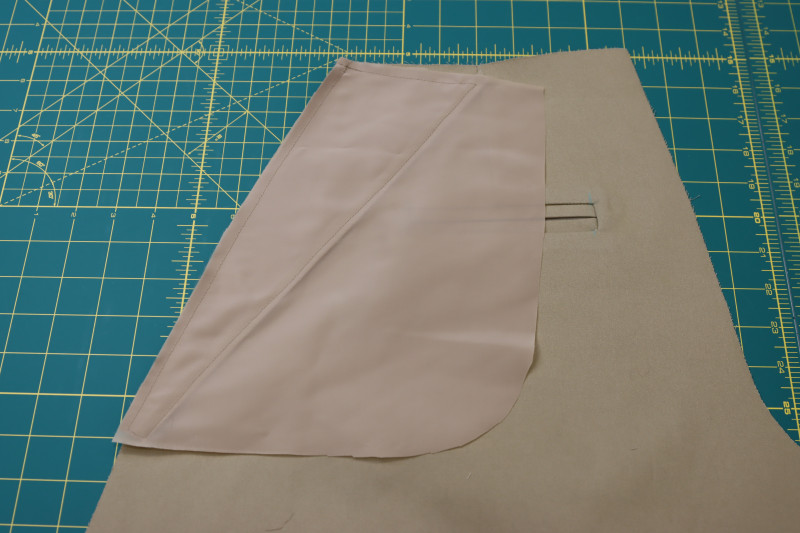
Step 3
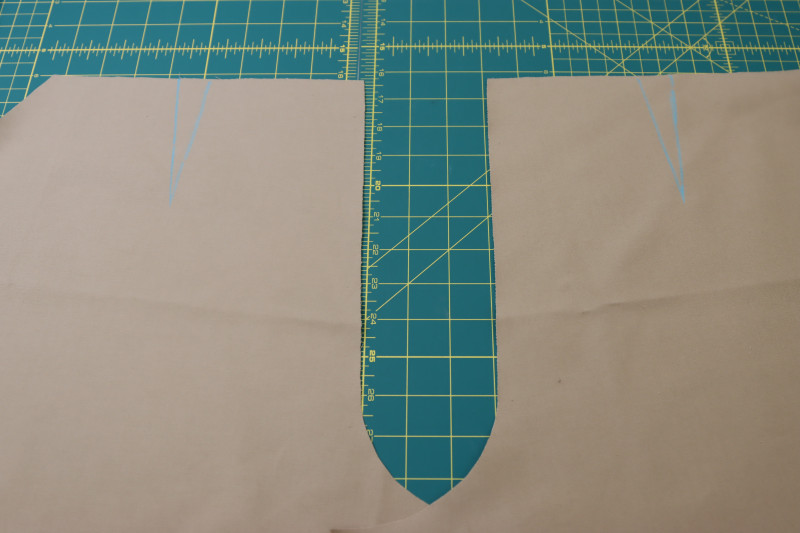
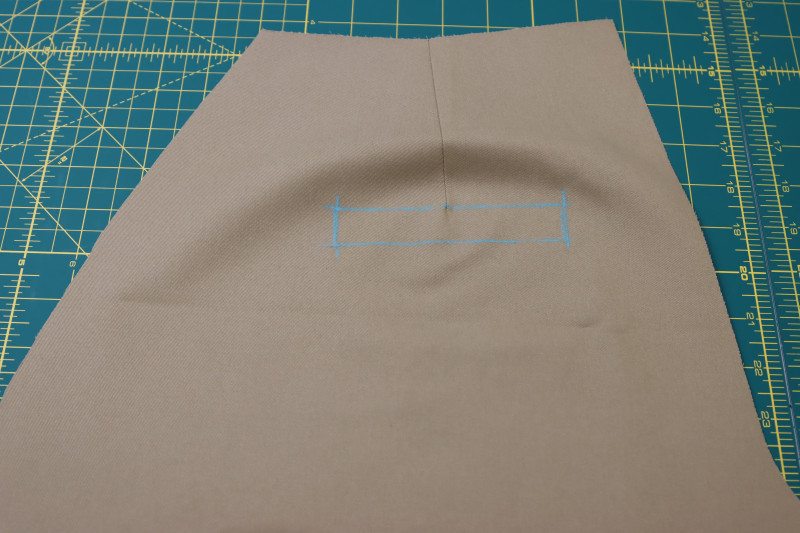
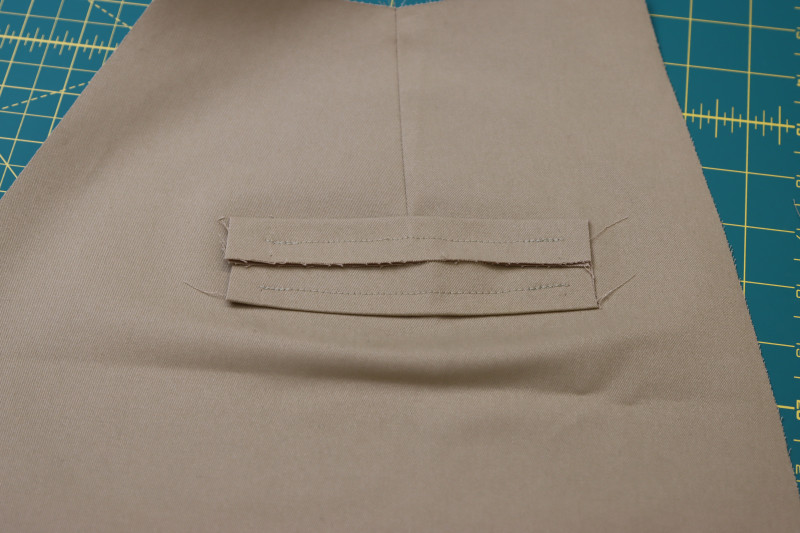
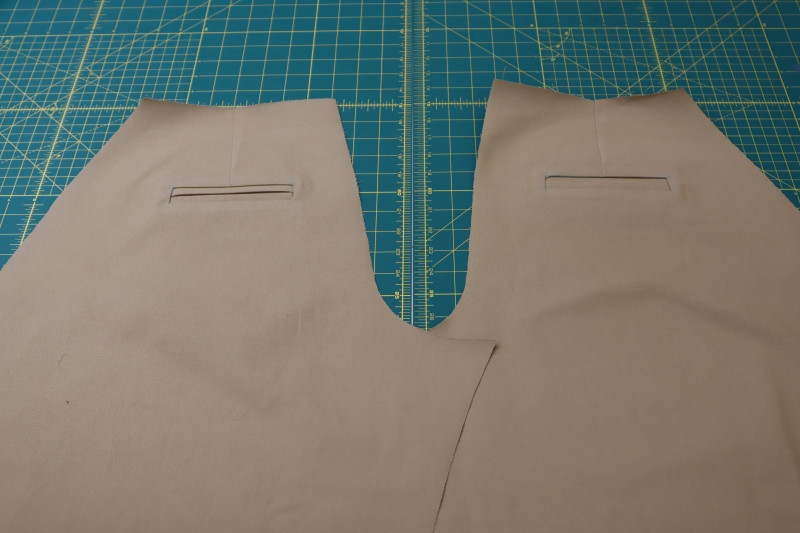
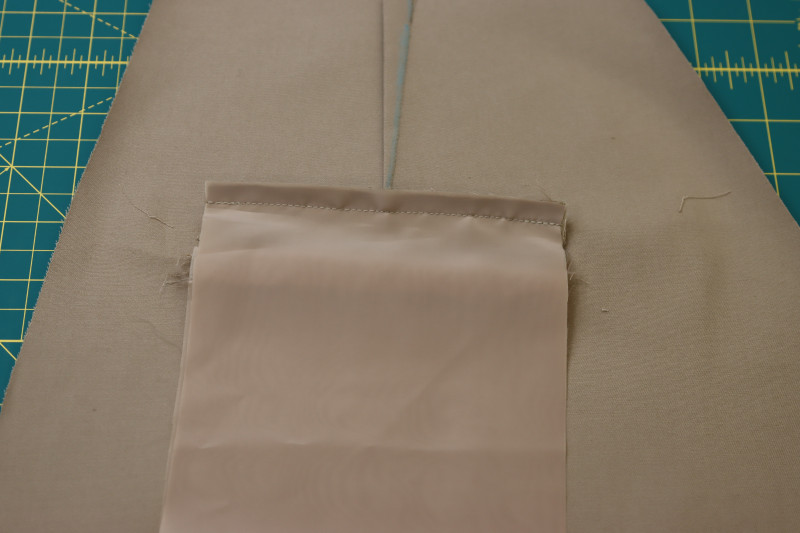
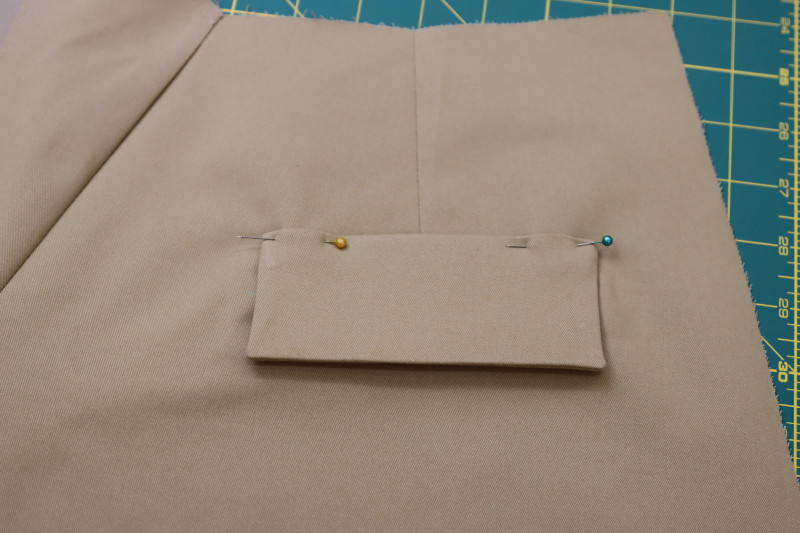
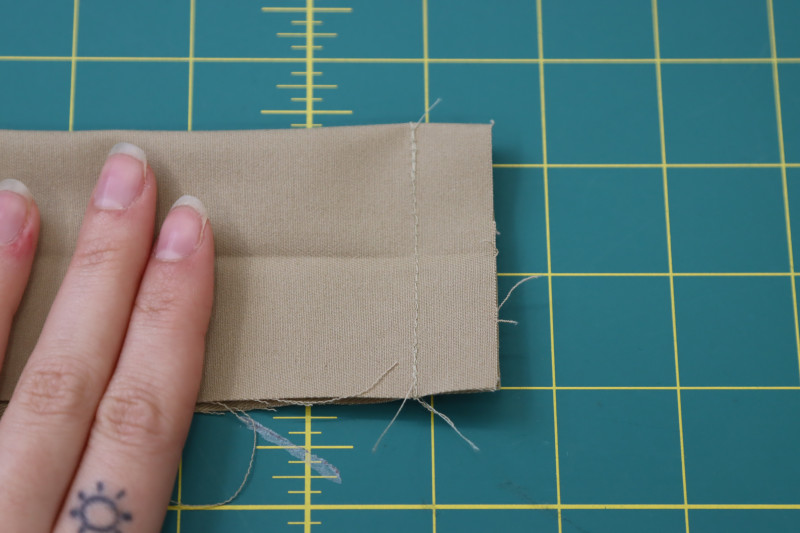
WELT POCKETS
- Mark the location of the welt pockets on the back pants pieces directly under and perpendicular to the dart.
- Fold the welts in half wrong sides together and press the fold.
- Pin and sew the folded welts to the top and bottom chalk lines for the welt pocket.
- Cut a slit in between the welts as shown in the photo below.
- Flip the welts toward the wrong side of the fabric.
- Press the welts flat.
- Make sure you repeat for both sides of the backs of the pants.
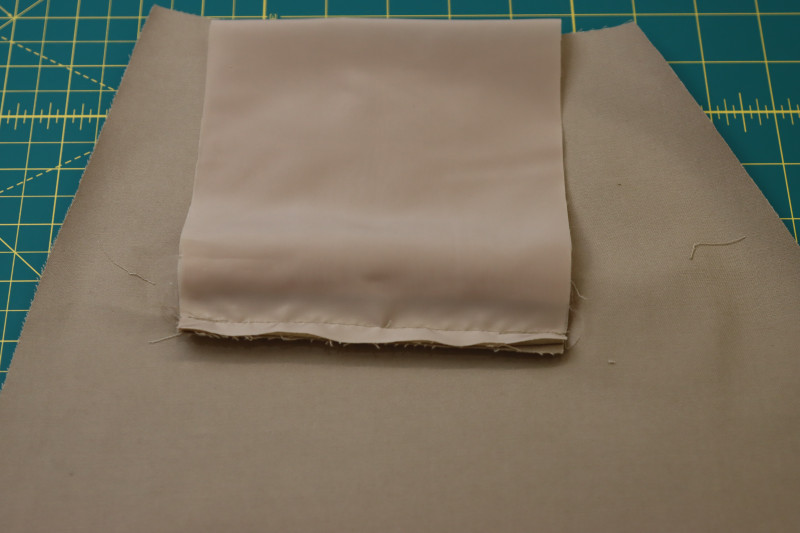
Step 4
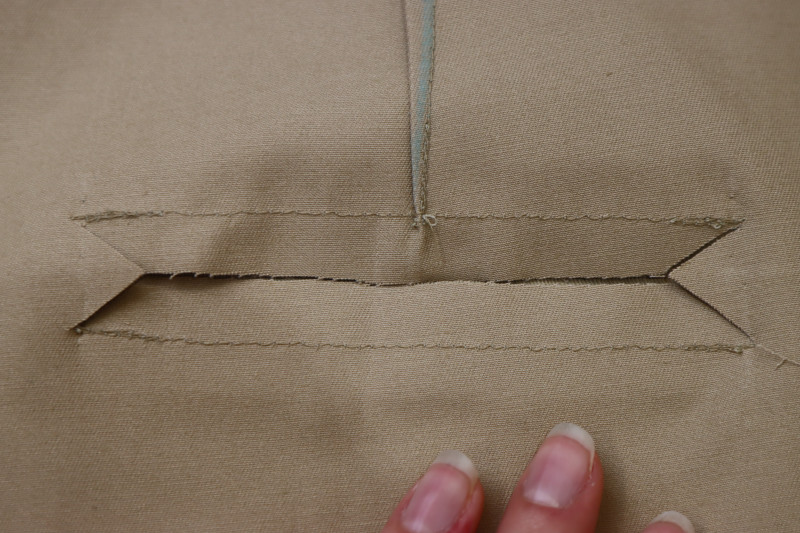
WELT LINING
- Pin and sew one of the short ends of the pocket lining to the seam allowance of the upper welt.
- Pin and sew the other short end of the pocket lining to the seam allowance of the lower welt.
- Fold the main pant fabric out of the way to access the side seams of the pockets.
- Sew a straight stitch from the top to the bottom of the side of the pocket, making sure to catch the triangular notch on the side of the welt pocket.
- Repeat on both sides of the pocket lining.

Step 5
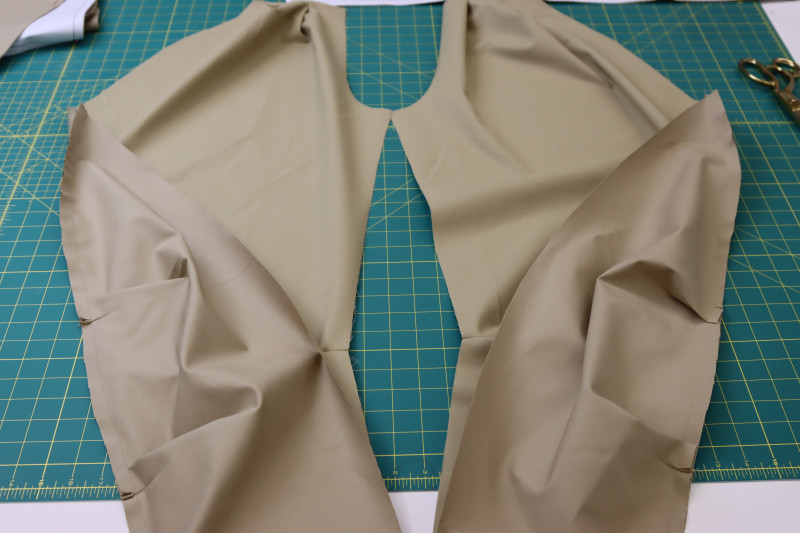
PLEATS
- Cut the notches for the waistline pleats.
- Cut the notches for the pleats on the inseam.
- Pin the pleat notches right sides together to create two pleats on either side of the waistline and one pleat on either side of the inseam.
- Sew the pleats ½ inch down from the notches.
- Make sure the waistline pleats open toward the side seams and the inseam pleat opens facing up.
Step 6
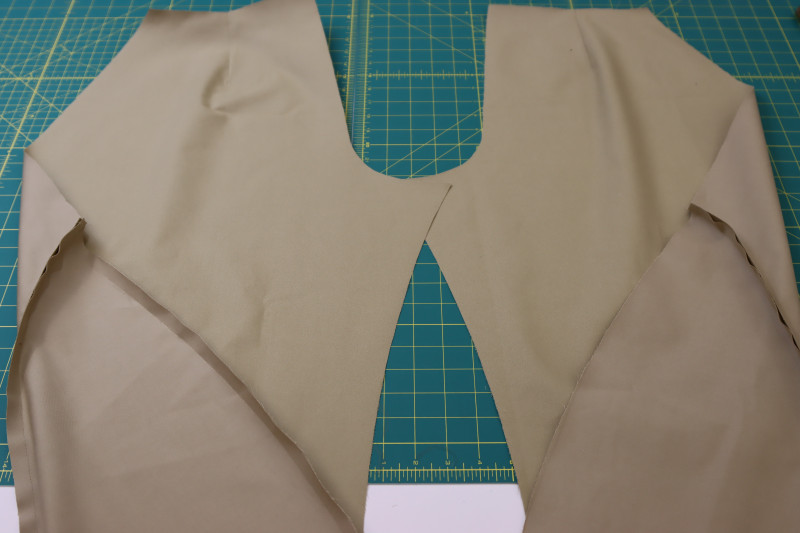
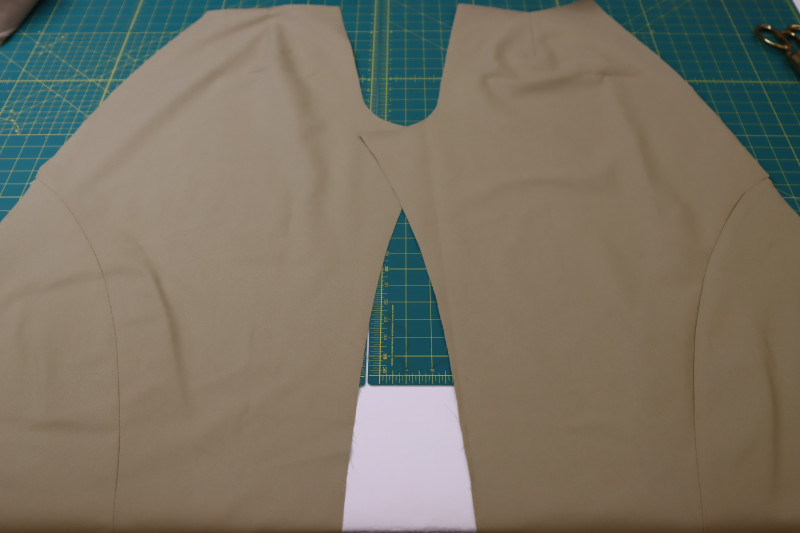
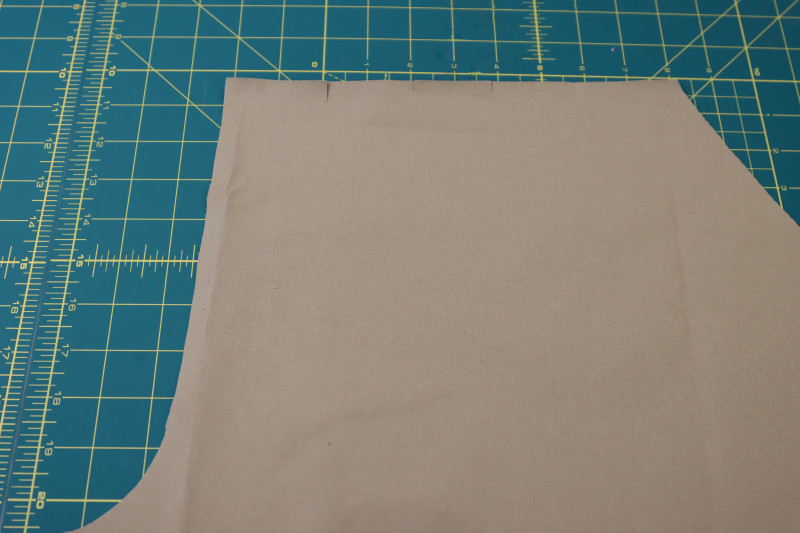
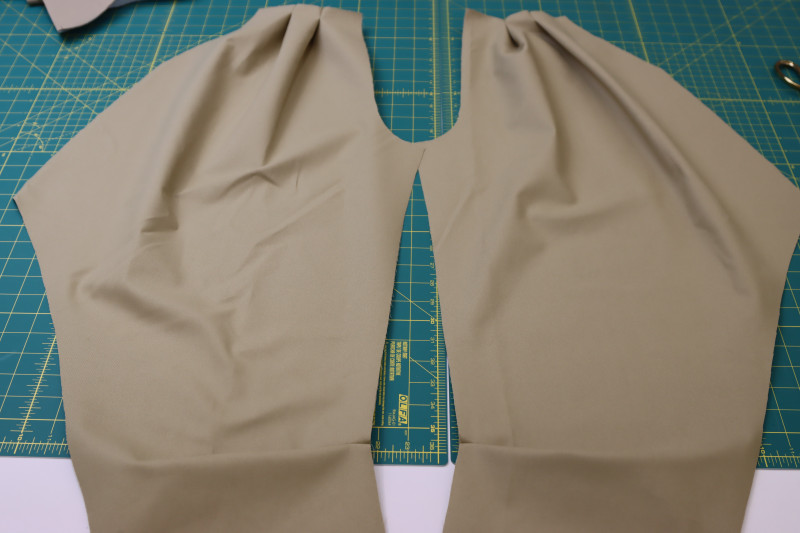
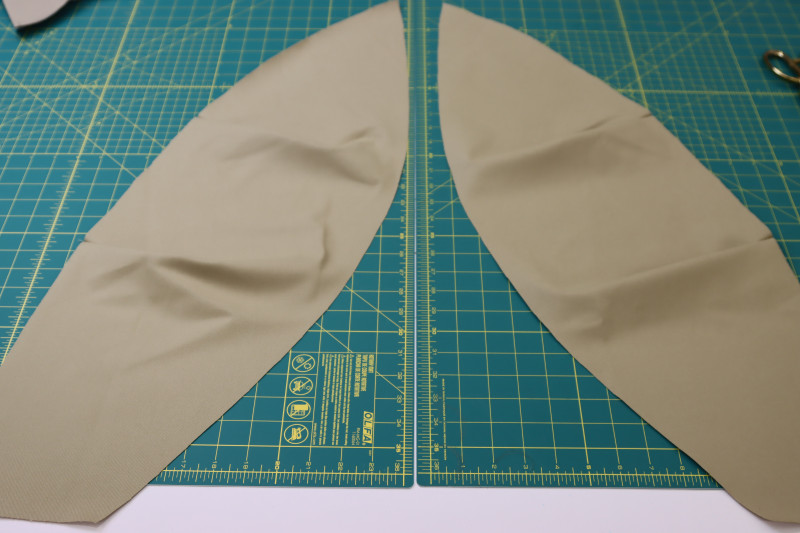
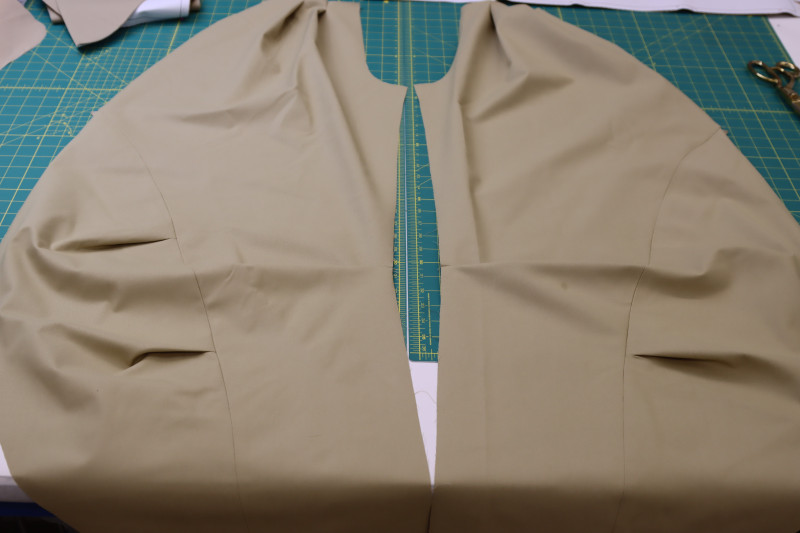
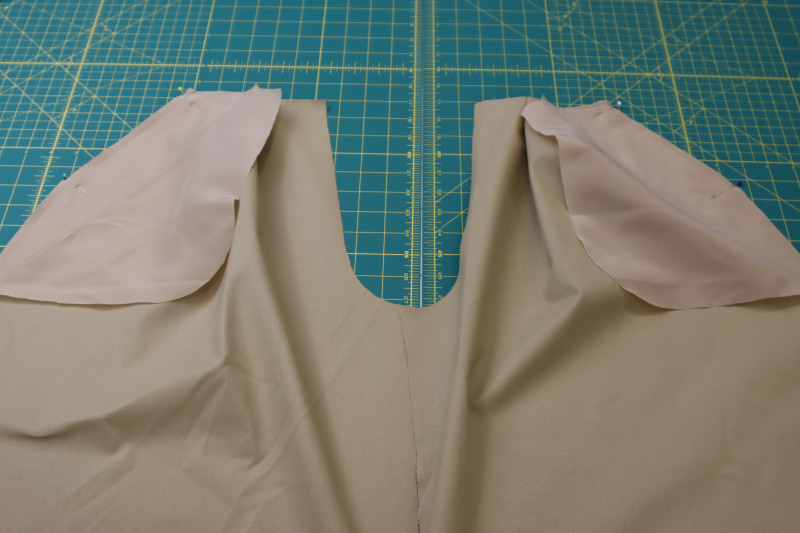
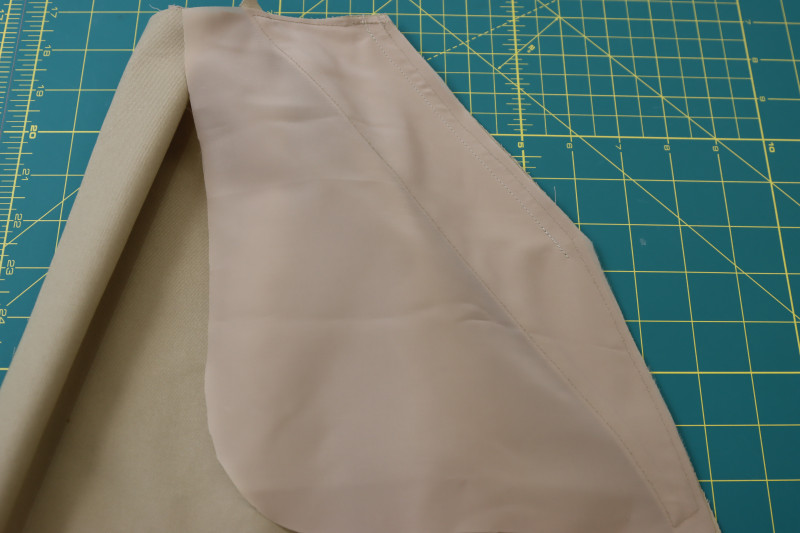
FRONT PANELS
- Cut the notches for the pleats on the front pant panels.
- Pin and sew the notches together to create the pleats.
- Make sure when you press the pleats that they are opening upward (I messed up in the photo below. You can see that the panel pleats are opening downward instead of upward. Don’t make the same mistake I made and have to seam rip your pleats).
- Pin the pleated side of the front pants panels to the curved cutout at the bottom of the front of the pants.
- Sew the front panels to the front pants pieces.
- Make sure you do the same thing for both sides of the front pants.
Step 7
SIDE POCKET FACINGS
- Layout the pocket facings mirrored from each other.
- Press the inner angled side of the pocket facings in toward the wrong side of the fabric with a ½ inch fold.
- Pin the A pocket facing to the A pocket lining and the B pocket facing to the B pocket lining, with the wrong side of the facings touching the right side of the pocket linings.
- Sew around the perimeter of the pocket facings with ⅛ inch seam allowance.
Step 8
ATTACH SIDE POCKETS
- Pin and sew the A pocket linings to the side seams of the front pants pieces, right sides together (make sure when you sew the pocket bags to the pants that you’re only sewing the top half of the pocket. This will be the part of the pocket you put your hand into. The bottom of the pocket remains unsewn so that it hangs freely without pulling on the side seams).
- Pin and sew the B pocket linings to the side seams of the back pants pieces, right sides together (follow the same pointer as above).
- Press all 4 pocket seams open and flat.
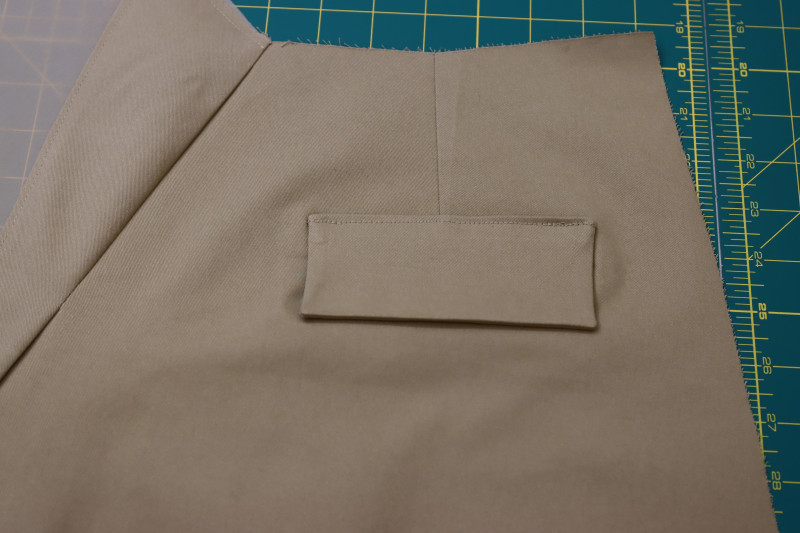
Step 9
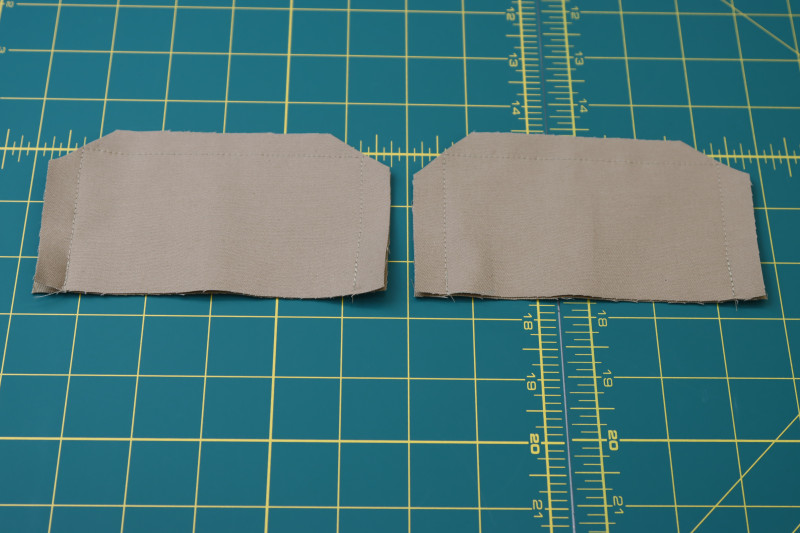
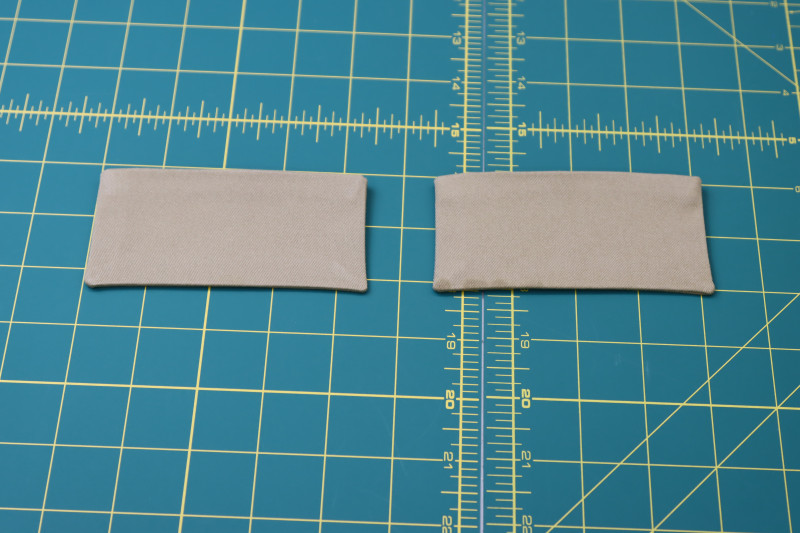
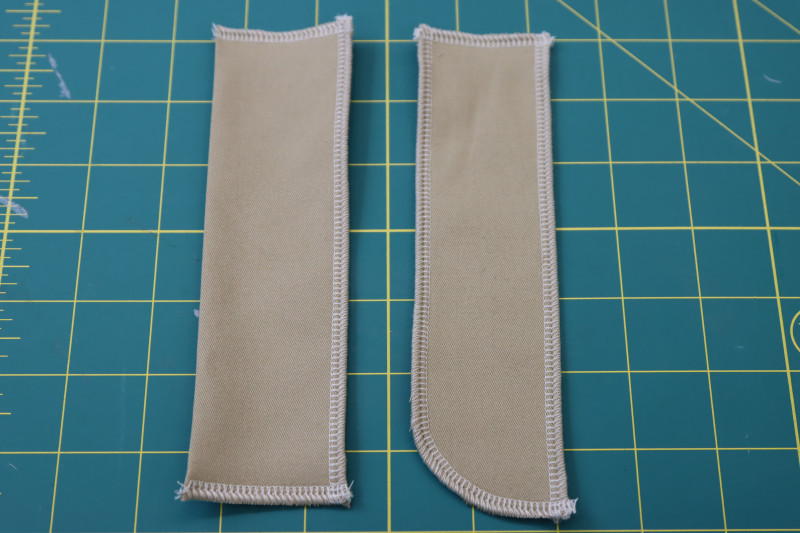
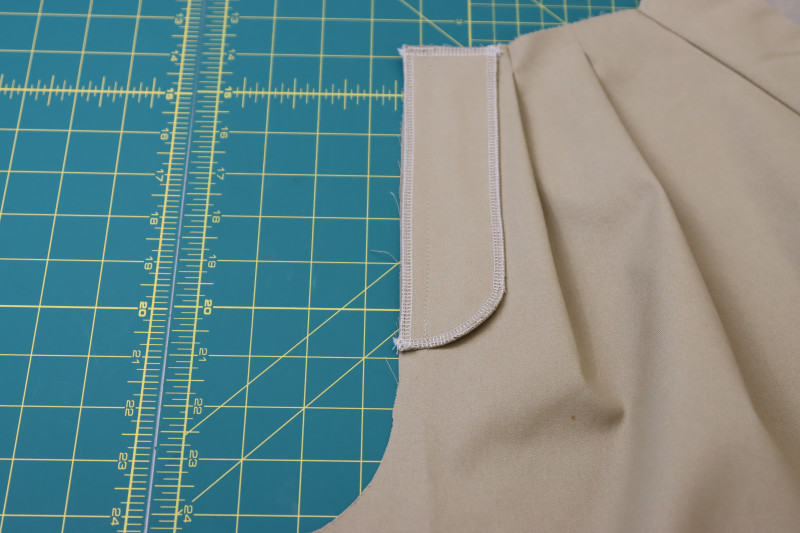
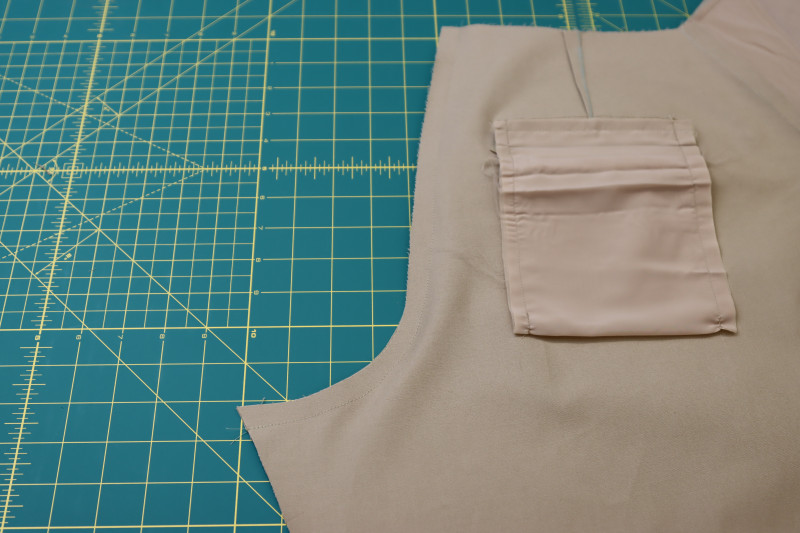
POCKET FLAPS
- Place the pocket flap pieces right sides together.
- Sew around 3 sides of the pocket flaps, leaving one of the long sides unsewn.
- Clip the corners of the pocket flaps.
- Flip the pocket flaps right sides out and press them flat.
- Fold the raw edges of the pocket flaps into the inside of the flaps.
- Press the folded raw edge of the pocket flat.
- Pin and sew the pocket flaps right above the seam allowance for the welt pocket.

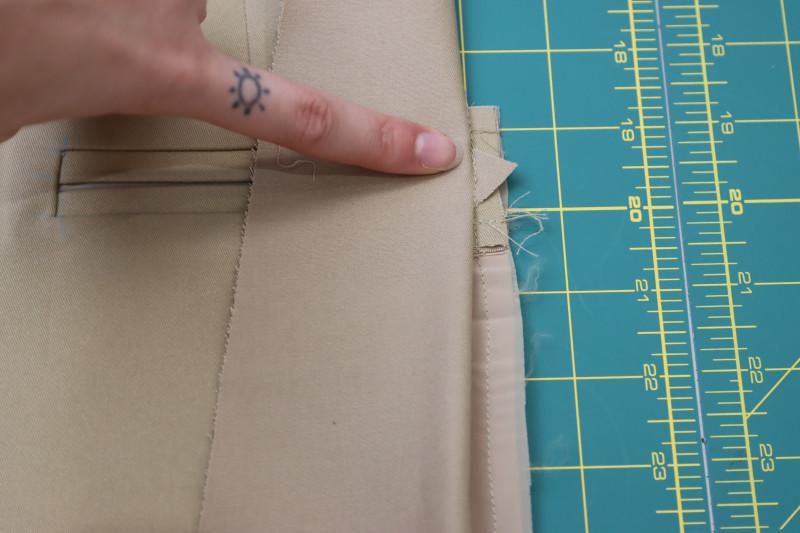
Step 10
SIDE SEAMS
- Lay the front pants pieces right sides together on top of the back pants pieces with the pocket bags and the side seams lined up.
- Pin and sew around the pocket bags and side seams, leaving the top of the pocket open (look closely at the photo below to see how the front and back pants are connected at the pockets and side seams. I sewed around the perimeter of the pocket, then when I got to the seam that connects the pocket to the pants, I pivoted the fabric on the sewing machine needle and sewed down the side seam of the pants).

Step 11
WAISTBAND
- Fold the waistband right sides together long ways.
- Pin and sew the ends of the waistband shut.
- Clip the corners of the waistband by the seam to make it easier to flip right sides out.
- Flip the waistband right sides out.
- Fold the raw edges of the waistband into the inside of the waistband and press them flat.
Step 12
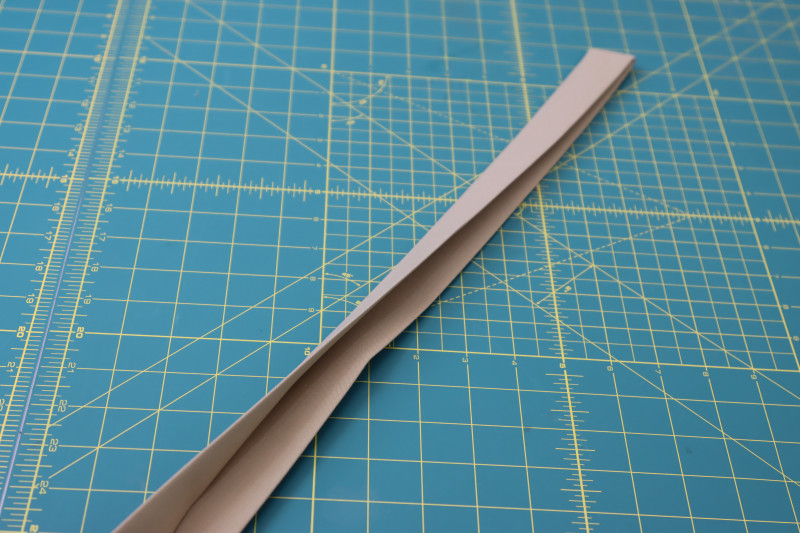
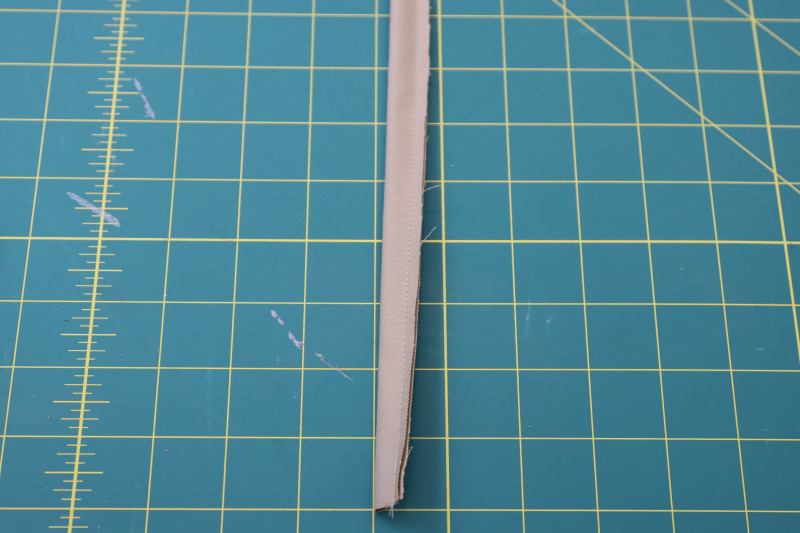
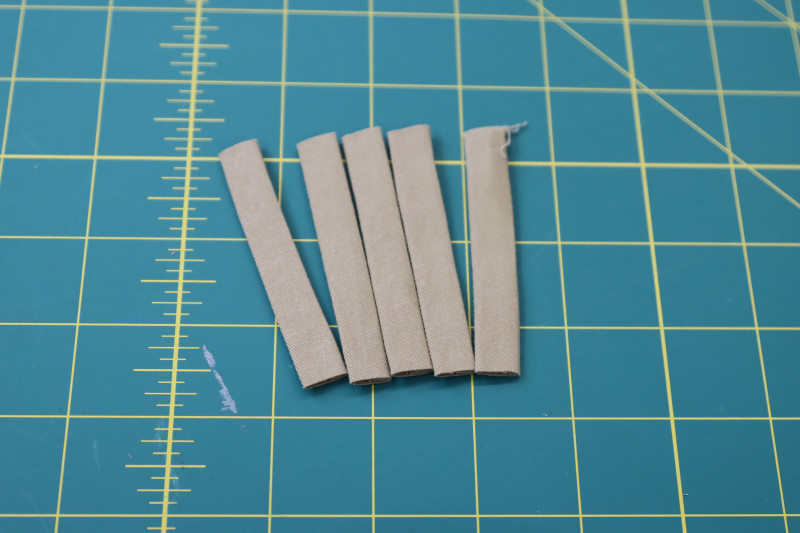
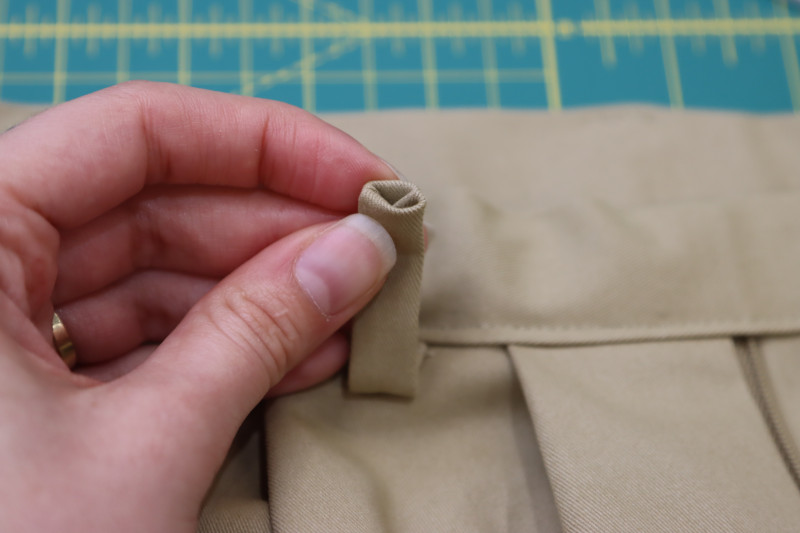
BELT LOOPS
- Fold the strip of fabric for the belt loop in half long ways right sides together.
- Sew the strip into a tube by sewing it with a ¼ inch seam allowance.
- Flip the tube right sides out with a loop turner.
- Cut the tube into 5 equally sized strips.
Step 13
SERGE FLY PIECES
- Fold the fly shield wrong sides together.
- Place the fly facing pieces wrong sides together.
- Serge or zigzag stitch around the edges of both fly pieces.
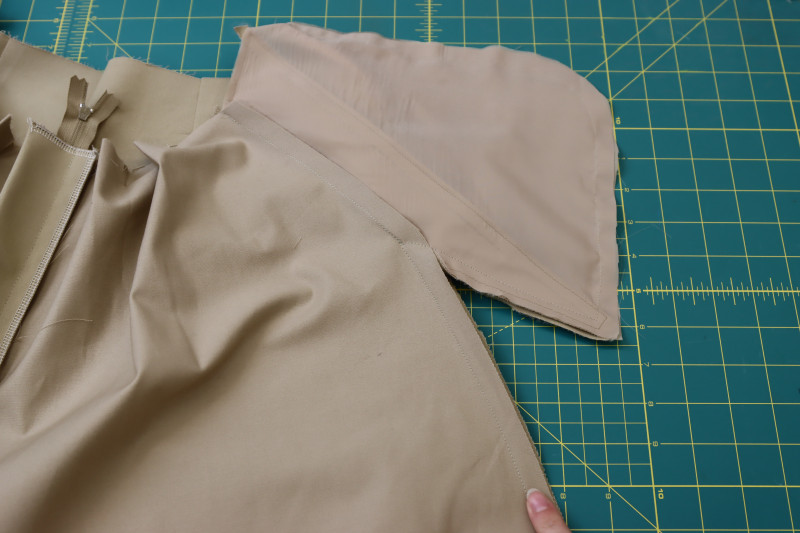
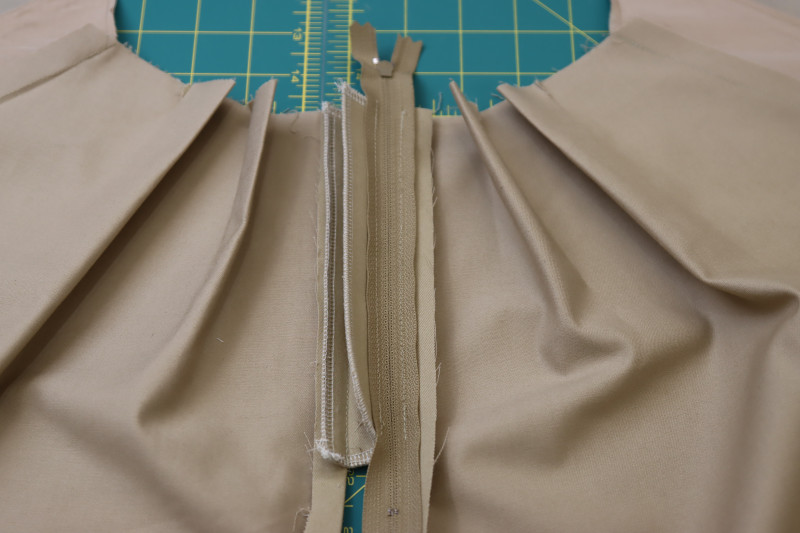
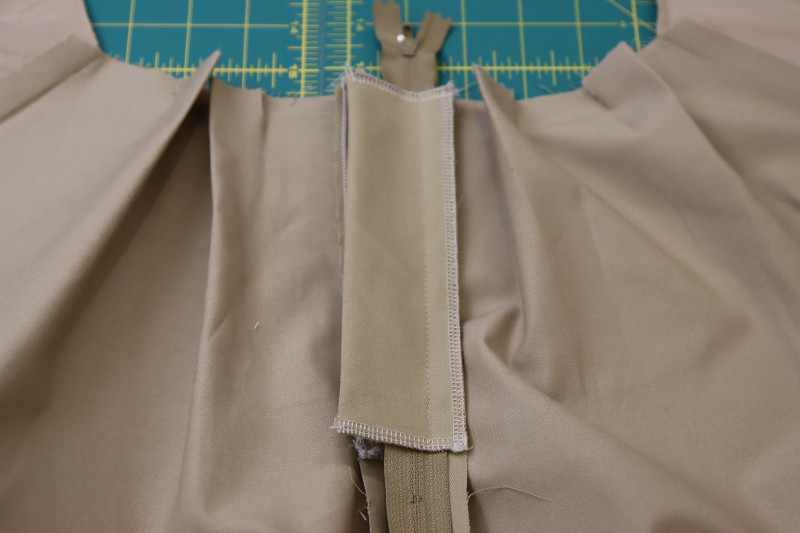
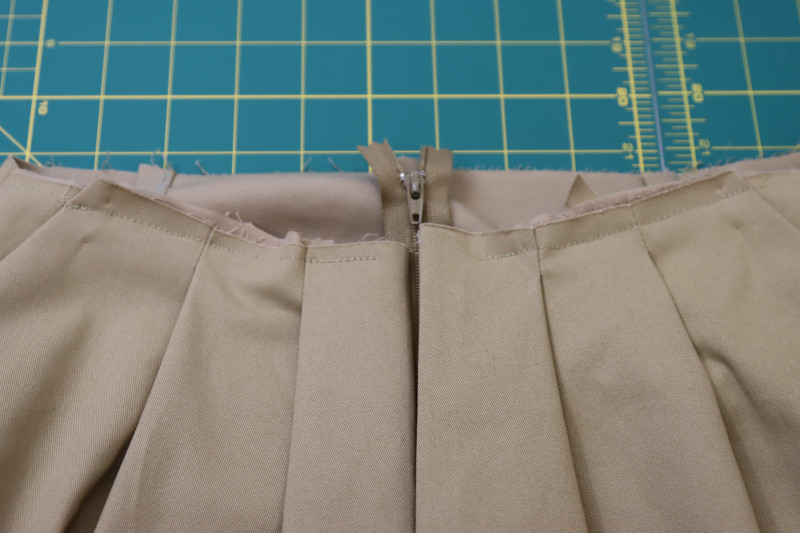
Step 14
INSER FLY FACING
- Place the fly facing right sides together with the wearer’s left side of the front crotch seam.
- Pin and sew the fly facing to the front crotch seam as shown below.
- Press the fly facing seam open and flat.
- Place the zipper right sides together (face down) with the fly facing.
- Pin and sew the side of the zipper tape that is closest to the curved edge of the fly facing.

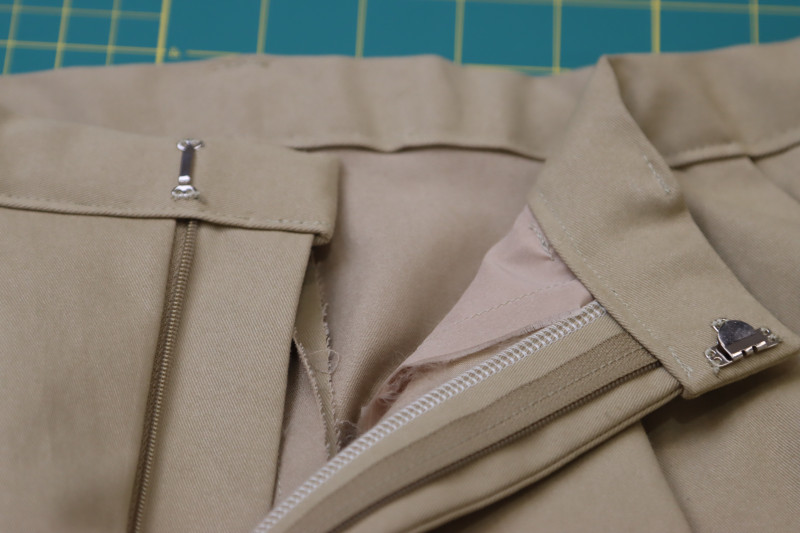
Step 15
INSERT FLY SHIELD
- Unfold the zipper from the fly facing and place it right sides together with the wearer’s right side of the front crotch seam.
- Pin and sew the other side of the zipper tape to the other side of the crotch seam.
- Place the fly shield right sides together on top of the zipper seam you just sewed, sandwiching the zipper between the fly shield and the wearer’s right side of the crotch seam.
- Pin and sew the fly shield on top of the zipper.
Step 16
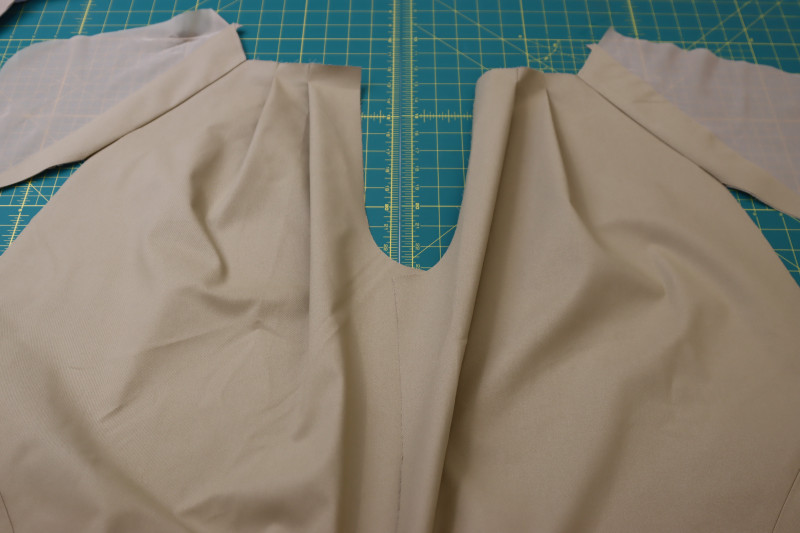
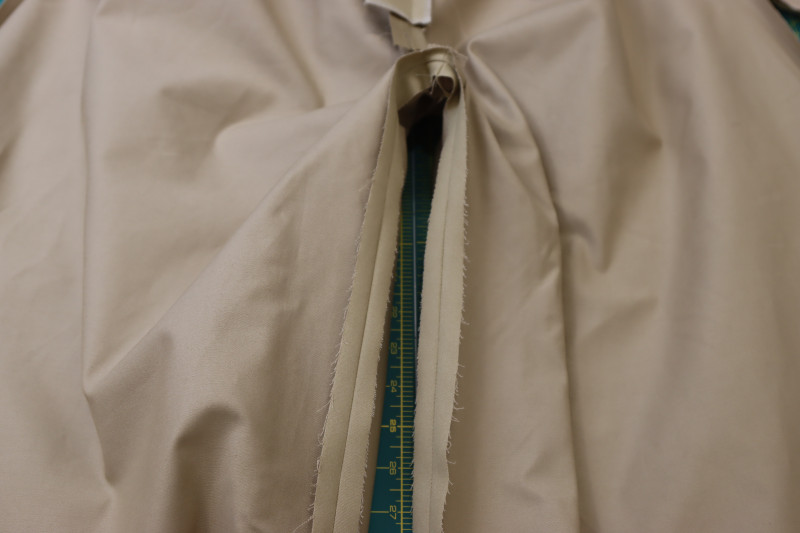
CROTCH SEAMS
- Fold the pants so that they are right sides together with the front crotch seams lined up under the zipper.
- Pin and sew the front crotch seam under the zipper fly.
- Pin and sew the back crotch seam all the way from the waist to the apex of the inseam.
Step 17
INSEAM
- With the pants inside out, pin and sew the inseam on both legs.
- Press the inseam flat.
Step 18
TOPSTITCH POCKETS
- Fold the pockets into the pants while the pants are right sides out.
- Line up the top edge of the pocket bag with the waistline of the pants and make sure that the pocket is laying completely flat.
- Topstitch the top of the pocket bag to the waistline of the pants with a ¼ inch seam allowance.
Step 19
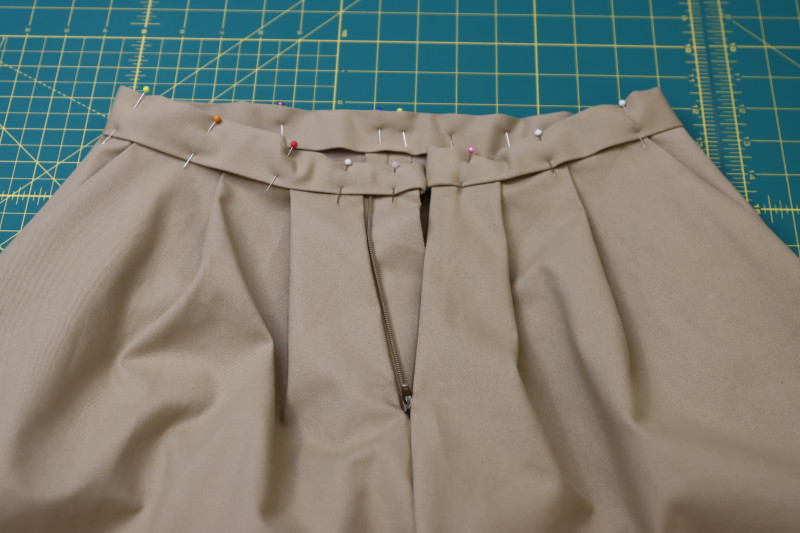
ATTACH WAISTBAND
- Sandwich the waistline of the pants into the opening of the waistband.
- Pin and sew the waistband to the waistline of the pants ⅛ inch away from the bottom edge of the waistband.
Step 20
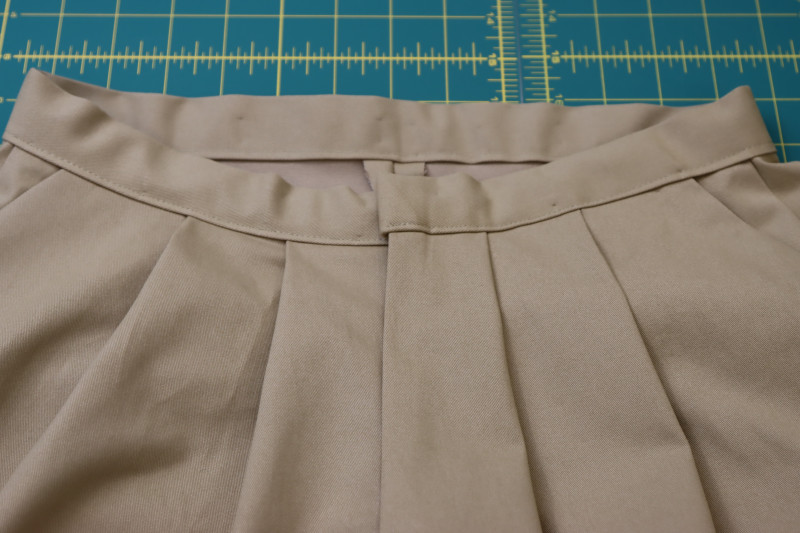
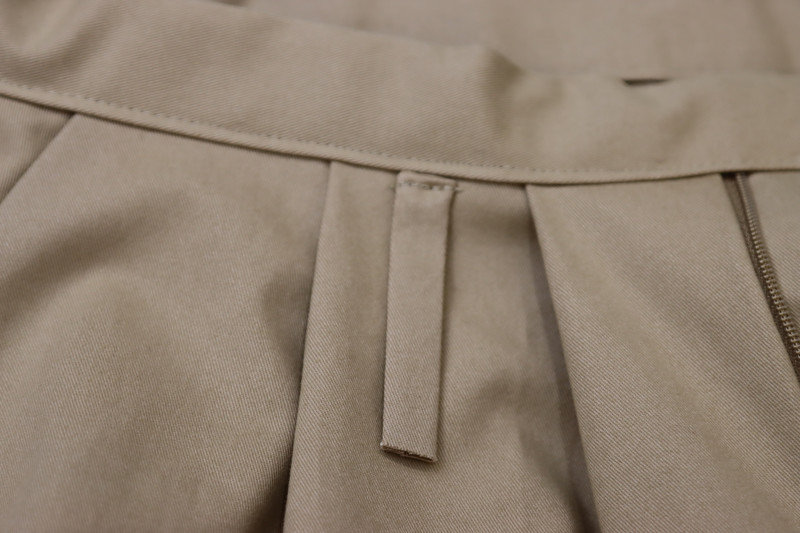
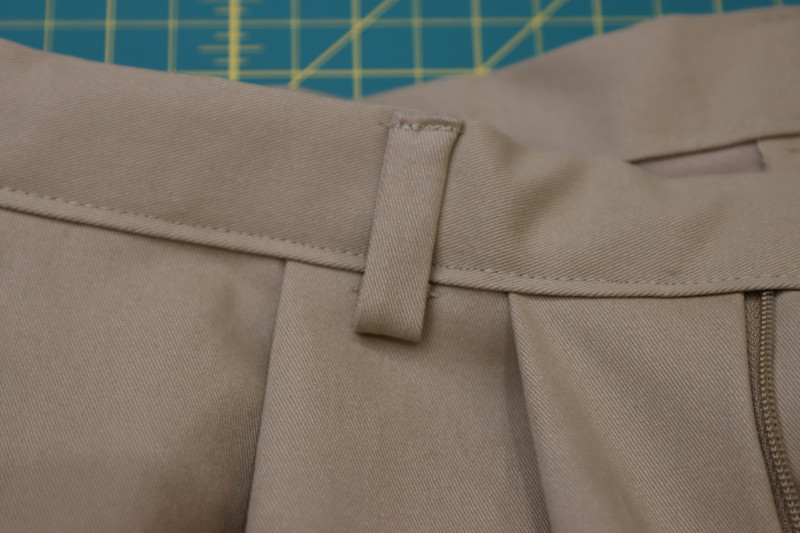
ATTACH BELT LOOPS
- Tuck the ends of each belt loop inside of itself.
- Mark the locations of the belt loops (one at the center back seam, one in between the two pleats on the fronts of the pants, and one in between the front belt loops and the back belt loops, perfectly centered between the two).
- Sew one end of each belt loop directly under the waistband.
- Flip the belt loop up over the waistband and sew the other end of each belt loop to the top of the waistband.
Step 16
CROTCH SEAMS
- Fold the pants so that they are right sides together with the front crotch seams lined up under the zipper.
- Pin and sew the front crotch seam under the zipper fly.
- Pin and sew the back crotch seam all the way from the waist to the apex of the inseam.
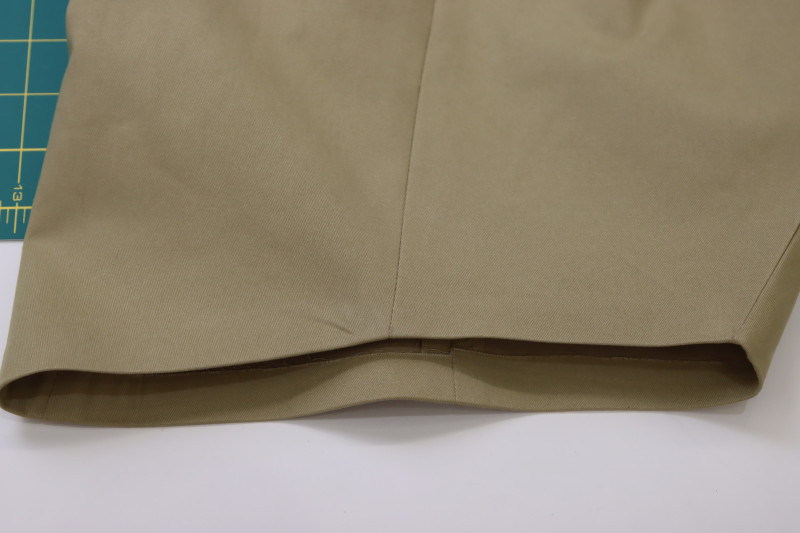
Step 22
HEM
- Hem the pants with the method of your choice. Here, I used stitch witchery hem tape because I wanted the hem to be invisible, but a straight stitch will be just as effective.
Sewing Success: The Finished Lucca Tailored Barrel-Leg Pants
Share this post with a friend (or two!), download the Lucca Tailored Barrel-Leg Pants free sewing pattern, and show us which fabrics and colors you choose, using the hashtags #MoodLuccaPattern & #MadeWithMood—and don’t forget to tag us @MoodFabrics, too.

Free Sewing Pattern Inspiration for Your Next Project
With 500+ free sewing patterns and counting, your opportunities for sewing with Mood are endless!
We hope you had as much fun sewing this barrel-leg pants pattern as we did! As always, we want to hear from you—share your thoughts and comments below and let us know where you’ll be wearing the Lucca Tailored Barrel-Leg Pants free sewing pattern!
Can’t get enough sewing with Mood? Browse your next make with our latest free sewing patterns.
I immediately downloaded this! Thank you for sharing!!!
hey there! how would you hack this pattern if you didn’t want any pleats on the pant leg itself (only on the top at the waist)
Nice pants
Would love these
They look amazing
Excited to try these
So cute
Rally nice
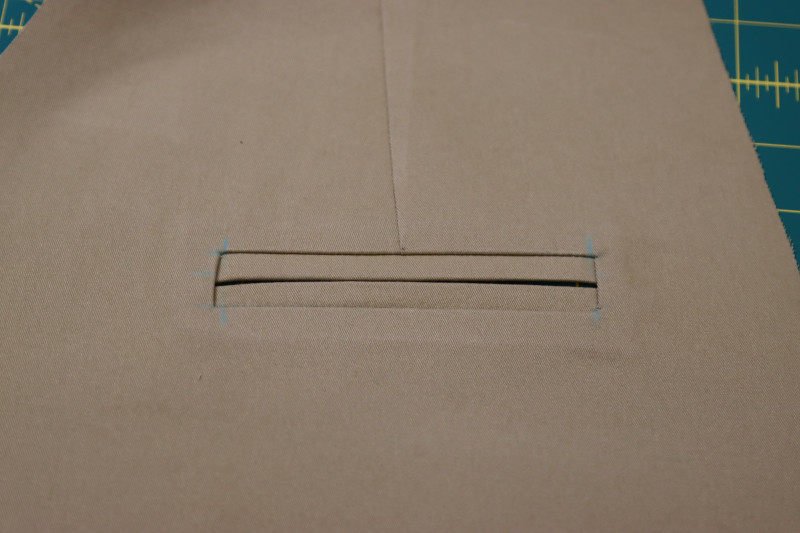
Thank for this awesome pair of pants. I am at the point of drawing the box for the pocket welt. What are the measurements for the rectangle that the welt fits within?
The box will be 1 inch shorter in length than the length of the actual welt in the pattern piece and it will be the same width (height) as the welt.
I would like to add a couple of inches in length to these, any recommendations on where best to add them?
Honestly, I would add it either right below or right between the pleats at the knees of the pants. The barrel shape is tricky so you want to try and keep that curve continuous on the outside of the pants. You’ll have to extend both the front and back pant pieces AND the panels.
Il est magnifique
Hello! How many yards of fabric should I prepare for? Also, should I use 55-60 W fabric? I am putting the pattern together and want to make sure I have enough fabric.
Hey Tamara, depending on the size, you’ll want between 3 and 4 yards.
hi! would you say they are high waisted, mid rise of low? im looking to adapt them to low rise… any advice?
They’re pretty high/mid rise, definitely not low rise. If you want to make them lower rise, you can just shorten the waistline and lengthen the waistband so that it fit around the wider waistline. Make sure to transfer your pleats.
Thank you!
Thank you.
What a masterpiece…surely heavenly to wear.
Pattern says to cut 1 welt pocket lining but don’t I need 2?
Yes, you need two. One for each pocket. Good catch! Thank you for pointing it out!