


Purchase Materials Used Below:
- 2-3 yards Stratton Khaki Solid Organic Cotton Twill
- 2 Silver Metal Buckle – 1.25″
- 1 Mood Exclusive Italian Off-White and Silver T5 Closed End Metal Zipper – 9″
- 1 Mood Exclusive Italian Small Silver Flat Trapezium Metal Zipper Pull
- ½ yd of Lightweight Cotton for Pocketing
- 1/2 yard Fusible Interfacing
- MDF251 – The Basquiat Trousers Sewing Pattern (free download below!)
Alternative Recommended Fabrics:
Sewing Instructions:
Step 1
Tape your pattern pieces together and cut them out of the paper.
Step 2
Fold your fabric in half so it’s selvage to selvage.
Step 3
Place your pattern pieces following the grain of the fabric, cut them out according to directions.
Step 4
Get your interfacing, lay it out the same way you did your main fabric. Cut those pieces out.
Step 5
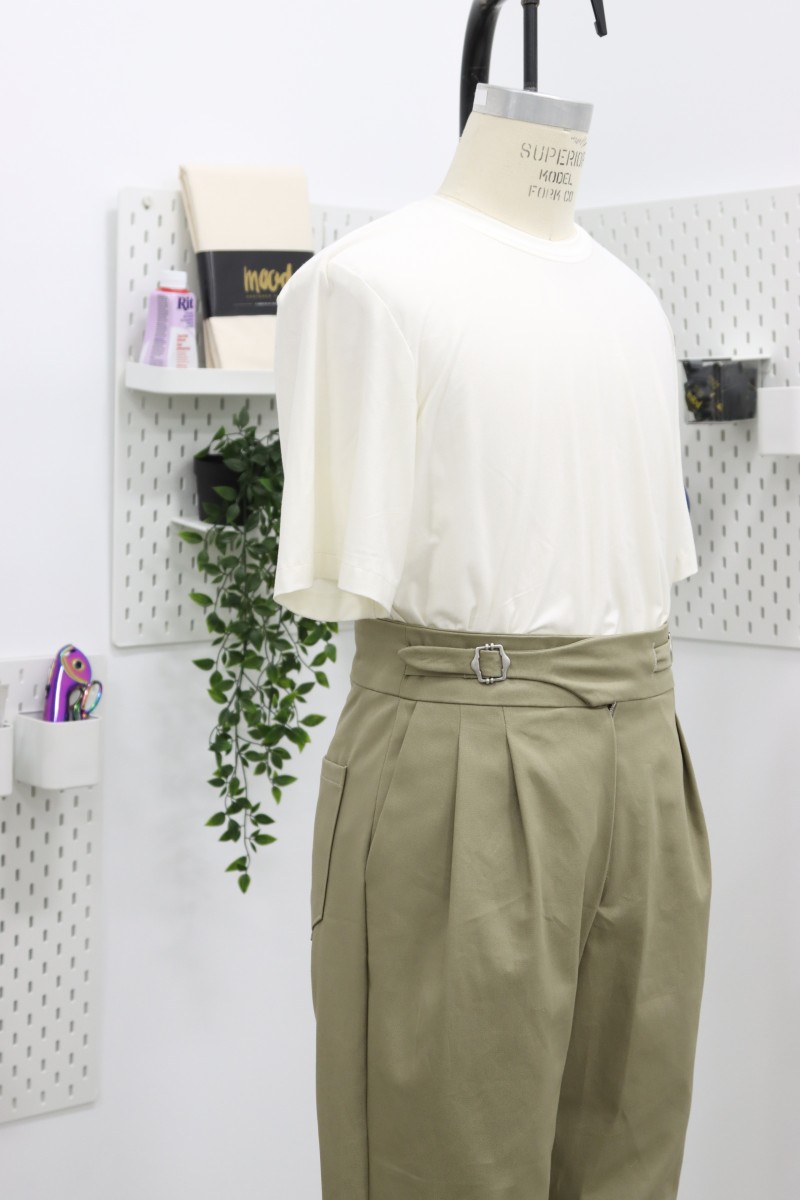
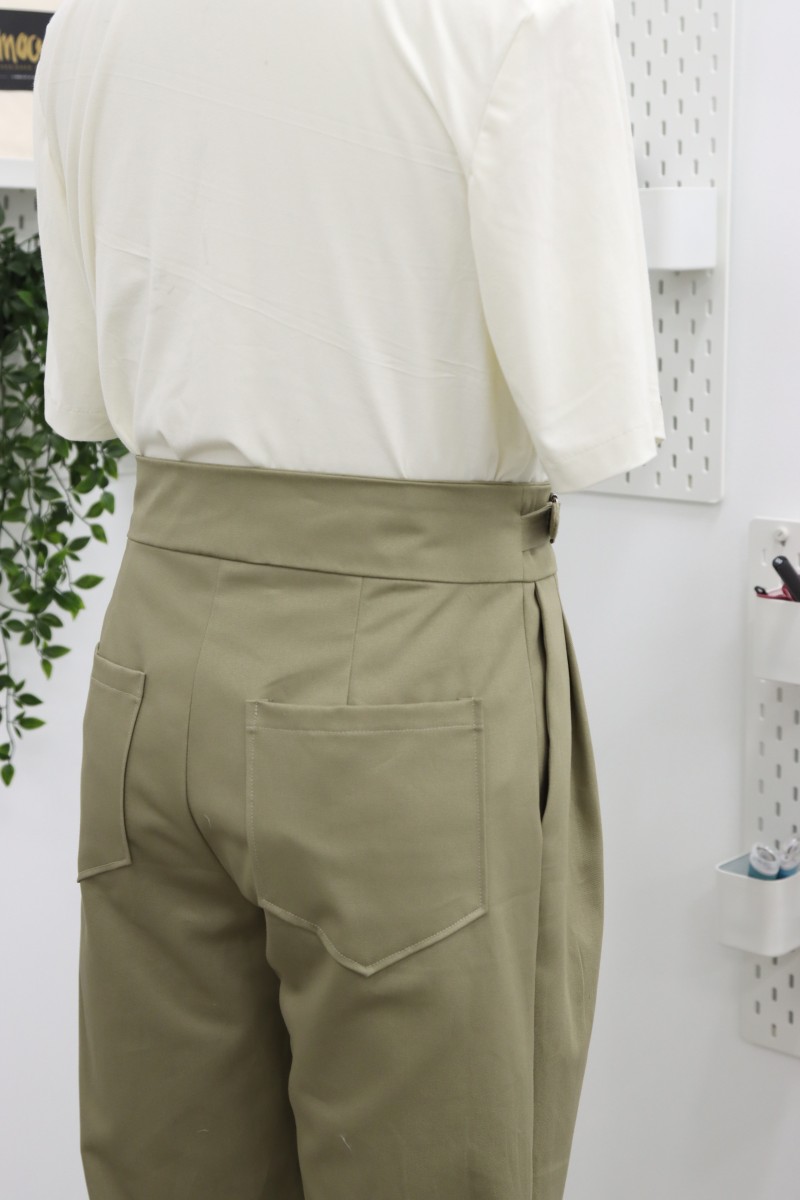
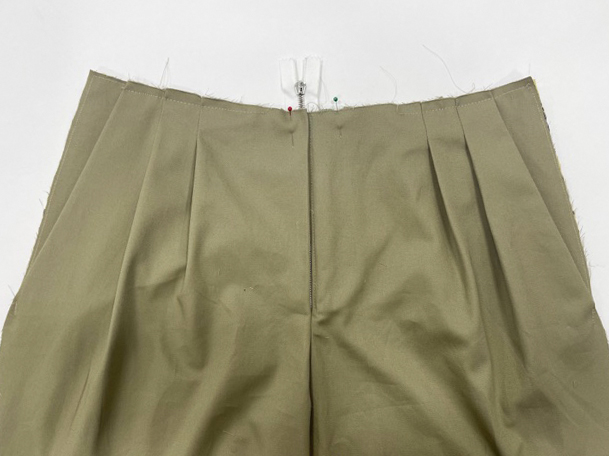
Mark your darts, pleats, notches, and back pockets. Sew darts and pleats into place and press.

Step 6
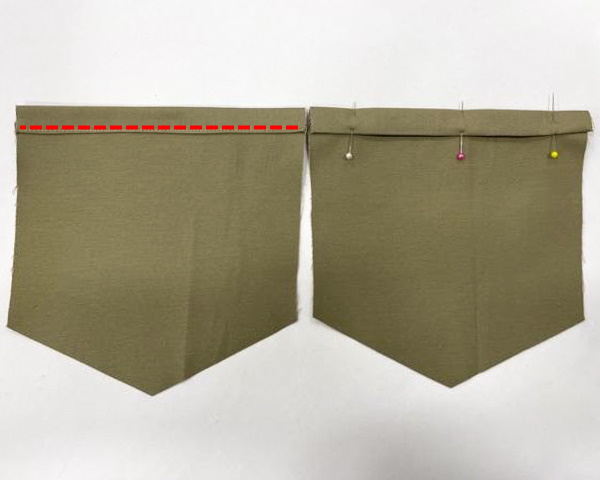
Gather your 3 front pocket pieces, place and stitch them down, like below. (I folded the edge of both pocket facings, which is optional.)
Step 7
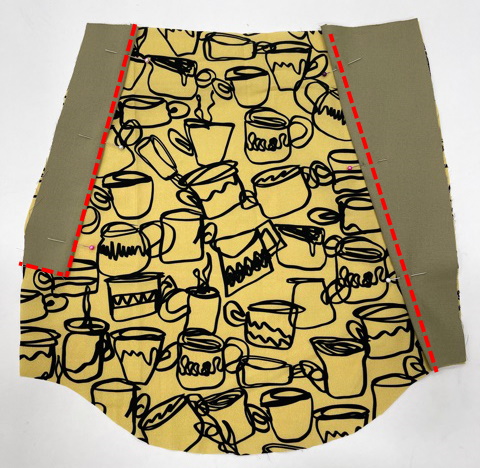
Sew your two front pieces together at the crotch. Next, set in your zipper. If you’re unfamiliar with a zip fly, check out this tutorial!
Step 8
Now attach the pockets to both front sides of the pants.
Step 9
Sew the center back seam on the back pant pattern.
Step 10
Join pant front and pant backs together, sewing the sides.
Step 11
Sew the inseam, matching center front and center back seams.
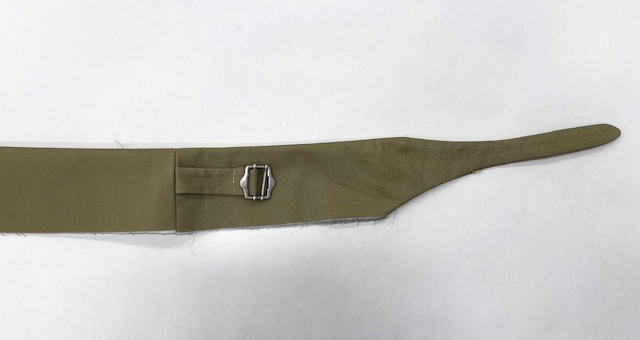
Step 12
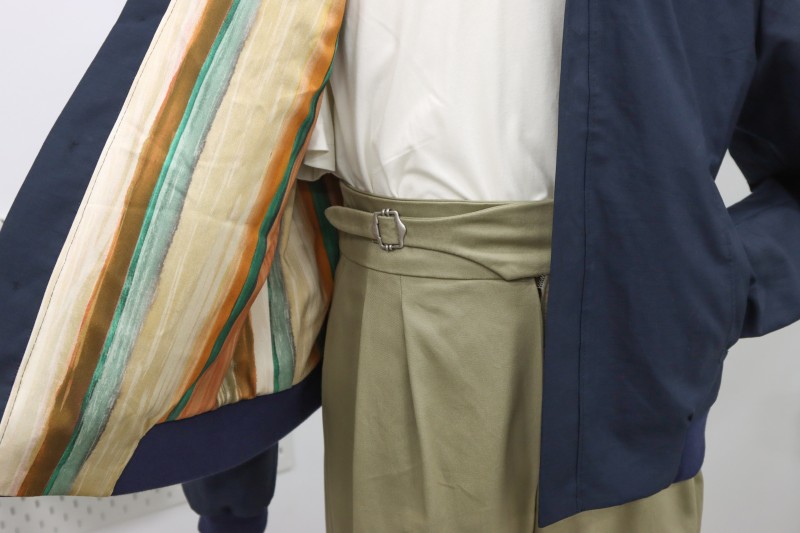
Fold the buckle pieces in half along the length, sew along one short edge and the long edge, and flip inside out. Then thread the loop through the buckle on the fold line and sew.
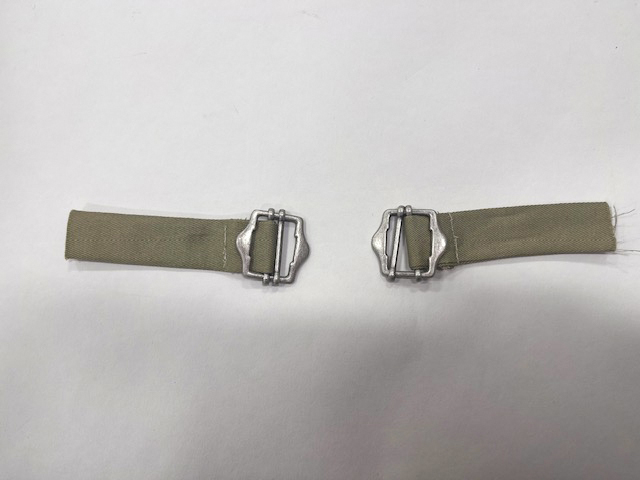
Step 13
Get the waistband pieces. Pin your buckle between each side seam, sew, and press.
Step 14
Take both waistband layers (the self and facing) and place them right sides together. Starting either side, pin around the waistband, leaving the bottom edge open. When sewing around the tabs, sew at 5/8″ if using the same buckles I did, then go back to 1/2″. This will allow the tabs to be just a fraction of an inch smaller and to fit comfortably through the buckle slide. Trim the seam allowance around the tabs on both sides of the waistband. Turn right side out, press.
Step 15
Now, attach the outer layer of the waistband to the pants matching side seams and center back. Once sewn fold over and press. (A little tip: fold the center back waistband in half, put a pin in. That will mark your center back.)
Step 16
Fold up the bottom waistband and slip-stitch it shut.
Step 17
Sew buttonhole for the lower waistband tab to fit through, following the guide on your pattern piece. (Before sewing on your main garment, test out your buttonhole on a scrap piece of fabric.)
Step 18
Lastly the hem. Fold 1/2″ up and press, then fold another 1″. Pin and slip-stitch to finish!
Can I use a larger hip size and convert this to a women’s pattern?
Hi, Stacy! You probably could 🙂 Although, you could likely also use the waistband from these in the size that accommodates your waist and use the pant legs from our Nasrin Pants – that might be an easier hack!
The Nasrin may have tiny pleats, but they don’t at all have the same ‘oxford bag’ vibe as these ones. Stacey if you increase both the back darts and the depth of the front pleats chances are you’d get a fine result with these
I am trying to combine the Nova pants with this waistband! Would it be possible to have the back of the waistband from the Nova pants with the elastic with the front of the Basquiat pants without the zipper? Or would this look weird?
Hi! I think that would look awesome. 🙂
Good afternoon, do you have a video tutorial on how to make it?
Hello, unfortunately we do not have a video tutorial for this pattern at the moment, but you can check out all of our other tutorials here!
Do you guys have a tutorial for this created?
Hi!
So far we only have the sewing instructions for the garment in this post. Let us know if you have any questions about a specific step and we’ll be happy to help you.
hello, I am wondering if this pattern allows for buttons to be used instead of a buckle for adjusting the fit when wearing it, does the pattern allow buttons to be used instead of a metal buckle?
Yes! You can use buttons instead. You’ll just have to sew buttonholes into the strap extension and sew the buttons down where the buckle was meant to go.
Hi, can you guys try to do a pattern for the KEFTAS for the new shadow and bone show on netflix, I think it would be an huge success on tiktok, love you guys XOxo
I’ll see if we can add it to the list! 🙂
the wool keftas are essentially a 4-piece coat pattern. I made one using a free coat patter that had princess seams and it worked out perfectly!
We do also have the actual Kefta pattern! 🙂
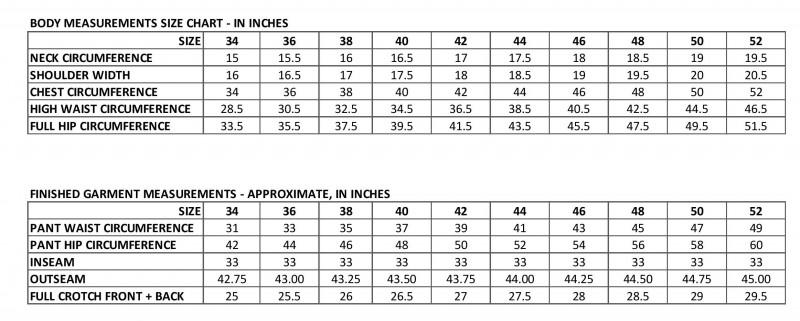
First project from Moodfabrics for me! I am going to do Basquiat trousers for my hubby. I have measured him and I feel confused about which of the 2 table I should compared to. I am not afraid of fitting a bit if it’s a big large. Natural waist: 37.5inch / Fashionable waist: 38.5-39 inch / Hips: 42.5 inch. Should I go for size 44 (as per “Body measurements chart” and fit it a bit once finished) or size 42 (as per “Finished Garment Measurements chart” but, while waist measure match for this size, hip circumference is 7.5inch bigger)?? Could be that in the finished garment in the hip I may have the extra 7.5 inch in fabric that will allow me to do the front pleats?
This is a great question Lorena. I would definitely recommend that you use the body measurement and then take the garment in a bit if its too big. The finished garment measurement is likely to be too snug if its the exact measurement as his waist.
Hello,
These patterns for men are really great.
I hope these patterns won’t be the only ones. And that others will follow.
Anyway, thank you very much for all the great work you do.
Best regards
Elisabeth
Bonjour. Ce pantalon est magnifique!
Thanks for this! Nice to see some patterns for menswear.
Excited to make this.
the seam allowances are included?
thank for this pattern
Yes, a 1/2″ seam allowance is already included! 🙂
I did not like the look of the back pockets on my body so I used a slash pocket with a welted finish. Very comfortable and adaptable for different looks.
Yes it’s refreshing to see a men’s trouser pattern but it’s “free”? Pinch me Freddie!! I will take a look at it and see what turns out.
I made these and I absolutely love them! The sizing was spot on and I find them incredibly flattering. I did have to narrow the legs down a bit, and I added a few buttons to the waist band for less pulling and wrinkling. I think I’m gonna adapt these with a non-gurka waistband because the actual pants fit so well. Thanks Mood!
Hi!
I’m very excited to do this project: hope to start and finish everything in next 2 weeks.
My main concern are the pochets: these are the gurkha trosuers with pleats – so a bit more ‘formal’ option, so I think welted back pockets would suit them better, completeng this classy look.
Also, I’m looking forward to take tips from video on YouTube channel ‘Stressed & Distressed’ about sewing gurkhas (not especially seams and his jeans-type features, but overall shape, tips, waistband etc.):. Might help also to someone other 🙂
We’ll see, how my pants will turn out!
Overall these turned out great! I did get confused at the waistband and have to redo it though (partly my fault for doing the buttonhole before attaching, I think it wouldn’t have mattered if I did it in order but the steps didn’t say wait til later to buttonhole it). My mixup happened because both waistband pieces are labeled “left waistband.” Similar typo on the pant legs, they both say Front instead of front & back.
Hi, what is the seam allowance used?
Hi Ethan! There’s a 1/2″ seam allowance, unless otherwise stated in the instructions! 🙂
I have the same observation as above where the pattern pieces for the waist were labelled the same so took me a lot longer to compile than I was expecting.
I bound all of the seams because I made this out of a beautiful mustard corduroy, and added a welt pocket on the back. Note to self: corduroy is fluffy as hell and I keep finding gold fluff everywhere!
I love to send you some images of the finished article so you can see?
I just tried this pattern out, I was SOOO confused since it was my first pants.
I left out the back pockets when I made it , and i LOVE it !
the tutorial you made here was quite hard to understand.
But i found this youtuber who almoste ahd the same pattern, so i managed to try and copy him a bit :
https://www.youtube.com/watch?v=lz6g2FhkIkU&ab_channel=CorneliusQuiring
For the fly i checked your tutorial, and i must say i understood how to make it , but not how to finish it. o now the zipper shows if the waistband isnt pulled strongly .
Thanks for this great pattern! 🙂
I completely agree. I was very confused following the instructions.
I followed this tutorial https://www.youtube.com/watch?v=j9ljDpkkB8w
Which helped so much with the fly, pockets and waistband.
But an awesome pattern 🙂
I’m not sure what Sean allowance to use for the buckle pieces. 1/2” would make it way too small once you turn it inside out
Hi Dontaiz, we’re sorry for the delay in responding to your question! We get dozens of comments and questions each day, and so many questions get buried and, unfortunately, unanswered. We are now focusing user support on patterns 2 years and newer. We hope this will prevent questions on our more current patterns from going unanswered. Although this is late, we wanted to respond in case anyone else has the same question: the seam allowance is still 1/2″ for the buckle pieces.
Same here. Were you able to navigate it or just did them as shown? I made them but they’re just so skinny. The buckle pieces in the picture just look bigger than the pattern allows.
Hi, when I click “shop this look” the sizes for the fabric calculation show up in woman’s sizes. I didn’t see a chart for the fabric required for the different sizes. I want to purchase fabric and it would be super helpful to have some guidance on total fabric needed calculation. Where can I find that information?
Hi Kate, we’re sorry for the delay in responding to your question! We get dozens of comments and questions each day, and so many questions get buried and, unfortunately, unanswered. We are now focusing user support on patterns 2 years and newer. We hope this will prevent questions on our more current patterns from going unanswered. Although this is late, we wanted to respond in case anyone else has the same question: we recommend looking for a similar menswear pattern and checking the sizing on that pattern to find the yardage needed.
I made these into shorts I’m female and these shorts fit me really well. I love this pattern I’ve made two pairs so far and I’m definitely going to make more. Thank you so much for all of the free patterns it’s really appreciated
These are a great pair of pants, but the labeling on the pieces don’t seem right, so I hope that can be updated, i.e. both pant legs labeled ‘front’. That’s one of the reasons I don’t think the instructions are beginner friendly. I’m not a beginner, but even I was scratching my head at some of the instructions, like when it said to attach both ‘front’ sides. Also, I wish there was more clarity on how the pockets were sewn. Really cool design, though.
Hello!
Thank you for your feedback. Most of the instructions on our 350+ patterns, especially these older ones, do reflect their no-cost nature. But we understand your frustration!
Unfortunately we can’t update the instructions on every pattern in our archive, especially if they are over 2 years old, however, if there are errors we will correct them! We encourage you to take a look at the improved in newer patterns, offering more thorough guidance! We appreciate your engagement and invite you to explore these updated options for a better sewing experience!
I love these! If I wanted to make the pants not taper in but instead be wide fit what do you recommend?
Hi Eris! Sorry for the late response, but I’m going to answer this anyway in case other people have the same question. If you want the pants to be straight leg or wide leg instead of tapered, start by printing and assembling your pattern but don’t cut it out yet. Before you cut it out, take a yardstick and orient it so that it is perfectly parallel with the widest part of the pant leg (this should be at the hip, below the waist). Now you’re going to trace a line along the yardstick all the way from the hip of the pants to the bottom hem. This will make it so that the pants go straight down at the sides instead of coming in at an angle. You have to do this to both the front and back pant leg pieces AND you’ll want to do the same to the inseam of the pants as well. I hope this answers your question! Happy sewing!
Hello! I love these pants! But I was wondering, what would you recommend if I don’t want the pants to taper and instead want wide fitting pants?
For a wider fit, I recommend printing and taping your pattern together like normal, but instead of cutting directly around the size lines for your desired size at the bottom of the leg, draw a new line from the knee down to the hem that goes straight down instead of tapering in. Then you can cut that line out.
Hi!
First of all thank you for all your free patterns, it’s wonderful!
I was wondering though, is it a problem for this pattern if I’m smaller than your smallest size? I really like those pants’ design so I’d like to make this one and not have to resort to another one. Do I just try to make it smaller myself?
We don’t use the same system were I live so I don’t know my exact size (for your chart) but I do know that I’m overall shorter and thinner, for example by 2 to 3 inches for waist and almost by 10 for the inseam, than your size 34 (and than most men).
Sorry for the bother btw, have a great week!
Hi I’ve been stuck on the front pockets far too long. Please explain.
I’ve completed a pair of these now, and I have a few notes. I’ll start by saying that the fit was great. The sizing was correct, and they are comfortable. There are several significant issues with this pattern. It could definitely benefit from more instructions on each step and a few additional pictures. There are also a couple of glaring problems in the construction.
If you do the zipper in the way the linked tutorial suggests, the top of the zipper will be visible as you don’t have a button to keep it tight. You’ll need to shift the top of the left zipper to the left side to prevent it from showing. The fastening doesn’t work, as the “center flaps” will slide out as soon as any pressure is applied to them. I’m guessing that this is because the pants are modified Gurkha pants. They have a belt-like construction that keeps them in place. As they are shown in the picture, they won’t stay on. You’ll need to reverse the endpoints of the flaps so that they point forward. Not a very flattering look. Alternatively, you would have to change it so that the front flaps hold the buckle instead.
Thank you so much for this feedback! We love getting detailed reviews of patterns like this.
HI I requested 3 downloads, the other 2 came through fine, but this one (The Basquiat Trousers) does not have a link to the PDF, just a link back to this page. Can you let me have the correct link please.
Hi Shirley, when the link redirects you back to the instructions, scroll down to the orange bar that says “Click Here to Download Your Free Sewing Pattern”. If you’re still having trouble downloading, shoot us an email at patterns@moodfabrics.com
I do wish this tutorial was a bit more thorough, I am still trying to figure out what to do with the waistband. With only one picture with the directions, it’s very hard.