
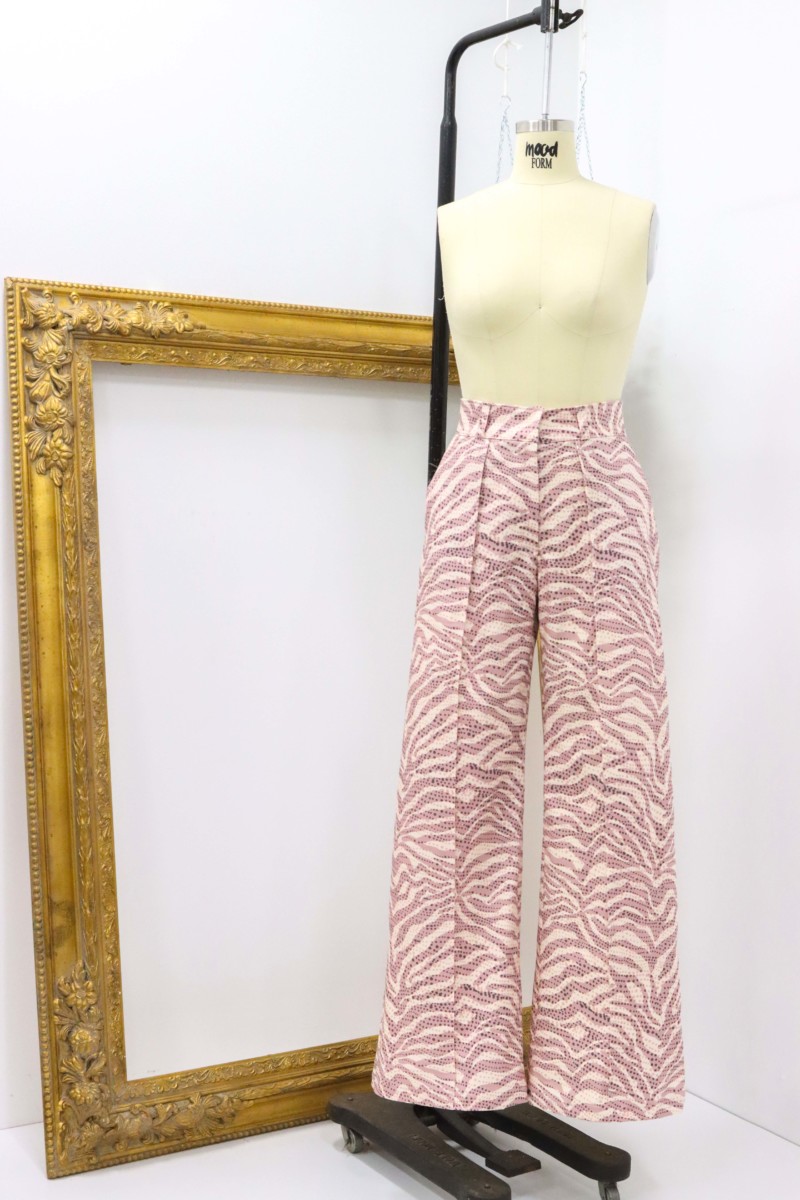
Who doesn’t love wide-leg printed pants? I know I do! Check out Mood’s newest pattern, the Liv Pants. Add these to your transitional wardrobe with a bright sateen or tonal corduroy, no matter your style! With a wide assortment of wonderful fabrics, you can make the coolest pants out there right now! Let us know what fabrics you choose and how you style them.
Purchase Materials Used Below:
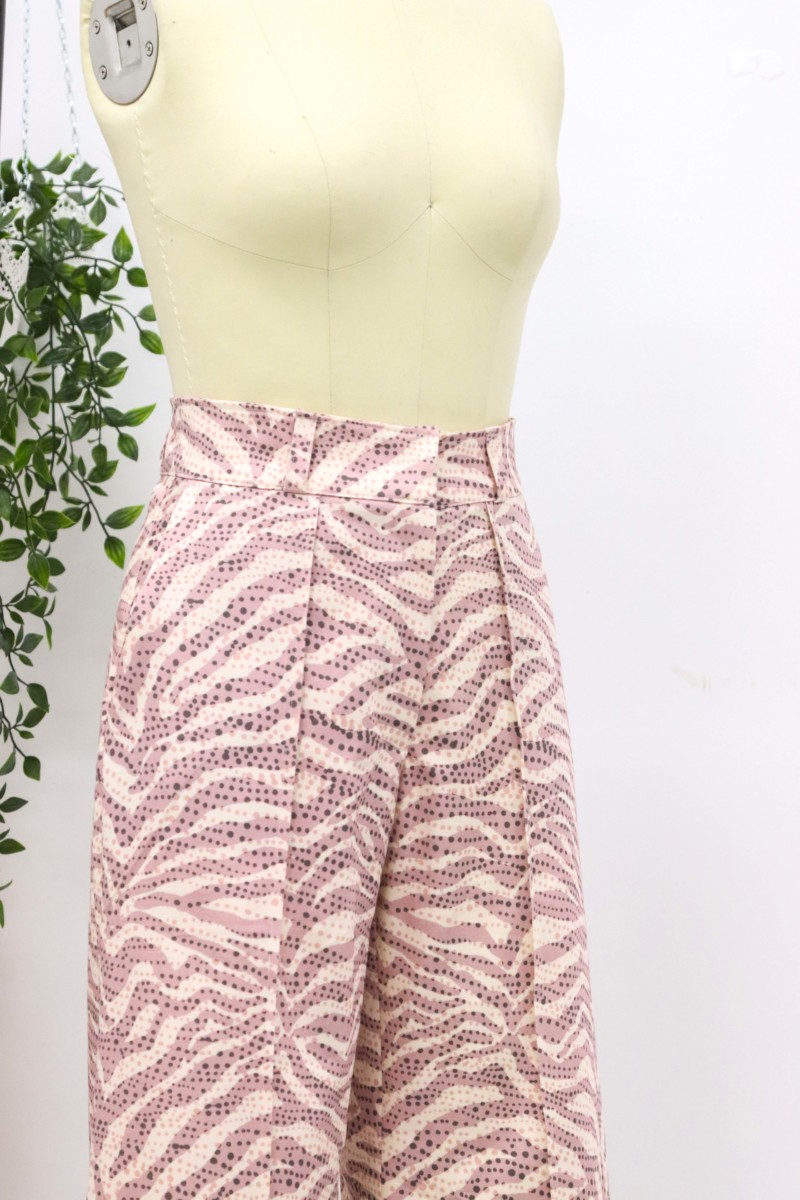
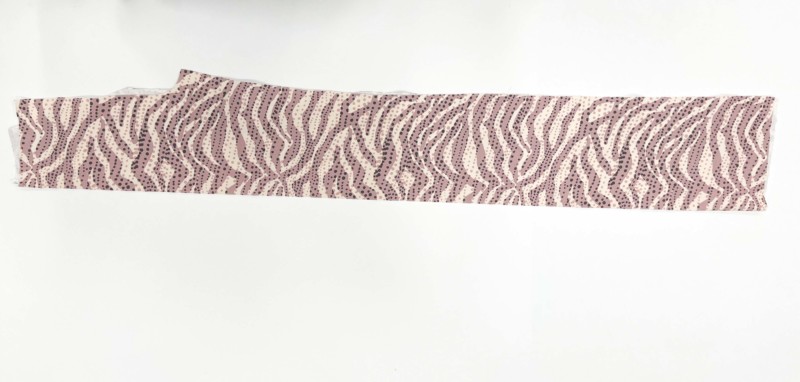
- 2-3 yards Mood Exclusive Spotted in Stripes Stretch Cotton Sateen
- 1 085 Beige 9″ Regular Zipper
- 1 pkg Dritz Brass Skirt Hook & Eye Closures – 4ct
- MDF293 – The Liv Pants Sewing Pattern (free download below!)
Alternative Recommended Fabrics:
Please note:
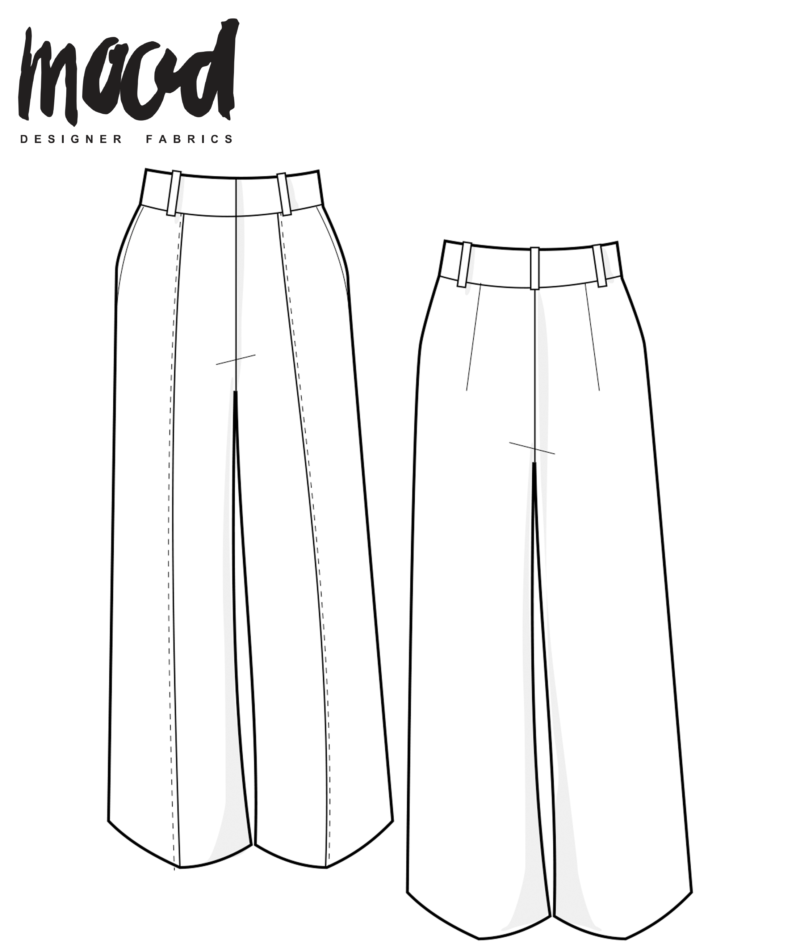
It has come to our attention that the back leg is slightly longer than the front leg. We are working on correcting this, but in the meantime, please adjust the pattern accordingly!
Step 1
Print, tape, and cut out the pattern.
Step 2
Cut out interfacing for waistband and iron on.
Step 3
With the front pant legs, fold in half, press, and sew ¼’’ down. Press seam towards the center front. As another option, you could press the seam away from the center front. It depends on what you want.
Step 4
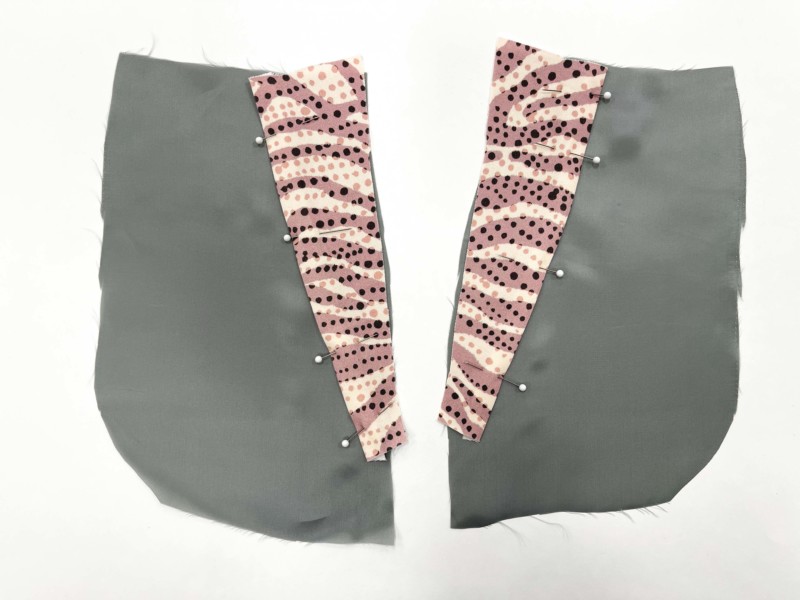
Fold the pocket facing outer edge under ½’’. Edgestitch it down to the pocket bag lining. Baste around the other areas to keep the facing secure.
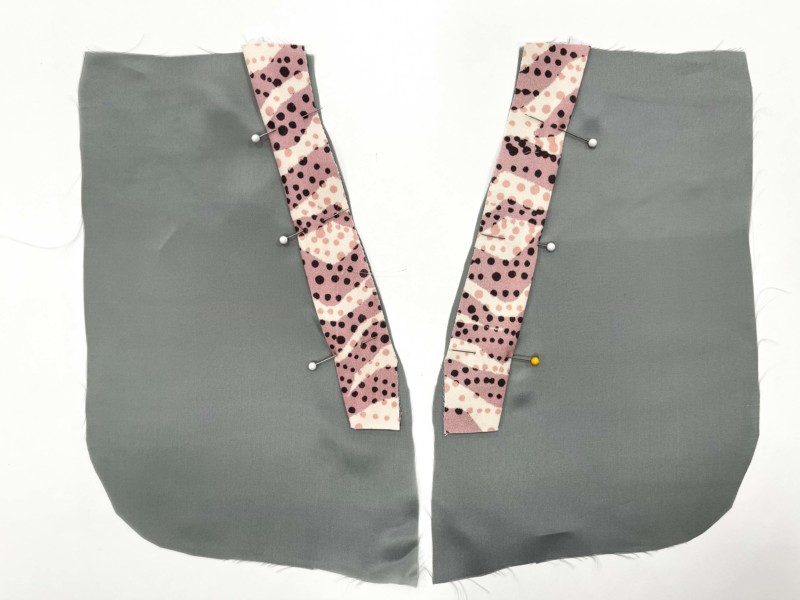
Step 5
Fold the edge of the pocket bag facing ½’’, pin in place to the pocket bag lining. Edgestitch, then baste around the opposite edge.
Step 6
Sew center front together up until the notch.
Step 7
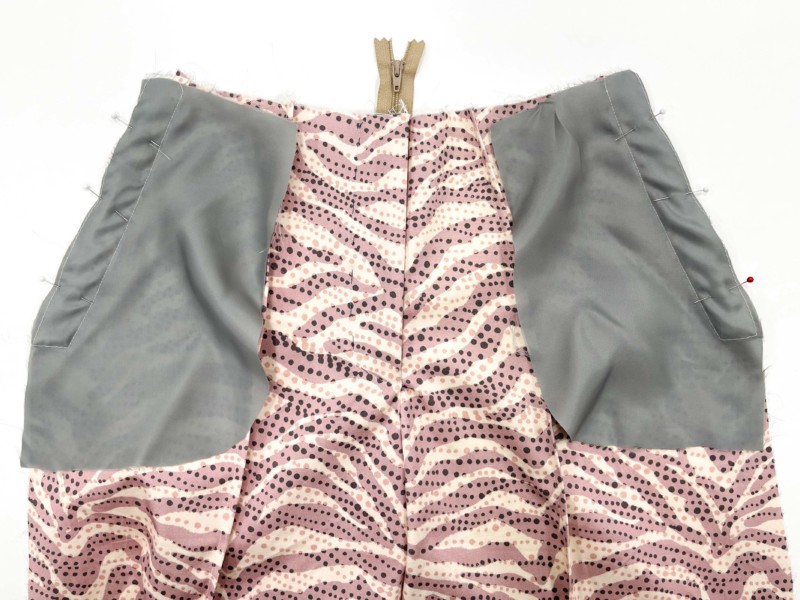
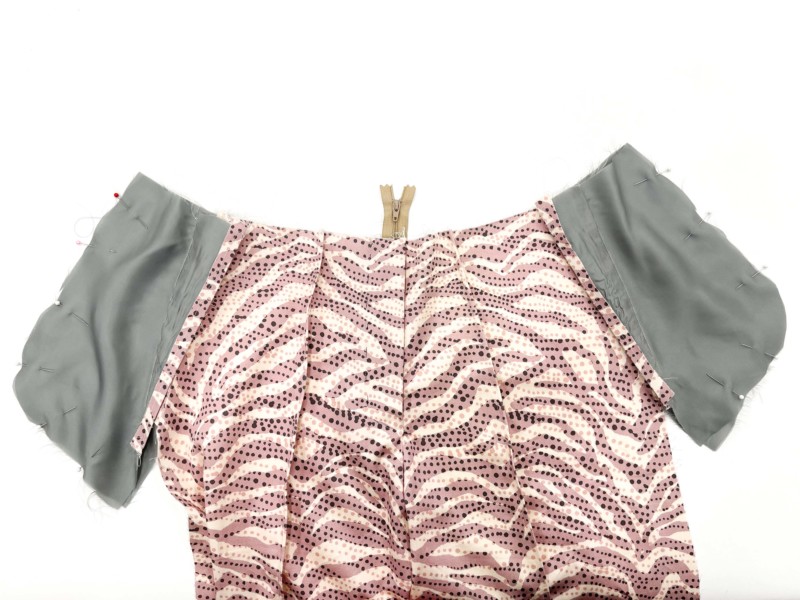
Set in your zipper. See how to install a fly zipper here for the zipper process if needed!
Step 8
Pin your pocket bag to the side front. Stitch, trim, and press down. You can topstitch the edge if you want to, but it’s not needed.
Step 9
With the right sides together, pin the other pocket bag to the one you just sewed. Stitch around the curved edge. To finish the raw edge, use a serger, zigzag stitch, or a pinked edge.
Step 10
With right sides together, pin center back seam together and sew.
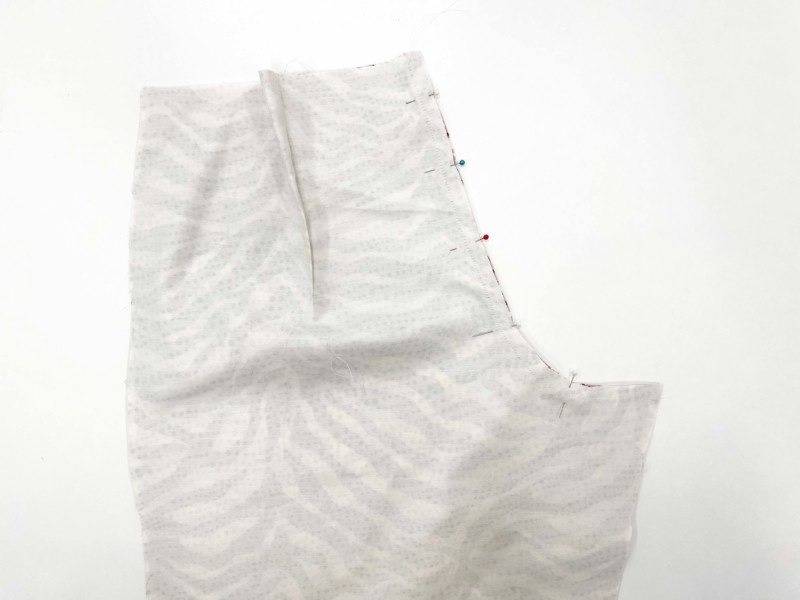
Step 11
Pin the front and back together at side seams and crotch seam, then stitch.
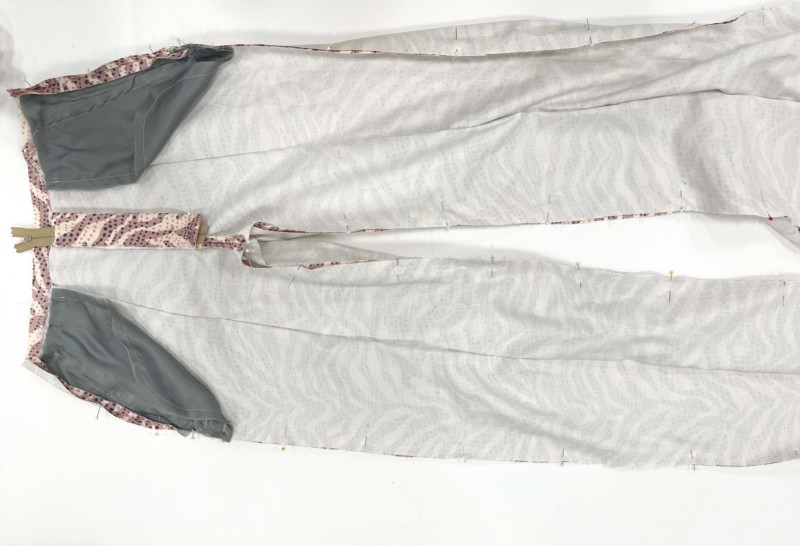
Step 12
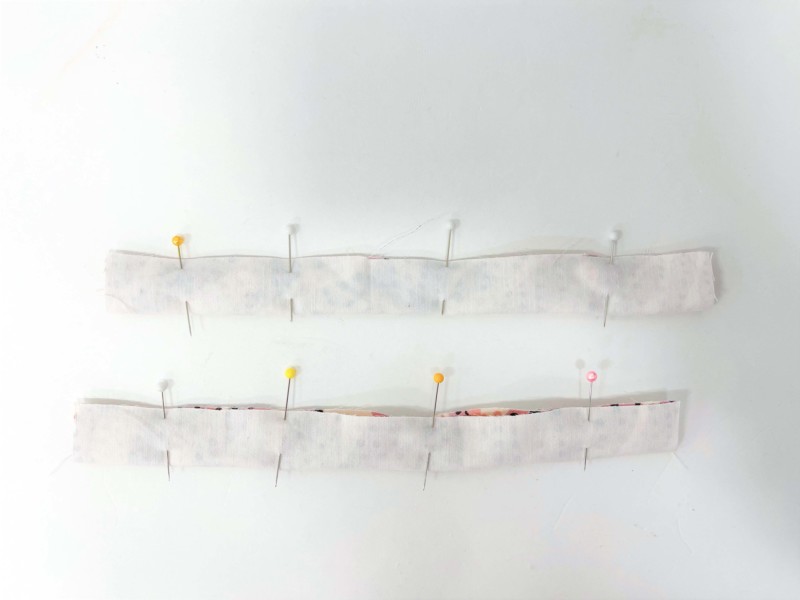
Pin and sew your waistband together. Make sure you don’t mix up the left and the right waistband together.
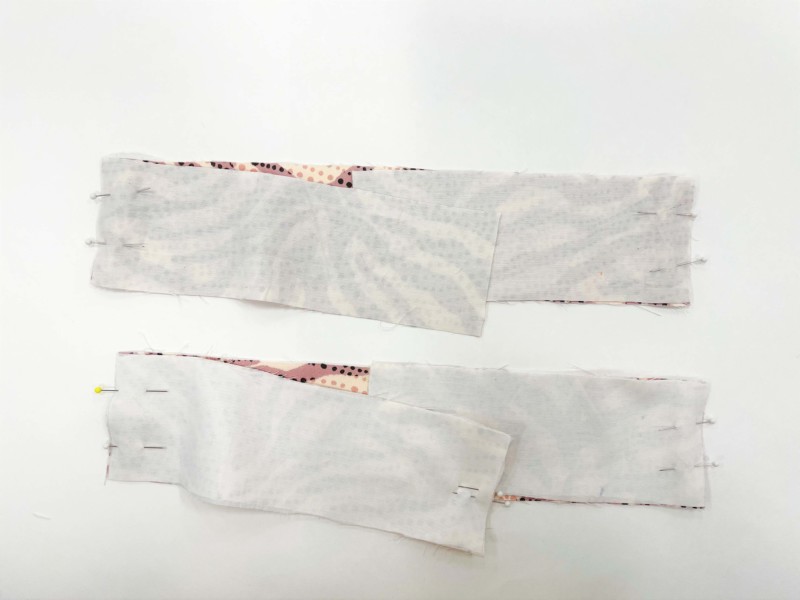
Step 13
Fold your belt loop in half and stitch. Flip right side out, press, and topstitch.
Step 14
Pin belt loops on the side, front, and back. Now pin the waistband matching side seams and stitch.
Step 15
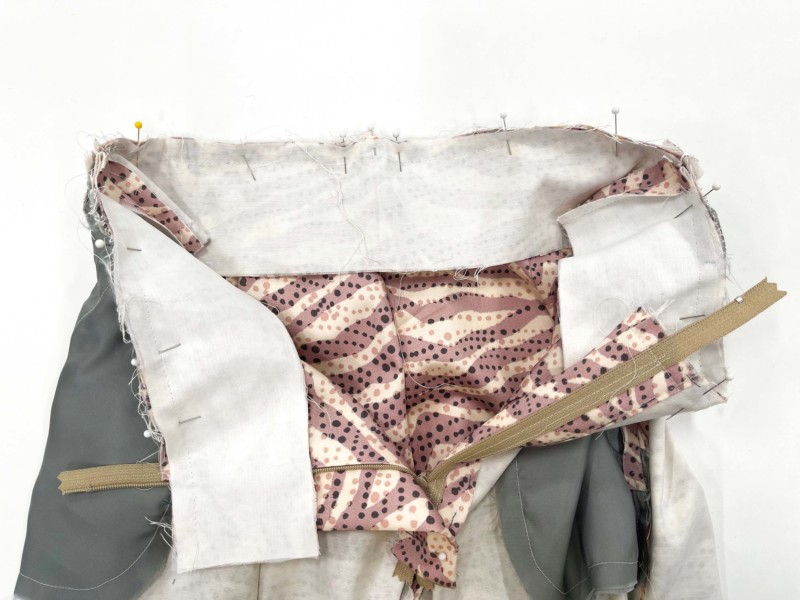
Pin and sew the lining, leaving the belt loops free.
Step 16
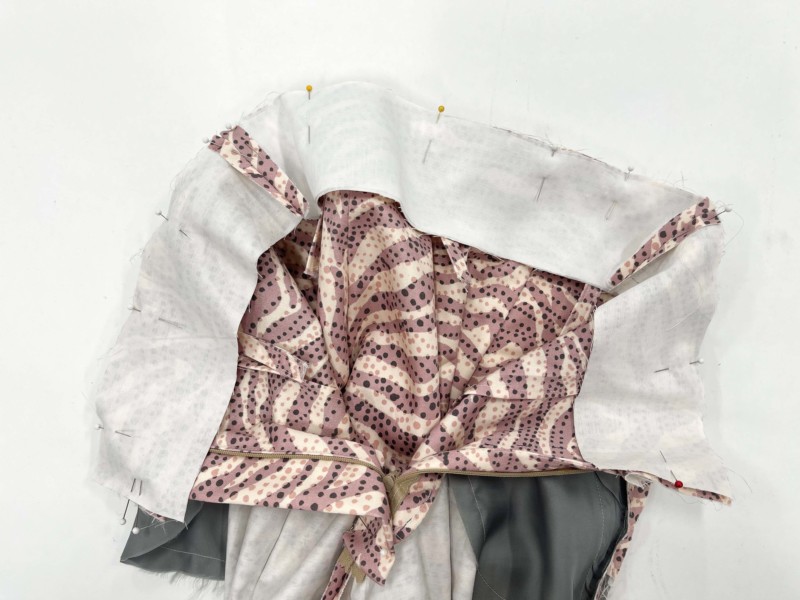
Press the waistband and fold up the raw edges and topstitch around. Once the band is topstitched, pin loops in place, then topstitch the loops down.
Step 17
Fold the hem ¼’’ then ¾’’.
Step 18
To finish the top you have three options: sew a hook and eye, snap, or a button. For mine, I did two hooks and eyes.
For More Ideas and Pattern Hacks Using the Liv Pants, Click the Links Below:
The liv pants redux: Reimagining Street Style with a utility upgrade
Top 10 Pants – Free Sewing Patterns
Just yesterday I said that I want to make more wide leg pants. I love these!
The linked zipper post is for a standard centered zipper, not the fly type like these pants with a fly shield and fly facing, so it doesn’t help much. I like the pants enough to look up other basic fly tutorials to figure out how to do it, though.
Donde vivo no consigo ropa de mi tamaño, voy a probar de hacerlo!
I like the pants enough to look up other basic fly tutorials to figure out how to do it, though.
Gracias x el patrón
De nada!
Gracias por la oportunidad de obtener e patrón. Dios bendiga tus conocimientos .
Not gonna lie, these pants bested me. The directions are really hard to follow for a beginner sewer. There are a significant amount of steps skipped. Also the zipper tutorial, those pants are white on white. It was so hard to decipher what was the right side or the wrong side of the fabric. Plus the photos were so tiny.
Hello, we are sorry to hear about this tough experience and we will take it into consideration for our future patterns, thank you.
I agree with you, I have just cutted the pieces and I wonder where should I start from? I don’t know and it doesn’t say what to sew first or anything, and the zipper tutorial is very confusing too.
Hola buenas deseo obtener el patron se este pantalón. Me encanta aprender.
Comuníquese con nosotros a patterns@moodfabrics.com y nos aseguraremos de que obtenga su descarga gratuita. ✨
SO in love with these – I made them over the weekend. As another commenter said, the zipper instructions linked do not specify how to install a front fly zipper, so those making it will have to do a bit of hunting. Can’t wait to make these in every fun print I can find!
Hi ! I would love to make those ! Do you think it Can work with an elastic Fabric ?
(Sorry if i made mistakes english is not my 1st language)
Hi Laurine, it depends on your fabric. If it’s stretchy enough that you can pull the pants over your hips, I suggest omitting the front zipper, sewing a faux fly instead. You may need to add elastic at the waistband.
Hola me encanta
There’s a really good video on YouTube for a front facing fly. Not sure if I can post a link but Tock Customs made a really good thorough easy to follow video.
Hello,
I am watching the informative video of Tock customs on how to install the zipper, I just want to clarify, did you follow his instructions but swapped the placements of the pieces, like say, his tutorial for the men’s jeans, the LEFT SIDE of the jeans would overlap to the right part, as for the reference pic for this pattern, the RIGHT SIDE over laps to the left as coz this is a women’s pants?
Thanks
Hi AJ! While we can’t speak on this specific video, generally, men’s and women’s closures are reversed. 😀
Thanks, i followed his link that BEV put, very short and i was able to install my zipper first time for pants and I am beyond happy with it. Thanks
hi, how do I work out how much fabric is required for my size? I looked at the pattern but I couldn’t find that information. Thanks 🙂
Hi Kaz! If you look at the top right corner of this post you should see a “Shop this Look” widget. This will let you know the estimated yardage for sizes in small, medium, large, and extra large size ranges. 😀
Está hermoso el pantalón
I made these pants over the weekend and they are such a great fit! Thank you so much! <3
As mentioned by the previous commenters, the link does not send you on how to install a zipper with a front fly. However, I found a YouTube tutorial that was super helpful for the zipper installation – https://youtu.be/jpuBhUcsARg
I hope this helps!
Thanks
Quiero los patrones me encantan
Gracias espero me quede igual
Thank you, this helped so much!
Se ve que todo lo que hacen es bello
I’d like to sew these pants for myself, but I cannout make out from the descriptions whether the pattern is designed for stretch or non-stretch fabrics. Can anyone help me with that? Thanks!
Hi, Zita! This pattern is drafted for woven fabrics.
Non-stretch, but technically you could make it in stretch with a few adjustments. Personally i would replace the zipper closure with just a elastic waistband in this case.
Has anybody made this pants pattern with a SIDE zipper? I think I can make the change, just wonder if anybody has any tips or comments about the adaptation. Thanks in advance for any…
There should be no problem changing the zipper location. On the side, I would use an invisible zip, or, if the fabric is not very bulky, the classic lapped zipper.
Hello, first of all, thank you for this amazing pattern ! I was wondering about the sizing system (A,B,C …) Which letter corresponds to wich size ? Thanks !
Hi, Lana! Our sizes are numbered – the size chart can be found above and on the pattern itself.
Lo correjore
#Bev,
Thanks for the zipper-clip, perfect!
First timer with these patterns. Are seam allowances included in the paper pattern? I just want to know before I start cutting. Thanks.
Yes, seam allowance notes can be found on the first couple of pages of the pattern. 🙂
Hi, I can’t wait to make these!! but I am struggling with printing the pattern. Usually when I print it, the mood square measures 2″ on 2″. I used the same parameters like usual for this one but I am not getting 2″. I keep having less (I am sorry I am not sure how to read inches, basically in cm it gives me this 2″ is 5cm, I am having 4.70cm) I tried different parameters. Is it possible that the square size is different than usual or it’s my printer and I should use an other printer?
Thank you a lot for all these great patterns.
You are the best.
Hi Baru! First, make sure you are printing the pattern at 100%. If you are still having trouble, you can increase or decrease the size by small percentage amounts in order to get the 2″ square. 🙂
Are the Lines in the front of the pants pressed and then stitched in place or they just pressed
Hi, Ty! The pintucks are stitched. 🙂
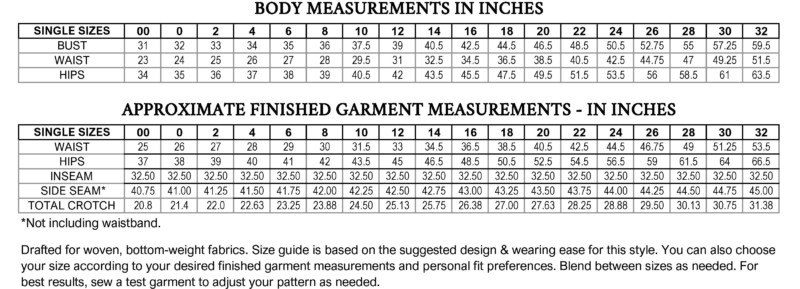
Hi, I’m between 29 and 30 inches at the waist and 42 inches at the hips. Would these pants work for me ? I can never find pants for my hips to waist ratio the waist is always too large and pants usually hurt in the belly area because they’re never patterned for people who don’t have a flat stomach. Which size should I try ? And are there a lot of alterations that I will have to do ? I’m trying to determine if this will be a waste of time or not 🙁
Thank you if you can answer me
Hi Lula! If you are concerned about finished fit, we also have the finished garment measurements below the body size measurements. For this pattern and with the measurements given, it seems a size 8 would work well. 😀
@LULA : I would suggest that you blend between sizes to customize your fit. Let’s not forget you will want to have wearing ease, which is already built into the pattern. Based on the body measurements chart, you would be a size 10 in the waist and a 12 in the hips. You can blend, or cut the 12 and alter the waist before you put on the waistband.
First time making pants. Any recommended videos or instructions for the pocket construction. I am having trouble understanding the instructions. Thanks!
Hi Jessica! The pockets for these pants are pretty much a standard inseam pocket with the added facing. An inseam pocket guide can be found here. 😀
Actually it’s very different from an inseam pocket I struggled too and I found this https://cosplaid.com/gb/blog/post/5-how-to-sew-a-diagonal-pocket.html it helped a LOT! The difference in the linked tutorial is that they don’t fold over the edge of the facing to make it look more neat from the inside, and i really loved that part so I followed along the linked tutorial, and still folded and sewed the edges instead of just serging the facing (the bottom one too not just the side), hope this helps future people who attempt those pants 🙂
This is so helpful! Thank you for sharing!!
Hi! Getting ready to sew up my mock up of these pants. What height are they drafted for?? I’m a shorty, and would like to know how much adjustment to make at the knee line.
THANK YOU!!
Hi Kristina, we’re sorry for the delay in responding to your question! We get dozens of comments and questions each day, and so many questions get buried and, unfortunately, unanswered. We are now focusing user support on patterns 2 years and newer. We hope this will prevent questions on our more current patterns from going unanswered. Although this is late, we wanted to respond in case anyone else has the same question: Unfortunately we don’t have finished garment measurements for our older patterns.
Its a beautiful pattern, i would like to see it for myself one day, thank you so much for the free patterns
I am almost done with these pants!!!! But now I am struggling with the waistband. I cut out the pieces according to the pattern, but they don’t fit around the circumference of the pant the way I think they are supposed to. Any advice for completing the waistband? Do I need to take in the pant waist at the sides to get it to fit? Thank you!!! I’m really loving this website, your patterns, and fabrics. I haven’t had this much fun making a project in a while.
Hi, Jessica! Each layer of your waistband should be three pieces: one back piece that should align with the side seams, and two front panels. One front panel should be shorter than the other to account for the fly. The second layer of your waistband is the facing and will go inside the garment. I hope this helps!
hi! 🙂 while drawing this pattern on fabric, should I leave a little space between the pattern and the line that I will draw or do I draw it directly besides the pattern? (basically, does pattern include a space for “sewing lines”?)
Hi Sunny! This pattern includes the seam allowance, so just trace the pattern as-is and cut along the line. Refer to the instructions in this post to get the correct seam allowance, as it varies depending on the section you’re sewing. Good luck! 🙂
I also am struggling with the waist band, I managed to pin them in place, three layers, but I cant seem to figure out how to construct the front part where teh zipper would go or how to finish it, anyone with a link to a tutorial that would be applicable to this pattern please share. Thanks and happy Sewing.
Check out this one at 17:00 https://www.youtube.com/watch?v=Ze4Gzj3e9_w
Hi, i’ve been eyeing this pattern and i would like to know if i can use medium-weight linen for this one or not ? Do you think it could work and have a nice finish still ? Thank you
Hi Marina! Yes, I believe a medium weight linen would work nicely. 😀
Could these be mens pants or do you have a mens wide leg pants/flared pants pattern you could link me to please. Thankyou
Hi Ruth! These are all-gender pants, so they will work for men as well 😀
Hi there! Thanks for the very nice pattern! I’ve made one pair using leftover fabric just to practice and struggled a lot with the pockets. Nevertheless the fitting is great and now I’m starting over using a beautiful mustard yellow twill. Kudos from Curitiba, southern Brazil.
Yep, I found the pockets a bit hard to understand too. If you can, I would recommend handsewing facings to cover the raw edges. It takes a bit longer and some people don’t like the way it looks, but it might be easier than the instructions.
Hi! I am having a lot of trouble understand what the third step is trying to do? am I supposed to stitch on the fold?
Hi Jay! On step 3, you are sewing the decorative fold or pleat at the center of the pattern. 😀
Just checking on my comments? My sewing circle and I are making this pant and none of us could figure out how steps 10 and 11 work since we have never sewn flies yet (that was a whole drama in and of itself… I think we’re staying away from your company’s patterns for now… shame because I thought it would be a great resource). please send help!
Hi Juliette! I am sorry to hear that you are having trouble with our free patterns. However, we have a great library of free sewing tutorials that are more detailed, and are much more instructive than anything I could put in a blog comment! 😀
Thank you so much, this helped a lot!
If adjusting these to make the pants from knit fabrics, I’m thinking the main thing I’d need to adjust would be the front fly option. I’d need to smooth the front crotch out and just sew the crotch curve rather than going through all of the zipper fly steps. Then, I could create a waistband that could either contain elastic, or just be a band with no elastic in it if my fabric has enough stretch and recovery. Am I missing anything? I suppose if I fall in between sizes I could size down because of the stretch. Any additional thoughts?
Hi Michele! That sounds pretty good, the only things I would suggest is to make a muslin or toile out of similar fabric in order to ensure that your pattern adjustments are correct. Additionally, depending on the amount of stretch, you may need to add a side zipper or other closure. 😀
I can’t believe I think I can do this having never sewn any clothing garment! Have never used a pattern but am going to give this a try. I’ll read all of the comments first and see if I ca figure it out. I really want to try sewing.
Hi Michele! Is the seam allowance included in the pattern or do I need to add it on myself?
Hi Jess, the seam allowance is included!
Hi! Do you think this pattern would work for making woolen pants?
Hi Kat, these would be excellent in a wool suiting. You can try something heavier too, but it wouldn’t have as much drape as the suiting. 🙂
Is there any way we could have the A0 file it would be easier beaucoup i hate taping everything
Hi Mathilde! We completely understand the frustration, however, in order to keep our patterns free we currently only provide our patterns to print at home.
Hello, I am very keen to sew these trousers, though I currently have a “largish hernia (bellybutton)” which causes no end of problems to find trousers that will not put any added pressure on that area. I presume that I could get away with just a waistband, no zip, if I used a larger size for the waist and hip measurements. So, tomorrow after my day with the grandchildren, I will run these trousers up. Many grateful thanks for the free patterns, it certainly helps the budget no end these days with high costs all round. All the very best to all your sewers, and again, many thanks. From New Zealand!
Hi Yvonne, you can certainly do that! When choosing your size, just take a look at the Finished Garment Measurements to make sure that the waist will be able to be pulled up over your hips. 🙂
Hi – I’m in the process of making these pants and discovered that the back inseam is about ½ inch longer than the front inseam in measuring from knee to crotch. Is that intentional? If so, how should I accommodate this in sewing them together?
Thanks for your help.
Hi Liese, we’re sorry for the delay in responding to your question! We get dozens of comments and questions each day, and so many questions get buried and, unfortunately, unanswered. We are now focusing user support on patterns 2 years and newer. We hope this will prevent questions on our more current patterns from going unanswered. Although this is late, we wanted to respond in case anyone else has the same question: We have been made aware of this error, and are trying to fix it. In the meantime, if you’ve already cut your fabric, here are a few options:
– Cut off that excess and just make the hem smaller. This would work if you can afford to lose that length.
– If you need to keep the length, would cut a strip of fabric to fit that missing length. Include a 1/4″ seam allowance. Sew it, with that with a scant 1/8″ seam allowance onto the hem. This seamline will be where you fold the hem under. So once folded, that seam will not be visible.
If you haven’t cut your fabric yet, add the missing length to the thigh. Cut the front pant straight across the mid-thigh, and add the amount you need there. Redraw the inseam so it’s blended.
Can I use brocade fabric for this (and make it into shorts)? Thanks!
Hi Veronica, yes you can make shorts! Brocade could work, but the stiffness might affect the silhouette a bit.
Hi! I’m currently making these pants, and I have gotten to the point where I’m sewing the front and back together, but the back is significantly larger than the front. Is the pattern supposed to be this way, or have I made a mistake?
Hi Max! Hmmm that doesn’t sound quite right. A few things to double check: Did you sew the darts in the back? Did you cut out the same size for all pattern pieces? Were the pages tiled together correctly?
Thank you a lot for this pattern. I love my new pair of pants !!
MERCI POUR CE BEAU PATRON DE PANTALON
These pants are so cute! I did have to add two pleats in the front, as even after double checking all of my measurements, the pants came out 4″ too big in the waist. I’m not sure what I did wrong, as there isn’t anything off about my pattern scaling and I sewed everything (excluding the back dart) with 1/2″ seam allowance. If it helps, I made a size 0, and it ended up with a 30″ waist.
Thank you so much for this pattern I want to make this as straight leg pants using polyester viscose stretch fabric. any tips on how I need to adjust would be great?
Hi Hana, it depends on the amount of stretch. This pattern wasn’t drafted for stretch fabric, and since I don’t know enough about the fabric, you’ll have to experiment a bit. If it’s an incredibly stretchy fabric, omit the zipper, and sew up the center front instead of adding the fly. You can always stitch a faux fly if you want that look. If your fabric doesn’t have great recovery, then an elasticated waistband might be necessary.
First timer. For the life of me I can’t find the amount of fabric for my size. Where is it?? I don’t see any widget as was mentioned for another lost soul.
Welcome, Mary! If you look at the top right hand side of the post, you’ll see a box that says “Shop This Look”. Simply enter your size, and the estimates will reflect the yardage for that size. 🙂
Does using a slightly stretchy fabric affect the pants? And are the front lines a needed step?
Hello! If you’re using something like a stretch cotton sateen, it shouldn’t affect the fit too much. But you should take into account if the fabric has recovery, which could determine if you want to make a size smaller. If you don’t want the fold on the pants, just remove 1/2″ from the center of the front pant leg.
I am a bit confused about the pin tuck part? I have never done one I don’t think. Do I just make a small vertical stitch from the top down 1/4″? Is that it? From what I understand, I fold the front pant panel in half, iron/press it, then make a small, vertical stitch 1/4″. then I Iron it again? Im not really sure I understand. Plus I can’t tell whats going on in the photos either. Could I get some help? Thank you!
Hi Zoe, yes you’ve got it right! Simply fold along that pintuck line and press. Sew 1/4″ from the fold, down the entire length of the leg, then iron the pintuck either pointing in or out.
No matter how I measure the front pant is an inch or so shorter than the back pant I have quadruple checked my overlap from assembly. Any idea as to what’s gone wrong?
Hi Amanda, thank you so much! We have been made aware of this error, and are trying to fix it. In the meantime, if you’ve already cut your fabric, here are a few options:
– Cut off that excess and just make the hem smaller. This would work if you can afford to lose that length.
– If you need to keep the length, would cut a strip of fabric to fit that missing length. Include a 1/4″ seam allowance. Sew it, with that with a scant 1/8″ seam allowance onto the hem. This seamline will be where you fold the hem under. So once folded, that seam will not be visible.
If you haven’t cut your fabric yet, add the missing length to the thigh. Cut the front pant straight across the mid-thigh, and add the amount you need there. Redraw the inseam so it’s blended.
Me encanta. Quiero realizarlo.
Hi when cutting the fabric with the pattern do I have to leave half inch for seams? Or I just cut following the pattern and sew at a distance of 1/4 inch from the borders of the fabric pieces? Thank you
Hi Lisa! It has come to our attention that the back inseam is slightly longer than the front. We have our pattern maker working on these adjustments, but in the meantime we suggest just extending the back leg to match the front. Other than that adjustment, you should be good to go! All of our patterns include a 1/2″ seam allowance unless otherwise stated. 🙂
Hi, I‘m a little bit concerned about the “perfect“ size for me. I measured in waist 30“ (76cm) and in hips 35“ (88cm)
So I don’t really know what to do now.
I looked at the lower size chart „ FINISHED GARMENT MEASUREMENTS“ and in Waist I have size 8 and in hip like size 00. Is it kind of normally bc of the fitting of this pant? Should I stay at size 8?
Best Regards Vanessa
Hi Vanessa, we recommend using the size 8 and grading down accordingly for your perfect fit! We recommend doing this using muslin, so you do not ruin your fashion fabric.
Hi, I am thrilled to start this little project however, my body measurements are:
– a size 31 in the waist (79 cm)
– 36,2 inch on the hips (92cm)
– 38 inch including ‘butt’ haha (97 cm)
According to the chart I would have both a size 12 (waist) and between size 2-6 (hips/butt).
So what do I do? go with size 6? My European pants size is 38-40EU, but according to Google that would correspond with size 10/12… I watched a video on how to choose the best size but I’m lost! If I would indeed go for a size 2-6 according to my waist, would I not end up with too few fabric for the waist?
Best,
Vera
Hi Vera, we recommend going by your hips and grading accordingly for a perfect fit. We recommend making a muslin first to get your perfect fit before using your fashion fabric.
im wondering how large do i have to print this pattern anyone know ?
Hi Jadarius, our patterns are formatted to be printed on US Letter or A4 format. Print just the first page to check accuracy. The Mood square to the left should measure 2 inches. Print “actual size” (no scaling is required).
I downloaded and printed this pattern only to dicover a misaligment in the largest sizes, I tried downloading and printing again but had the same issue, I checked and the error is actually in the pdf file. I was very disappointed, I wish it would be fixed because the pants are beautiful 🙁
Hello, you can contact patterns@moodfabrics.com for any issues on pattern downloads and we will email you the pattern
Cute pants that came out looking very professional. A NOTE TO NOVICES (like myself) please note that the instructions are more like an order of operations than detailed instructions. I totally get it, it’s a free pattern, but I did want to point that our because I only noticed once I was in too deep to quit. After much googling and seam ripping I figured it out an now have a great pair of work pants.
Thanks Mood!
Hi, the pattern is wonderful. I only found that the waistband measurement is too small for the sizes. In two tutorial videos that I saw on social networks, the girls said that the waistband pattern didn’t work for them either because it was too short for the size. What could have happened? Could it be some error in the pattern or that we didn’t follow some instructions?
Hey Ana! I’ve made this pattern several times before for myself and I also found that the waistband was too short. As a rule, I started cutting my waistbands longer than the pattern just in case because of these pants! It was probably just a mistake when drafting the pattern.
Hi there, has anyone perhaps found a link or tutorial that explains the pocket construction better? The above linked site in comments is faulty. I’d love to try these but I can see a headache a mile away.
Hey Miranda! Sorry for getting back to you so late, the Liv pants have the same pockets as the Perugia Peplum Blazer and Pants Suit from 2025. Check out that tutorial for more detailed instructions on pocket construction.
Ciao ma i margini di cucitura sono inclusi ? E poi il pantalone arriva fino a che taglia ? Grazie
Ciao, il cartamodello arriva fino alla taglia 32 USA e include già un margine di cucitura di 1/2 pollice
Hi, would it be possible to remove the pintucks from the pattern? Could the pattern just be reduced along the pintuck line? Thanks!
Yes, you would need to remove the width of the pintucks on the patterns and account for it on the waistband as well.
Quiero el patrón, pero no me deja descargarlo
Hola, envíe un correo electrónico a info@moodfabrics.com si tiene problemas con la descarga de patrones.
Si bon
Acabé de hacer mi pantalón, debo decir que nunca había hecho un pantalón desde cero, me quedó espectacular, imprimí el patrón, elegí mi talla y me gustó mucho el paso a paso, creo que me facilitó el trabajo, me siento muy feliz y agradecida
That’s absolutely incredible! We’re so thrilled to hear you successfully made your first pair of pants from scratch, and that they turned out spectacular! Knowing that our pattern and step-by-step instructions made the process easy and enjoyable for you truly makes us happy. Happy sewing, and congratulations on your amazing accomplishment!
¡Eso es absolutamente increíble! ¡Estamos tan emocionados de saber que lograste hacer tu primer par de pantalones desde cero y que te quedaron espectaculares! Saber que nuestro patrón y las instrucciones paso a paso te facilitaron el proceso y lo hicieron agradable, nos llena de alegría. ¡Feliz costura y felicidades por tu increíble logro!
I adore the wide-leg Liv pants. The pattern is stylish and accessible. Love the fabric suggestions too. Quick note: The back leg length issue was flagged.
This was my first try at trousers, and as some of the other reviewers have mentioned, this pattern is really not for beginners. They completely skip the instructions on the zipper, and the link to the other instructions are useless because it’s white on white and you can’t see what’s going on. I ended up using Youtube. They start to instruct you on the pockets, but then those are abandoned after the very first instruction, so i had to make a lot of guesses on how to attach those. I had a pair of store bought trousers next to me to reference the whole time. Lastly, the waist band attachment was confusing, i think there is a better way to do that and I will change it on the next pair.
Other than these issues, the pants came out really cute. They fit me perfectly and i’m very proud of the project. If you’re a beginner, just expect to spend some time finding other resources to figure out the zipper and pockets. I very much appreciate the free patterns, and I’m more than willing to reference YouTube when needed. Thanks Mood!
Hi Carolyn, I’m so glad your pants turned out how you intended! This pattern is a couple years old and our patterns are a bit more detailed now. If you ever have problems sewing a zipper fly in the future, check out the pattern for the Amherst Palazzo Set, which has a trouser with a zipper fly and accompanying instructions. This is the same for the waistband.
Just wanted to clarify, is the length for the back leg still 1/2” too long and needs to be cut, or has the pattern been corrected?
Hi Ken! This was not the case when I made the pants, but if your back pants pieces end up being longer than the front, then you can definitely trim them AFTER they are attached to the front pieces so that you can make them even with the front hem.
Thank you❤️
Beautiful
I’m finishing up these pants and cut everything to a size 6 and followed the correct seam allowance but the waist band ends up being far too short. I had to make the seams 1/4″ and my side seams still don’t match up not does the left front piece. It’s still an inch too short. Having to fudge with it to make it work
Hey Marcia! I actually found this to be the case when I made these pants several years ago. When I used to use this pattern back when I used to teach sewing classes, I would always cut the waistband a few inches longer than the pattern (and still tend to do that with new patterns just in case). Thanks for pointing it out!
Thanks
The pattern says “Cut 2” for the belt loops. I do this and think, huh, only 2 belt loops and they are so big! I then see the “makes 6 loops” on the pattern piece. I measure and see that each loop can be cut into 3 pieces once sewn together. I recut the 2 beltloop pieces. Instead of folding each strip in half and stitching, I fold the 2 long sides of each strip 1/4″ inward toward the center, press and topstitch both sides. Much easier than turning a skinny loop inside out. You will need to mark the 3″ yourself as the pattern does not indicate any cut marks.
Beautiful page