
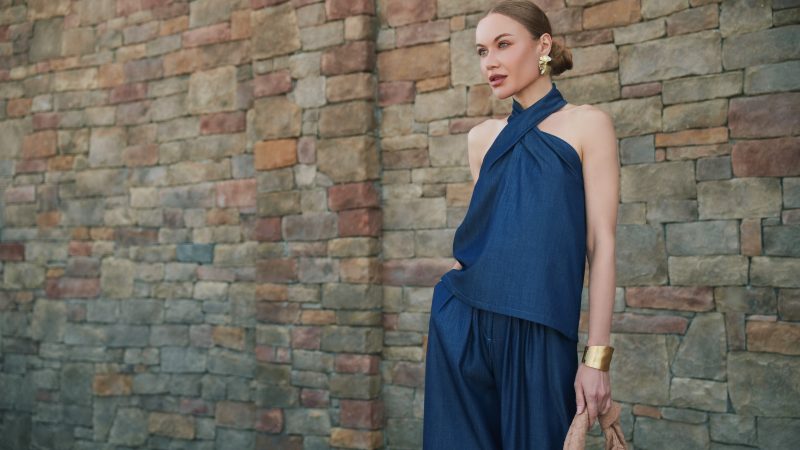
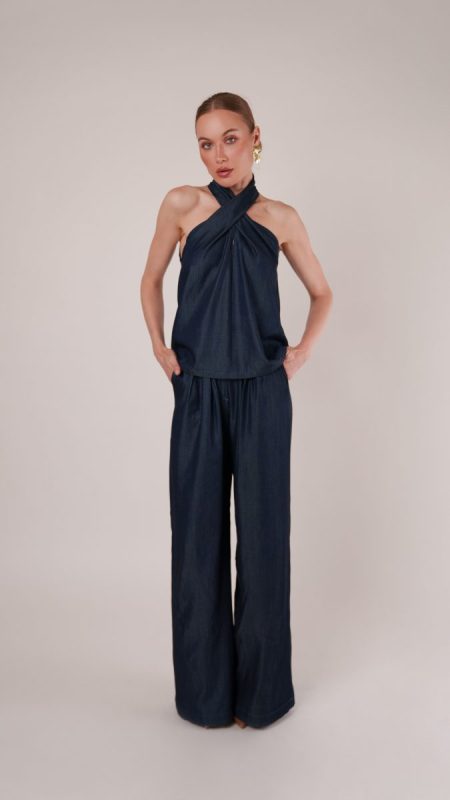
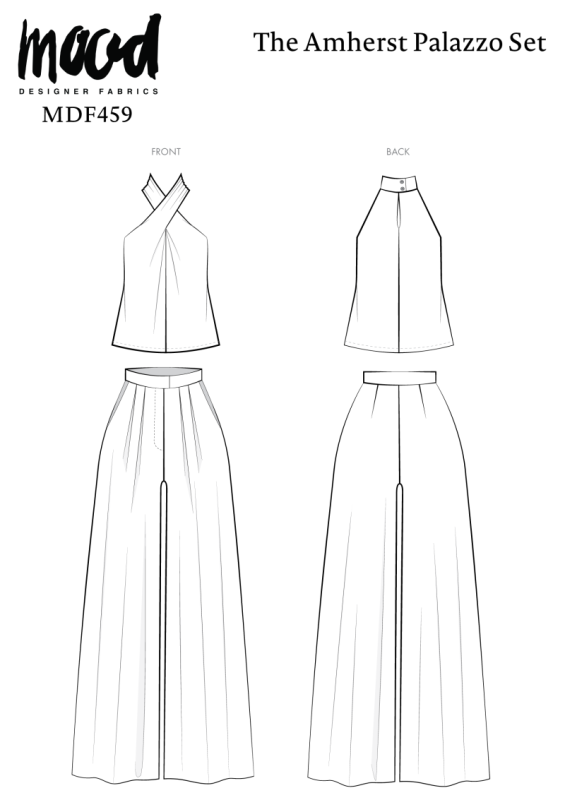
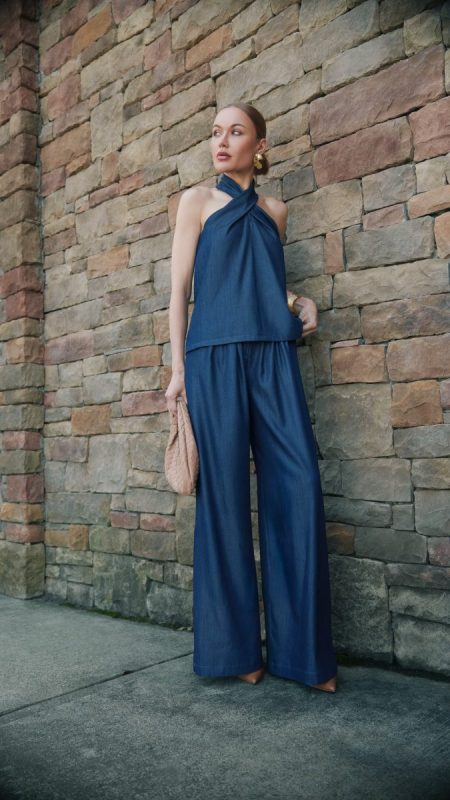
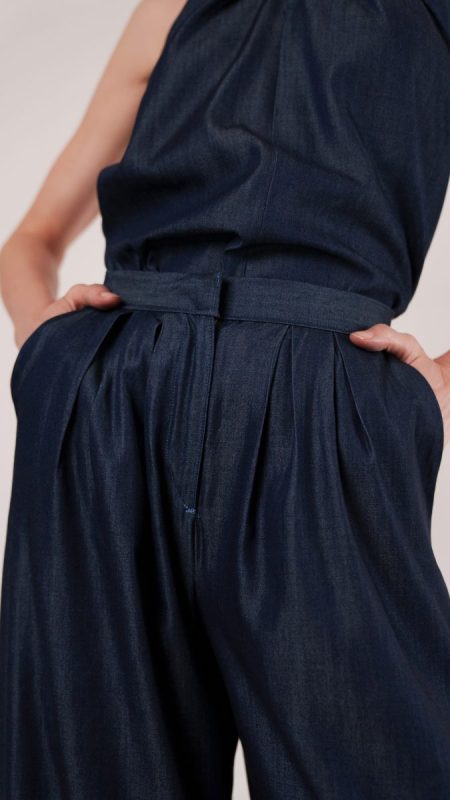
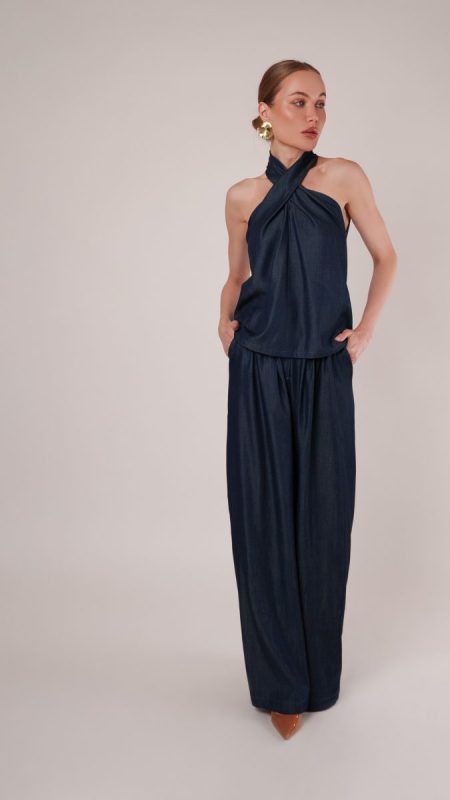
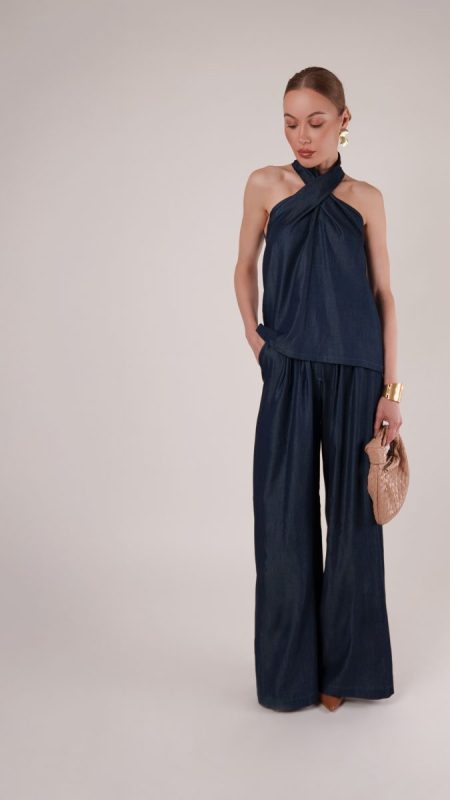
Inspired by the changing rhythm of late summer on the East Coast, the Amherst Palazzo Set free sewing pattern is the definition of delicate denim with a modern, bohemian twist. Designed in a blue lightweight viscose denim, this two-piece palazzo set balances effortless charm with a touch of trendiness, making it the kind of outfit that feels just right for the season. The twisted halter top frames the neckline with soft, dainty lines, while the wide-leg pants create a breezy silhouette that drapes beautifully with every step.
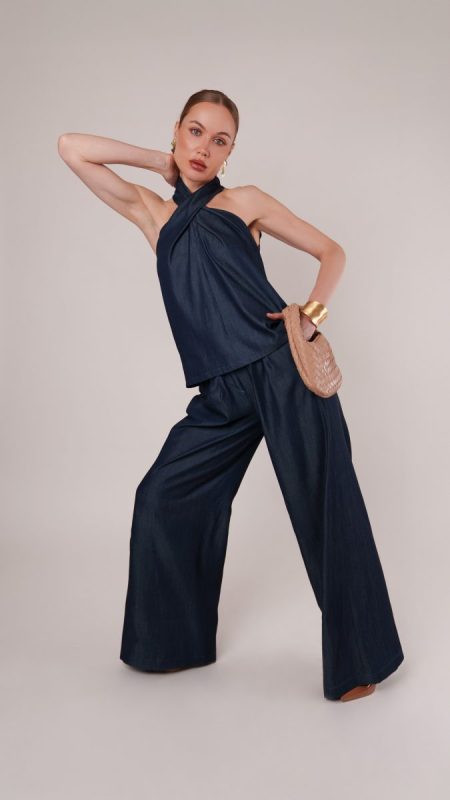
Picture yourself slipping into Mood’s new palazzo set as August gives way to September, when the air is still warm but the evenings call for something just a little more refined. Whether you’re heading out for a night with friends, attending an end-of-summer rooftop gathering, or simply strolling through the city, the Amherst Palazzo Set captures that sense of ease that makes transitional dressing feel so effortless.
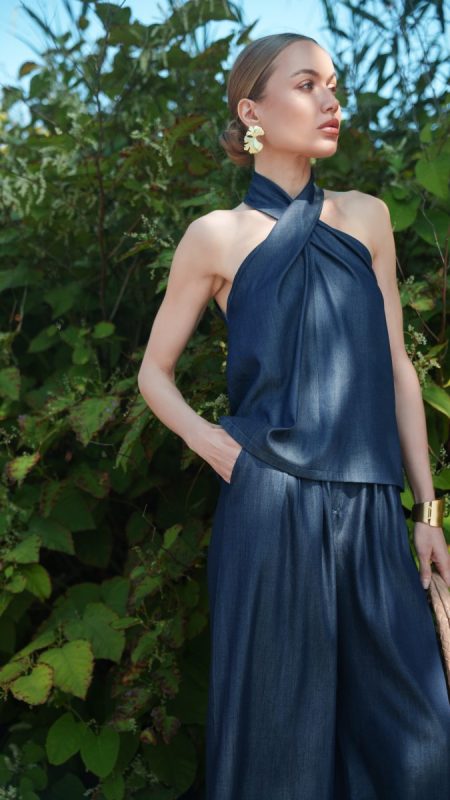
Infused with boho sensibility, yet polished enough for everyday wear, this sewing pattern invites versatility into your wardrobe. Style it barefoot at the beach, layered with airy jewelry for a delicate, dainty finish, or dress it up with heels for an urban outing in New York or Paris. Wherever the season takes you, the Amherst Palazzo Set free sewing pattern offers a lightweight denim moment that feels cosmopolitan, free-spirited, and distinctly your own.

Essential Materials & Sizing Guide for the Amherst Palazzo Set
Continue reading for a breakdown of what knowledge and materials you need for creating your very own palazzo set! We’ve got you covered with the recommended materials we used—if you want to follow along exactly—as well as a curated list of alternative fabric type recommendations if you want to customize your own version. The Amherst Palazzo Set free sewing pattern download includes technical drawings for seam and silhouette visibility, plus a size chart to help you find your perfect fit!
Purchase Products Used Below:
Quantities indicated are for sewing a size small palazzo set. Toggle the ‘SHOP THIS LOOK’ box to find quantity estimates for other sizes.
- 3 yards of Italian Blue Topweight Viscose Denim
- 0.5 yards of White Non Woven Single Side Fusible Interfacing
- 2 each of Italian Navy Textured Shank Back Buttons – 16L/10mm
- 1 each of Dritz Black and Nickel Sew-On Skirt Hook & Eye Closures – 4ct
- 1 each of Regular Zipper 9″ by YKK – 560 Deep Navy
- 1 each of Gutermann Jeans Thread 200m – 5397 Washed Denim
- MDF459 – Amherst Palazzo Set Sewing Pattern (Free download below!)
Additional Products Used:
Alternative Fabric Type Recommendations:
The Amherst Palazzo Set sewing pattern is best suited for lightweight fashion fabrics. Explore other fabric types or colors from our featured collections for your palazzo set with the links below.
Download Your Free Sewing Pattern
Submit your name and email in the form below to receive the download link for the Amherst Palazzo Set free sewing pattern directly in your inbox. Mood Sewciety Patterns will send your free download link via email with the subject line: ‘Your Free Download from Mood Sewciety – The Amherst Palazzo Set’ (in PDF format for A4 and letter-size printing).
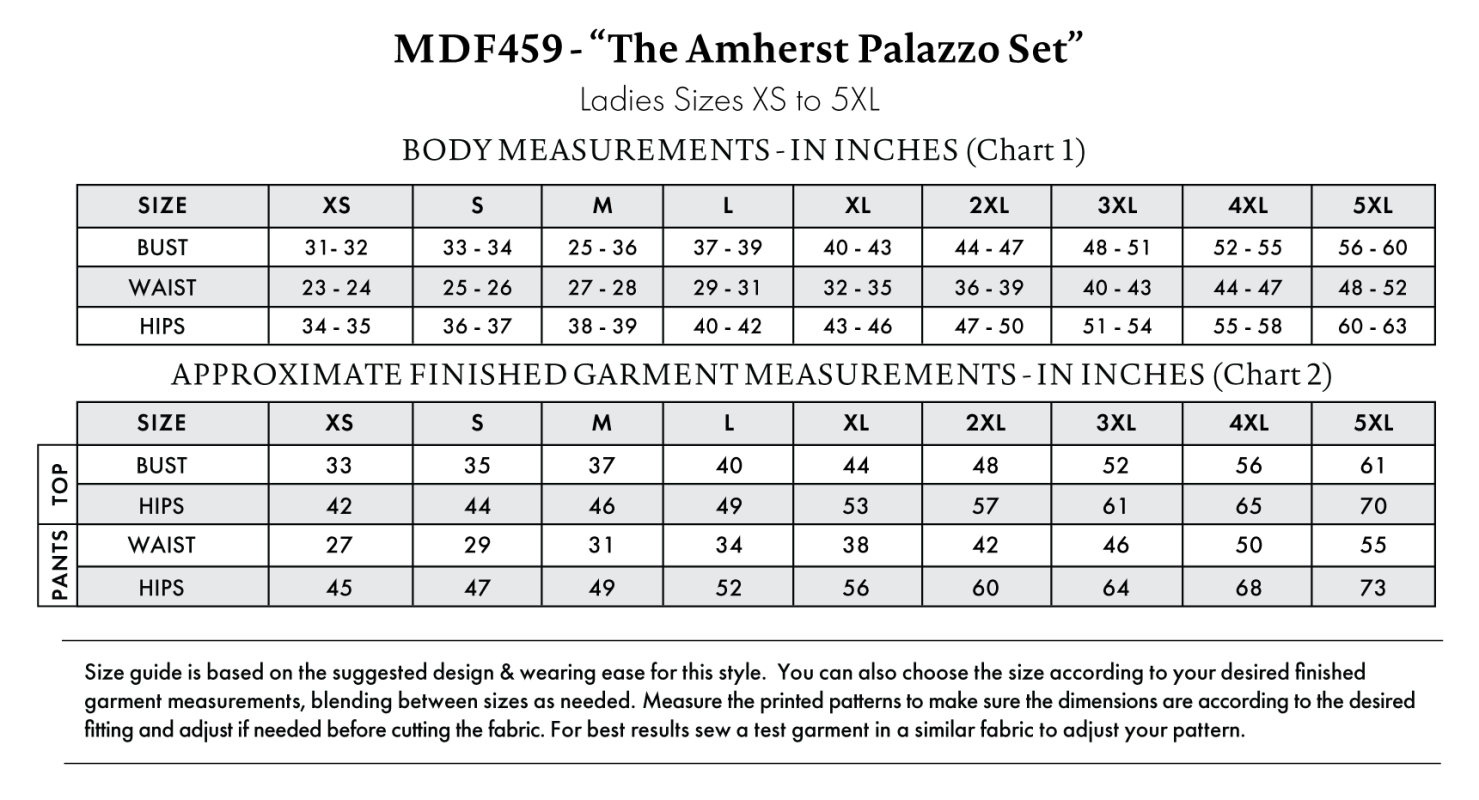
Find Your Perfect Fit
The Amherst Palazzo Set Sizing Guide is based on the suggested design & wearing ease for this style. You can also choose the size according to your desired finished garment measurements, blending between sizes as needed. Measure the printed patterns to make sure the dimensions are according to the desired fitting and adjust if needed before cutting the fabric. For best results, sew a test garment in a similar fabric to adjust your pattern.
Note: Measurements may vary after adjustments. Reference the approximate finished garment measurements chart to choose your size.
Always read all the instructions before cutting the fabric!
How to Sew The Amherst Palazzo Set
The instructions provided below are designed to guide you through sewing the Amherst Palazzo Set from start to finish.
2 Tips for Sewing with Topweight Viscose Denim:
- After each stitch attaching two pattern pieces together, iron the seams open.
- This fabric isn’t too thick, so it’s not entirely necessary, but using a denim needle when sewing a denim weave fabric is generally a good idea to avoid breaking needles while sewing.

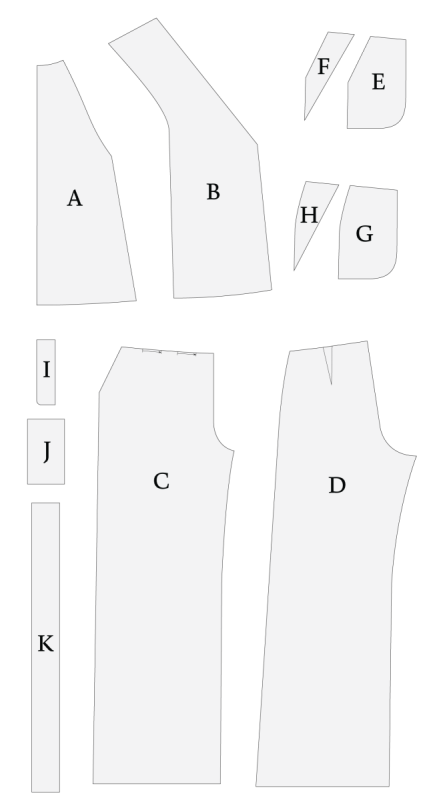
Pattern Pieces & Fabric Cuts Needed
- (A) TOP BACK
- Fabric – Cut 2 Mirrored
- (B) TOP FRONT
- Fabric – Cut 2 Mirrored
- (C) PANTS FRONT
- Fabric – Cut 2 Mirrored
- (D) PANTS BACK
- Fabric – Cut 2 Mirrored
- (E) PANTS POCKETS (A)
- Lining – Cut 2 Mirrored
- (F) PANTS POCKETS (A) FACING
- Fabric – Cut 2 Mirrored
- (G) PANTS POCKETS (B)
- Lining – Cut 2 Mirrored
- (H) PANTS POCKETS (B) FACING
- Fabric – Cut 2 Mirrored
- (I) FLY
- Fabric – Cut 2
- (J) FLY SHIELD
- Fabric – Cut 1
- (K) WAISTBAND
- Fabric – Cut 1
Sew with a 1/2″ seam allowance for all seams unless otherwise specified.
HOW TO SEW A TWIST KNOT TOP
Step 1
FRONT SEAM
- Place the two top front pieces right sides together and pin from the bottom to the lower notch marking on the pattern.
- Sew a straight stitch from the notch to the bottom corner of the pattern piece.
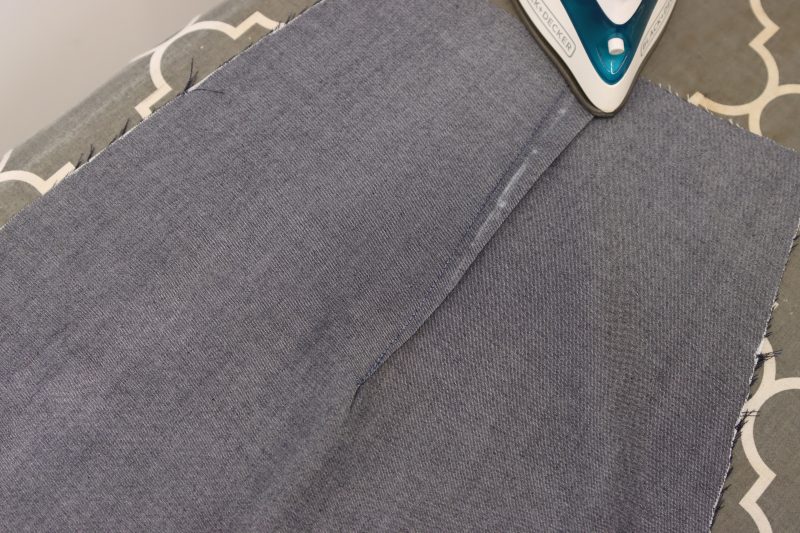
- Open up the fold and press the seams open.
Step 2
BACK SEAM
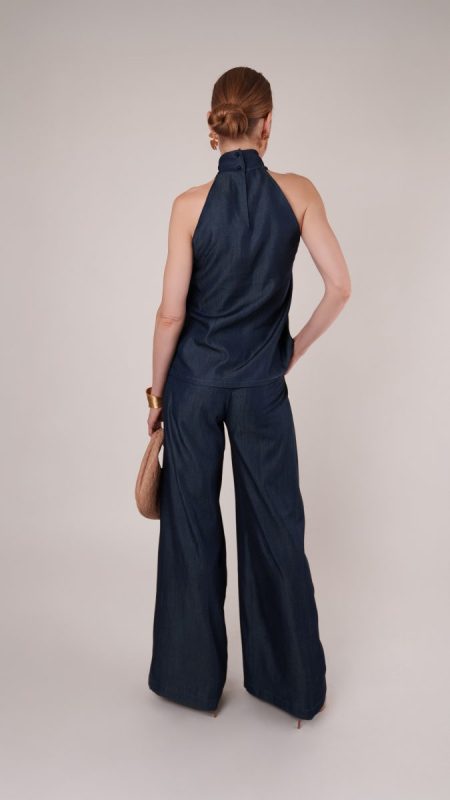
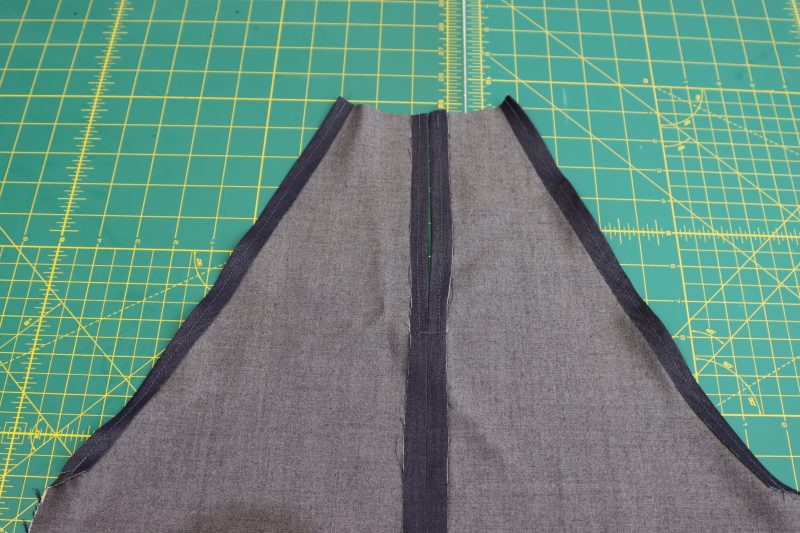
- Place the two top back pieces right sides together and pin from the bottom until 6 inches from the top (this will leave a small slit opening in the back of the blouse).
- Sew a straight stitch, connecting the two back pieces except for the 6 inches at the top.
- Open up the fold and press the seams open, including the top 6 inches of each piece.
Step 3
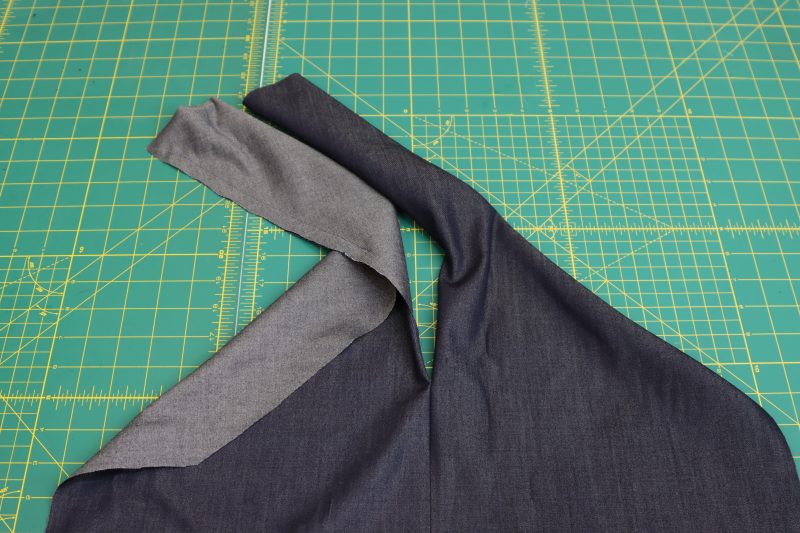
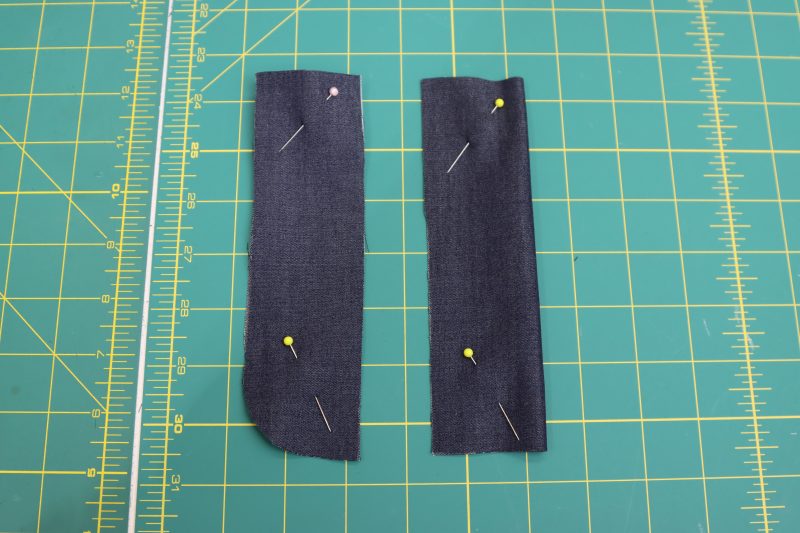
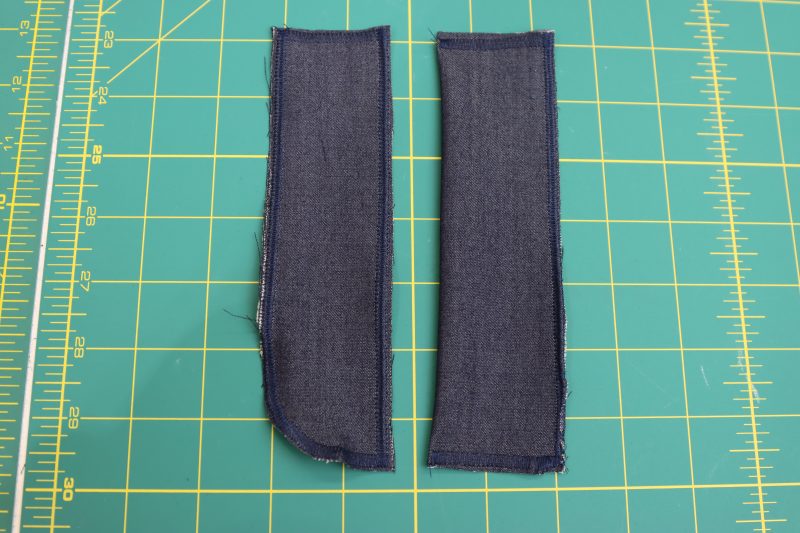
STRAPS
- Fold each strap in half longways with the right sides of the fabric together, lining up the long edges of each strap.
- Pin from the top opening of the strap to the upper notch on the top front.
- Sew the straps shut from the top opening of the strap to the upper notch.
- Turn both straps right sides out.
Step 4
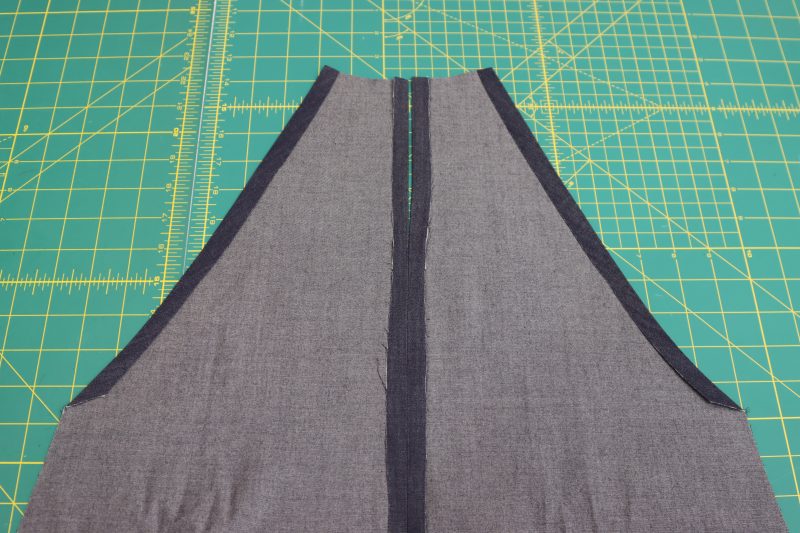
FINISH RAW EDGES
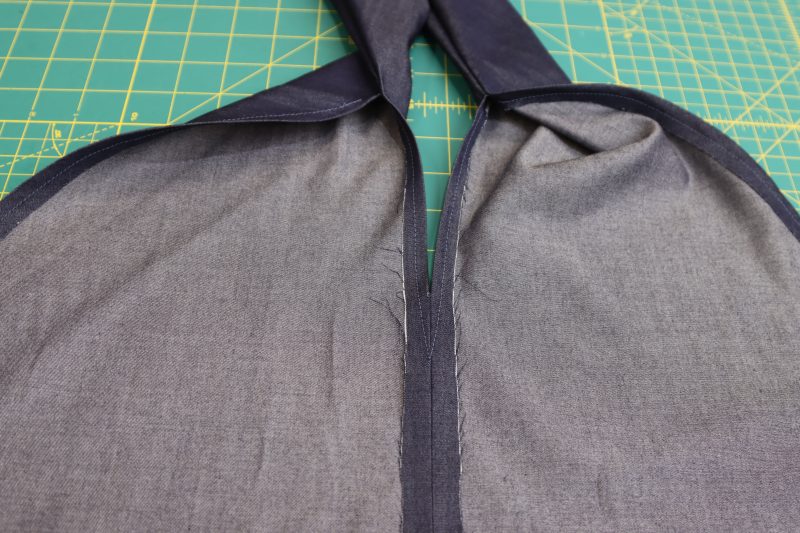
- Iron a ½ inch folded hem on the V-neck opening and arm openings of both the front and back top pieces.
- Sew a straight stitch across each folded hem with ¼ inch seam allowance.
- Sew a straight stitch down the 6 inch opening on the back of the top with ¼ inch seam allowance, connecting the two stitches at the bottom like a rectangle as shown in the photos below.
Step 5
SIDE SEAMS
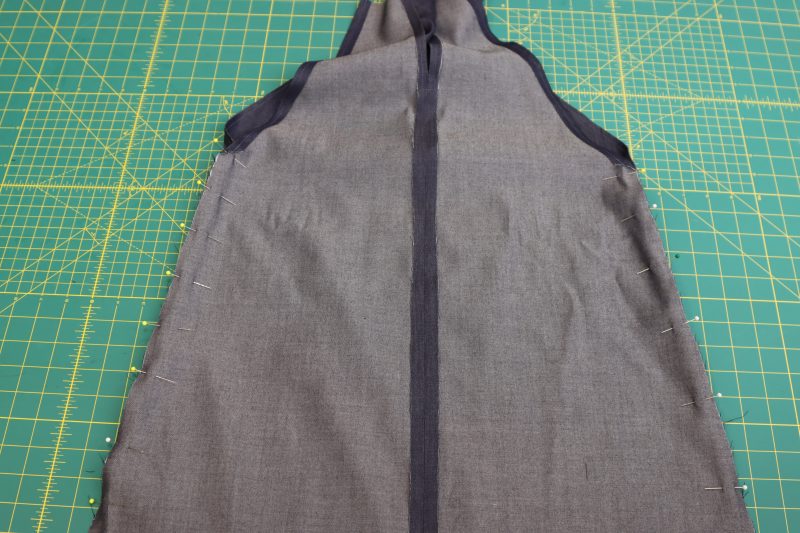
- Place the front and back top pieces right sides together.
- Pin and sew the two side seams together.
- Open up the fold and iron the seams open.
Step 6
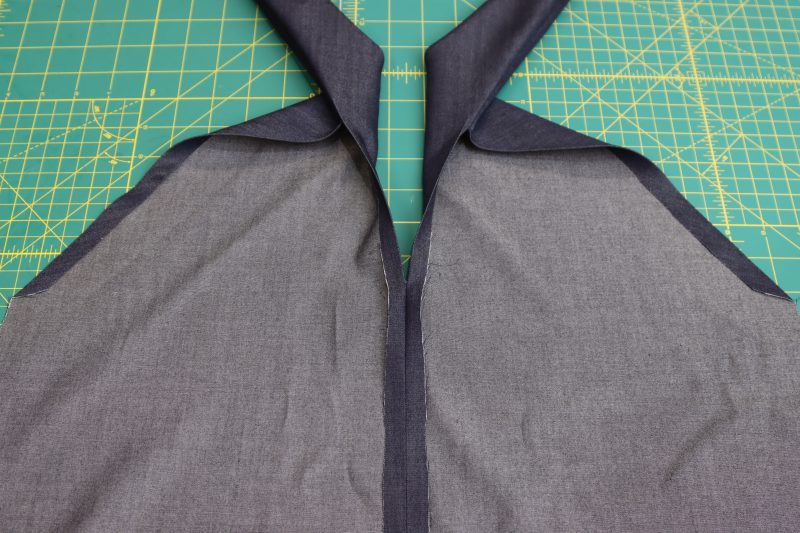
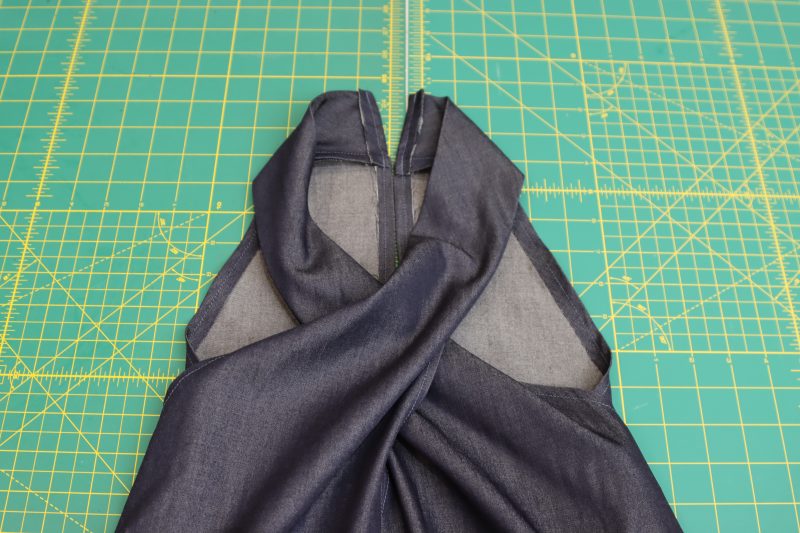
CONNECT NECK CLOSURE
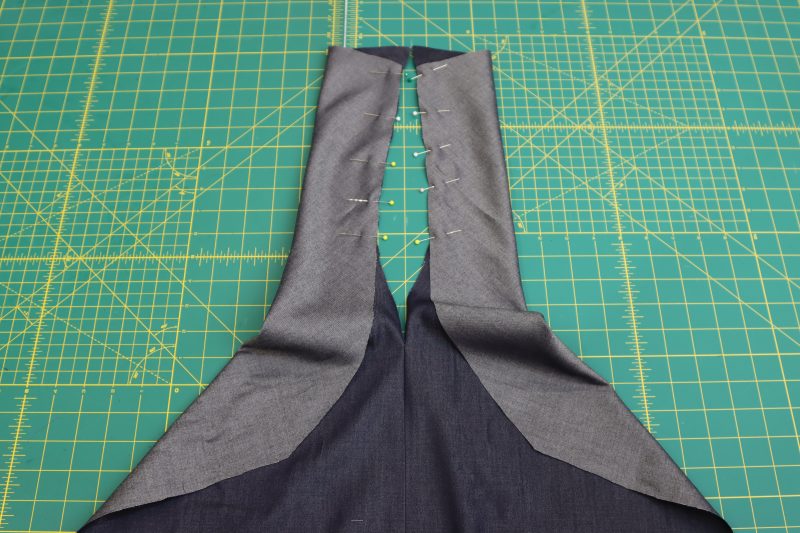
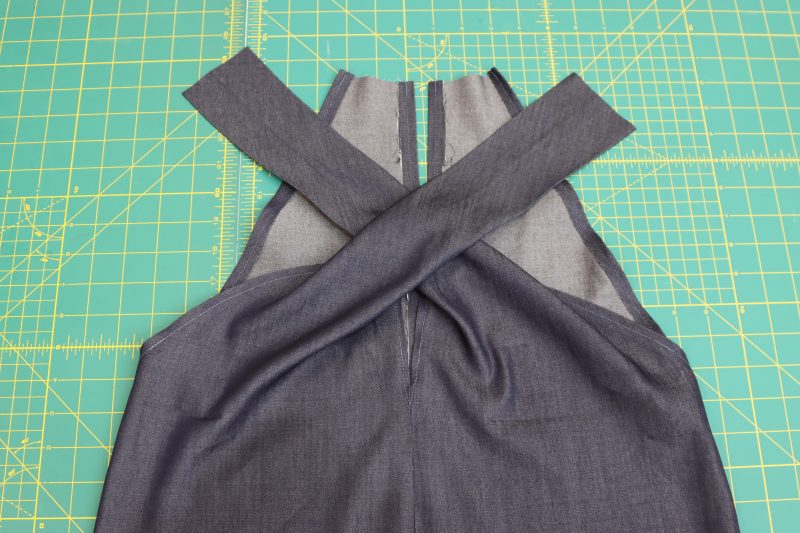
- Fold the two front straps over one another so they are cross-crossed in the front.
- Pin each front strap to the back opening right sides together, leaving ½ inch of the strap hanging over the edge of the back opening to be hemmed later.
- Sew the straps to their respective sides on the back opening (front right strap to back left side and front left strap to back right side).
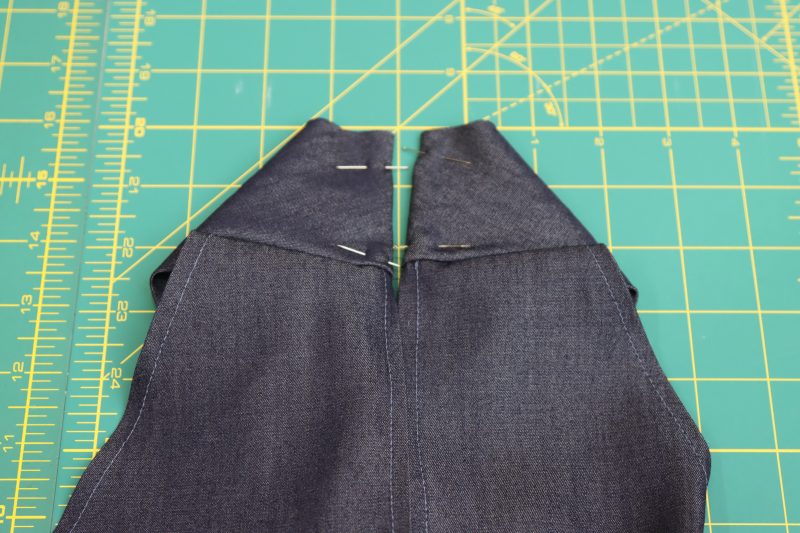
- Fold the extra ½ inch of each strap piece inward and pin in place.
- Sew the strap hems with ¼ inch seam allowance to finish the raw edges of the back neck opening.

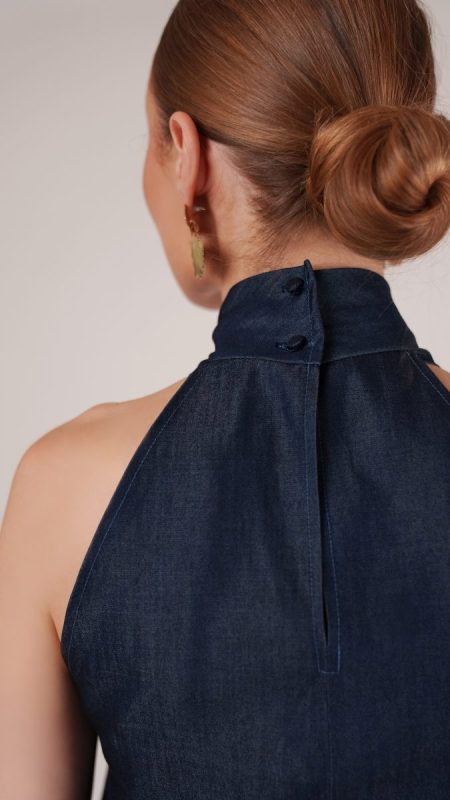
Step 7
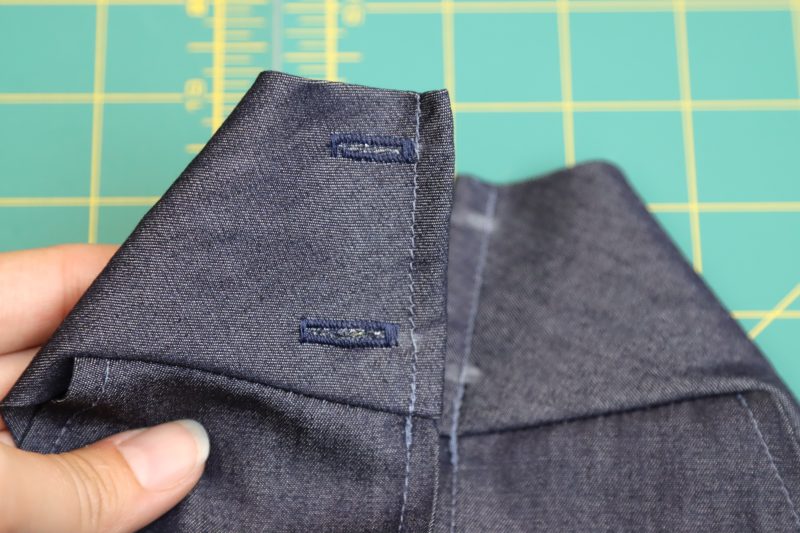
BUTTONHOLES & BUTTONS
- Evenly mark the desired location of the two (or more) buttons and buttonholes on the back neck opening.
- Use the buttonhole foot attachment of any sewing machine to create two buttonholes on the back neck closure.
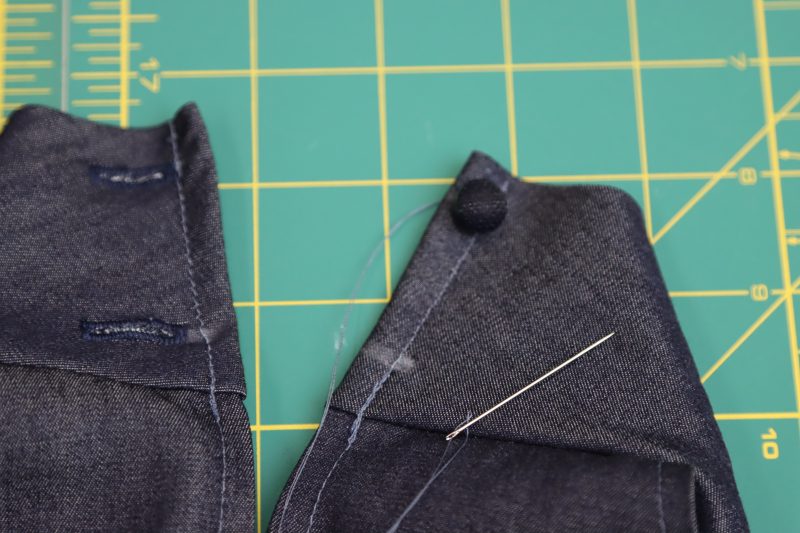
- Hand sew two buttons on the opposite side of the back neck closure to mirror the buttonholes.
Step 8
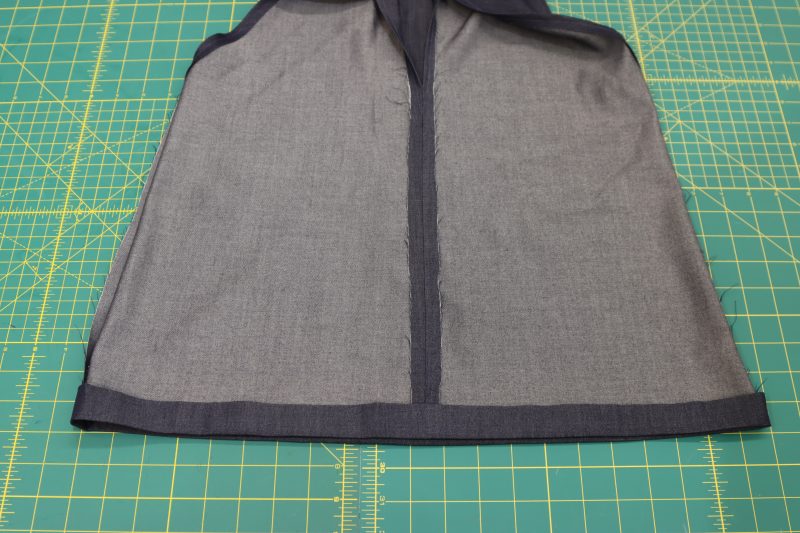
BOTTOM HEM
- Fold the bottom hem of the top 1 inch and iron it flat. Fold it up again another 1 inch and iron again to create a double folded hem that encloses the raw edges of the hem.
- Pin and sew along the folded edge of the hem with a ⅞ inch seam allowance, getting as close to the folded edge as possible while catching both the hem and the main fabric.
HOW TO SEW PALAZZO PANTS
Step 9
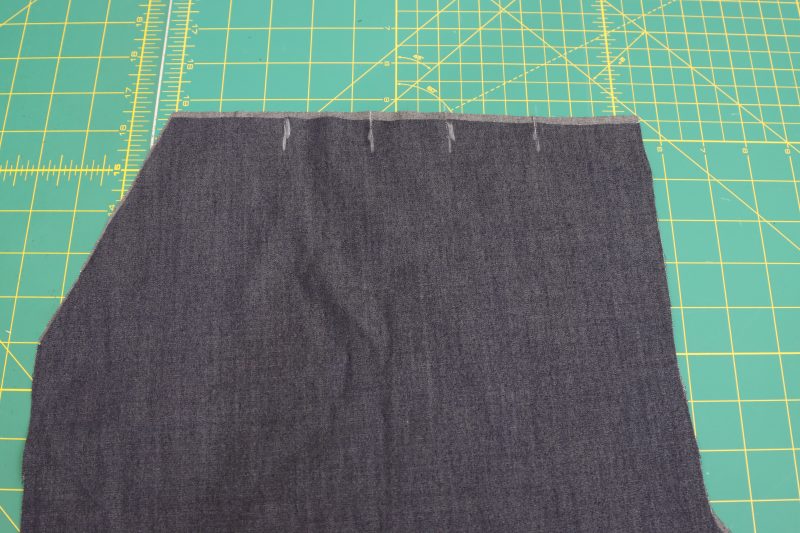
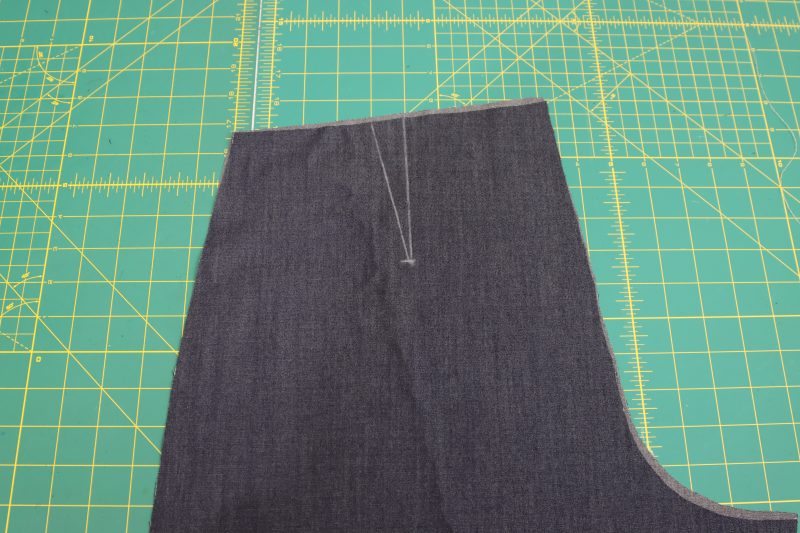
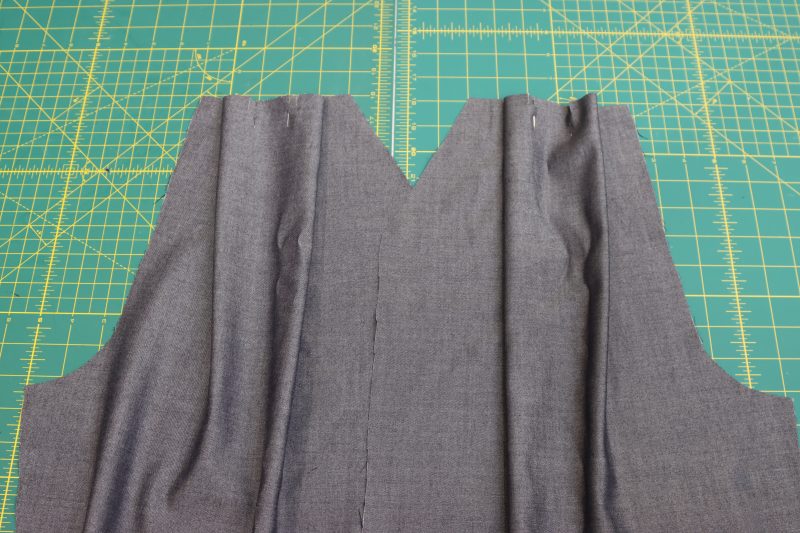
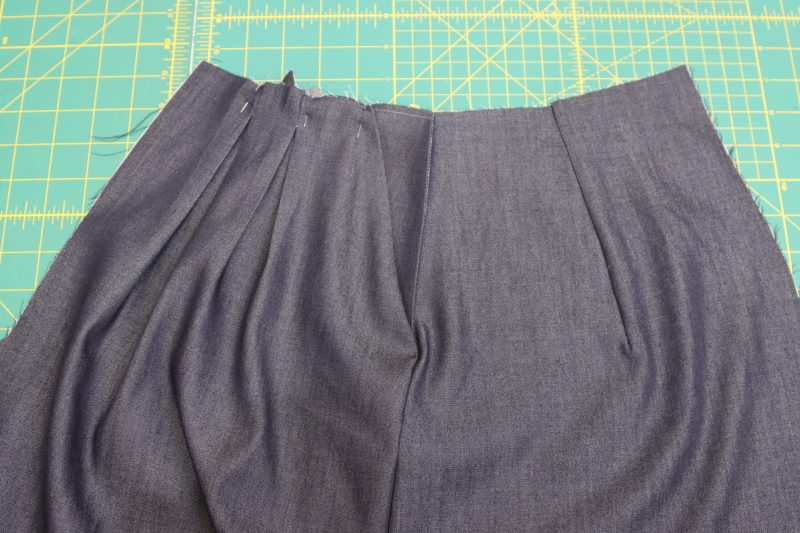
PLEATS & DARTS
- Mark the pleats and darts from the pattern onto the main fabric.
- Fold and pin the pleats and darts into place according to the notches.
- Sew the darts and pleats.
- Iron the darts open and towards the center back. Iron the pleats flat and centered.

Step 10
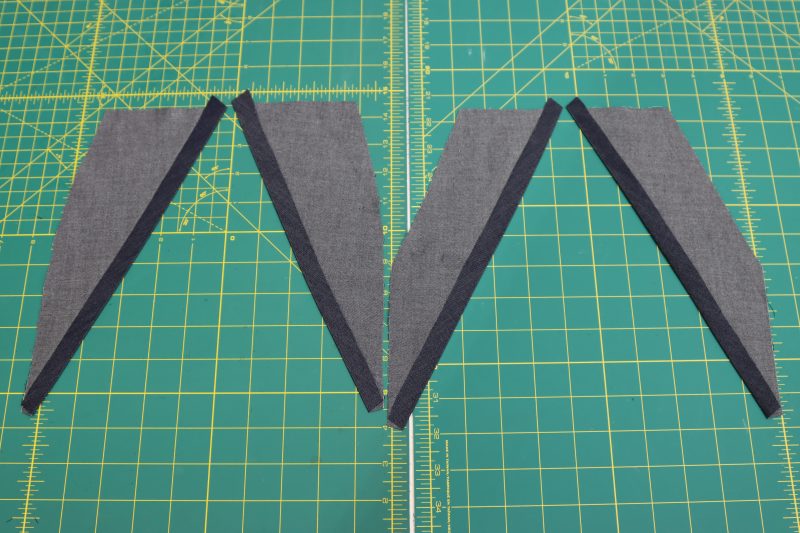
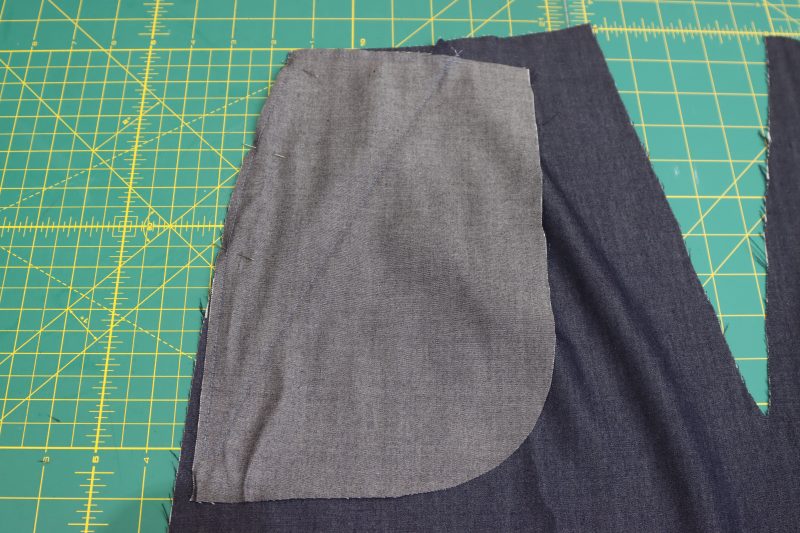
POCKET FACING
- If using a different fabric for the pocket bag/lining from the main fabric, fold and iron the longest diagonal edge of each facing piece with a ½ inch hem.
- Place each pocket facing on its respective pocket bag/lining piece so that the right sides of both pattern pieces are all facing up (right sides of pocket bag/lining to wrong sides of facing).
- Pin and sew the facings to the pocket bags/linings with ¼ inch seam allowance around all 4 sides of each facing piece.
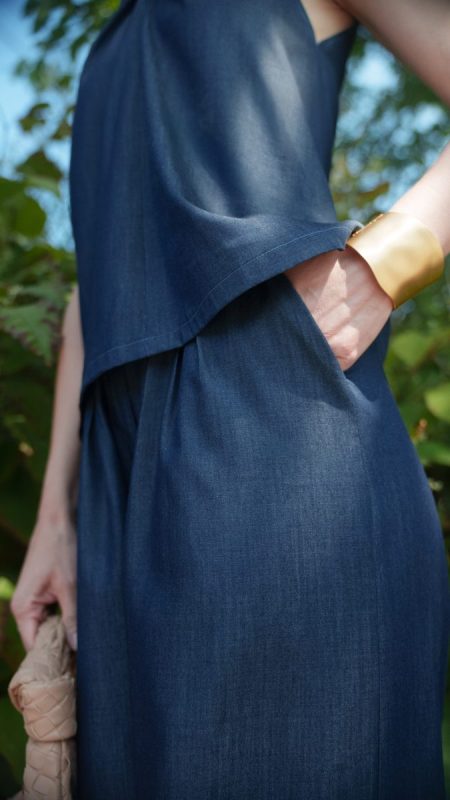
Step 11
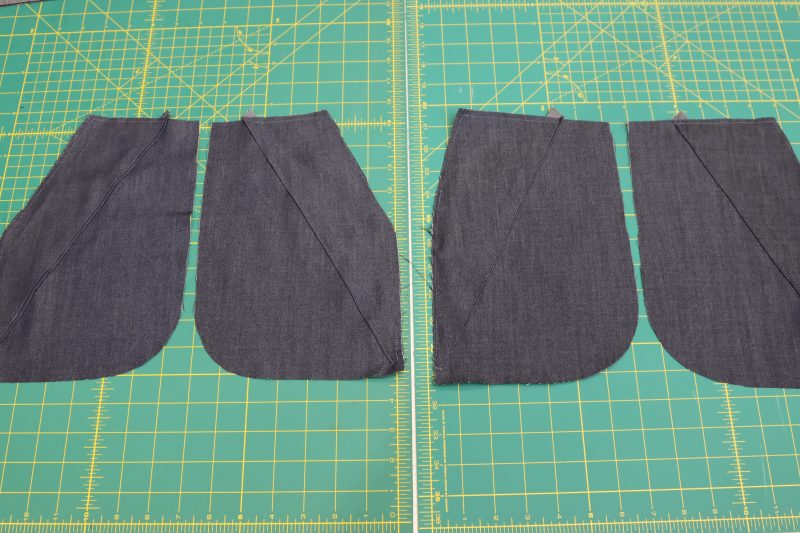
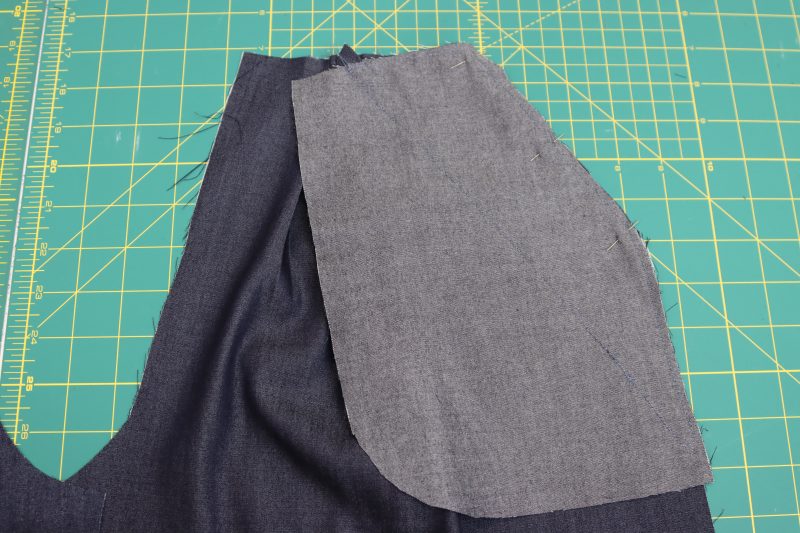
ATTACH POCKETS
- Place pants pocket B right sides together against the side seam of each back pants piece.
- Place pants pocket A right sides together against the side seam of each front pants piece.
- Pin and sew only the top half of each pocket to each side seam, leaving the bottom half free to sew the pocket bag shut later.
- Open each pocket piece out to the side of the pant leg and iron the seams open and flat.
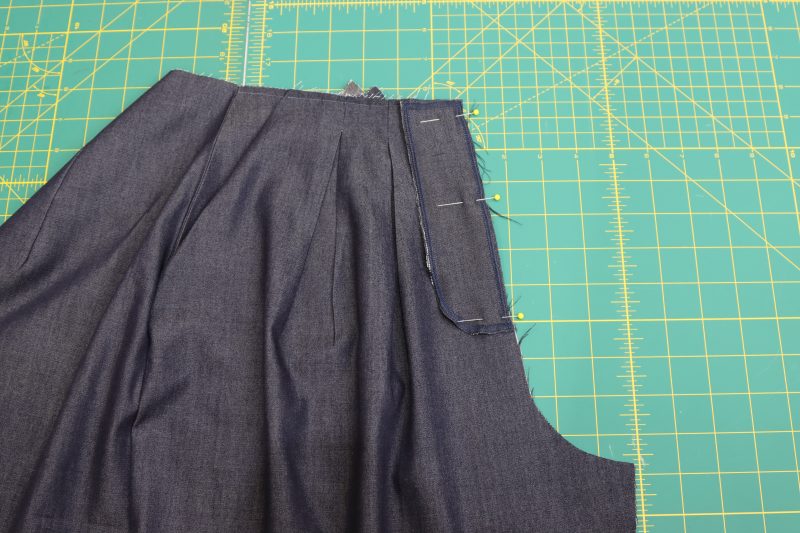
Step 12
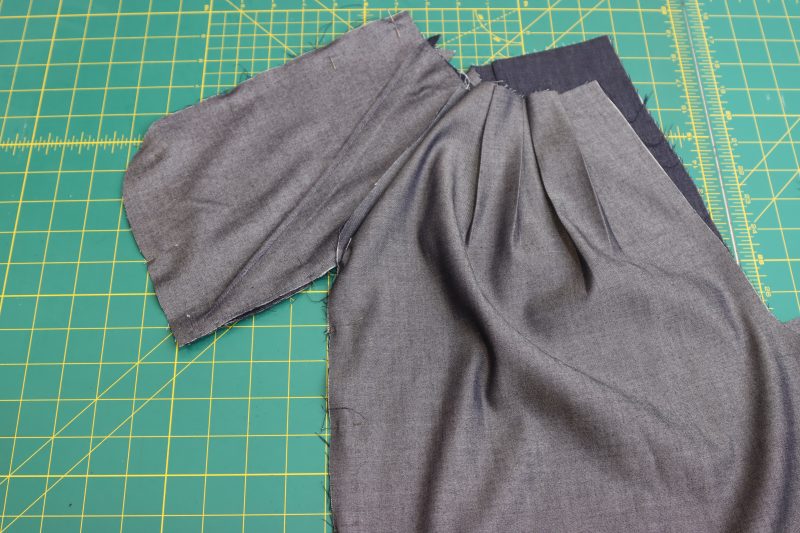
CLOSE POCKETS
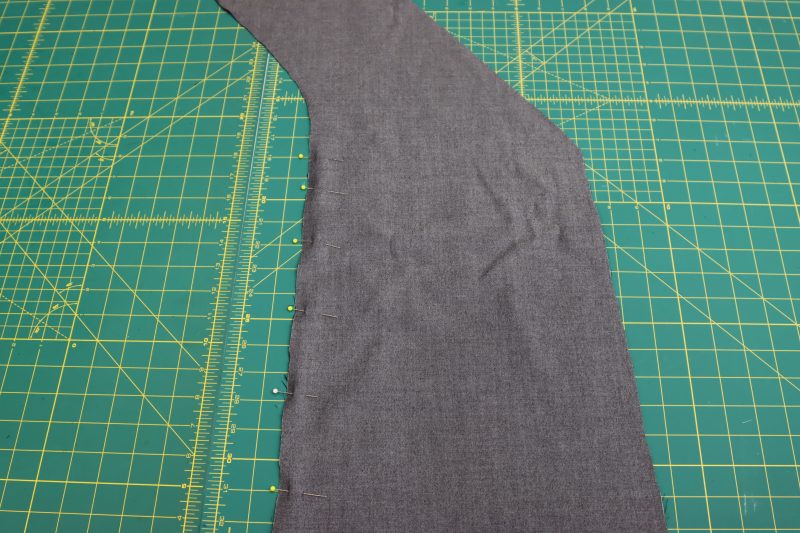
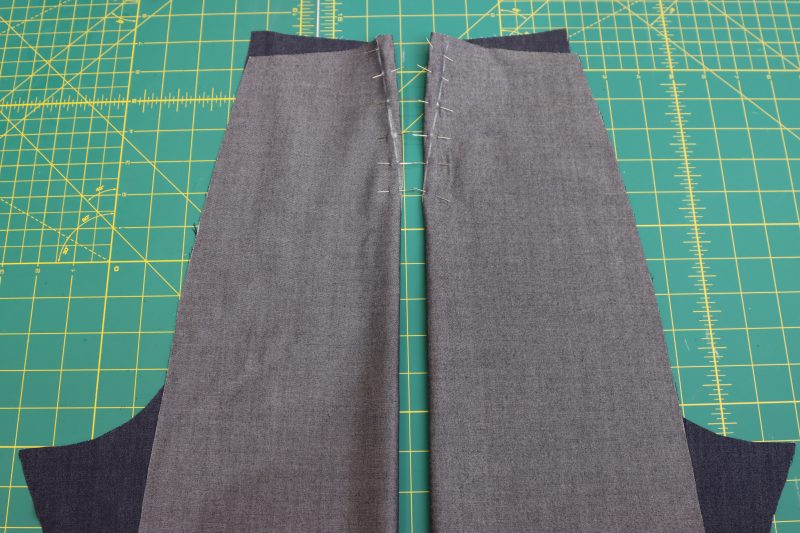
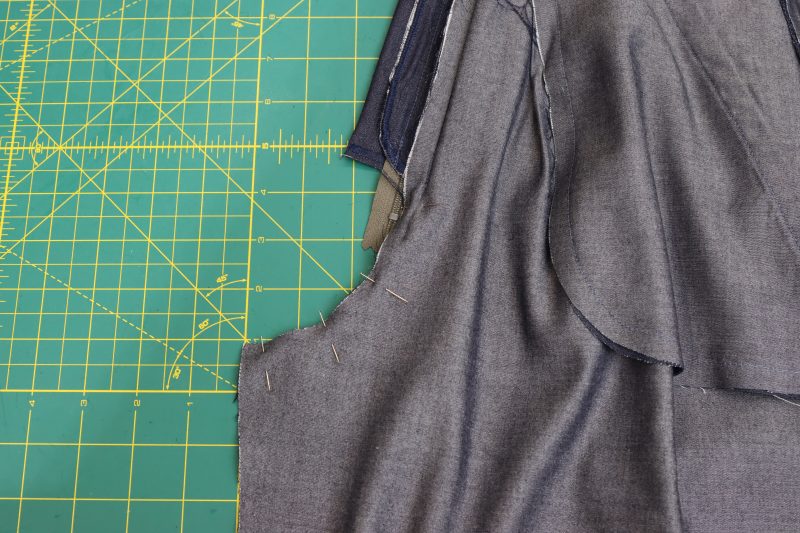
- Place the front right pattern piece right sides together on top of the back right pattern piece with the pockets opened out to the side. Do the same for the left side of the pants.
- Pin the entire side seam of the pants together from the bottom hem of the pants, up into the corner where the pants meet to the pockets, all the way to the top outer corner of the pocket, as shown in the photo below.
- Sew a continuous straight stitch along the pins to connect the pockets and side seams of the pants. Do this on both the right and left leg.
- Open the seam and lay each side of the pants flat. Iron the pockets so that they are folded towards the front pleats.
- Pin and sew the top of the pocket to the waistband of the front of each pant leg with a ¼ inch seam allowance to tack them in place.
Step 13
PREPARE FLY PIECES
- Fold the fly shield in half long ways and pin in place, wrong sides together.
- Pin the two zipper fly pieces wrong sides together.
- Serge or zigzag the raw edges of both the fly shield and zipper fly to prevent fraying.
Step 14
FLY SHIELD
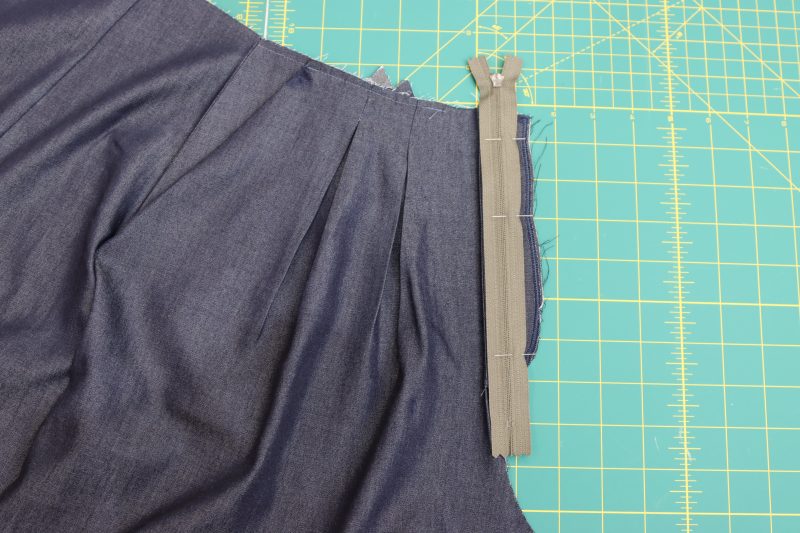
- Pin the long flat side of the fly facing right sides together to the front right crotch seam of the pants. Sew with ¼ inch seam allowance.
- Iron the seam attaching the fly facing to the pant leg flat, then fold it back so that it’s tucked towards the inside of the pants.
- Pin the zipper right sides down onto the fly facing with the leftmost side of the zipper lining up with the seam that attaches the shield to the pant leg.
- Sew down the middle of the rightmost side of the zipper tape.
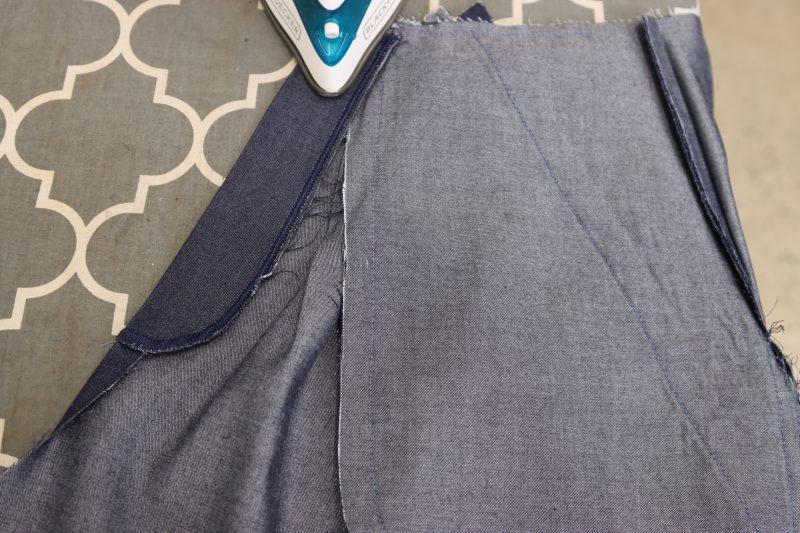
Step 15
FLY FACING
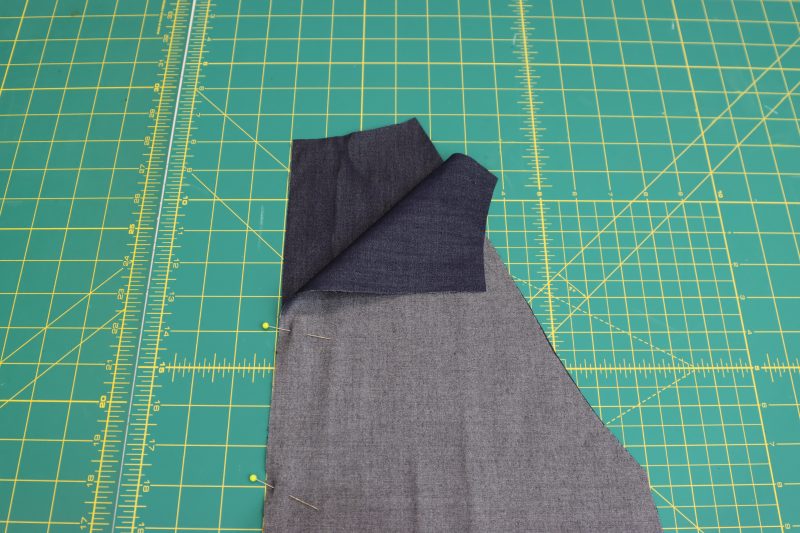
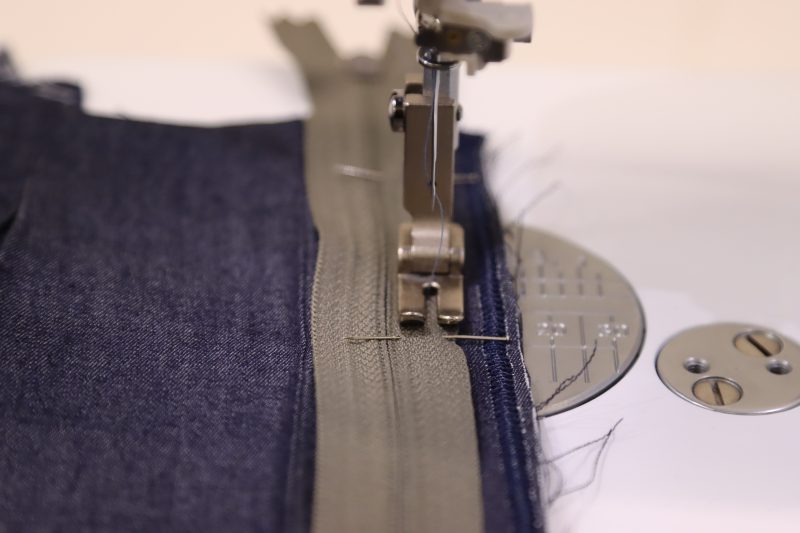
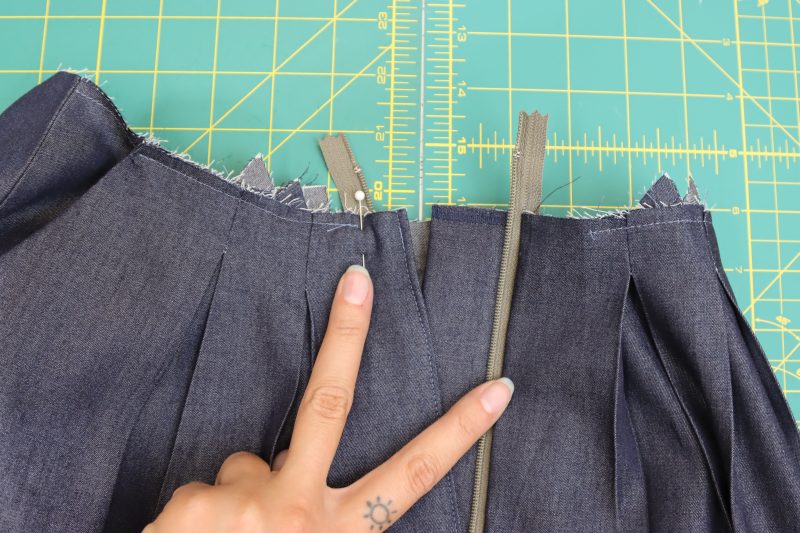
- Make a sandwich starting with the front left crotch seam of the pants, the unsewn side of the zipper (right sides together with the front left pant leg), and the serged edge of the fly shield, as shown in the picture below.
- Pin and sew the zipper and fly shield to the front left side of the pants with ¼ inch seam allowance, being sure to catch every layer of the sandwich, including the zipper tape.
Step 16
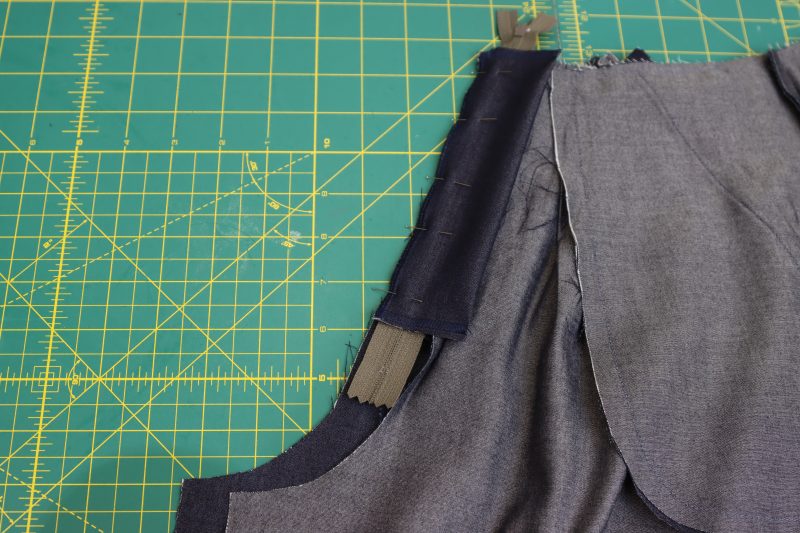
CROTCH SEAMS
- Place the left and right sides of the pants right sides together so that they’re lined up at the crotch curves.
- Pin and sew the back crotch seam.
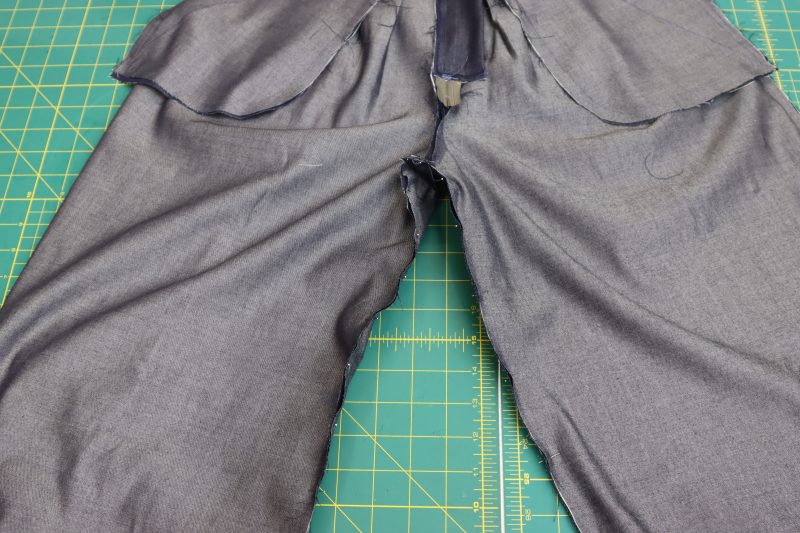
- For the front crotch seam, pin and sew up to the bottom of the seam that attaches the zipper to the front pant pieces, as shown in the picture below. Be sure to keep the zipper, fly shield, and fly facing all folded out of the way to avoid sewing over the wrong layers of fabric and ruining the zipper fly.
Step 17
FLY FINISHINGS
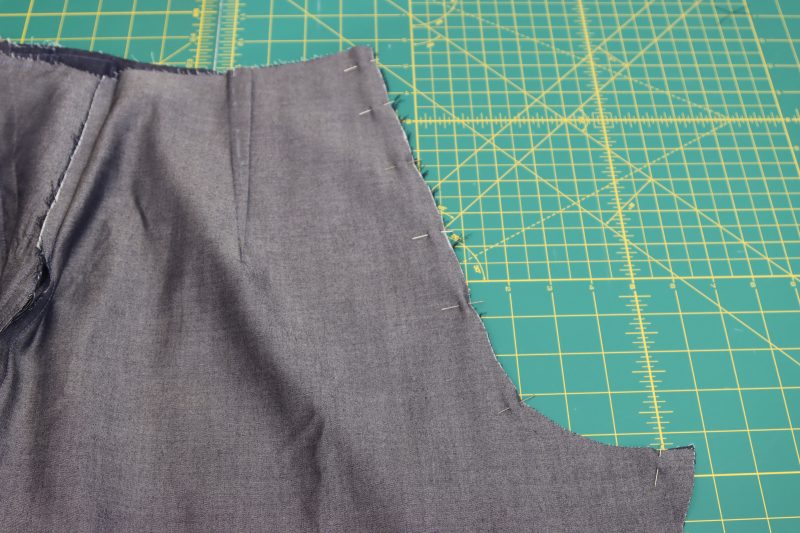
- Pin the fly facing flat against the inside of the front right side of the pants.
- With a ⅛ inch seam allowance, sew along the serged edge of the fly facing to create a curved top stitch and secure the fly facing to the pants.
- At the bottom of that curved stitch, backstitch several times to create a tack at the bottom of the zipper, securing the zipper to the fly facing.
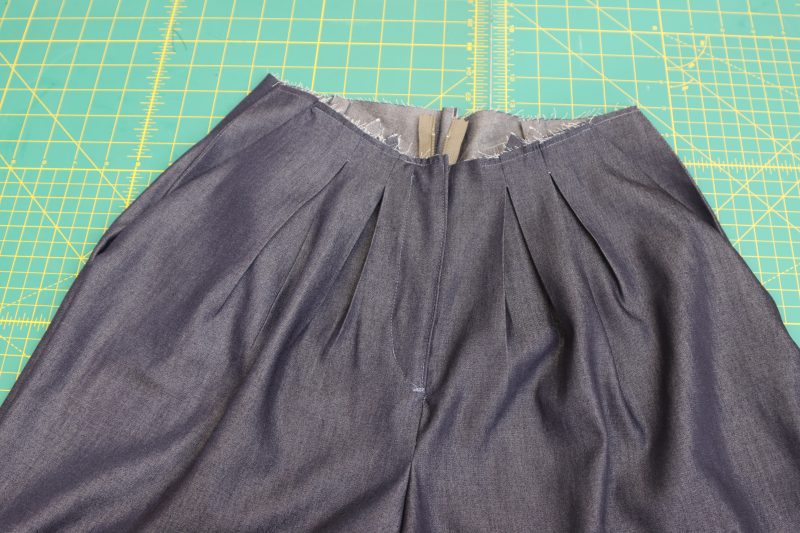
- Sew a top stitch down the front of the pants over the seam that connects the fly facing to the pant leg, as shown in the photo below.

Step 18
INSEAM
- Line up the front and back crotch seams right sides together and pin.
- Pin the front and back pant legs together at the inseams.
- Sew the entire inseam of the pant legs. For perfectly even pant legs, start sewing from the crotch seam, sew down one leg, and then start back at the crotch seam to do the other leg. This will help prevent the inseam from warping and becoming uneven.
Step 19
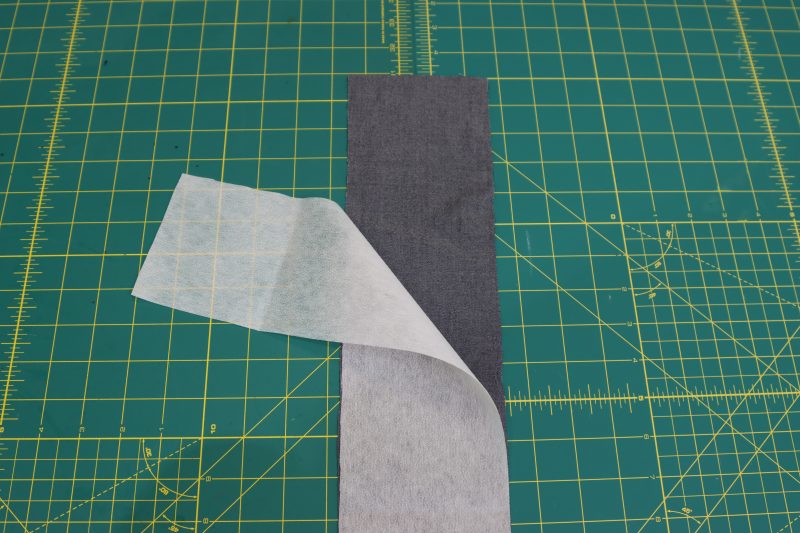
WAISTBAND
- Iron the adhesive side of the interfacing to the wrong side of the waistband.
- Iron down both long sides of the waistband with a ½ inch hem.
- Iron the entire waistband in half longways, as shown in the photo below.
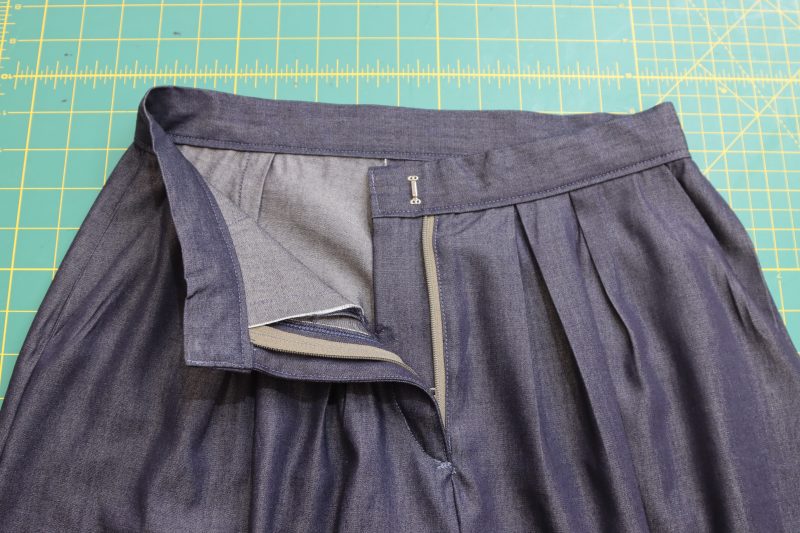
- Pin the waistband to the waist opening of the pants by encasing the raw edge of the pants inside of the fold when ironing the waistband. Be sure to keep the zipper completely unzipped and in the down position while sewing on the waistband.
- Sew the waistband onto the pants with 1/8th inch seam allowance, being sure to fold the raw ends of the waistband inward as shown in the photo below.


Step 20
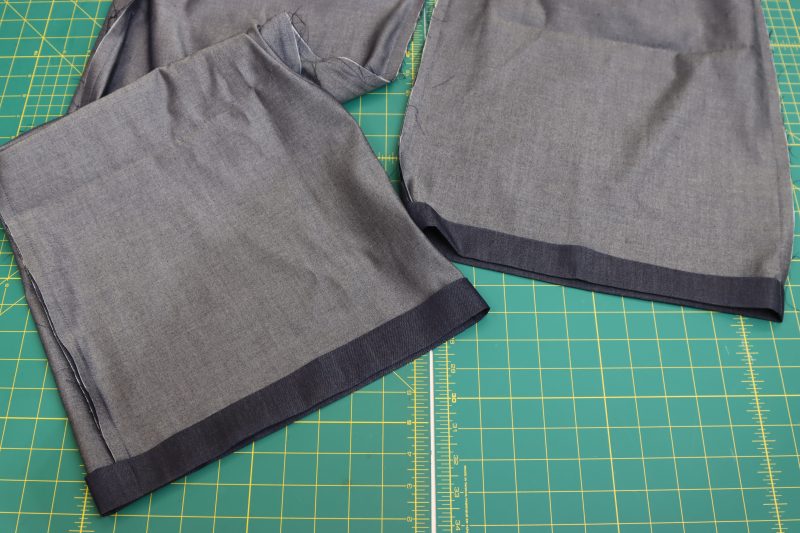
HEM
- Fold the end of each pant leg in 1 inch and then iron. Fold them in another inch to create a double folded hem.
- Sew the hem of the pants with a ⅞ inch seam allowance.
Step 21
HOOK AND EYE
- Mark the placement of the hook and eye closure at the top of the zipper by closing the zipper and finding where the hook and eye need to sit in order to keep the zipper and waistband laying flat.
- Hand sew each side of the hook and eye closure to their respective sides of the waistband, securing the hand stitching with several knots.
Sewing Success: The Finished Amherst Palazzo Set
Share this post with a friend (or two!), download the Amherst Palazzo Set free sewing pattern, and show us which fabrics and colors you choose, using the hashtags #MoodAmherstPattern & #MadeWithMood—and don’t forget to tag us @MoodFabrics, too.
Free Sewing Pattern Inspiration for Your Next Project
With 450+ free sewing patterns and counting, your opportunities for sewing with Mood are endless!
We hope you had as much fun sewing this palazzo set pattern as we did! As always, we want to hear from you—share your thoughts and comments below and let us know where you’ll be wearing the Amherst Palazzo Set free sewing pattern!
Craving more free sewing patterns? Sew with suiting fabrics using our popular Anne Waistcoat free sewing pattern. Challenge yourself with sewing luxurious silk charmeuse using our Pirouette Luxe Set free sewing pattern. Or have your hand at sewing the Sorrento Set free sewing pattern using beginner-friendly stretch cotton sateen.
I was literally thinking yesterday that I wanted to start a palazzo pant collection, and look what appeared in my inbox! Excited to try this.
Talk about perfect timing! The Amherst Palazzo Set is such a great way to kick off your collection — lightweight, flowy, and versatile!
Thank you so much for the free patterns! I can’t wait to sew this, it’s sew perfect as the season’s change. 🙂
You’re so welcome! We love hearing that the Amherst Palazzo Set feels just right for this transitional season.
Muchas gracias!!! Saludos desde Argentina! ❤️
¡Con mucho gusto! Nos alegra que disfrutes de nuestros patrones gratuitos. Saludos hasta Argentina. ✨
This was really helpful and Easy to understand
We’re so glad you found the instructions clear and easy to follow! Can’t wait to see your take on the Amherst Palazzo Set — be sure to share it with us! ✨
bonjour , merci beaucoup pour le patron
j’adore, je l’ai imprimer et il faut que je regarde les mensurations quand j’ai du mal avec les inches car moi c’est en centimètre
pouvez-vous m’aider s’il vous plait?
mes mensurations sont:
bust/poitrine;114cm
waist/taille:101cm
hips/hanches:114cm
quelle taille, je dois faire
merci beaucoup
Bonjour ! Merci beaucoup pour vos mensurations Avec une poitrine de 114 cm (≈45″), une taille de 101 cm (≈40″) et des hanches de 114 cm (≈45″), vous seriez la plus proche d’une taille 3XL selon notre tableau. Votre poitrine correspond à la 2XL, vos hanches à la XL, mais votre tour de taille est plus proche de la 3XL — c’est pourquoi nous vous conseillons la 3XL pour un ajustement confortable. ✨
bonjour merci beaucoup
Great looking pieces! I am not very familiar with sewing instructions here though; is it intended to leave the raw edges without finishing for the top? I followed the directions to fold neck and arms by 1/2″ and sew 1/4″ without finishing the raw edges first. Now I can’t properly zigzag neck and arm fold as they are stitched in by 1/4. I wonder if I should have known this beforehand and added my own finishing steps independent from the instructions here. The sewn pieces looks great from outside though!
Thanks so much for sewing up the Amherst Palazzo Set and for your thoughtful question! The instructions in Step 4 are written to finish the neckline and armhole edges with a simple turned hem: you press the raw edge in by ½”, then stitch it down ¼” from the fold. This method encloses the raw edge inside the fold so it isn’t left fully unfinished—it’s a clean, beginner-friendly way to finish without needing a serger.
That said, if you’re working with a fabric that frays easily (like the viscose denim shown in the tutorial), you can absolutely add your own finishing steps before folding—such as serging, zig-zagging, or even using bias tape—for extra durability. It’s not required to complete the pattern, but it can give a longer-lasting result if you prefer.
So you didn’t miss anything—the fold-and-stitch is the intended finish in the directions. But if you’d like even neater insides, feel free to add your own seam finishes before you hem. The outside looking great means you’ve done it correctly!
Are they getting more fabric?I love the denim look of this fabric but it’s sold out.
Hi Alexandria, more fabric will be in stock soon!
Hi! Is this a layered document? I tried it in Adobe Acrobat but there are no available layers. 🙁
Hi Gwyneth! As far as I am aware, the layers of the document cannot be isolated in Adobe. When the pattern is printed, all of the size lines will print together. All you have to do though is figure out which size you are and trace/cut those size lines. I hope this helps!
That’s fine, thank youuu. I already sewed the top only and it turned out GREAT!!! I used linen fabric, still not sure what type as I still have limited knowledge of fabrics, but it looks like something I can finally wear outside that I made. <3
That’s fine, thank youuu. I already sewed the top only and it turned out GREAT!!! I used linen fabric, still not sure what type as I still have limited knowledge of fabrics, but it looks like something I can finally wear outside that I made. <3
Hi! This patter is just beautiful bur I think I haven’t enouth fabric to sew the top and the pant. Can you tell me how much fabric is necessary to sew just the top and to sew just the pant (in small size) please?
Hi Barbara, the top only needs about a yard of fabric and the pants need about 2 yards for a size small.
Hello,
I tried the top but struggling to understand the placement for the closure. Do I need to match the bottom side of the straps with the edges at the top of the back panels, right sides facing?
TIA
Hi Vero, I think you’re correct. If you look at the straps, the seam in the middle of the strap should be touching the back of your neck (this is the wrong side of the strap). You’re correct that the straps should be attached to the top of the neckline in the back, right sides together. You just want to make sure that the side of the strap is sewn to the neckline, not the short end of the strap. Let me know if that makes sense!
I just made this set and it’s absolutely gorgeous, I used a black linen fabric. I wish I could share a picture. Thank you for this amazing pattern. Sending Love from Saudi Arabia!
Tag us on social media with the hashtag #MadeWithMood if you post any pictures of your finished product!
Hello, I am a beginner but I really love this set. I am up to the part where I put the folded waistband on the raw edges of the top of the pants. Can you please give me any tips. I can see that the length of waistband is shorter than the length of the raw edges of the top of the pants. How can I pin and sew it? Where do I bunch it up, for lack of better words, so that it looks nice and the waistband reaches both ends? I am not sure how to ask the question. Any help would be great! Thank you so much!
This looks like a perfect elegant outfit. .can’t wait to make it
So glad you love it! ✨ Be sure to tag us with #MadeWithMode when you make it.
Pattern looks great my first attempt at trousers. Thanks for pattern appreciated.
That’s awesome to hear! Trousers can be a big step, but it sounds like you nailed it. Enjoy your new handmade pair!
This patterns looks amazing
Thank you so much! We’re so glad you love The Amherst Palazzo Set pattern
I’ve enjoyed this but the top came up a little small. Even on the model, it looks a bit restricting near the throat.