

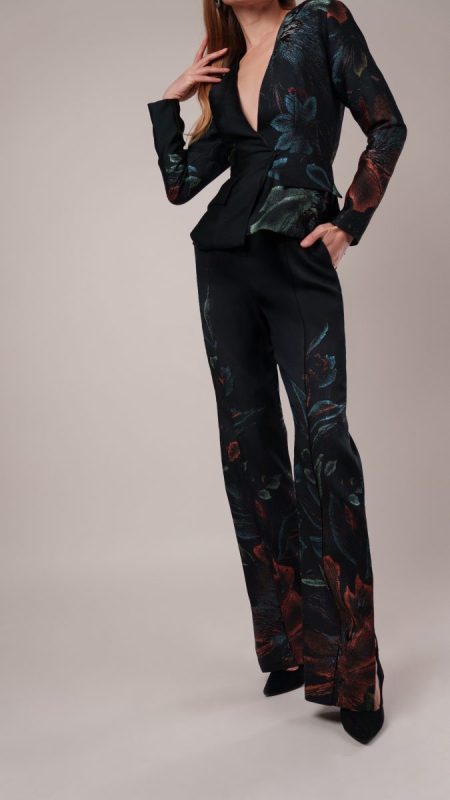
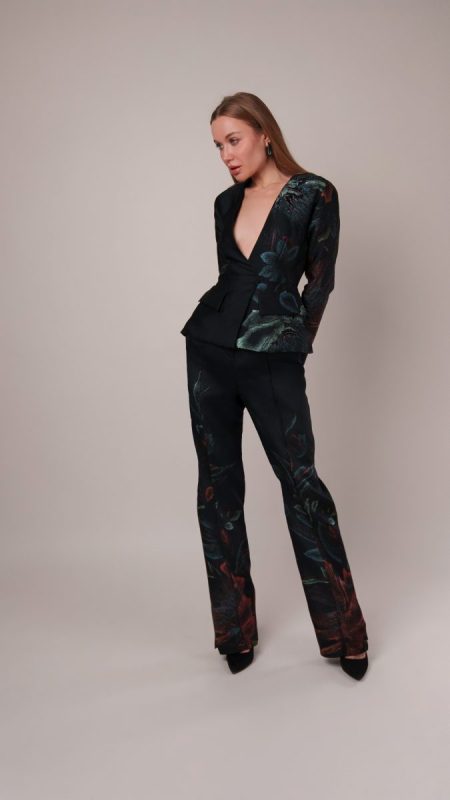
Soar new heights sewing Mood Sewciety’s elegant Perugia Peplum Blazer and Pants Suit free sewing pattern, a statement-making ensemble that perfectly blends vintage glamour with modern sophistication. Inspired by couture runway fashion, this design turns an ordinary suit into a showpiece. Crafted from an opulent metallic acetate brocade, the intricate floral weave shimmers in the light for an eye-catching and luxurious look.
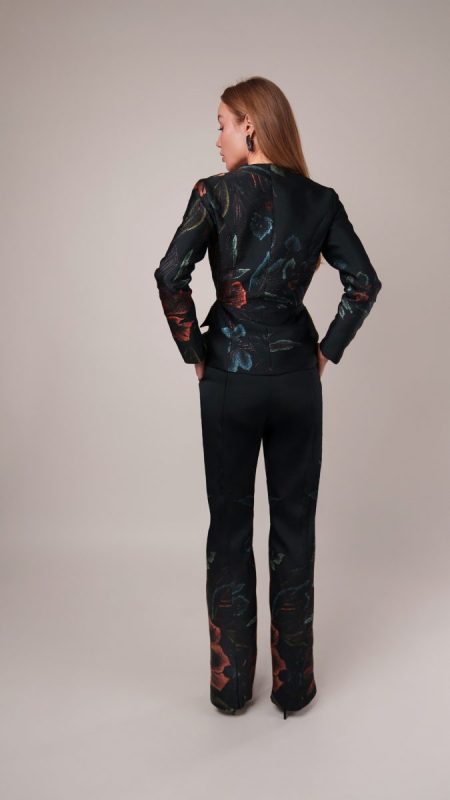
The blazer features a beautifully tailored peplum that cinches the waist and flatters the figure, while the plunging neckline and invisible front closure offer endless styling options. Wear it alone for a daring, fashion forward moment, or layer it over a camisole, collared shirt, or turtleneck for a polished and professional look.
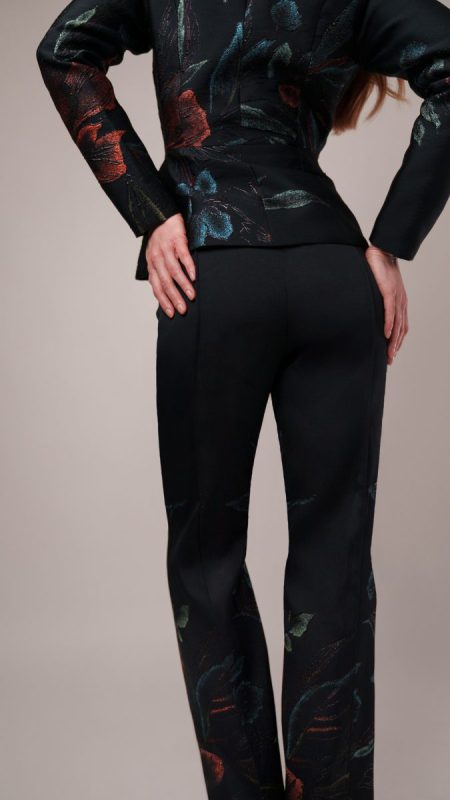
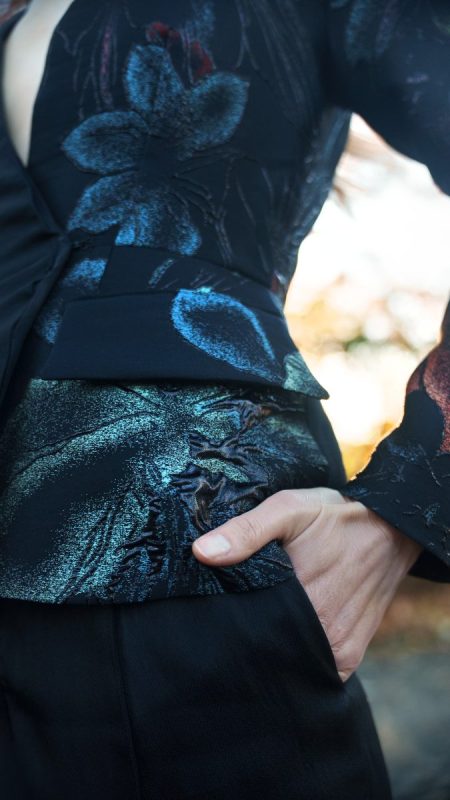
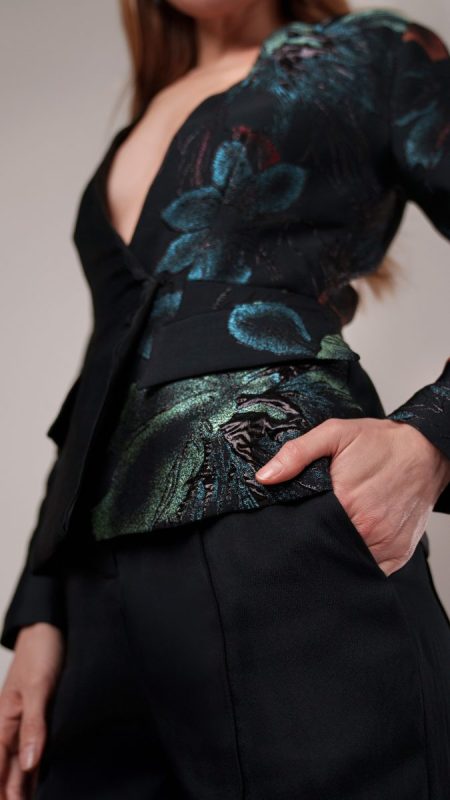
The coordinating pants are equally captivating, with a subtle slit at the hem and a refined faux welt back pocket, details that transform them from simple trousers into true couture separates. Whether worn as a matching set or styled on their own, they exude elegance and confidence.
This advanced sewing pattern is designed for makers ready to take on a rewarding challenge. The result is a custom fitted suit that commands attention. The Perugia Peplum Blazer and Pants Suit is perfect for those moments when you’re feeling confident and unmistakably original, whether you are walking into an interview or stepping onto the red carpet.


Essential Materials & Sizing Guide for the Perugia Peplum Blazer and Pants Suit
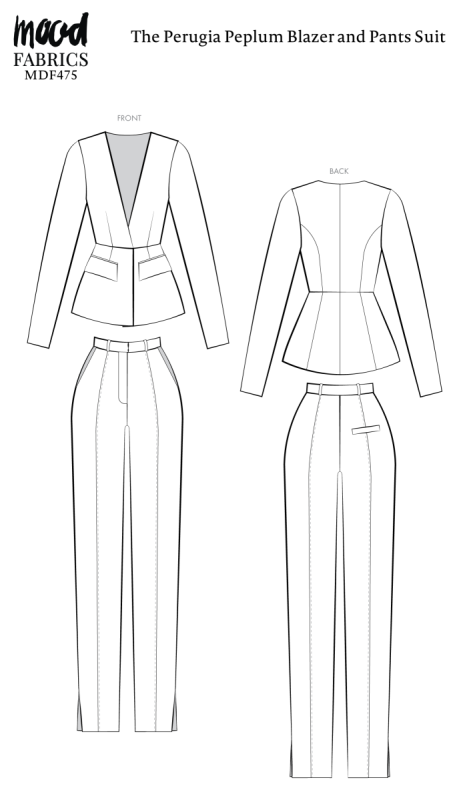
Continue reading for a breakdown of what knowledge and materials you need for creating your very own peplum blazer and pants suit! We’ve got you covered with the recommended materials we used—if you want to follow along exactly—as well as a curated list of alternative fabric type recommendations if you want to customize your own version. The Perugia Peplum Blazer and Pants Suit free sewing pattern download includes technical drawings for seam and silhouette visibility, plus a size chart to help you find your perfect fit!
Purchase Products Used Below:
Quantities indicated are for sewing a size small peplum blazer and pants suit. Toggle the ‘SHOP THIS LOOK’ box to find quantity estimates for other sizes.
- 5 yards of Metallic Acetate and Polyester Brocade – Black, Red and Mint Green Delicate Flowers
- 4 yards of Acetate Twill Lining – Black – Granada Collection
- 1 each of Gutermann Sew All Thread 250m – 10 Black
- 4 each of Maxi-Lock Serger Thread 3000yds – Black
- 1 each of Dritz Black Hooks & Eyes Size 3 – 14ct
- 1 each of Dritz Black and Nickel Sew-On Skirt Hook & Eye Closures – 4ct
- MDF475 – Perugia Peplum Blazer and Pants Suit Sewing Pattern (Free download below!)
Additional Products Used:
Alternative Fabric Type Recommendations:
The Perugia Peplum Blazer and Pants Suit sewing pattern is best suited for medium weight woven fashion fabrics. Explore other fabric types or colors from our featured collections for your blazer and pants with the links below.
Download Your Free Sewing Pattern
Submit your name and email in the form below to receive the download link for the Perugia Peplum Blazer and Pants Suit free sewing pattern directly in your inbox. Mood Sewciety Patterns will send your free download link via email with the subject line: ‘Your Free Download from Mood Sewciety – Perugia Peplum Blazer and Pants Suit’ (in PDF format for A4 and letter-size printing).
© MoodFabrics.com / MoodSewciety.com – Mass production, resale, or distribution of this pattern in any form is strictly prohibited.
Find Your Perfect Fit
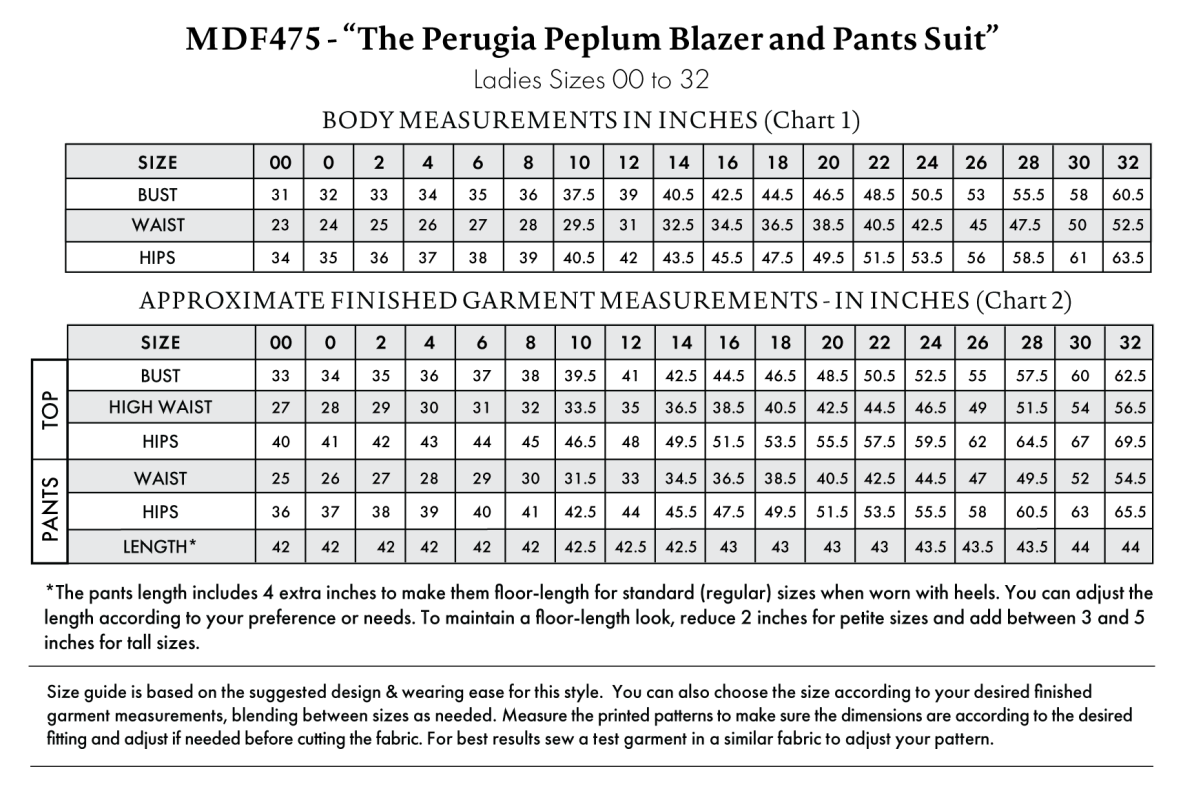
The Perugia Peplum Blazer and Pants Suit Sizing Guide is based on the suggested design & wearing ease for this style. You can also choose the size according to your desired finished garment measurements, blending between sizes as needed. Measure the printed patterns to make sure the dimensions are according to the desired fitting and adjust if needed before cutting the fabric. For best results, sew a test garment in a similar fabric to adjust your pattern.
*The pants leg includes 4 inches to make them floor-length for standard (regular) sizes when worn with heels. You can adjust the length according to your preference or needs. To maintain a floor-length look, reduce 2 inches for petite sizes and add between 3 and 5 inches for tall sizes.
Note: Always read all the instructions before cutting the fabric!
How to Sew The Perugia Peplum Blazer and Pants Suit
The instructions provided below are designed to guide you through sewing the Perugia Peplum Blazer and Pants Suit from start to finish.


3 Tips for Sewing with Brocade
⇒ Find a way to seal the raw edges of the seam allowance throughout the garments. Brocade will fray like crazy and your garments will last so much longer if you serge the raw edges, or even finish them with a zigzag stitch or a french seam.
⇒ This part is totally up to you, but since this fabric designed in such a way that parts of it are printed and parts of it are solid, you may want to plan out ahead of time where you want to put your pattern pieces on the fabric so that they floral design is distributed evenly throughout the garment.
⇒ Use a fresh needle before this project because brocade has a tendency to pull and get caught on tiny nicks in the needle.

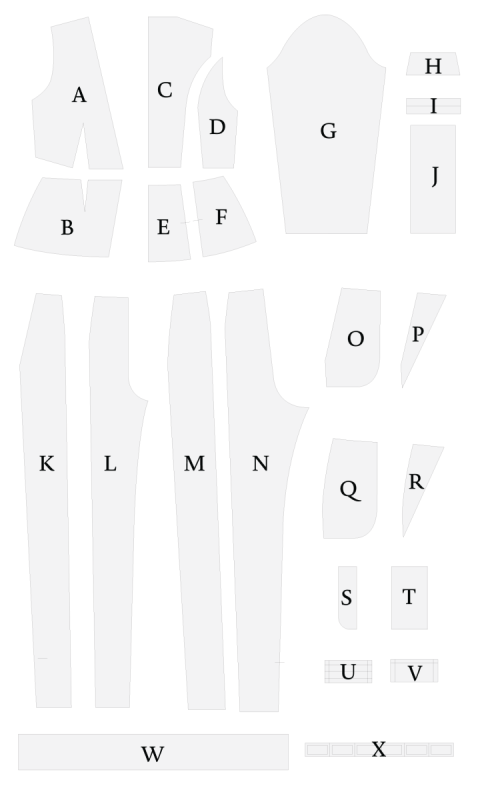
Pattern Pieces & Fabric Cuts Needed
- (A) BLAZER FRONT
FABRIC – CUT 2 MIRRORED
LINING – CUT 2 MIRRORED - (B) BLAZER FRONT PEPLUM
FABRIC – CUT 2 MIRRORED
LINING – CUT 2 MIRRORED - (C) BLAZER BACK CENTER
FABRIC – CUT 2 MIRRORED
LINING – CUT 2 MIRRORED - (D) BLAZER BACK SIDE
FABRIC – CUT 2 MIRRORED
LINING – CUT 2 MIRRORED - (E) BLAZER BACK PEPLUM CENTER
FABRIC – CUT 2 MIRRORED
LINING – CUT 2 MIRRORED - (F) BLAZER BACK PEPLUM SIDE
FABRIC – CUT 2 MIRRORED
LINING – CUT 2 MIRRORED - (G) SLEEVES
FABRIC – CUT 2 MIRRORED
LINING – CUT 2 MIRRORED - (H) BLAZER POCKET FLAP
FABRIC – CUT 4 - (I) BLAZER POCKET WELT
FABRIC – CUT 4 - (J) BLAZER POCKET BAG
LINING – CUT 2 - (K) PANTS FRONT SIDE
FABRIC – CUT 2 MIRRORED
LINING – CUT 2 MIRRORED - (L) PANTS FRONT CENTER
FABRIC – CUT 2 MIRRORED
LINING – CUT 2 MIRRORED - (M) PANTS BACK SIDE
FABRIC – CUT 2 MIRRORED
LINING – CUT 2 MIRRORED - (N) PANTS BACK CENTER
FABRIC – CUT 2 MIRRORED
LINING – CUT 2 MIRRORED - (O) PANTS SIDE POCKETS A
LINING – CUT 2 MIRRORED - (P) PANTS SIDE POCKETS A FACING
FABRIC – CUT 2 MIRRORED - (Q) PANTS SIDE POCKETS B
LINING – CUT 2 MIRRORED - (R) PANTS SIDE POCKETS B FACING
FABRIC – CUT 2 MIRRORED - (S) FLY
FABRIC – CUT 2 - (T) FLY SHIELD
FABRIC – CUT 1 - (U) BACK FAUX POCKET (A)
FABRIC – CUT 1 - (V) BACK FAUX POCKET (B)
FABRIC – CUT 1 - (W) WAISTBAND
FABRIC – CUT 1 - (X) BELT LOOPS
FABRIC – CUT 1 (DIVIDE INTO 6)
Sew with a 1/2″ seam allowance for all seams unless otherwise specified.

HOW TO SEW A PEPLUM BLAZER
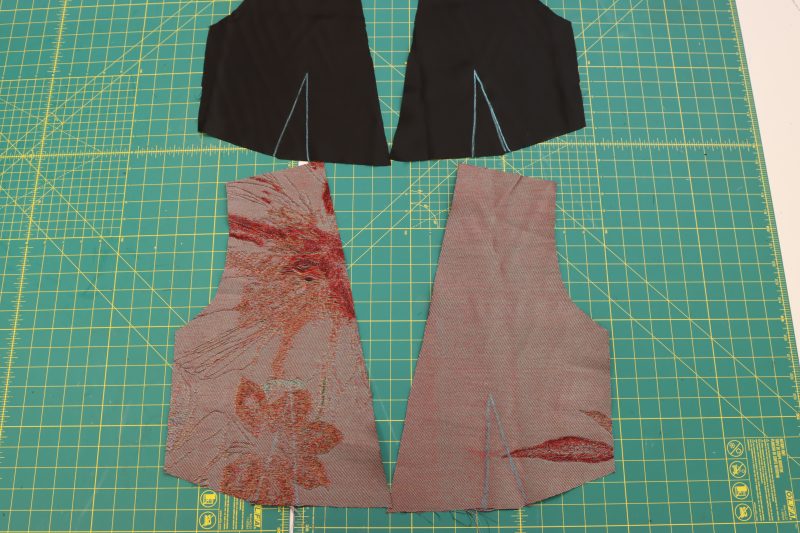
Step 1
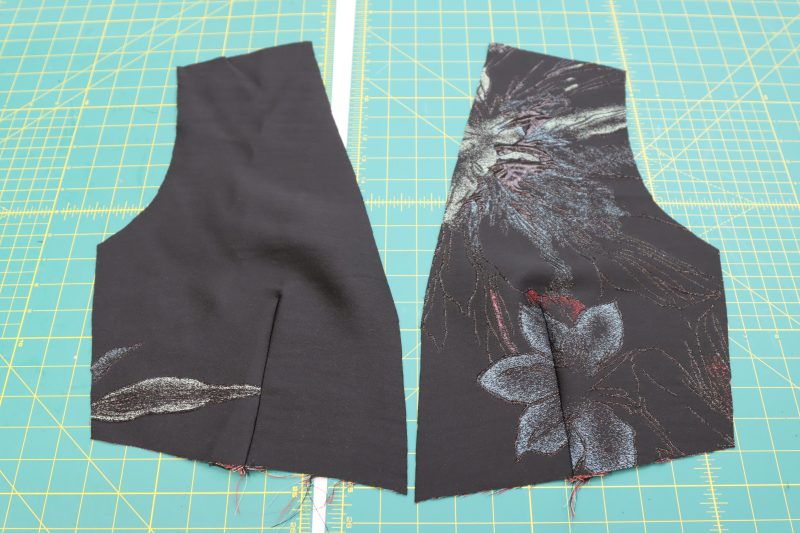
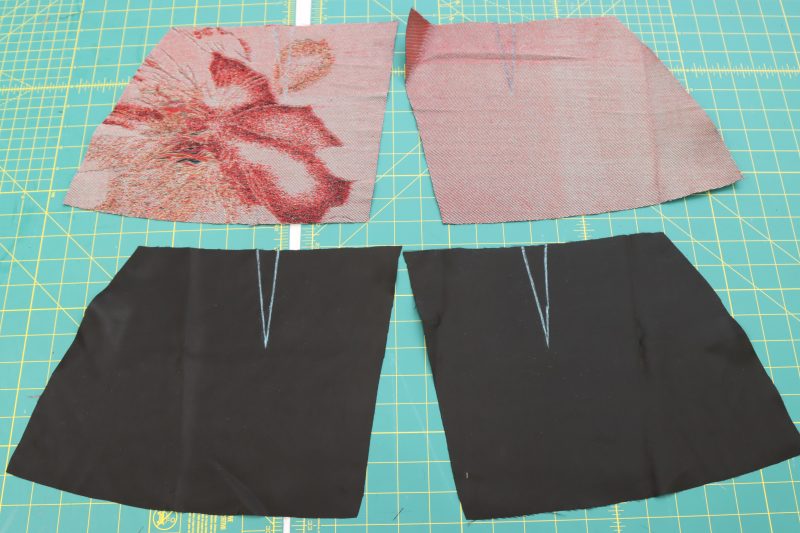
BLAZER DARTS
- Mark the darts on the wrong sides of the front blazer pieces with tailor’s chalk.
- Fold the front blazer pieces right sides together and pin down the darts.
- Iron the darts open and flat toward the side seams of the blazer.
- Repeat these steps for both lining and main fabric pieces.
Step 2
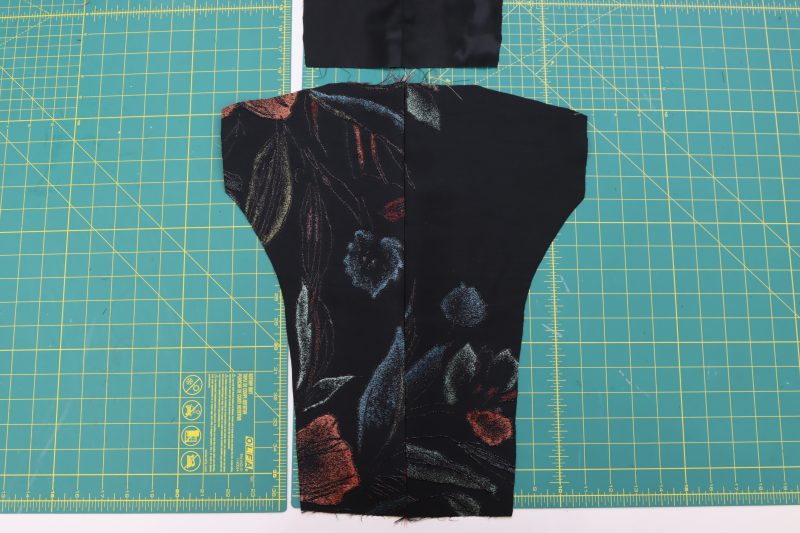
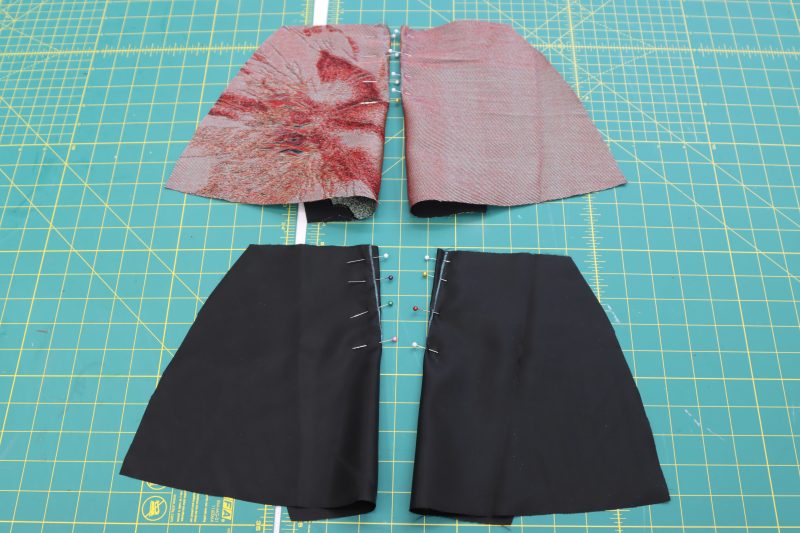
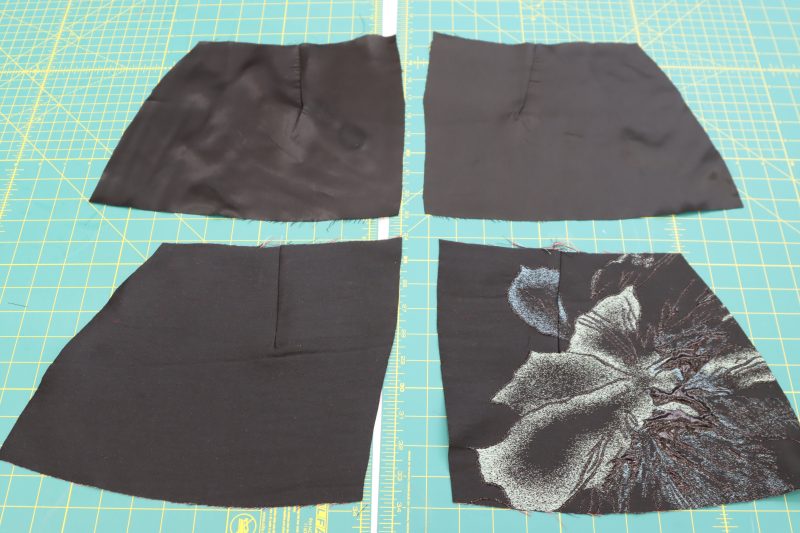
BACK PANEL
- Pin and sew the center back seam right sides together.
- Lay the back side pieces right sides together against the sides of the back center pieces.
- Pin and sew the back side pieces to the back center pieces along the curved edges.
- Repeat these steps for both the main fabric and the lining.
Step 3
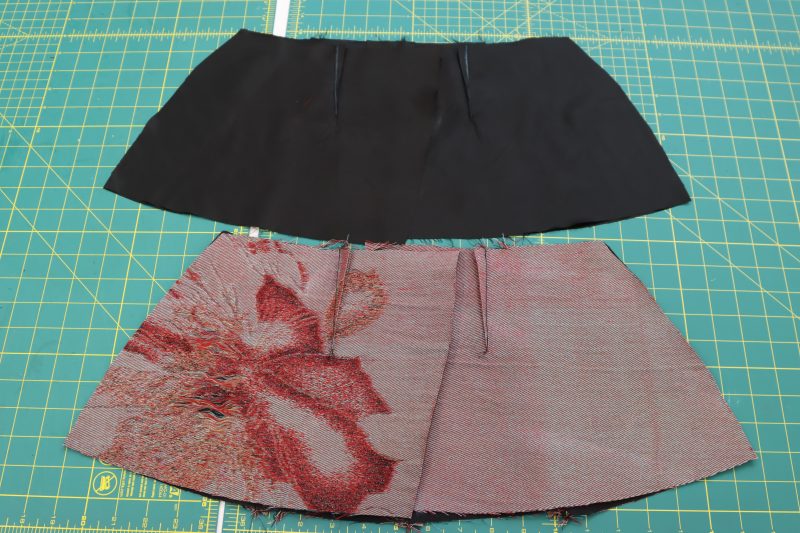
PEPLUM DARTS
- Mark the darts on the wrong side of the peplum pieces.
- Fold the peplum pieces right sides together and pin the dart.
- Sew the dart down.
- Iron the dart open and flat toward the side seams.
- Repeat these steps for both the main fabric and the lining.
Step 4
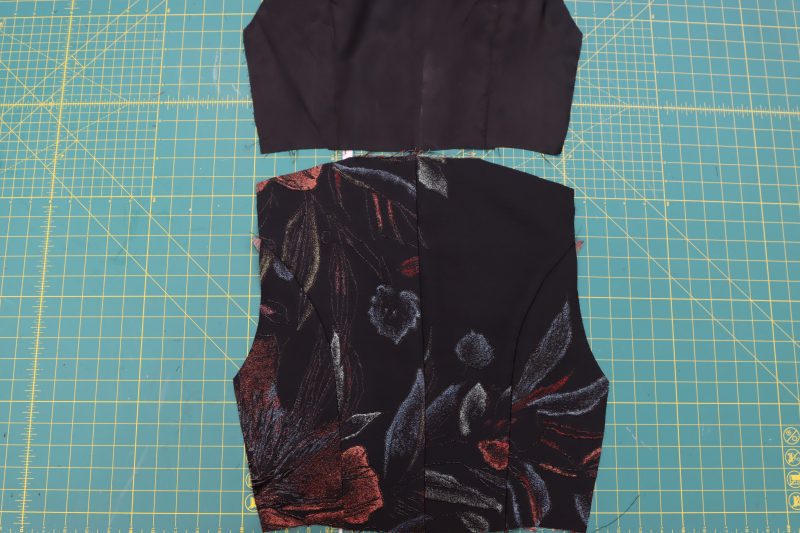
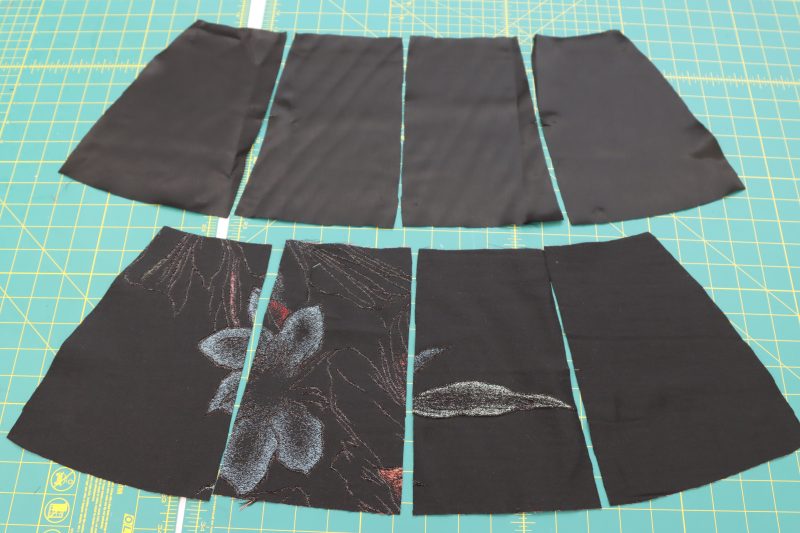
BACK PEPLUM
- Sew the center back peplum piece right sides together down the center back seam.
- Place the side back pieces right sides together with the center back pieces.
- Pin and sew the side back pieces to the center back pieces.
- Iron all the seams open and flat.
- Repeat for both the main fabric and the lining.
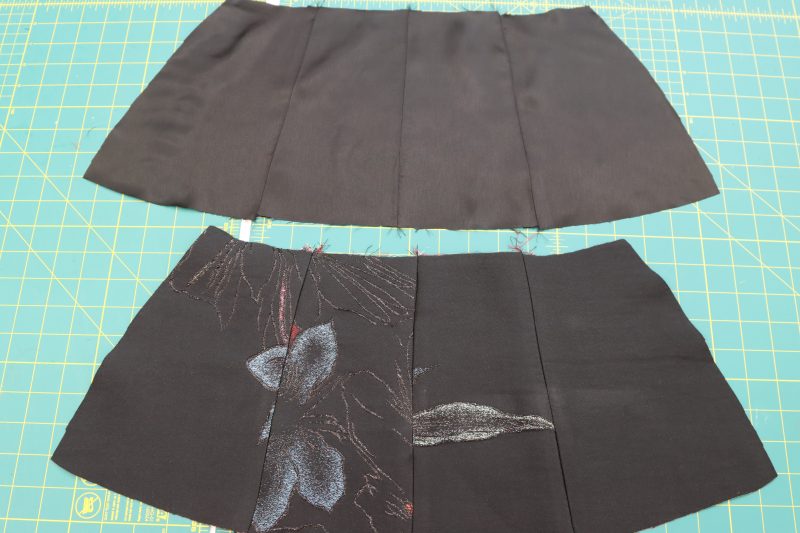
Step 5
PEPLUM SIDES
- Lay the front peplum pieces right sides together with the back peplum piece.
- Pin and sew the side seams of the peplum.
- Iron the side seams open and flat.
- Repeat for both the main fabric and the lining pieces.

Step 6
SEW BODICE
- Place the front and back bodice pieces right sides together with the shoulders and side seams lined up.
- Pin and sew the shoulder and side seams.
- Iron the shoulder and side seams open and flat.
- Repeat for the main fabric and the lining.
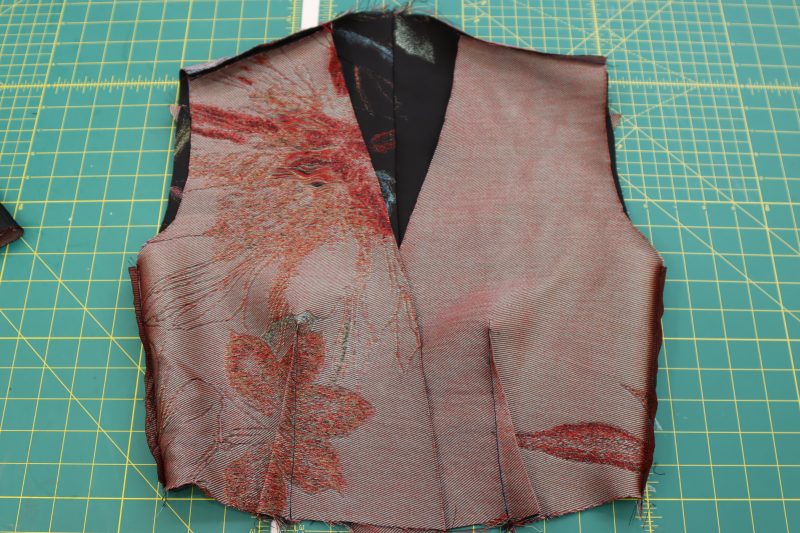
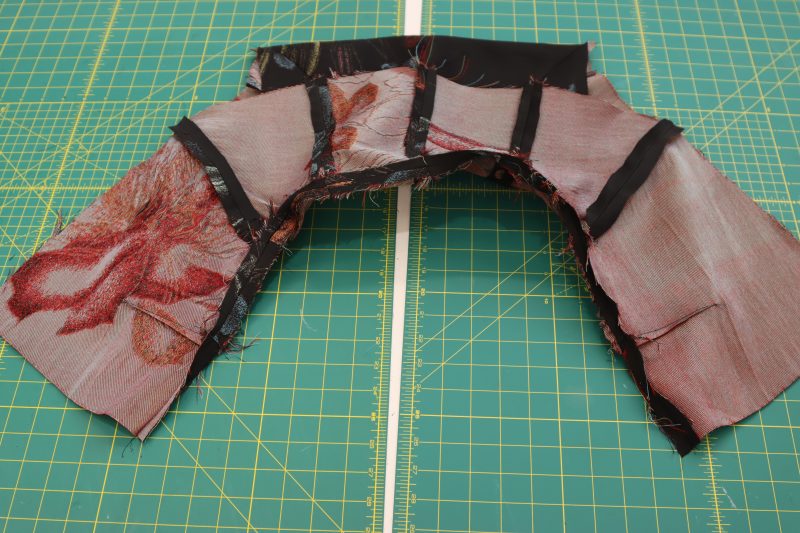
Step 7
ATTACH PEPLUM
- Place the bottom of the bodice and the top of the peplum right sides together.
- Pin the peplum to the bodice with the darts and seams lining up with each other.
- Sew the peplum to the bodice.
- Repeat for both the main fabric and lining.
Step 8
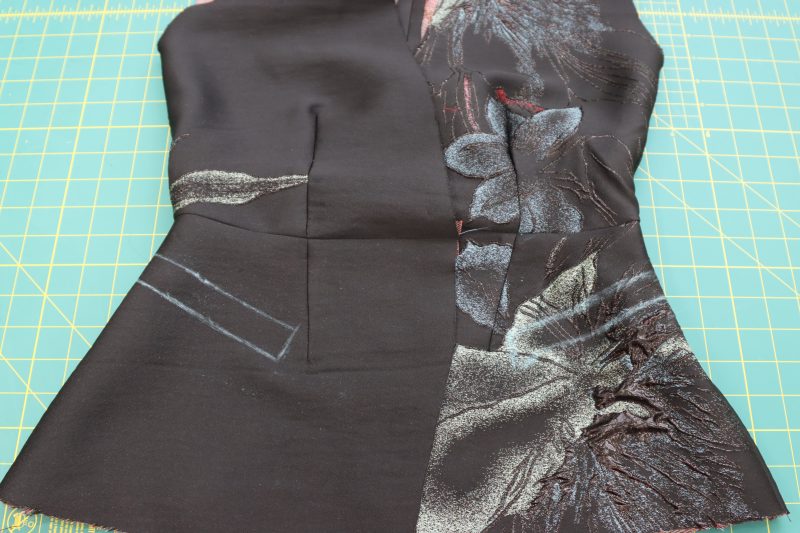
WELT POCKETS
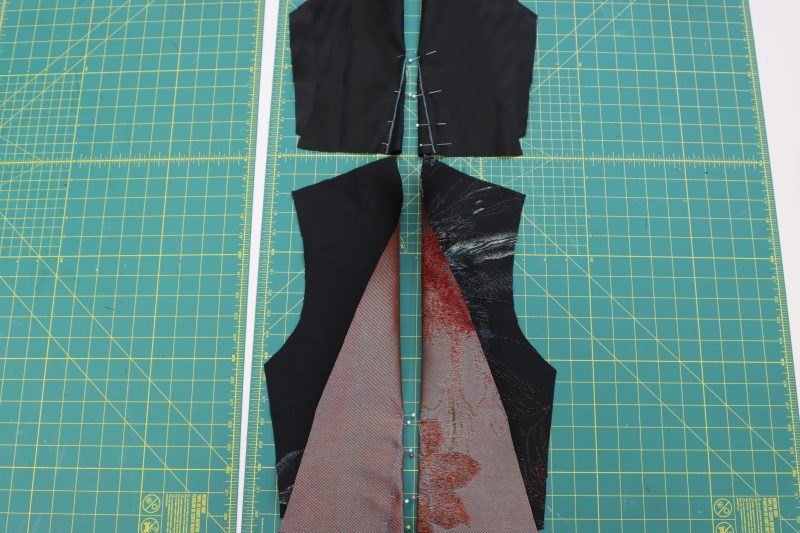
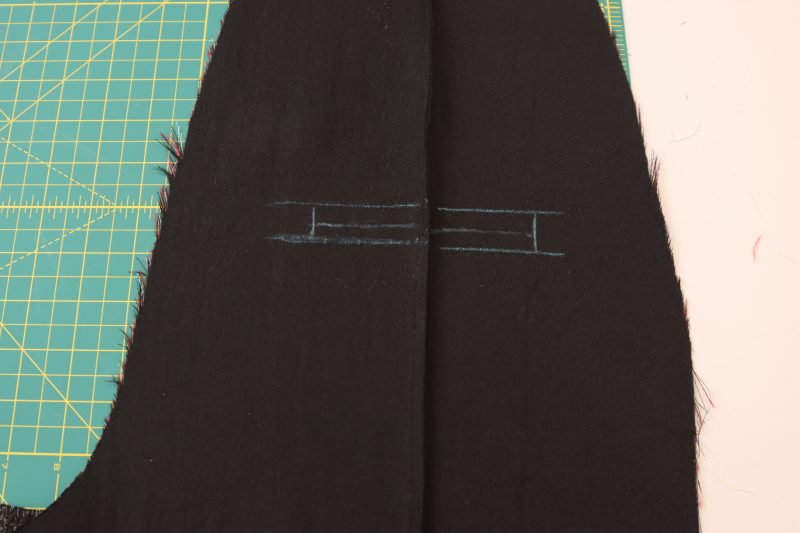
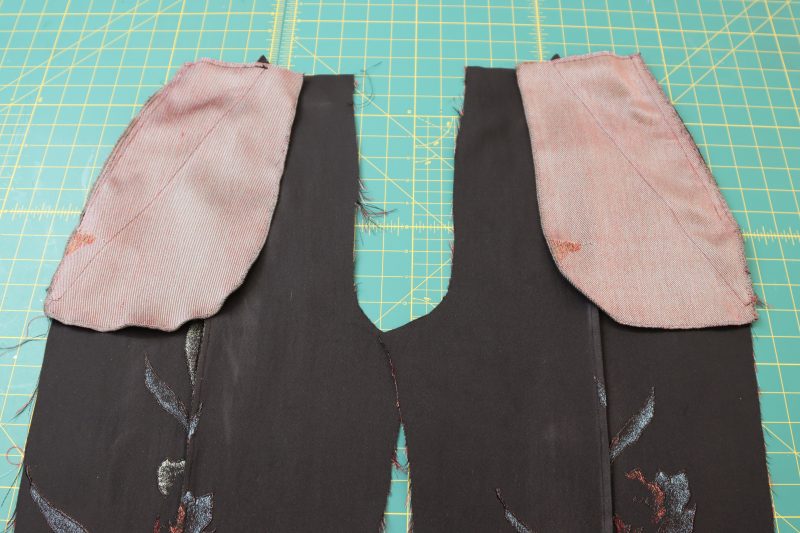
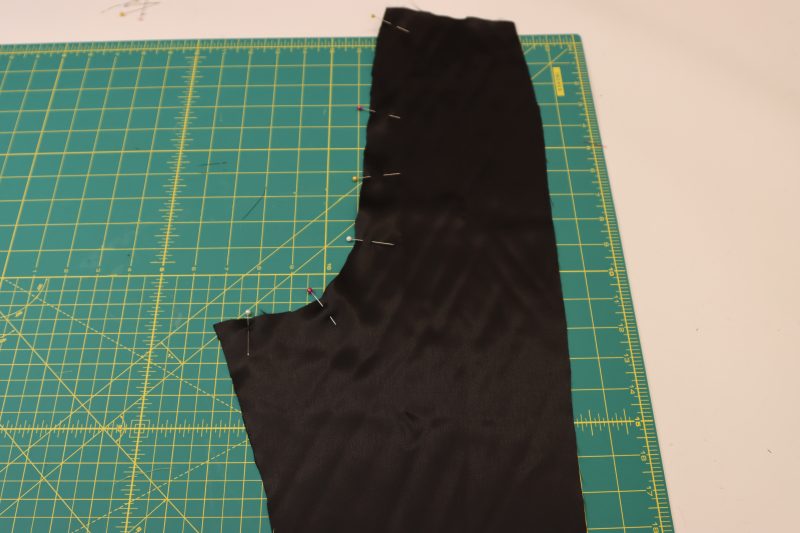
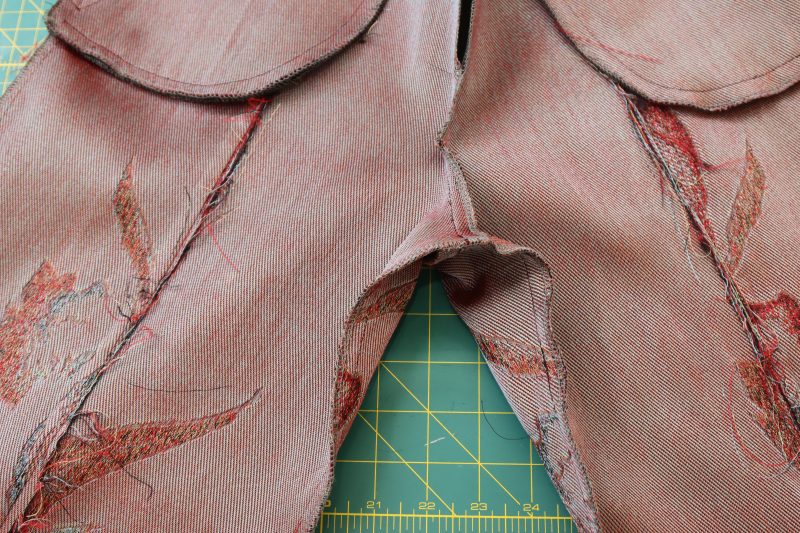
- Mark the welt pockets with tailor’s chalk on the front of the blazer (Note: The pocket welts are aligned vertically with the side seams of the blazer and are 1.5 inches below the seam that connects the peplum to the bodice. This makes the pockets sit at an angle).
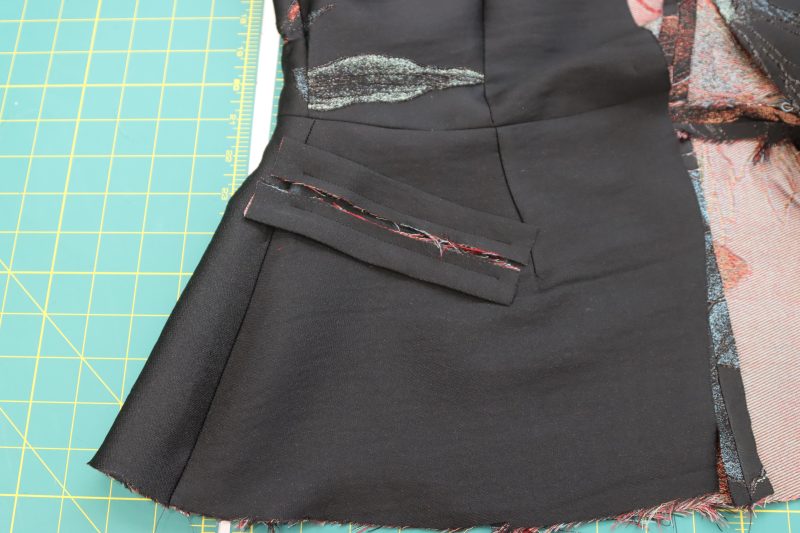
- Fold the welts in half long ways, wrong sides together, and iron the fold.
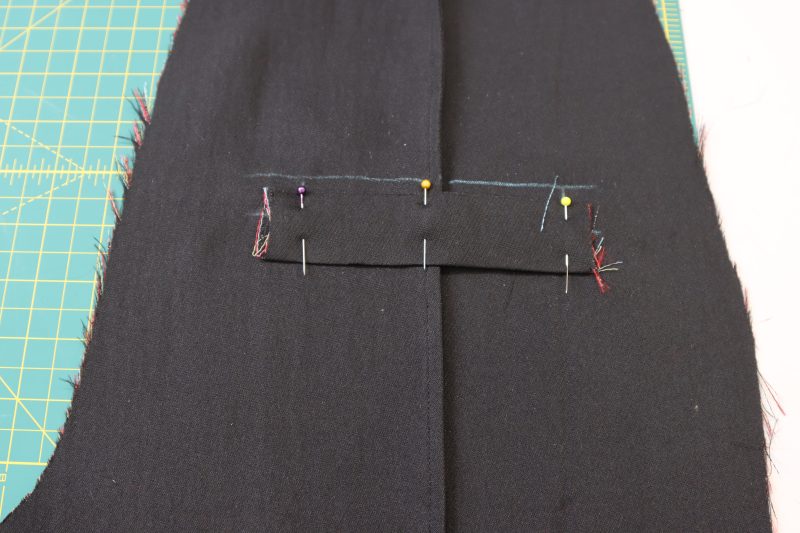
- Place the welts so that the raw edges are touching each other inside the rectangle that marks the pocket location.
- Pin and sew the welts in place along the top and bottom lines of the rectangle marking the pocket.
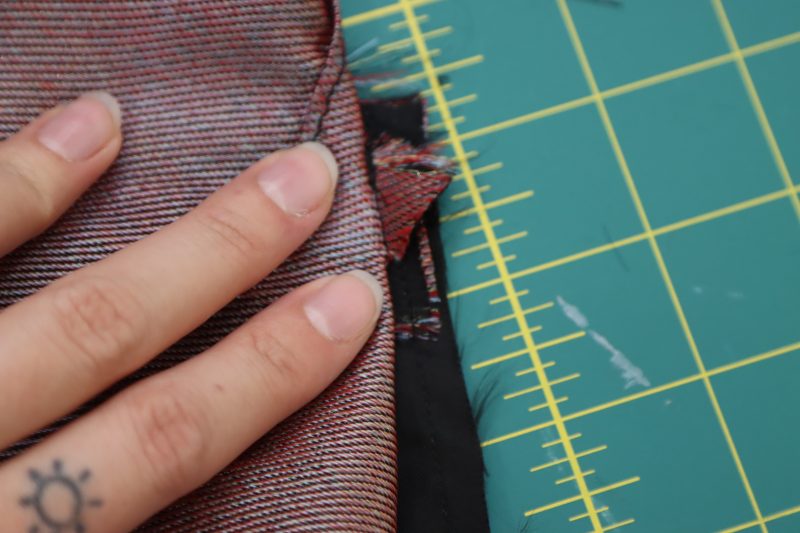
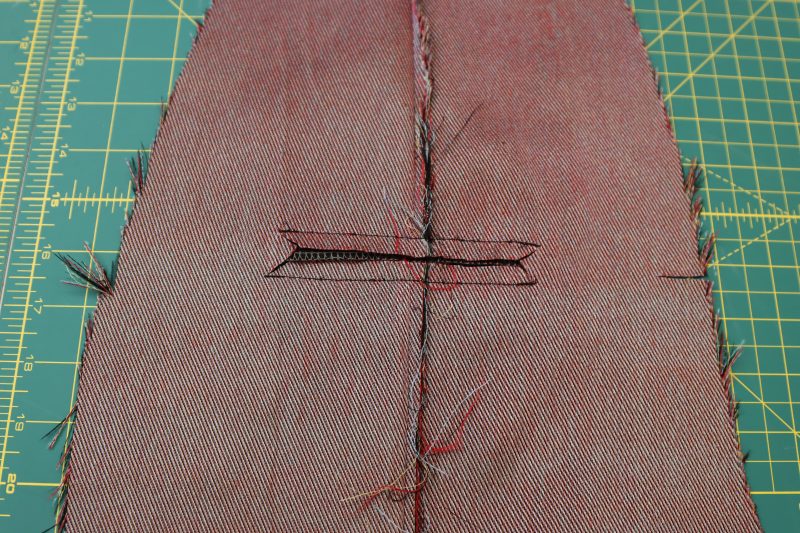
- Cut a hole from the wrong side of the blazer that matches the shape of the hole in the third photo below.
Step 9
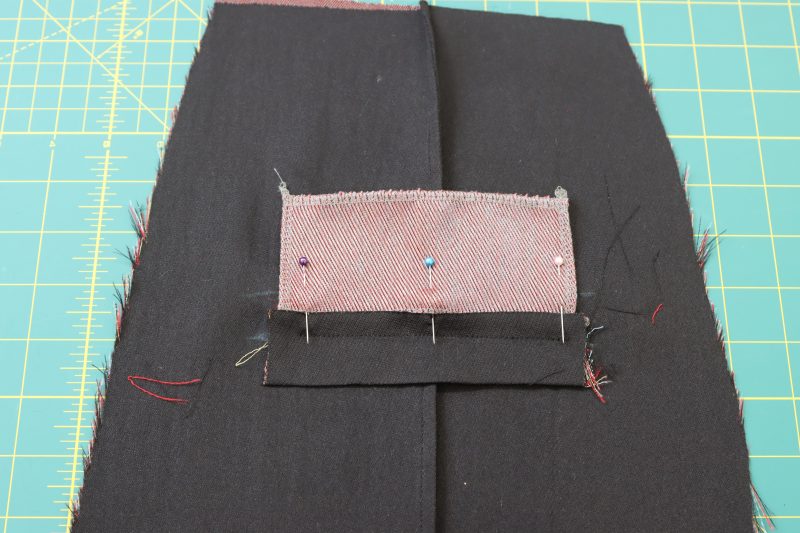
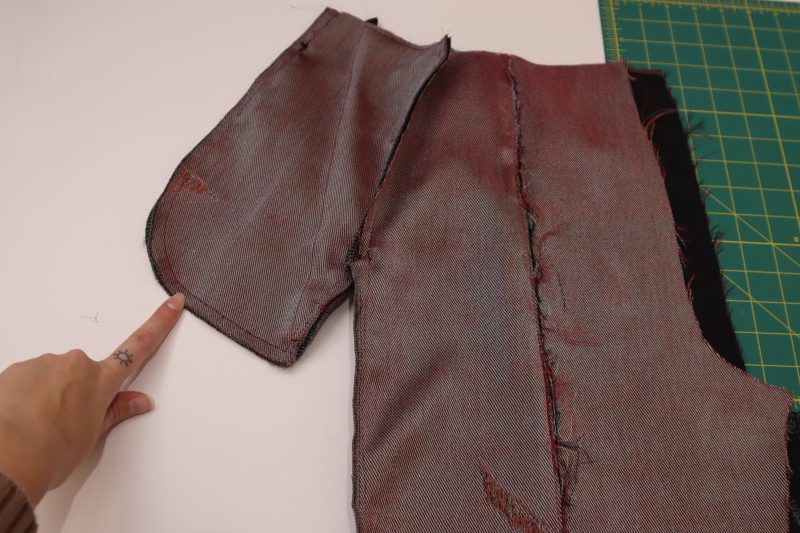
POCKET BAGS
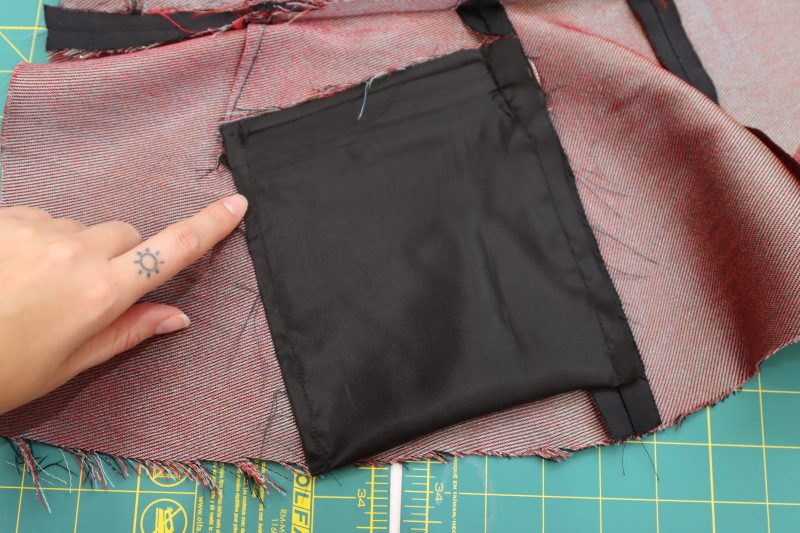
- Sew one of the short sides of the pocket bag directly on top of the seam you just sewed to connect the welt to the front of the blazer, right sides together.
- Sew the other short side of the pocket bag to the seam connecting the lower welt to the front of the blazer, right sides together.
- Flip the welts and pocket bag so that the raw edges of all the pieces are tucked toward the wrong side of the blazer.
- Pull the triangular pieces that were cut in the last step toward the wrong side of the blazer (the inside of the jacket) so that they are laying flat against the short sides of the pocket welts and the wrong raw edges of the pocket bag.
- Sew a straight stitch down both sides of the pocket bags, connecting the top and bottom welt, the triangular flaps, and the pocket bag together.

Step 10
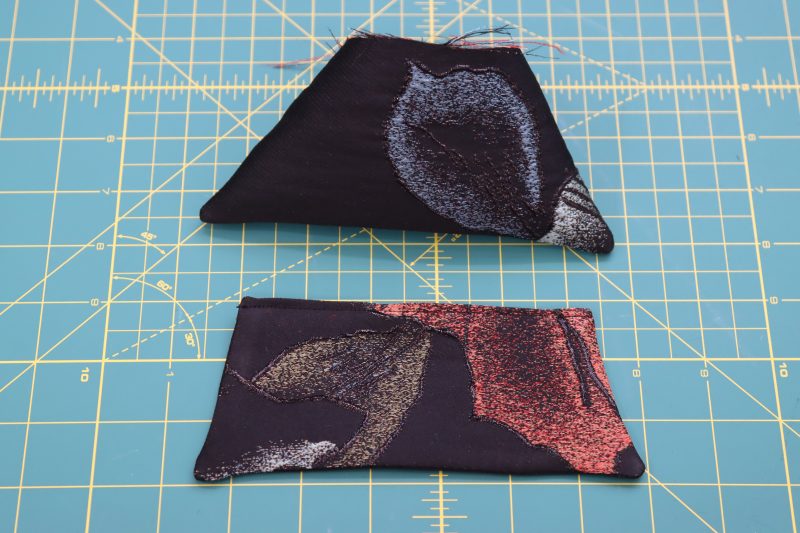
POCKET FLAPS
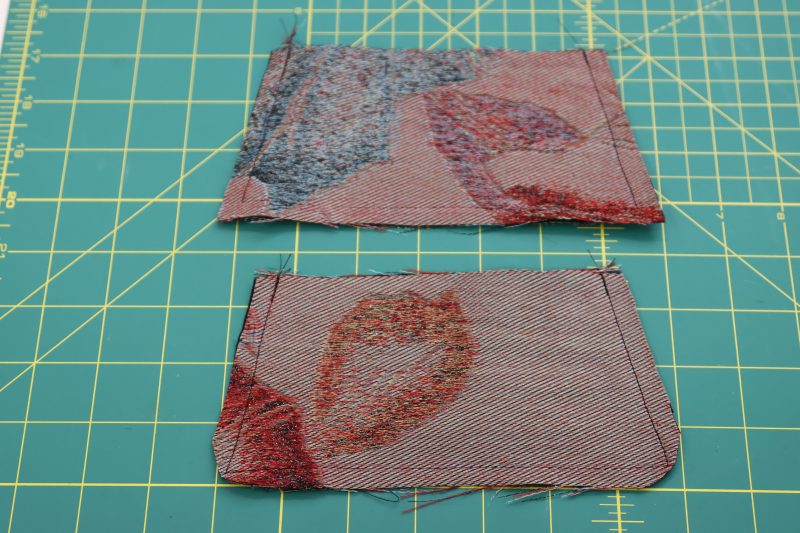
- To make two matching pocket flaps, place the pocket flap pieces right sides together.
- Pin and sew the sides and bottom of the pocket flaps together.
- Clip the bottom corners of the pocket flaps to make it easier to turn right sides out.
- Turn the pocket flaps right sides out and press the seams flat.
- Tuck the raw edge of the pocket flap into the wrong side of the flap and sew it folded shut.
- Sew a straight stitch over the folded edge to finish the top of the pocket flap.
- Pin and sew the pocket flaps at an angle directly above the welt pockets.

Step 11
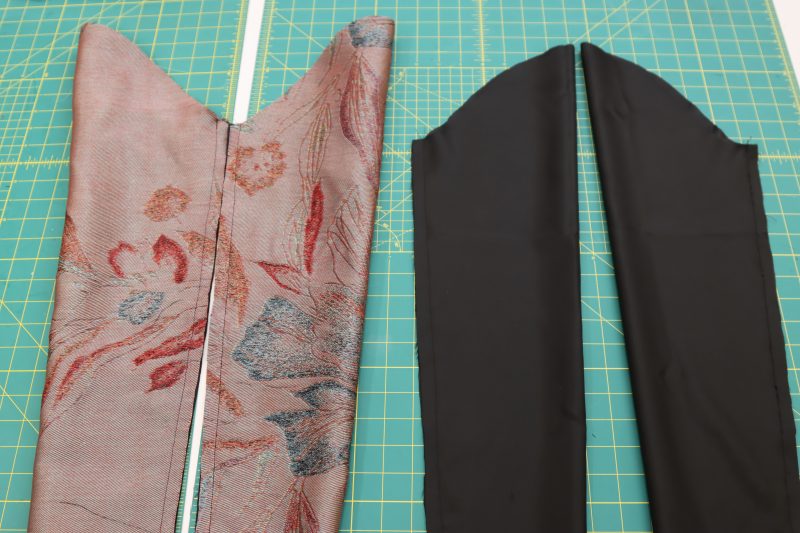
SLEEVES
- Fold the sleeves in half, right sides together.
- Pin and sew the sleeve seams shut.
Step 12
ATTACH SLEEVES
- Pin the sleeve caps into the armscyes of the bodice, right sides together.
- Sew the sleeves into the bodice (Note: If you find yourself struggling with this part, I recommend sewing a basting stitch around the armscye and the sleeve cap. This way, if the lengths of the openings are not perfectly equal, you can pull on the basting stitch a little bit to make them fit snuggly with each other).
- Repeat for both the lining and main fabric.

Step 13
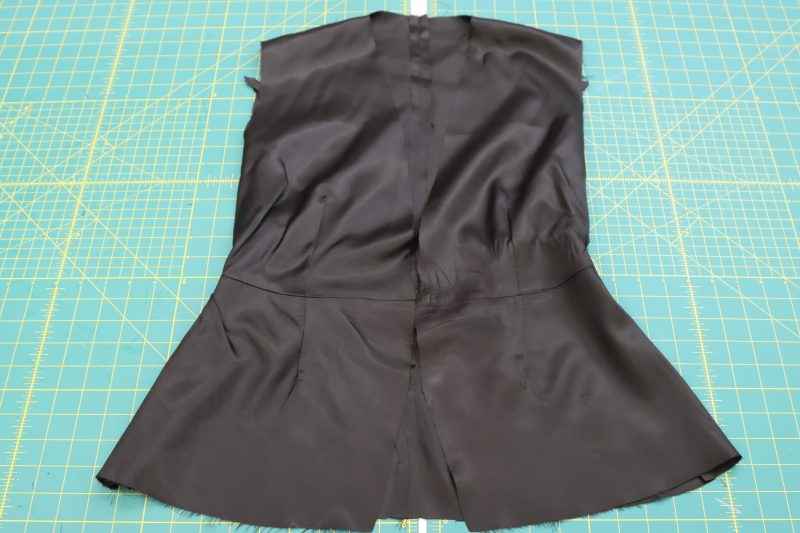
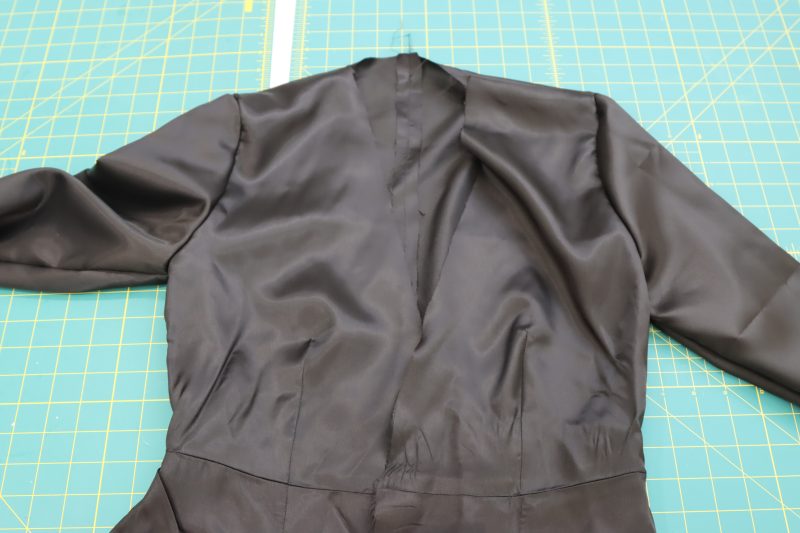
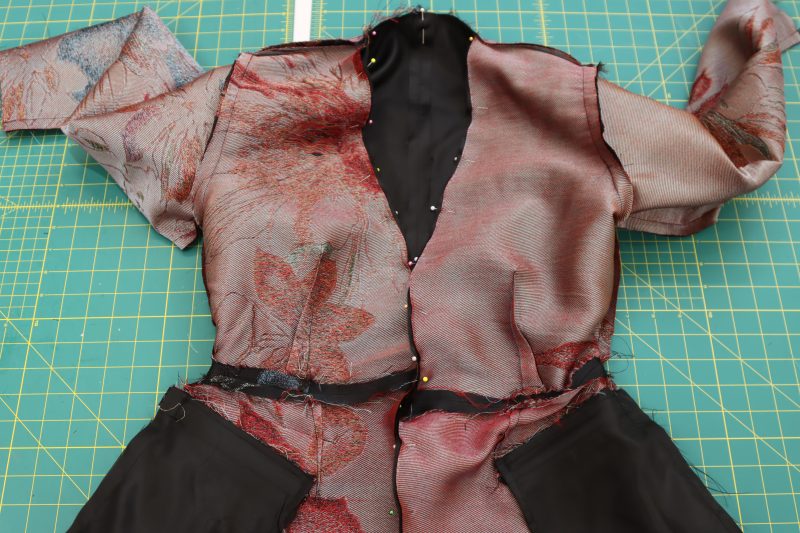
CLOSE BLAZER FRONT
- Place the lining inside of the main fabric blazer right sides together.
- Line up the front opening of the blazer and pin the lining to the main fabric around the entire front.
- Sew the front of the blazer together.
- Flip the blazer right sides out and iron the lining so that it doesn’t show from the right side of the blazer.
Step 14
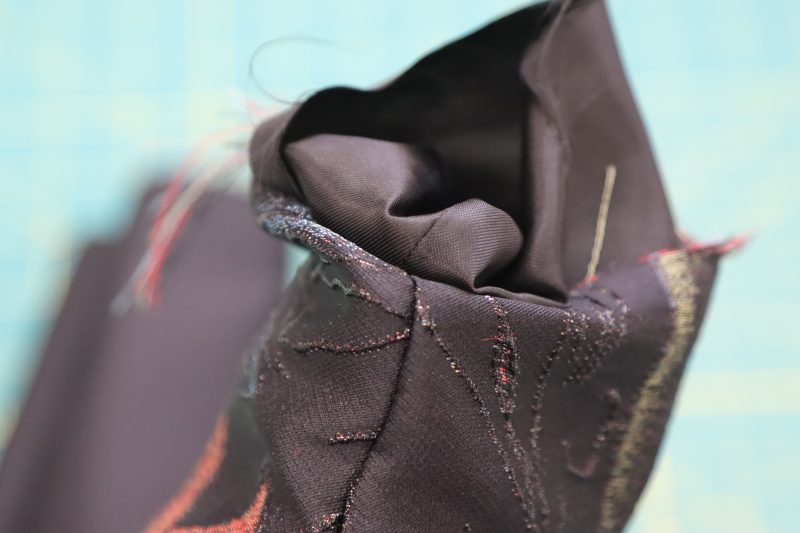
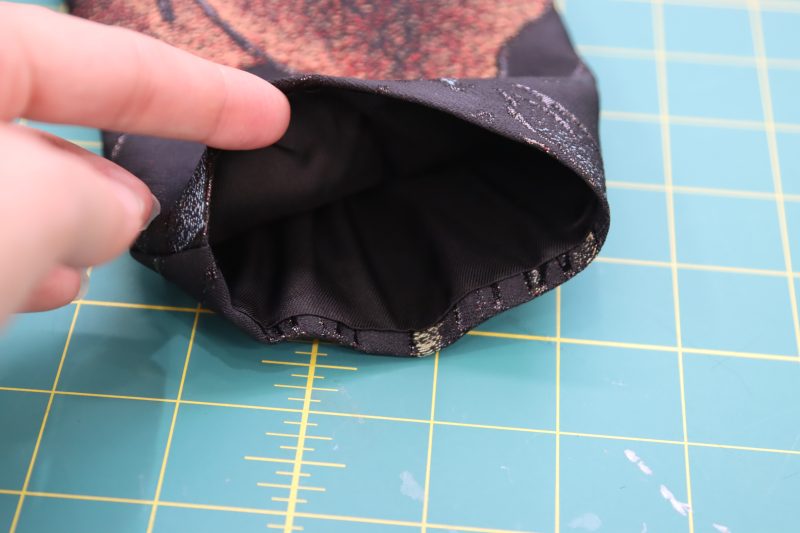
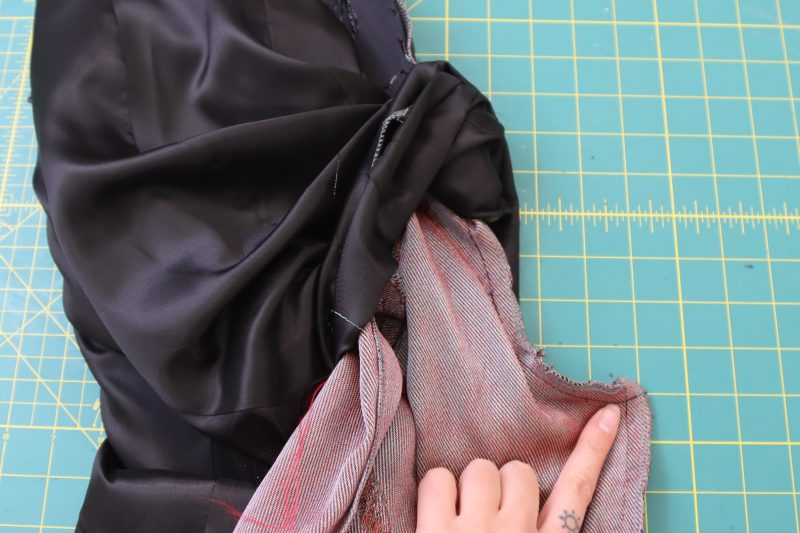
FINISH SLEEVES
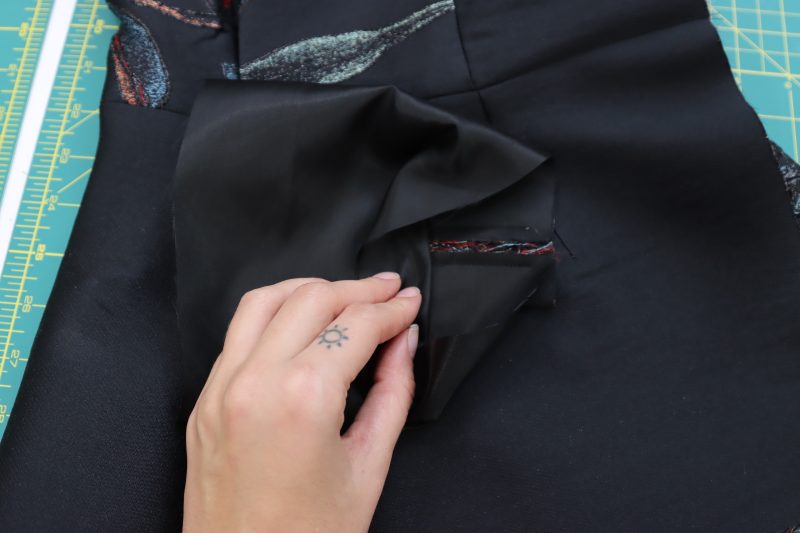
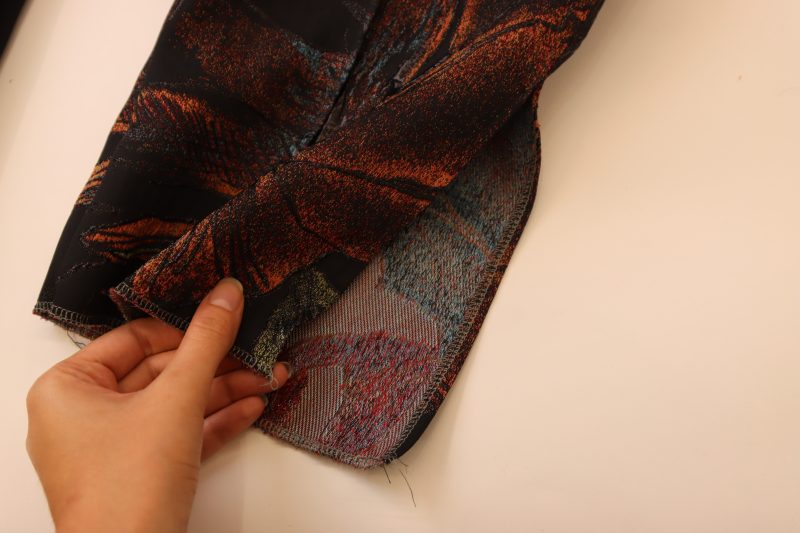
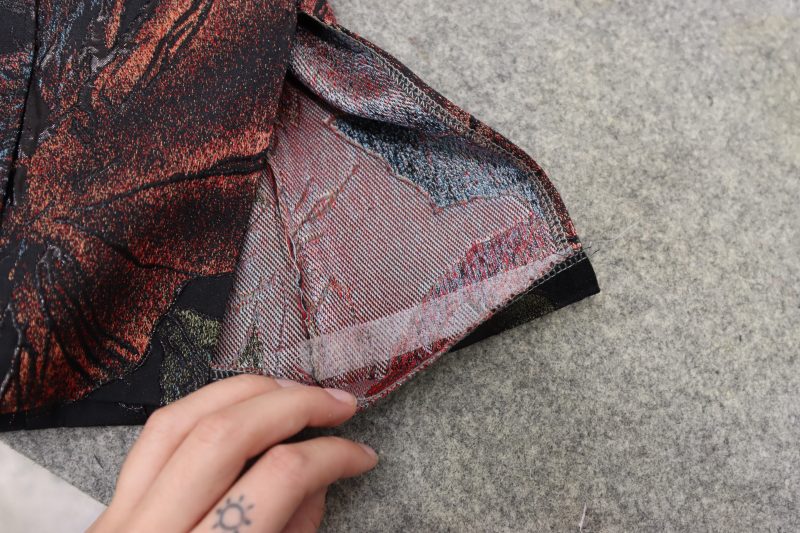
- Reach into the bottom hem of the blazer between the shell and the lining pieces.
- Reach down the sleeve and grab the raw edges of the lining and main fabric at the bottom of the sleeve.
- Pinch the lining and main fabric together between your fingers so that they are right sides together.
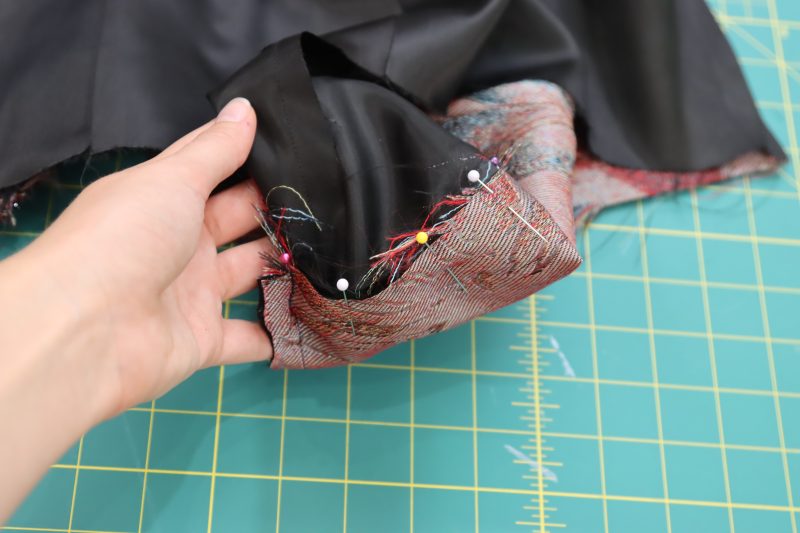
- Pull the sleeves out through the bottom of the blazer and place a pin where you were pinching the fabric.
- Pin around the rest of the sleeve, attaching the lining and main fabric right sides together.
- Sew around the entire edge of the sleeve hem along the pinned edge.
- Pull the sleeve right sides out back through the arm hole.
- Iron the sleeve opening so that the lining is hidden inside of the main fabric at the wrist.
- Repeat for both sleeves.
Step 15
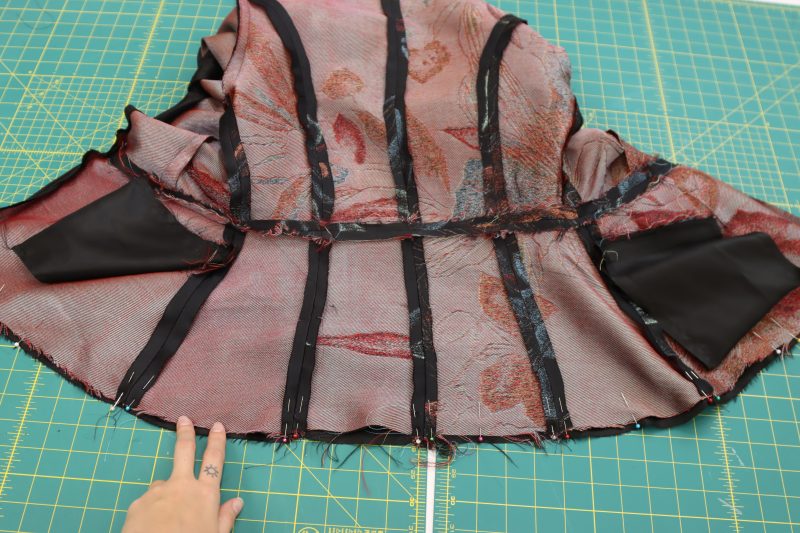
BLAZER HEM
- Flip the blazer inside out.
- Pin along the entire bottom hem of the blazer, connecting the lining to the main fabric.
- Line up the seams of the lining with the seams of the main fabric.
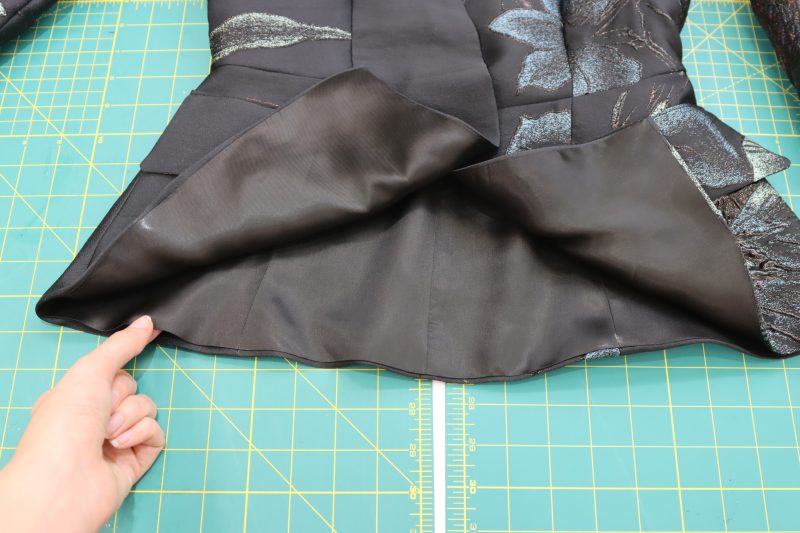
- Leave a 6 inch hole at the bottom of the hem where the hem will NOT be sewn.
- Sew along the entire bottom edge of the hem, EXCEPT for along the 6 inch hole.
- Flip the blazer right sides out through the hole in the hem.
- Iron the bottom hem so that the lining is hidden inside of the main fabric of the blazer.
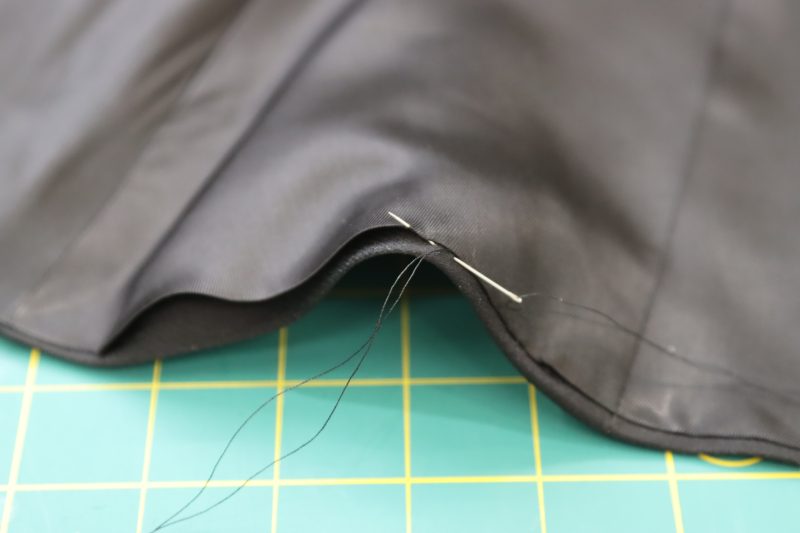
- Hand sew the hole closed in the hem using a ladder stitch.
Step 16
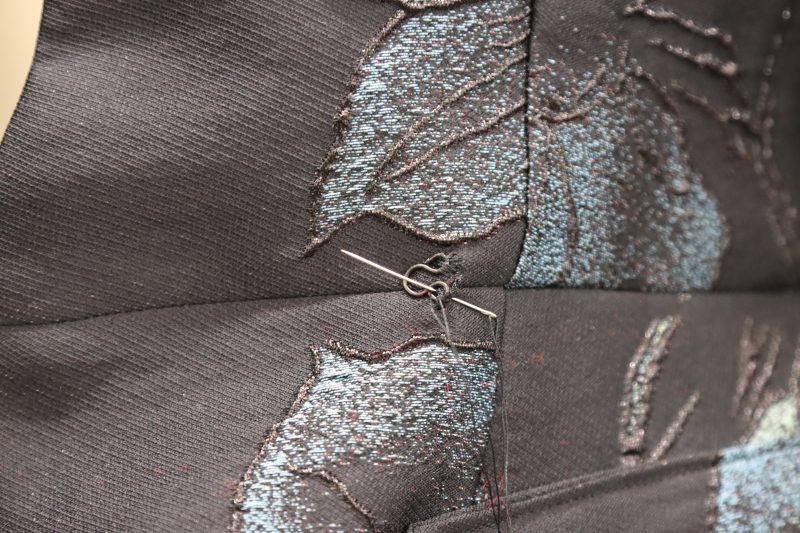
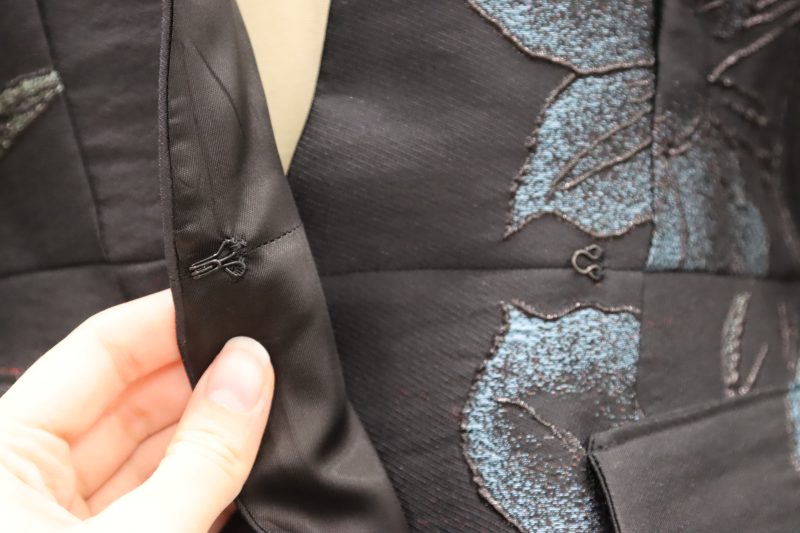
HOOK & EYE CLOSURE
- Hand sew the eye piece of the hook and eye closure to the front of the blazer on top of the seam that connects the peplum to the jacket. Make sure to try on the blazer at this stage to make sure that the eye piece is sewn in a spot where the waistline of the blazer will be fitting along your own waist.
- Hand sew the hook piece of the hook and eye closure to the inside (lining side) of the blazer, opposite to the hook piece. The hook and eye closure pieces should line up with each other so that the seam connecting the peplum to the jacket lines up on both sides of the front opening.
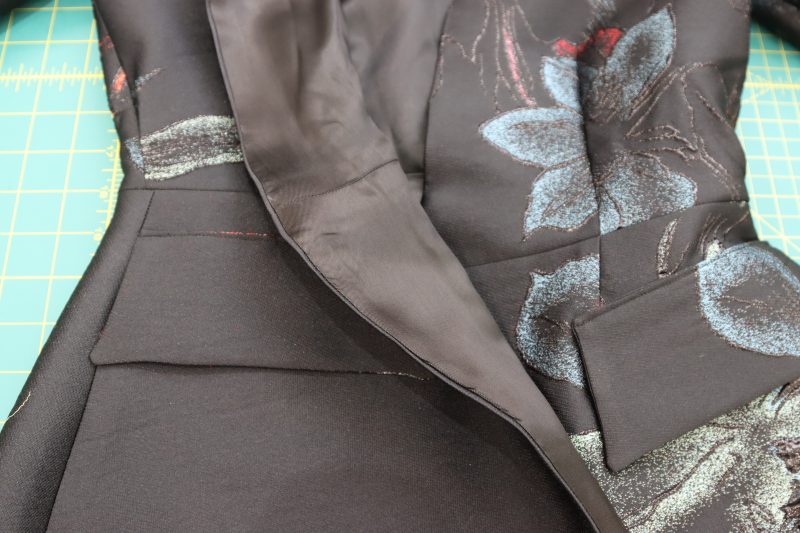
Step 17
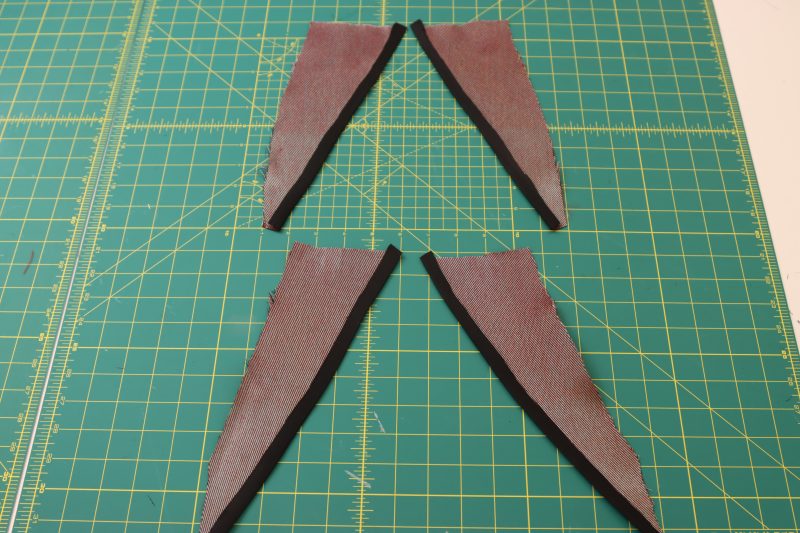
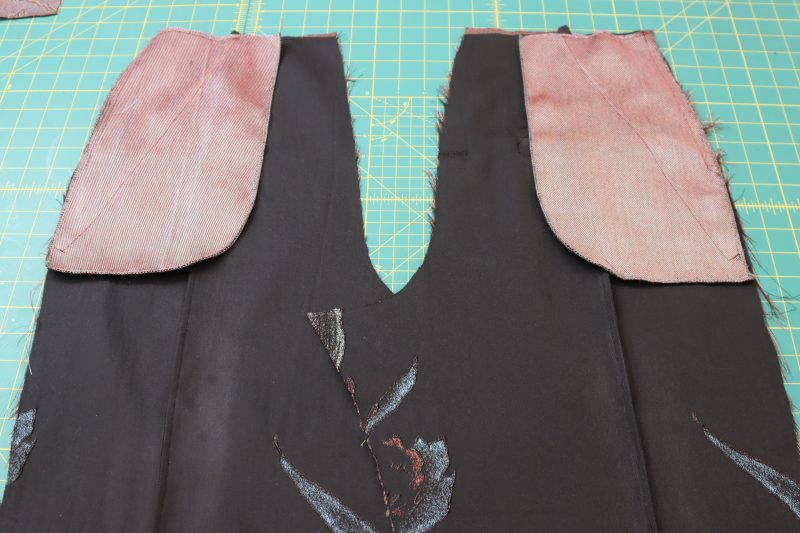
POCKET FACINGS
- Fold the long diagonal edges of the pocket facings towards the wrong side of the fabric by ½ inch.
- Iron the folded edge down.
- Top stitch pocket A facings to the A pockets and pocket B facings to the B pockets with ⅛ inch seam allowance.
Step 18
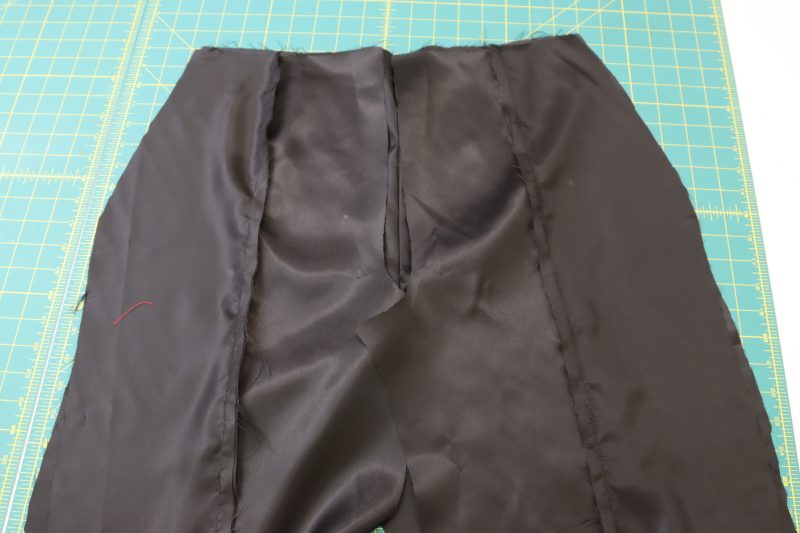
PIN TUCKS
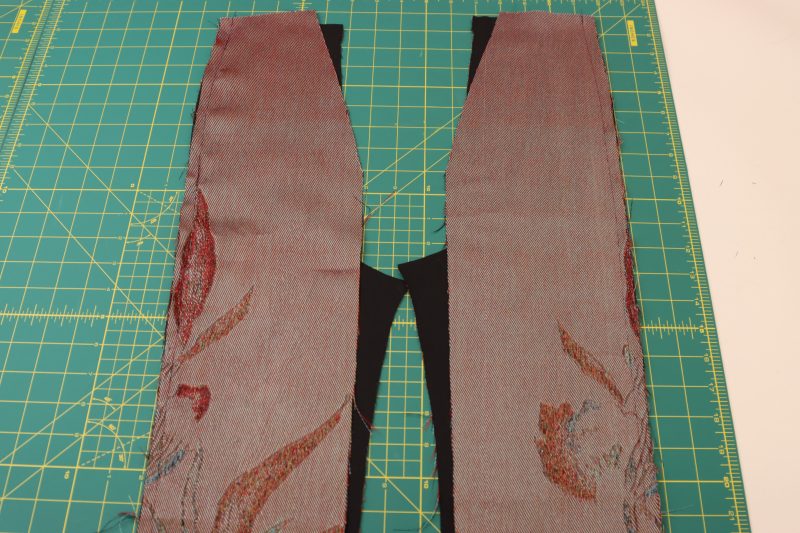
- Place the front center and front side pants pieces right sides together.
- Pin and sew a straight stitch along the center front seam to connect the two front pieces.
- Open up the seam and iron it flat.
- Fold the front pants legs wrong sides together along the seam you just sewed.
- Sew along the folded seam with ⅛ inch seam allowance so that the total amount of fabric taken in at the front pintuck is ½ inch.
- Open the front pants legs, iron the seam open, and press the pin tuck toward the side seams.
- Repeat all these steps for the pintuck on the back pant legs, except with the back pintuck pressed toward the back crotch seam.
Step 19
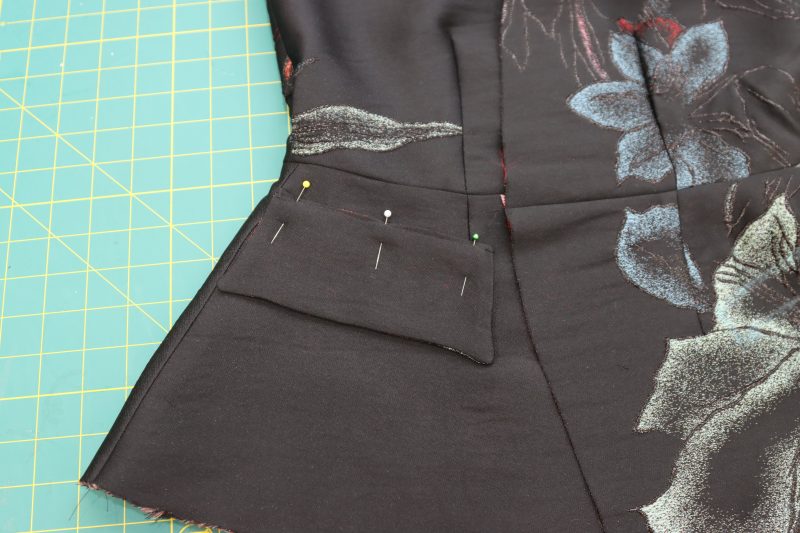
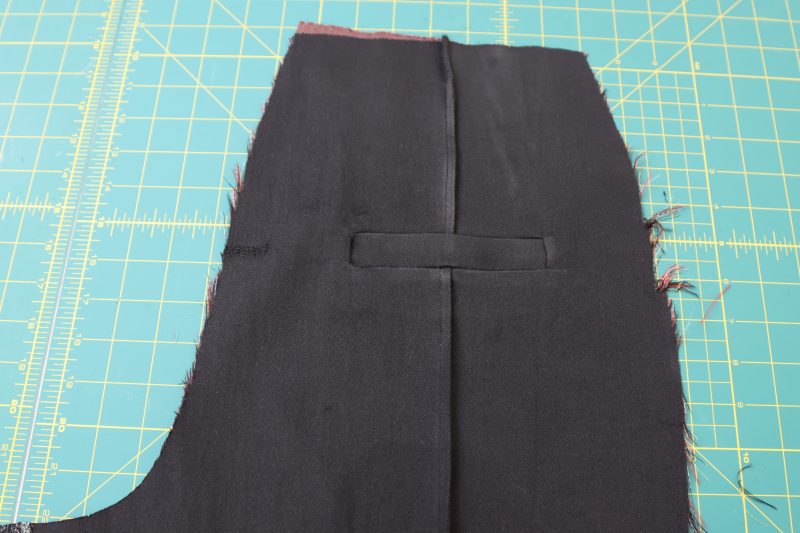
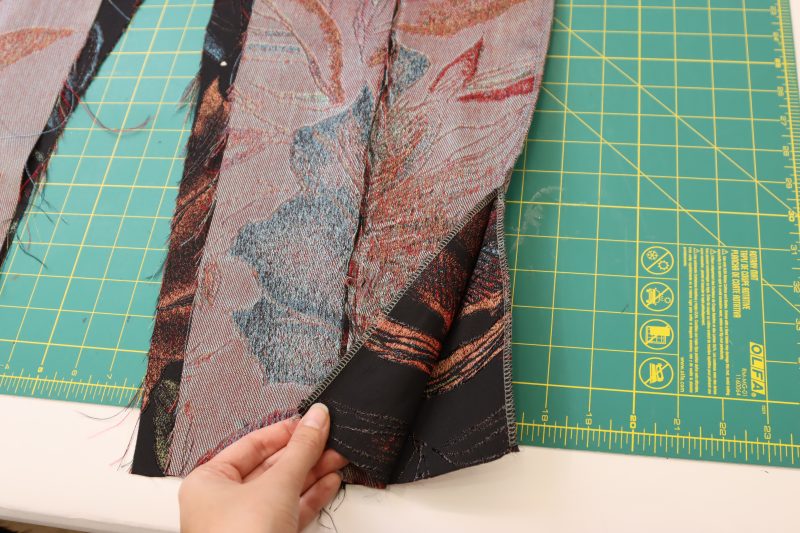
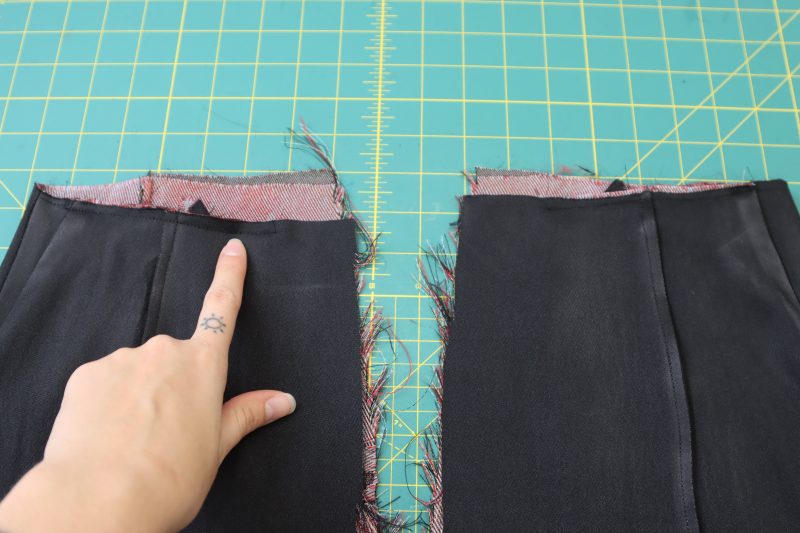
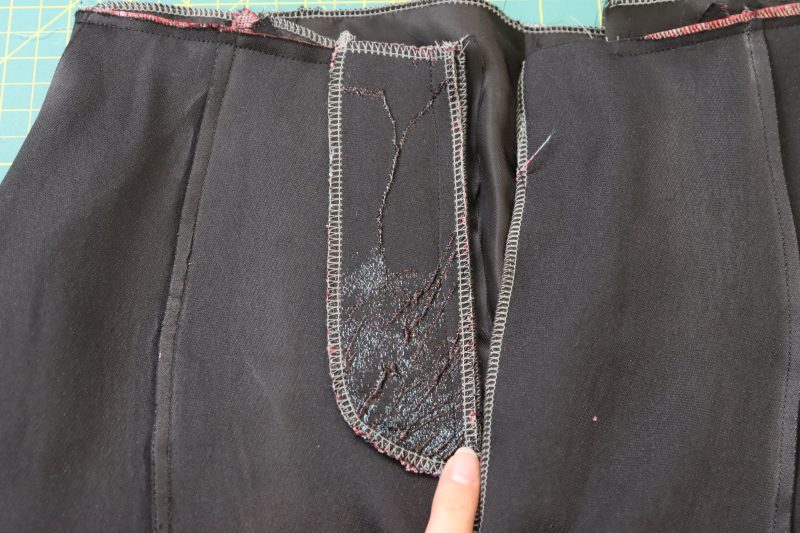
FAUX WELT
- Mark the welt location with tailor’s chalk.
- Fold faux pocket A in half long ways, right sides together.
- Pin and sew faux pocket A to the bottom line of the chalk mark with the raw edge of the welt lined up with the center line of the chalk mark.
- Pin and sew faux pocket B right sides together with the main fabric on the top line of the chalk mark.
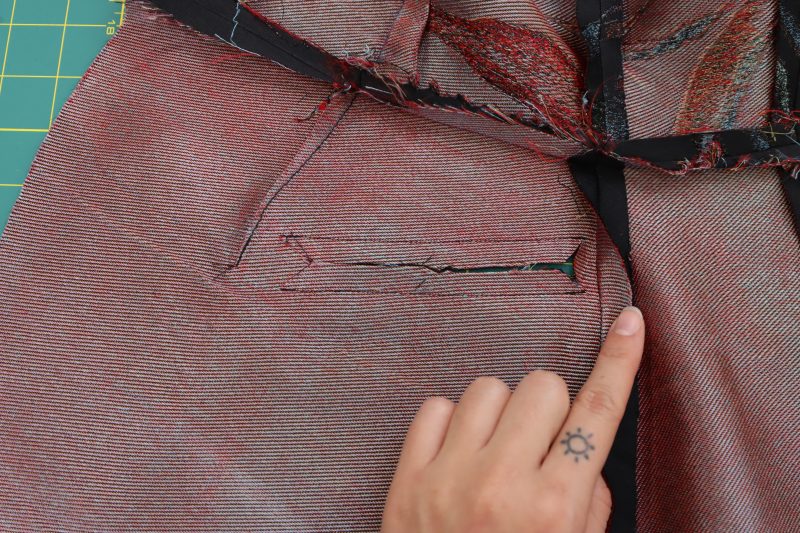
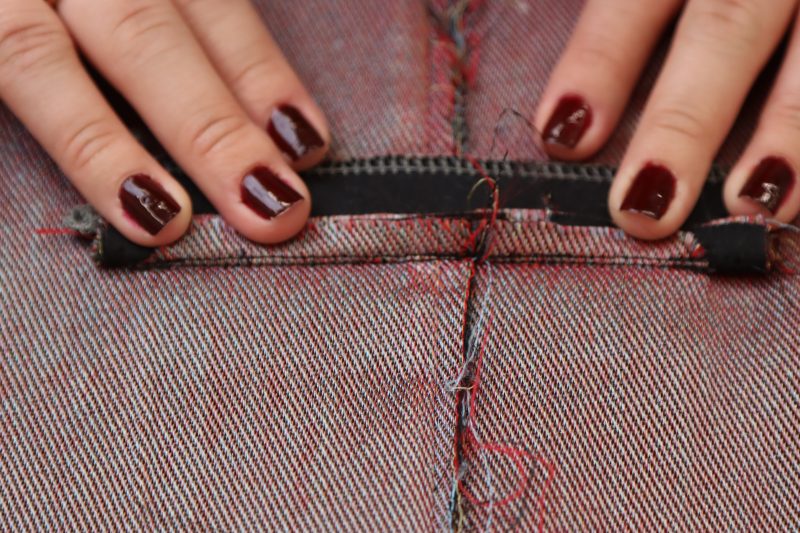
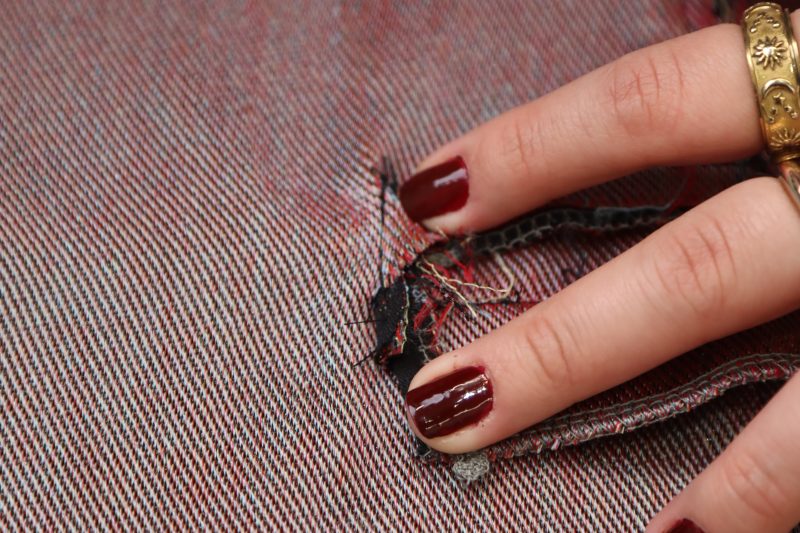
- Cut a hole through the main fabric on the back pants piece that matches the hole in the photo below.
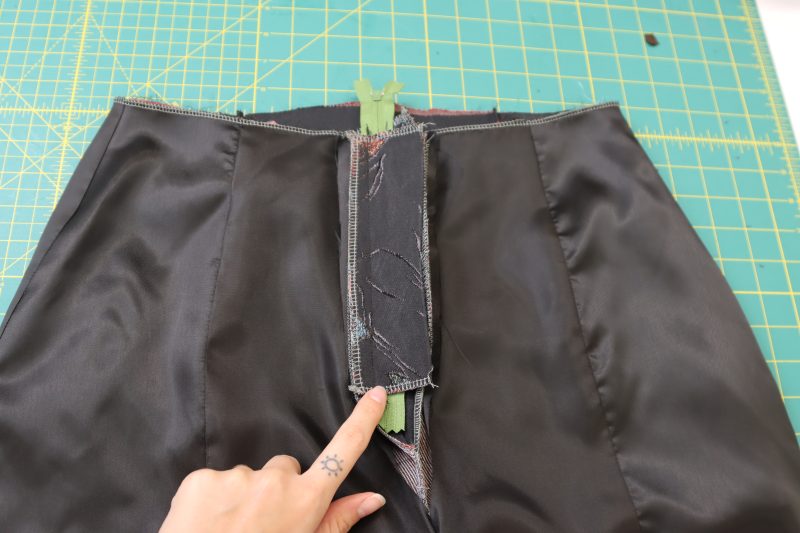
- Flip all the welt and faux pocket pieces into the wrong side of the fabric, being sure to tuck the triangular flap from the hole you just cut into the wrong side of the fabric as well.
- Pin and sew the faux pocket to the seam allowance on the bottom chalk mark that connects the pocket welt to the pants.
- Pin and sew the sides of the pocket shut, being sure to catch the faux pocket, the pocket welt, and the triangular flap of the back of the pants all in the seam.
Step 20
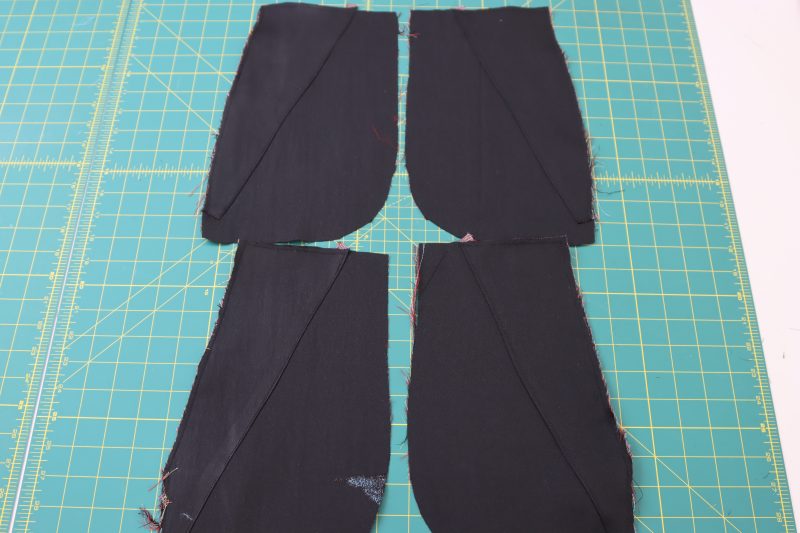
ATTACH POCKETS
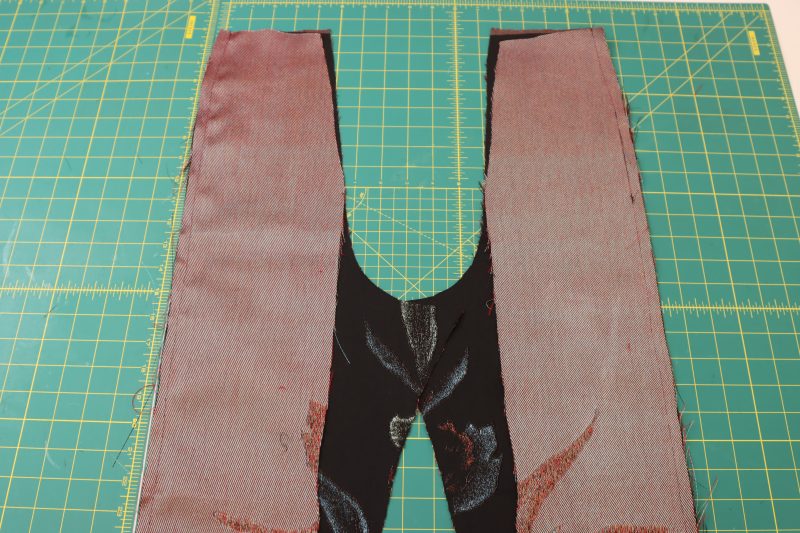
- Place the pockets A against the front pants pieces, right sides together.
- Pin and sew pockets A to the front pants pieces, being sure only to sew down to the point on the pocket bag where it begins to straighten out with the pants.
- Repeat these same steps with pocket B and back pants pieces.
Step 21
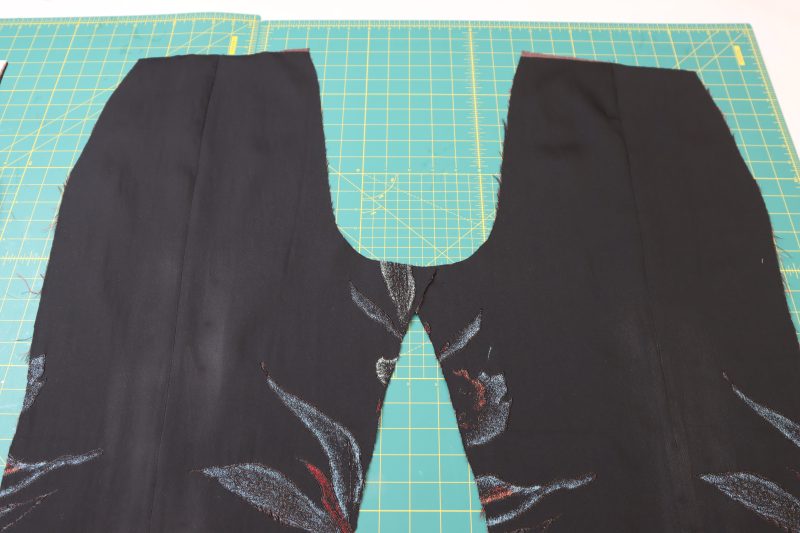
SIDE SEAMS
- Place the front pants pieces on top of the back pants pieces right sides together with the pockets and side seams perfectly overlapping each other.
- Pin and sew around the perimeter of the pocket bag and the side seam of each leg, being sure to leave a 6 inch gap on the bottom of the pant leg that is unsewn to leave room for the side slit.
- Finish raw edges of the side seams and slits with a serger or zigzag stitch.
Step 22
TOPSTITCH POCKETS
- Iron the side seams of the pant legs so that the pockets lay flat and towards the front of the pants.
- Pin and sew the top of the pocket bags to the waistline on the pants to hold them in place for the rest of the sewing process.
Step 23
BACK CROTCH SEAM
- Place the two sides of the pants right sides together with the crotch seams lined up in the back.
- Pin and sew the back crotch seam together.

Step 24
LINING PANTS
- To put the pants lining together, the steps are the same as above, except without the pintucks.
- Make sure to leave the front crotch seam and inseam open on the pants lining for now.
- Place the lining pants inside of the main fabric pants, wrong sides together, aligned at the waistline.
Step 25
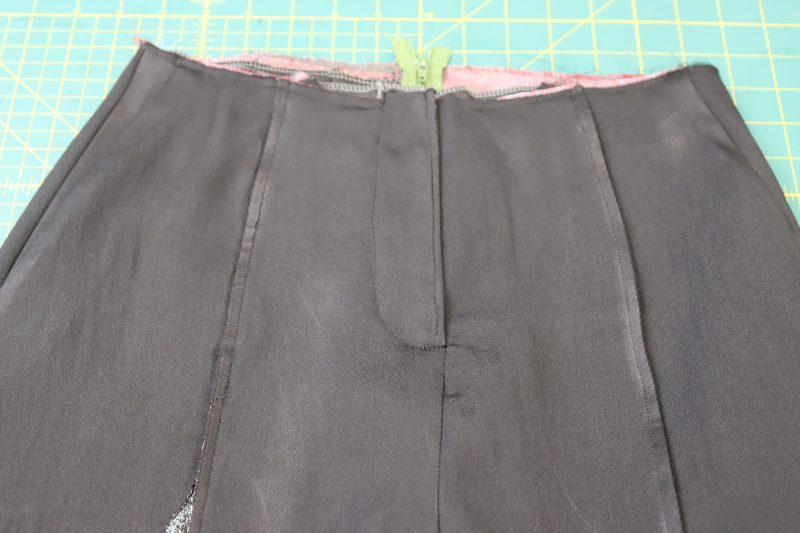
FRONT CROTCH SEAM
- Pin and sew the front crotch seams together for the lining and main fabric pants separately, being sure to leave a gap on the top of the crotch seam so that there is room to insert the zipper.
Step 26
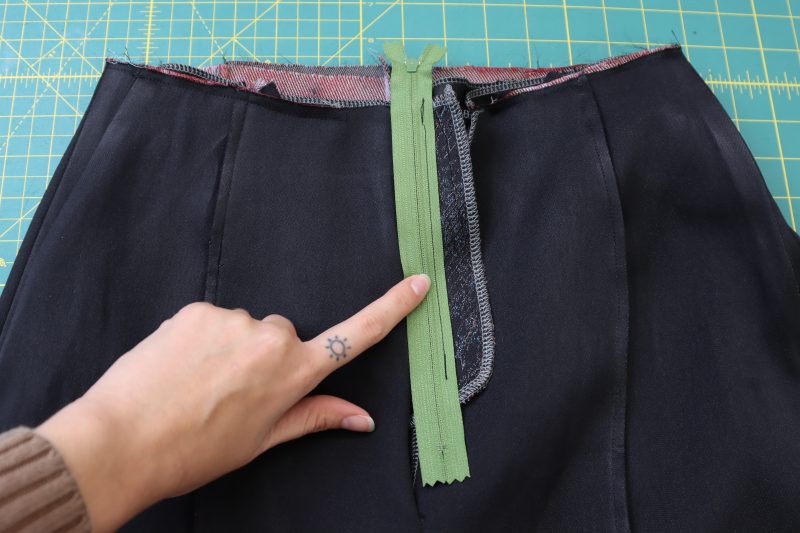
ZIPPER FLY
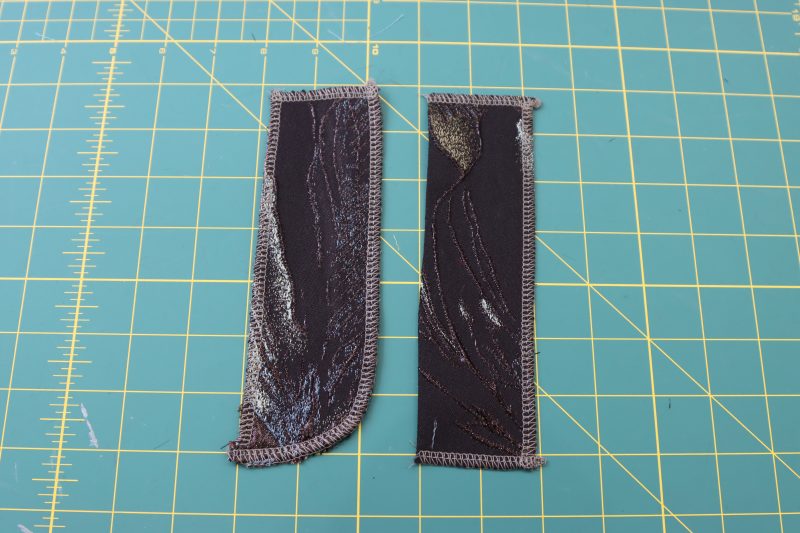
- Fold the fly shield in half, long ways, right sides together.
- Place the two fly facing pieces against each other, wrong sides together.
- Serge or zigzag around the edges of the fly shield and fly facing.
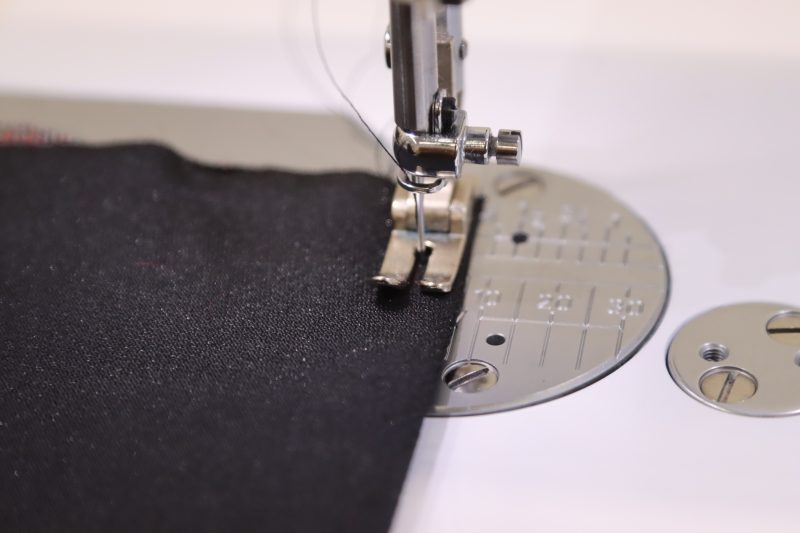
- Pin and sew the long flat side of the fly shield to the wearer’s right side of the front crotch seam.
- Pin and sew the zipper face down onto the fly facing, as shown in the photo below.
- Pin and sew the other side of the zipper to the wearer’s left side crotch seam.
- Place the fly shield on top of the zipper on the wearer’s left side of the crotch seam and sew it into place.
- Close the zipper and topstitch the fly facing to the wearer’s right side of the pants without catching the fly shield in the seam.

Step 27
INSEAM
- Pin and sew the front and back inseams together, being sure that the crotch seams are aligned in the center.
- Repeat for both the main fabric and the lining.
Step 28
LEG SLIT
- Fold the serged edge of the leg slit towards the inside of the pants.
- Top stitch the folded edge of the leg slit with ¼ inch seam allowance to hide the serged edge on the inside.
Step 29
BELT LOOPS
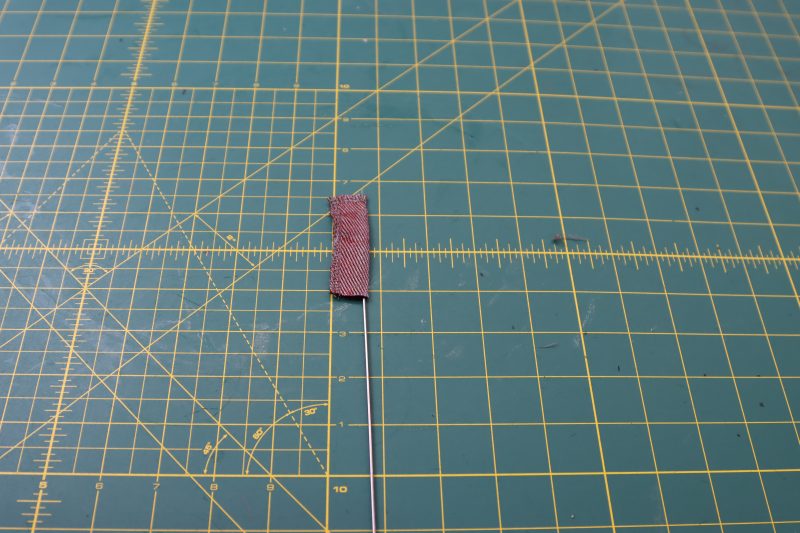
- Fold each individual belt loop piece long ways, right sides together.
- Sew or serge two of the open edges, making a tube with an open end.
- Use a tube turner to turn the tubes right sides out.
- Iron the belt loops flat.
Step 30
WAISTBAND
- Iron interfacing into the wrong side of the waistband.
- Fold the long sides of the waistband towards the middle until they meet each other.
- Iron the folds in place.
- Fold the entire waistband in half longways, then iron it in place again.
- Sew the short ends of the waistband closed, right sides together, to create the ends that will be at the front opening of the pants.
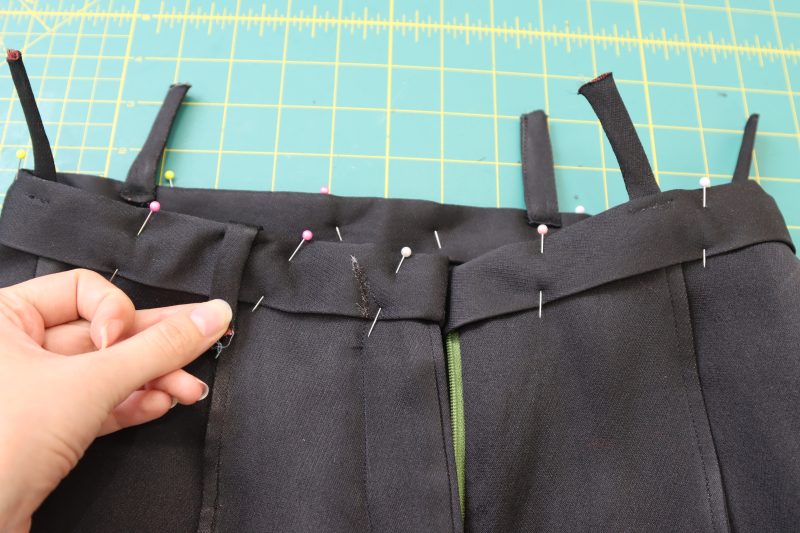
- Sandwich the waistband around the waistline of the pants and begin pinning in place.
- Place the belt loops around the waistband of the pants at the side seams and pin tucks.
- Top stitch the belt loops to the INSIDE of the waistband so that they wrap around the top of the waistband.
- Tuck the bottoms of the belt loops (with the raw edges) into the open edge of the waistband.
- Top stitch the waistband to the pants, being sure to go over the bottoms of the belt loops to secure them in place.
Step 31
HEM
- Fold the bottom hem of the pants with a ½ inch fold towards the wrong side of the pants.
- Iron the fold in place.
- Place hem tape into the folded hem and iron again to secure the hem tape.
- Alternately, you can always use a blind hem stitch or sew a blind hem by hand with a needle and thread.
Step 32
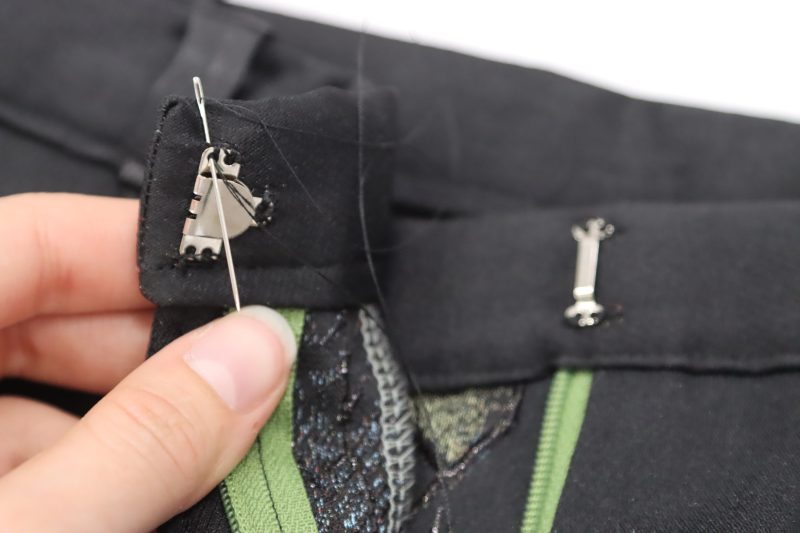
HOOK & EYE CLOSURE
- Hand sew the eye part of the hook and eye closure to the part of the waistband that is overlapped by the front closure.
- Hand sew the hook part of the hook and eye closure to the inside of the part of the waistband that overlaps the front closure.
Sewing Success: The Finished Perugia Peplum Blazer and Pants Suit
Share this post with a friend (or two!), download the Perugia Peplum Blazer and Pants Suit free sewing pattern, and show us which fabrics and colors you choose, using the hashtags #MoodPerugiaPattern & #MadeWithMood—and don’t forget to tag us @MoodFabrics, too.


Free Sewing Pattern Inspiration for Your Next Project
With 470+ free sewing patterns and counting, your opportunities for sewing with Mood are endless!
We hope you had as much fun sewing this peplum blazer and pants suit pattern as we did! As always, we want to hear from you—share your thoughts and comments below and let us know where you’ll be wearing the Perugia Peplum Blazer and Pants Suit free sewing pattern!
Stunning fabric, and a fabulous look! I wish it wasn’t so difficult to purchase all the way from Scandinavia, but thank you as always for the amazing inspiration. I could seriously consider a trip to the US, purely to visit you guys and buy loads of fabric.
Would you please make a patterned for me i have a design but i dont know how make this as a pattern
Hey Nadia! Shoot us an email at patterns@moodfabrics.com with any ideas you have for future patterns. We love to get feedback like this!
For the blazer, are we intended to cut the darts out of the pattern? It indicates yes but in the instructions it’s different. Additionally, for the peplum darts, it appears that the raw edges align without the darts and there was no real dart location on the pattern piece that I could identify.
Hi Molly! Wheat I do in the tutorial is I cut out the darts from the paper pattern, but I use that cutout to trace on the fabric with tailor’s chalk. You want to sew on the dart lines, not cut those lines.
If this is still helpful, I had the same thoughts on the peplum darts. I made the muslin without the peplum darts. Everything lined up perfectly and looked fine (in my opinion) leaving them out. I’m using a chenille fabric to make this suit (which may be a bit crazy, but…) so I’m glad for the decreased bulk there.
would really like both imperial and metric amount of fabric please . Also consider advising what each item individually fabric requirements are because I would only like to complete the jacket. Fab pattern though.
I provided my name and email address, pressed subscribe button and got confirmation that email will be send to my inbox with the PDF download, but I never receive any pattern! I am not sure what is wrong!!
Hey Maisa, I’m sending you the pattern directly to your inbox right now. Check again when you see this comment.
Hello. I was just wondering whether a person could opt to add interfacing to the jacket to make it a tad bit sturdier as I may not be using the same fabric or a fabric of a similar weight.
Hey Ty, yes you can interface the jacket. I recommend just interfacing the bodice and the peplum but not the sleeves.
omg this looks SO nice!! I can’t believe I haven’t come across this on the Sewciety blog before!!!! This would make such a chic wedding suit for a bride, or I wonder what it could look like in a stiffer summery fabric.