
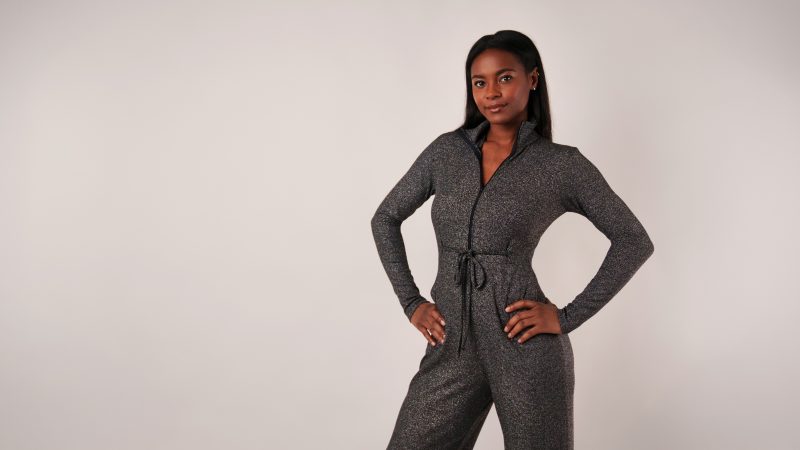
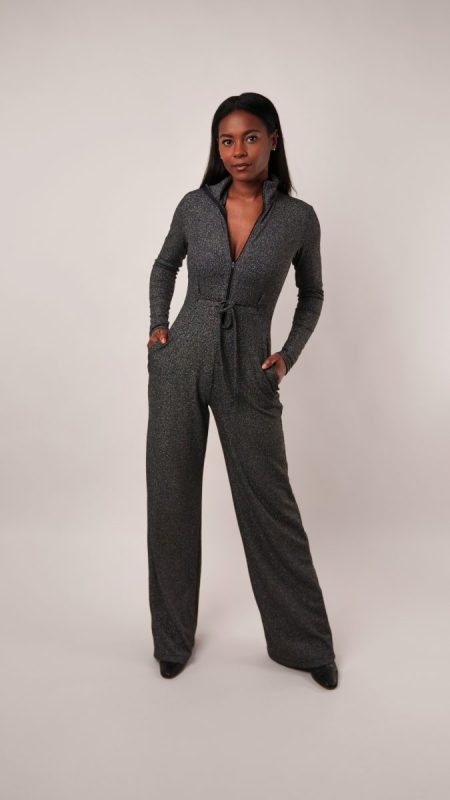
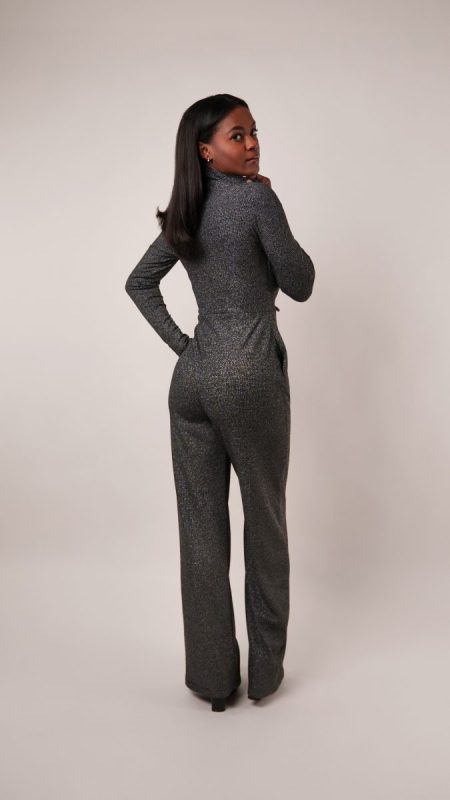
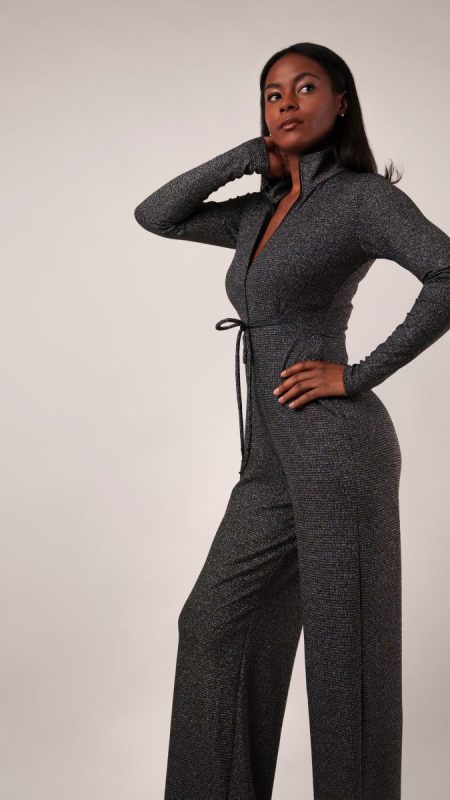
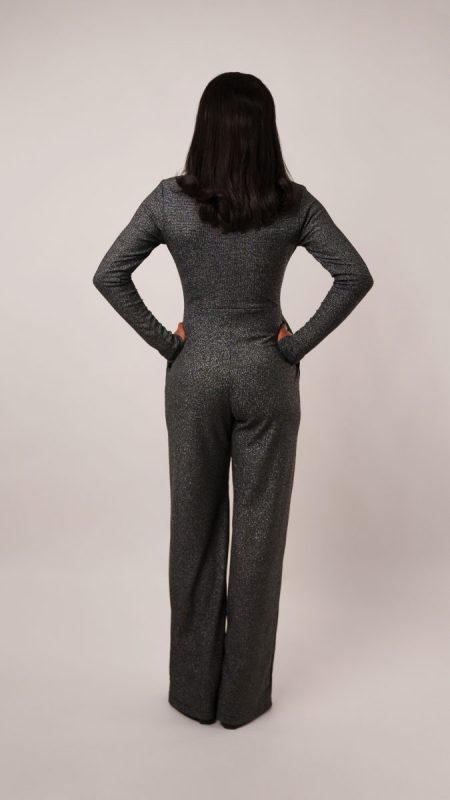
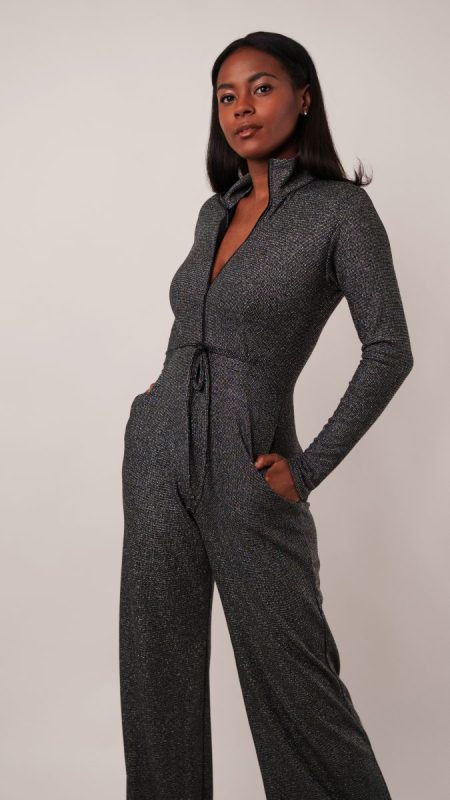
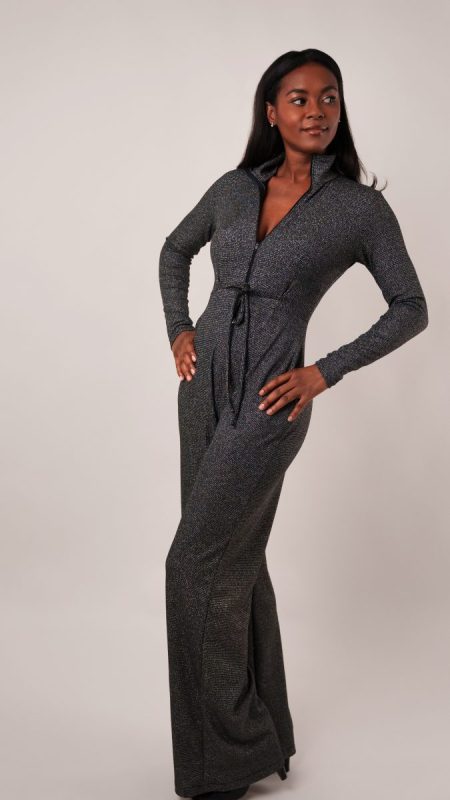
Meet the Zola Zip Front Jumpsuit, an all-in-one outfit with just enough attitude to turn a sidewalk into a runway.
Crafted from a sparkly metallic rib knit rayon, this jumpsuit catches the light like city pavement after rain. The fabric has a soft, stretchy give that forgives the little beginner hiccups that happen between the first pin and the final press. It’s the kind of knit that cooperates with you and your sewing machine, making you look far more advanced than your seam ripper history might suggest.
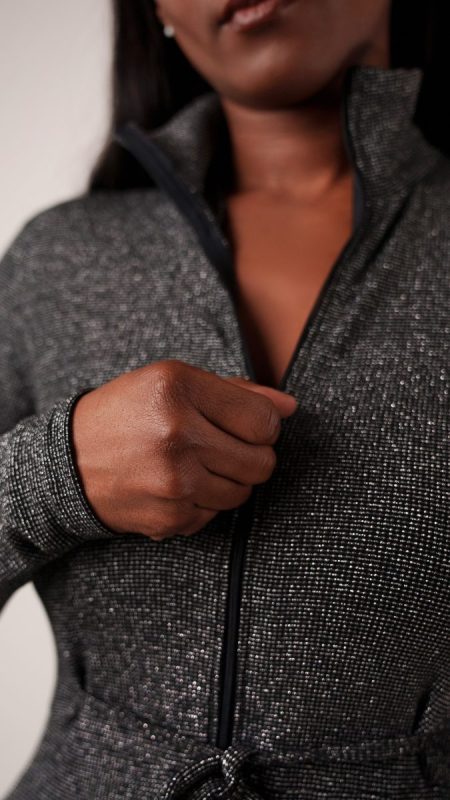
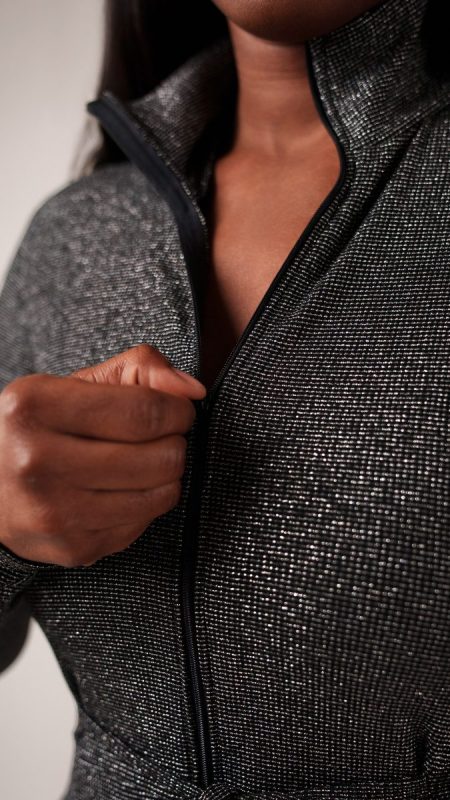
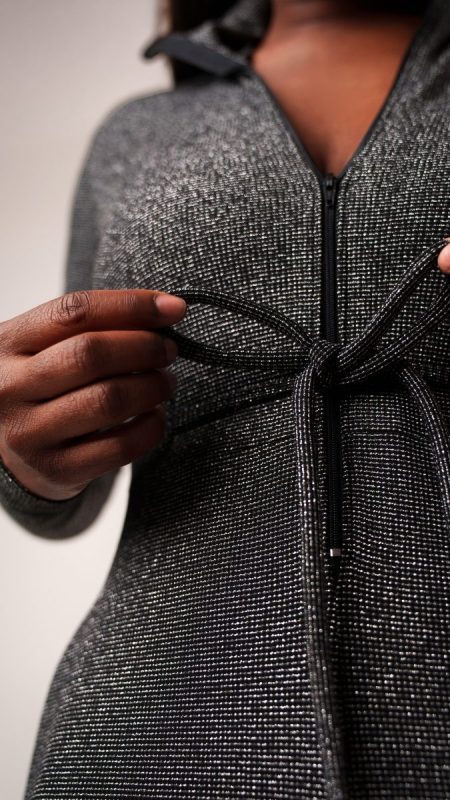
The visible front zipper is the star of the show. Zip it high for a sleek, streamlined silhouette with a cozy collar framing your face, or zip it low for a little drama and cool air on your skin. Adjustable waist ties let you cinch and sculpt or keep things relaxed and effortless, while the flowy wide leg moves with you and makes even a coffee run feel cinematic.
Designed with beginners in mind, this pattern keeps things approachable. The rib knit rayon’s stretch means fewer fitting headaches and more effortlessly fashionable moments. There are no fussy closures hidden in tricky seams and no rigid fabric demanding perfection. Just thoughtful construction, clean lines, and a silhouette that does the heavy lifting for you.
The Zola Jumpsuit is loungewear that decided to get ambitious. It’s streetwear that still believes in softness. Sew it once, and you may find yourself plotting a second in another shade of shimmer.
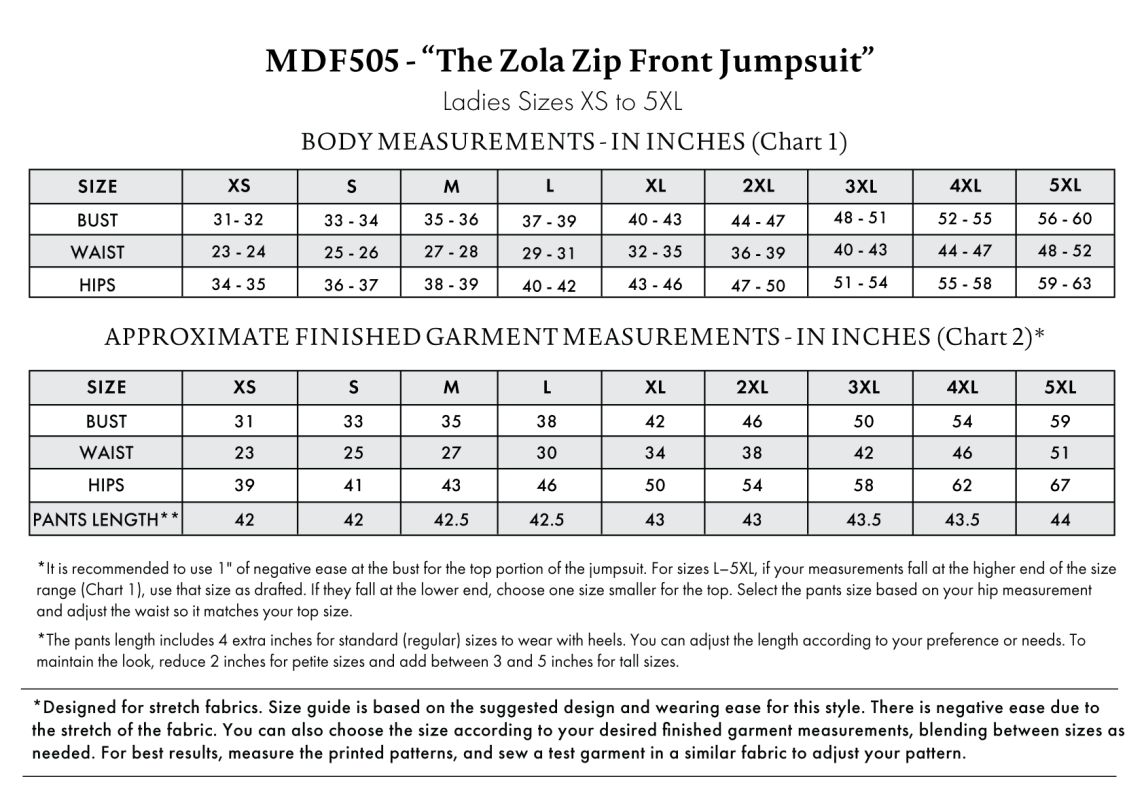
Essential Materials & Sizing Guide for the Zola Zip Front Jumpsuit
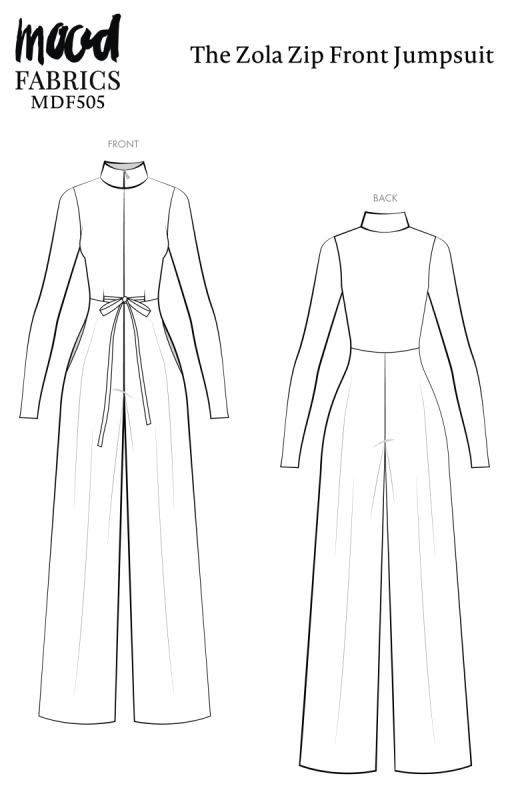
Continue reading for a breakdown of what knowledge and materials you need for creating your very own jumpsuit! We’ve got you covered with the recommended materials we used—if you want to follow along exactly—as well as a curated list of alternative fabric type recommendations if you want to customize your own version. The Zola Zip Front Jumpsuit free sewing pattern download includes technical drawings for seam and silhouette visibility, plus a size chart to help you find your perfect fit!
Purchase Products Used Below:
Quantities indicated are for sewing a size small jumpsuit.* Toggle the ‘SHOP THIS LOOK’ box to find quantity estimates for other sizes.
- 2.5 yards of Black and Metallic Silver Stretch Rib Knit
- 0.5 yards of Medium Weight Knit Fusible Interlining, Single Sided – Black
- 1 each of Black Regular Zipper with Nylon Coil – 24″
- 1 each of Gutermann Sew All Thread 1000m – 10 Black
- MDF505 – Zola Zip Front Jumpsuit Sewing Pattern (Free download below!)
Additional Products Used:
*Quick Tip! The ‘SHOP THIS LOOK’ box defaults to full-yard quantities. To order an exact half-yard quantity for any fabric, simply use the decrease quantity button (-) to subtract by the half yard. Then click “ADD TO CART” to add all materials to your cart.
(Our system can only display full-yard quantities initially.)
Alternative Fabric Type Recommendations:
The Zola Zip Front Jumpsuit sewing pattern is best suited for light or medium weight stretch knit fashion fabrics. Explore other fabric types or colors from our featured collections for your jumpsuit with the links below.
Download Your Free Sewing Pattern
Submit your name and email in the form below to receive the download link for the Zola Zip Front Jumpsuit free sewing pattern directly in your inbox. Mood Sewciety Patterns will send your free download link via email with the subject line: ‘Your Free Download from Mood Sewciety – The Zola Zip Front Jumpsuit’ (in PDF format for A4 and letter-size printing).
© MoodFabrics.com / MoodSewciety.com – Mass production, resale, or distribution of this pattern in any form is strictly prohibited.
Find Your Perfect Fit
The Zola Zip Front Jumpsuit Sizing Guide is based on the suggested design & wearing ease for this style. You can also choose the size according to your desired finished garment measurements, blending between sizes as needed. Measure the printed patterns to make sure the dimensions are according to the desired fitting and adjust if needed before cutting the fabric. For best results, sew a test garment in a similar fabric to adjust your pattern.
Measurements may vary after adjustments. If using non-stretch fabrics, reference the approximate finished garment measurements chart to choose your size.
Note: Always read all the instructions before cutting the fabric!
How to Sew The Zola Zip Front Jumpsuit
The instructions provided below are designed to guide you through sewing the Zola Zip Front Jumpsuit from start to finish.

2 Tips for Sewing with Stretch Rib Knit
⇒ Make sure you set your iron to low or medium heat when pressing seams open so you don’t melt or warp the fabric.
⇒ I ended up using the stretch stitch (also known as the lightning stitch) on my sewing machine for every part of this garment. This will let your fabric stretch without popping any seams.
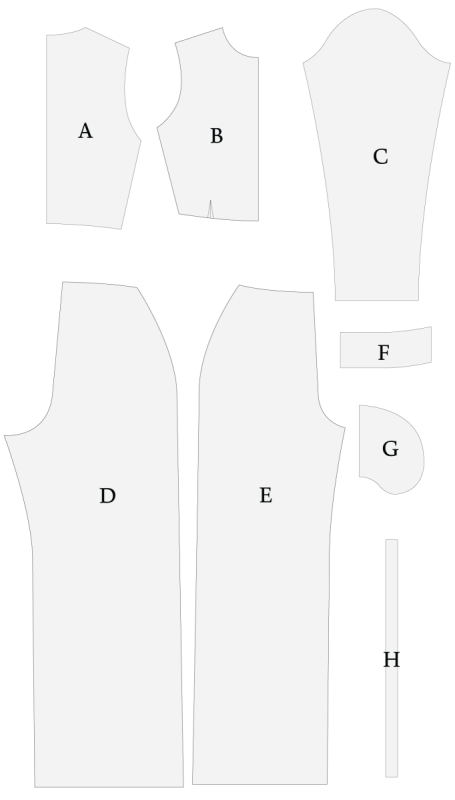
Pattern Pieces & Fabric Cuts Needed
- (A) TOP BACK
- Fabric – Cut 1 On Fold
- (B) TOP FRONT
- Fabric – Cut 2 Mirrored
- (C) SLEEVES
- Fabric – Cut 2 Mirrored
- (D) PANTS BACK
- Fabric – Cut 2 Mirrored
- (E) PANTS FRONT
- Fabric – Cut 2 Mirrored
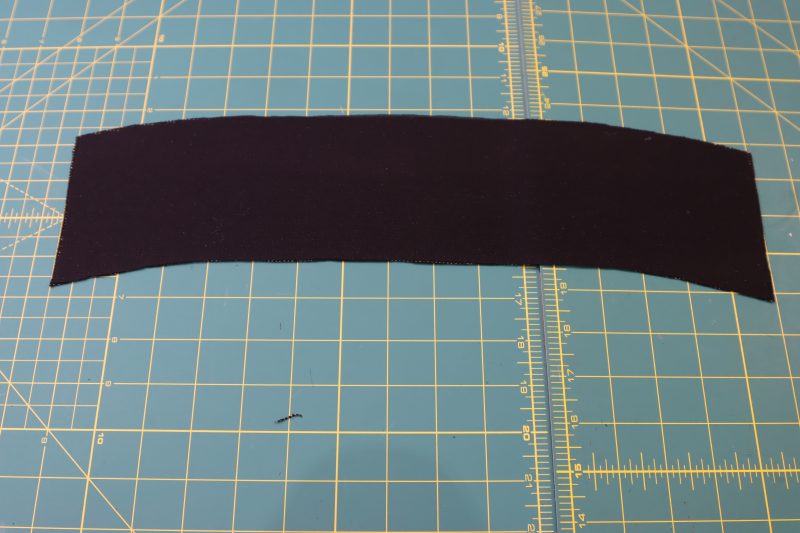
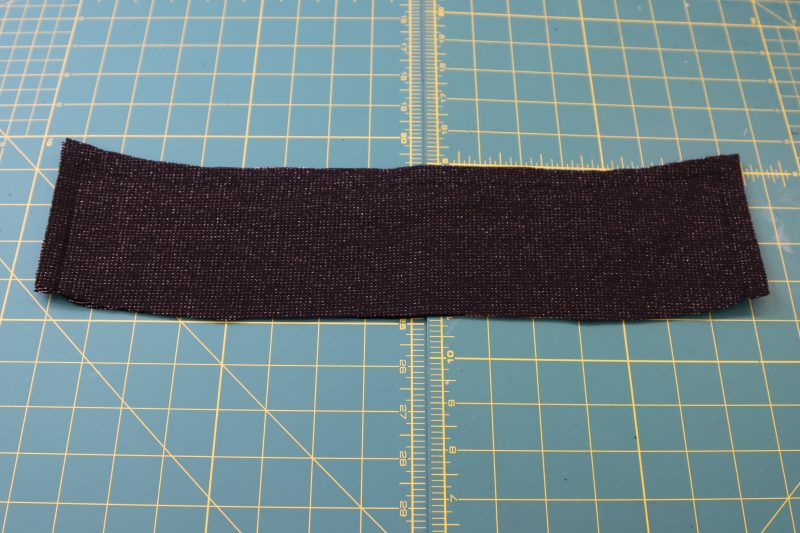
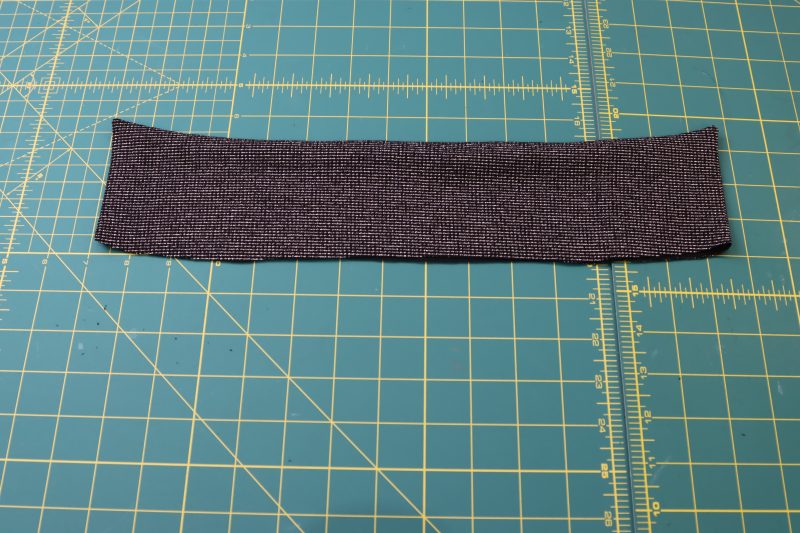
- (F) COLLAR
- Fabric – Cut 2 On Fold
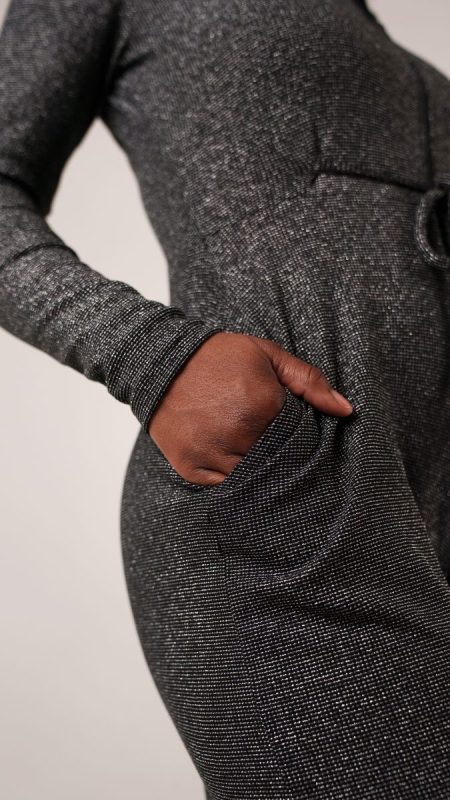
- (G) POCKETS
- Fabric – Cut 2 Mirrored Sets
- (H) FRONT TIES
- Fabric – Cut 2
Sew with a 1/2″ seam allowance for all seams unless otherwise specified.

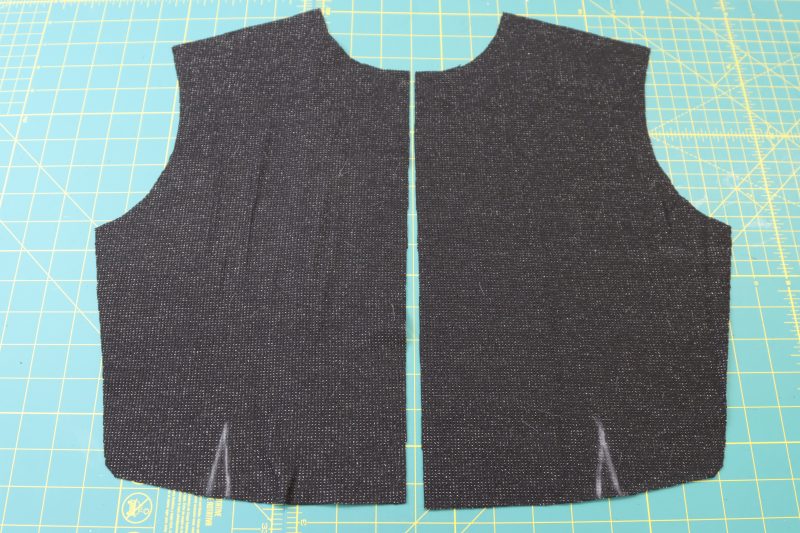
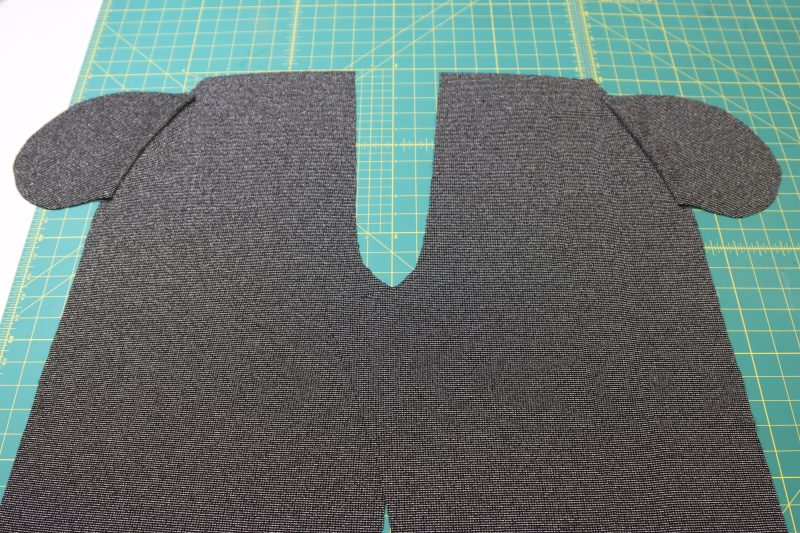
Step 1
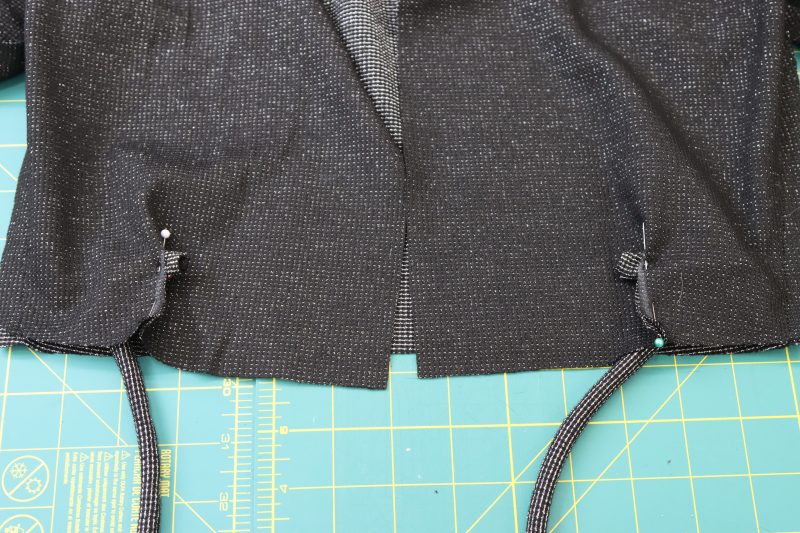
MARK SLITS
- Mark the slits for the waist ties using tailor’s chalk.
- Cut down the center of the triangular chalk lines (I know this looks like a dart, but it is technically not a dart because we’re going to insert the waist ties into the slits. That’s why we cut it open).
Step 2
SHOULDER & SIDE SEAMS
- Place the front pieces on top of the back piece right sides together.
- Pin and sew the shoulder and side seams to connect the front and back pieces.
Step 3
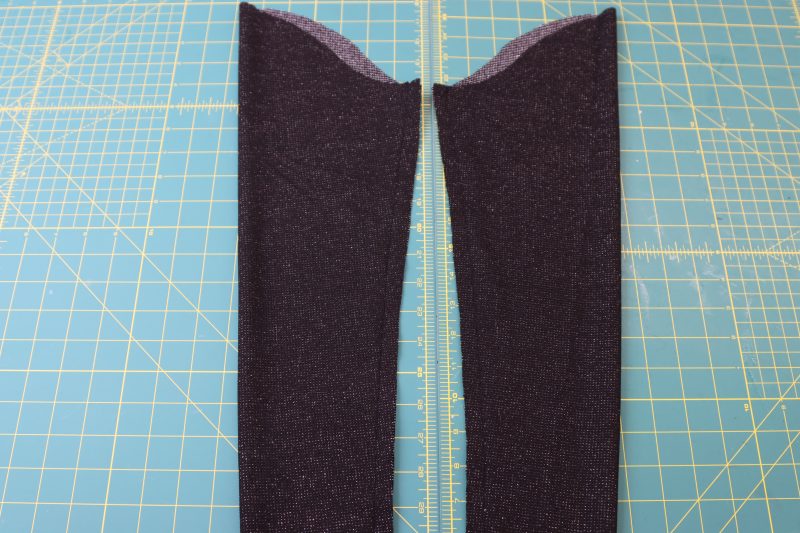
SLEEVES
- Fold the sleeves right sides together with the sleeve inseams lined up.
- Pin and sew the sleeve inseams.
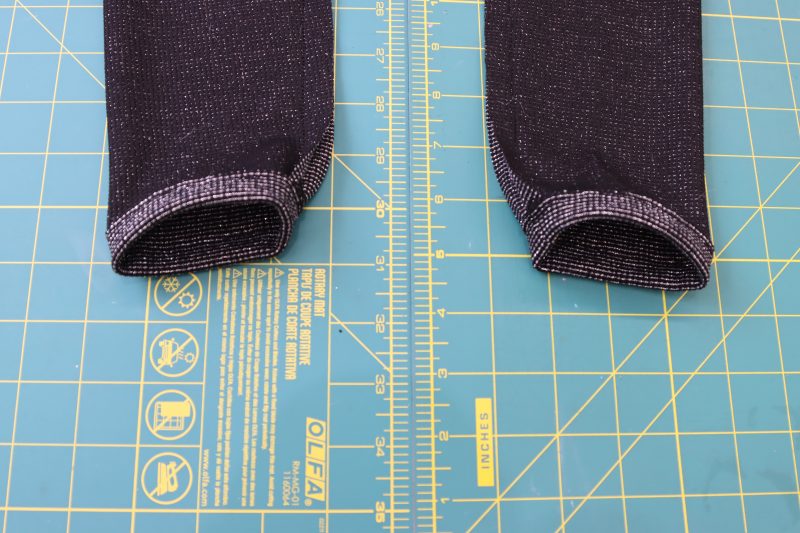
- Fold the wrist opening of the sleeve toward the wrong side of the fabric by ½ inch.
- Press the fold into place.
- Pin and sew a hem on the sleeves with ⅜ inch seam allowance.
- Insert the sleeve caps into the armscyes right sides together, making sure that the front of the sleeve is matched up with the front of the jumpsuit top.
- Pin and sew the sleeves into the armscyes.
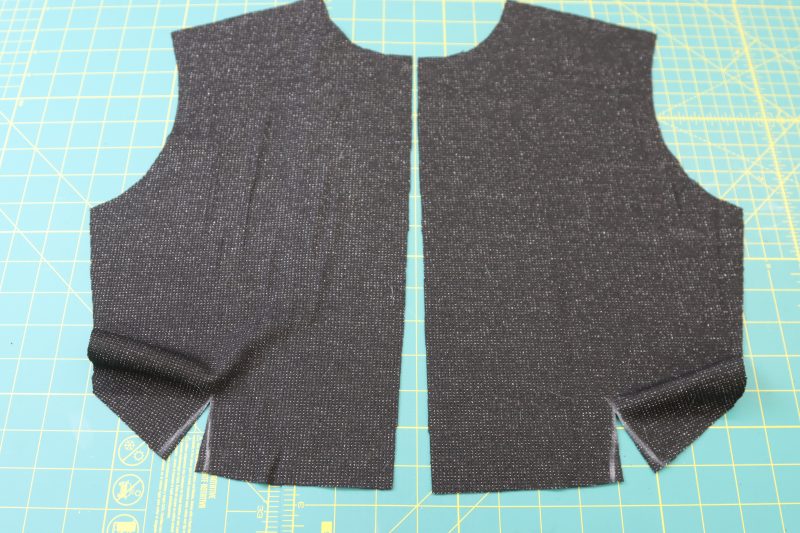
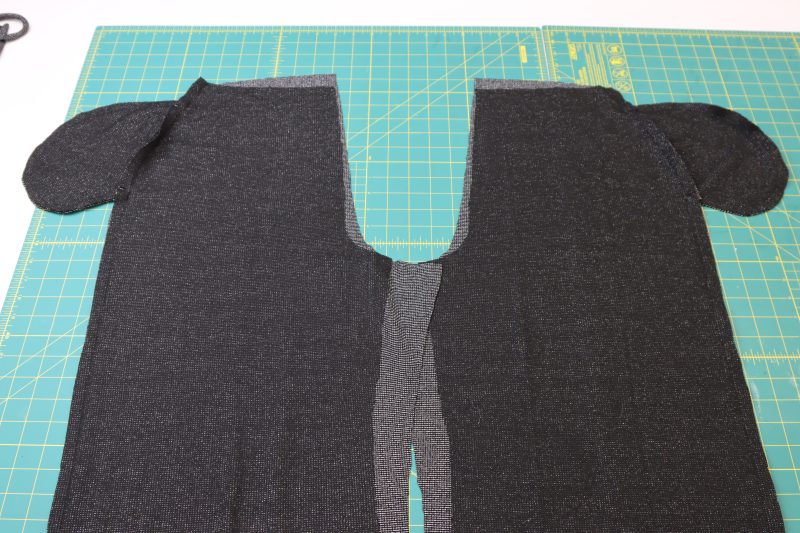
Step 4
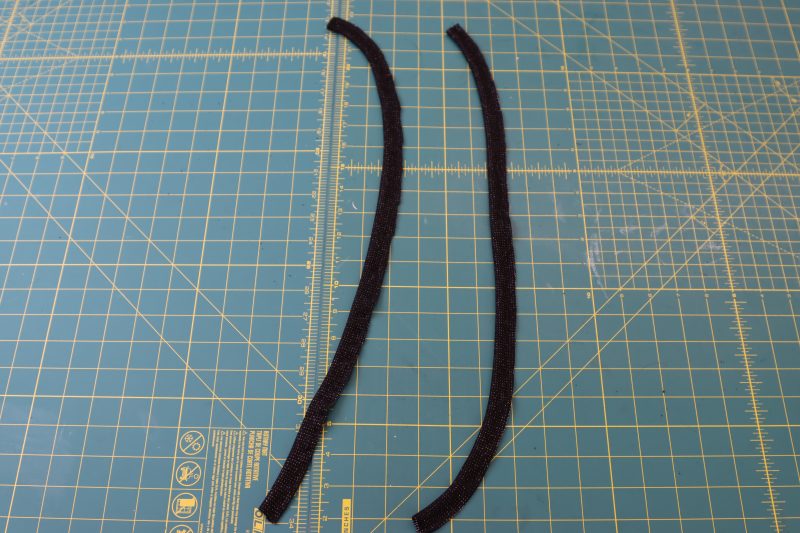
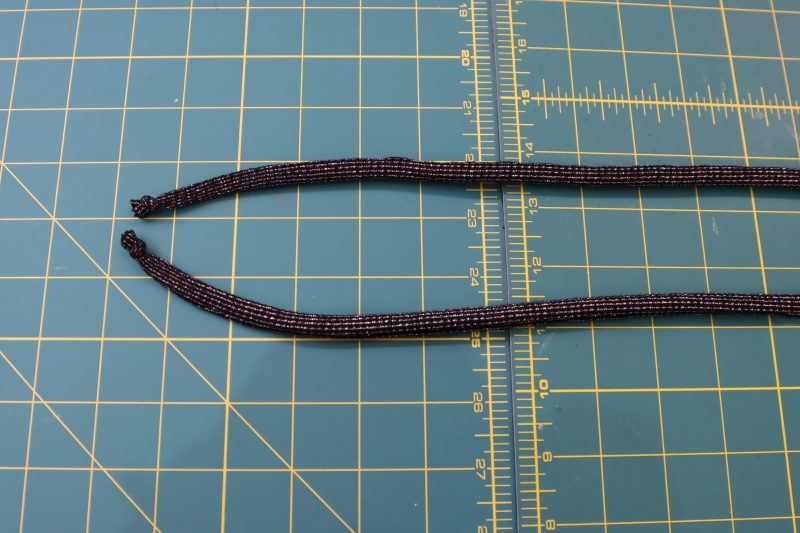
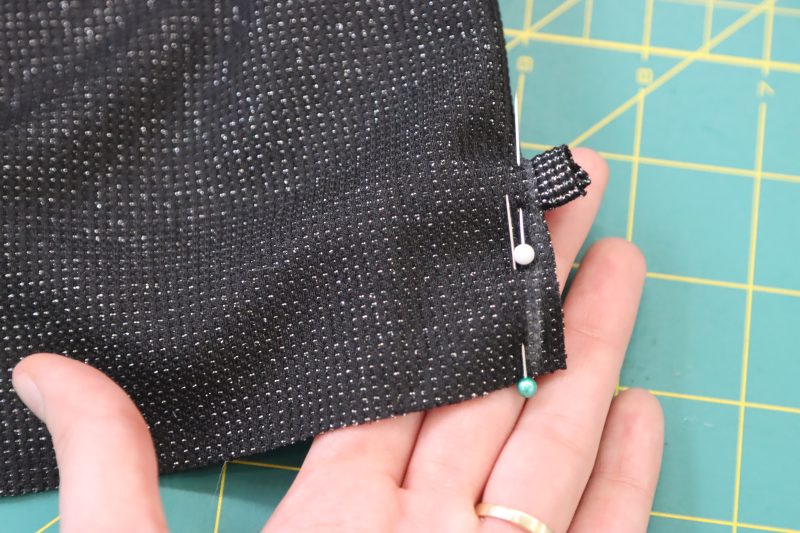
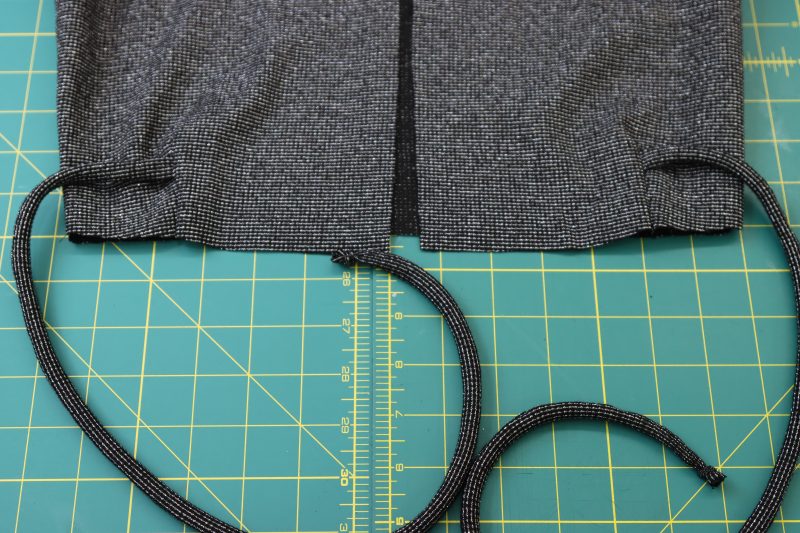
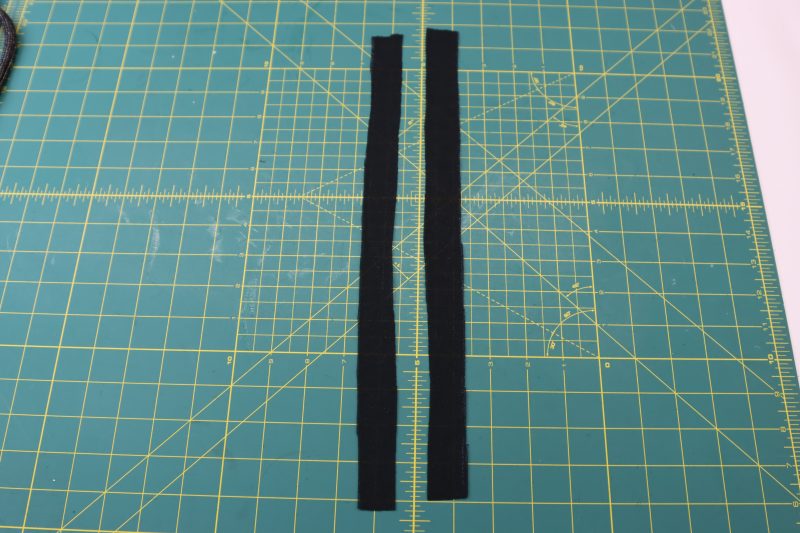
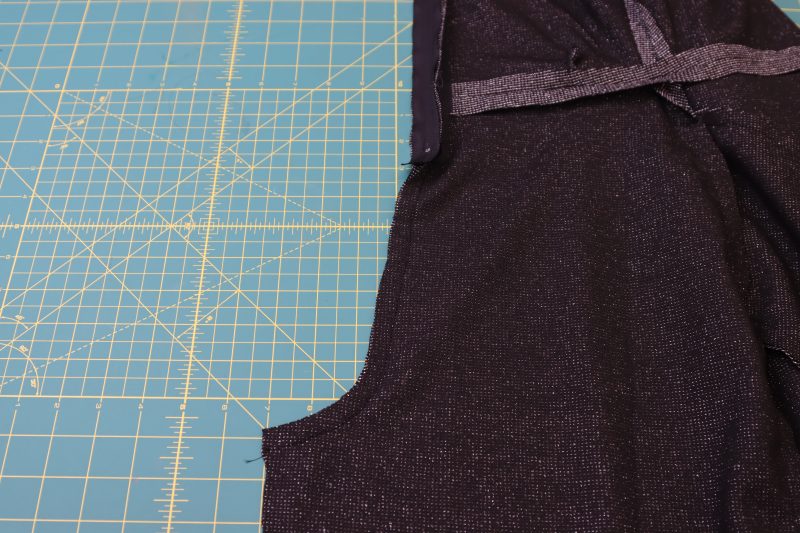
WAIST TIES
- Fold the waist ties long ways, right sides together.
- Sew down the length of the folded strip of fabric with ¼ inch seam allowance.
- Flip the waist ties right sides out.
- Tie a knot at one end of each of the waist ties.
- Insert the untied end of the waist tie into the slit at the waist of the top.
- Fold the slit in half with the fabric right sides together and the tie sandwiched in between the two sides.
- Pin and sew along the chalk lines.
- Repeat for both waist ties.
Step 5
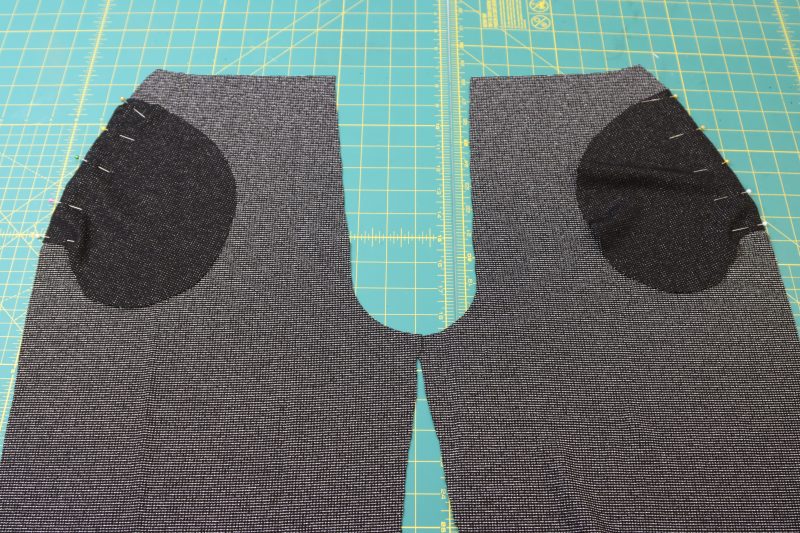
POCKETS
- Cut the notches that indicate where the pockets go on the front and back pants pieces.
- Place a pocket piece right sides together on each of the front pant and back pant legs lined up with the notches.
- Pin and sew the pockets to the pant legs.
- Flip the pockets out and press the seams open and flat.
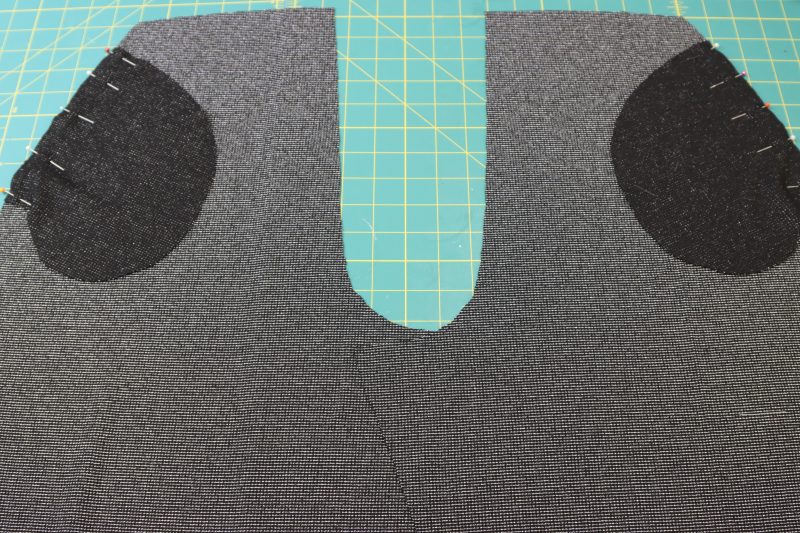
- Place the front pieces on top of the back pieces right sides together.
- Pin the side seams of the pants together, making sure to pin around the pocket and leave the opening.
- Sew the side seams of the pants, including around the pocket bags.
Step 6
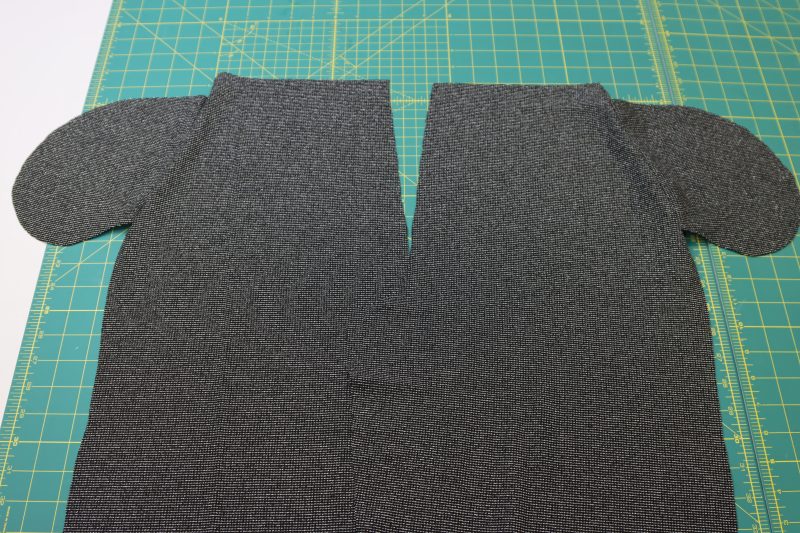
BACK CROTCH
- Place the back pants pieces right sides together with the back crotch seams lined up.
- Pin and sew the back crotch seam.
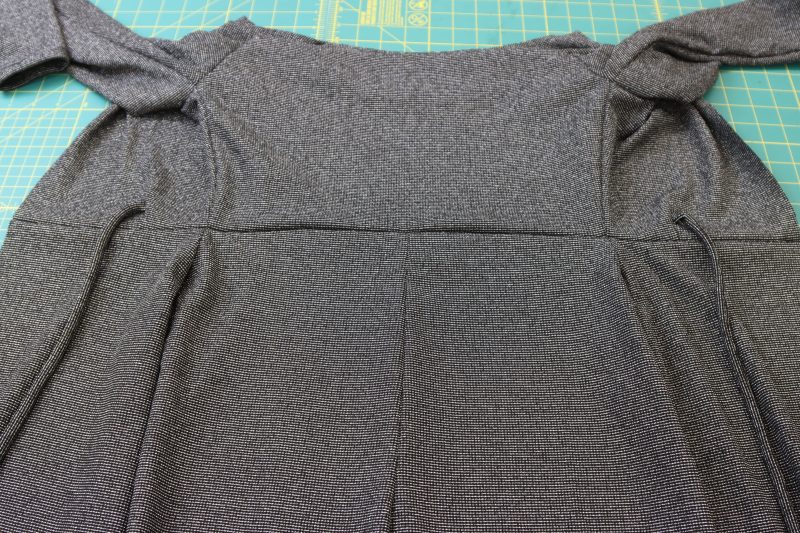
Step 7
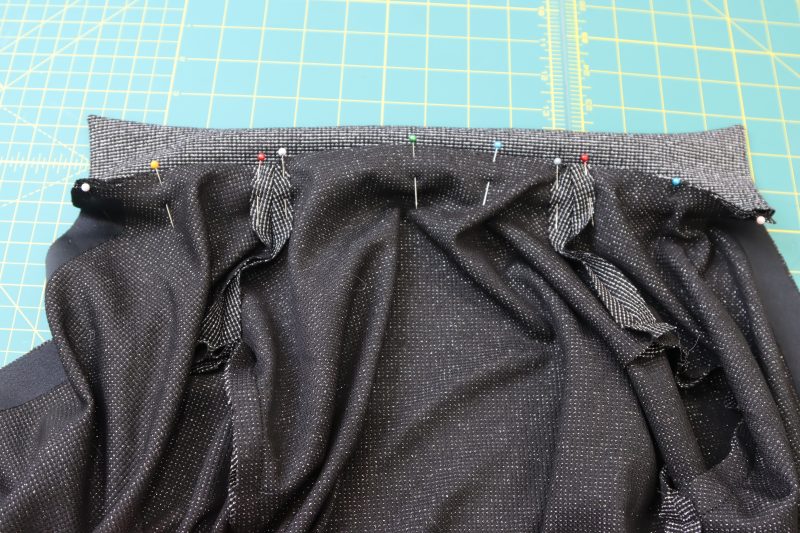
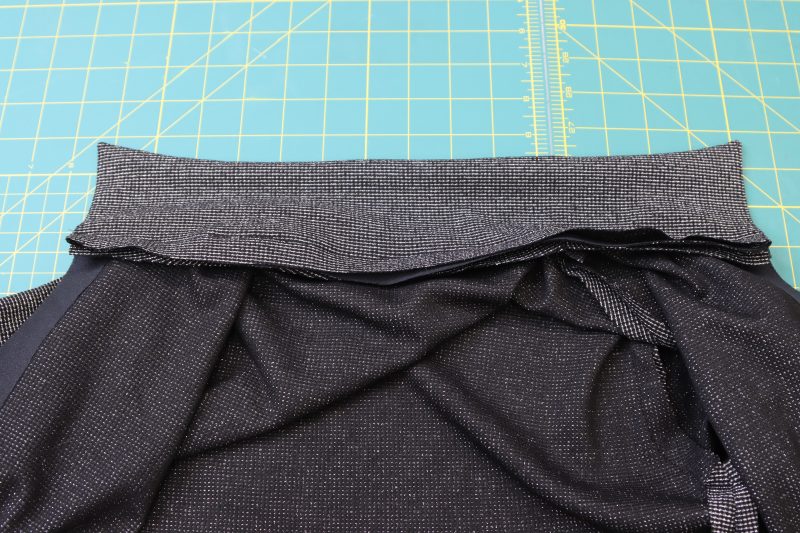
WAISTLINE
- Place the bottom edge of the top right sides together with the top edge of the pants.
- Pin the top to the pants, making sure the side seams line up with each other.
- Sew the top to the pants.
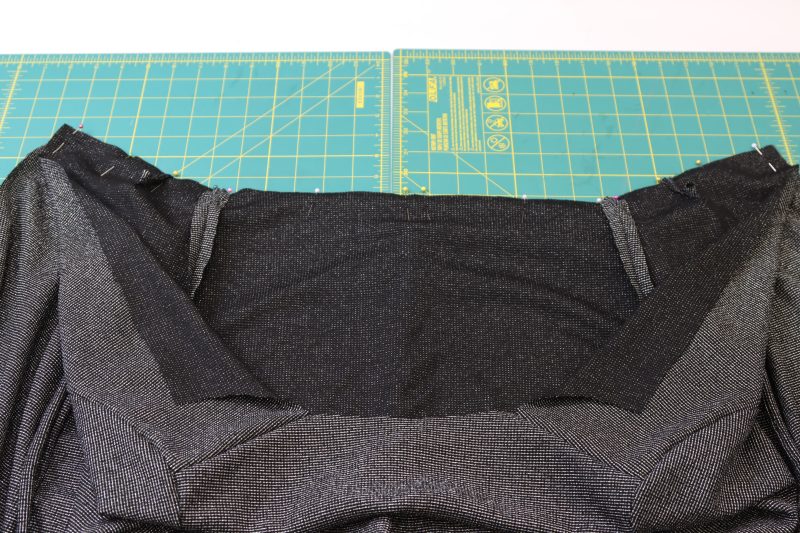
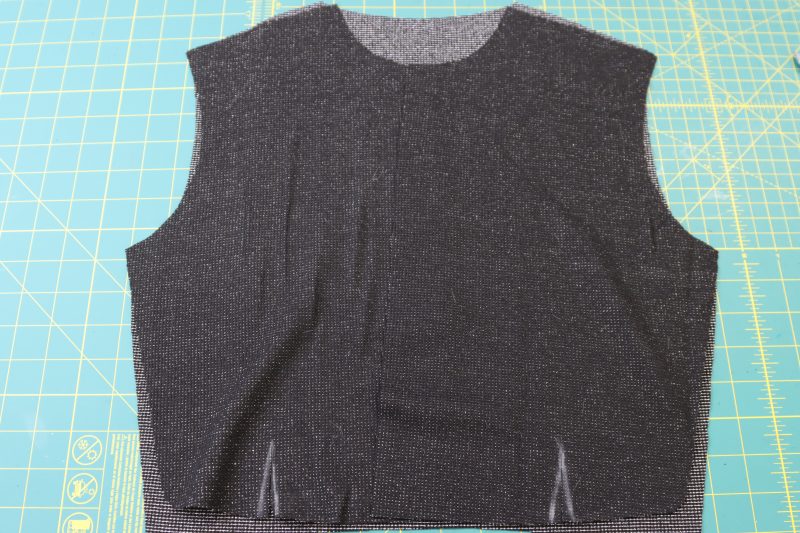
Step 8
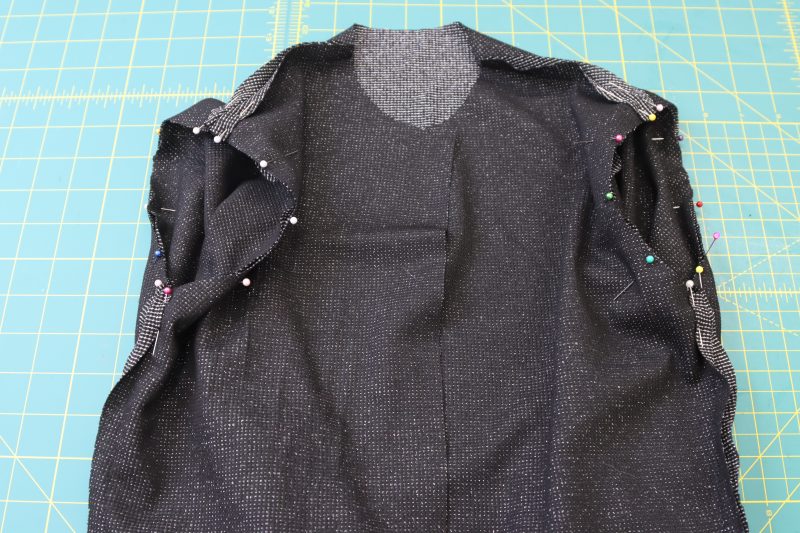
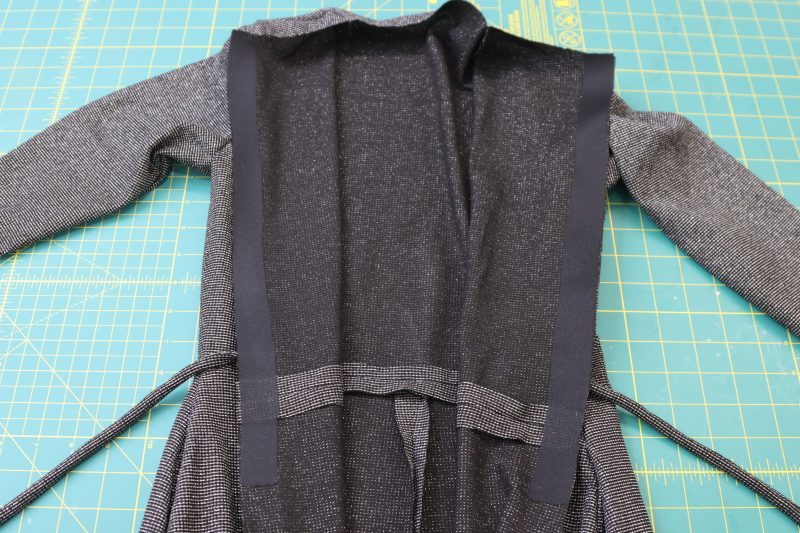
COLLAR
- Iron a piece of fusible knit interfacing to the wrong side of one of the two collar pieces.
- Place the two collar pieces right sides together.
- Pin and sew around the top and sides of the collar.
- Clip the corners of the collar.
- Flip the collar right sides out.
- Press the seams flat.

Step 9
CENTER FRONT INTERFACING
- Cut two strips of fusible knit interfacing that are 1 inch wide and 16 inches long (or as long as you want the zipper to be in the center front of the jumpsuit).
- Place the strips along the wrong sides of the center front opening.
- Iron the strips to the center front opening.
Step 10
ATTACH COLLAR
- Pin the side of the collar that has the interfacing right sides together with the neckline of the top.
- Sew the collar to the neckline.
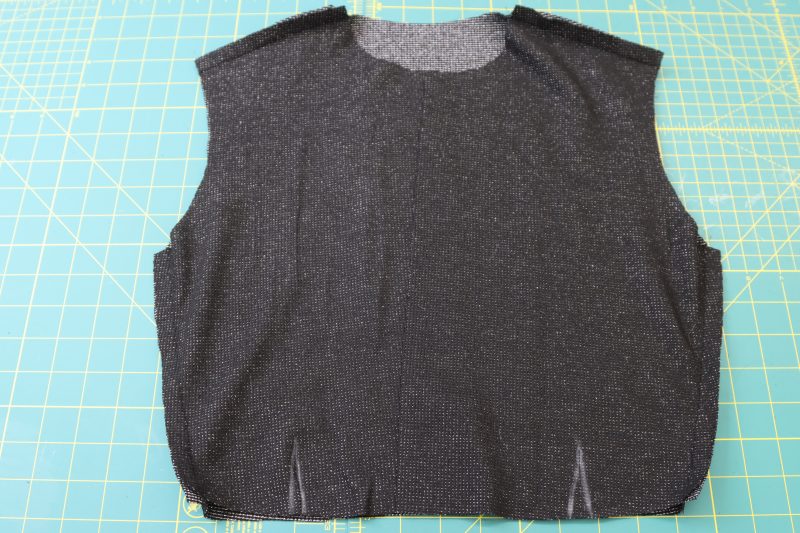
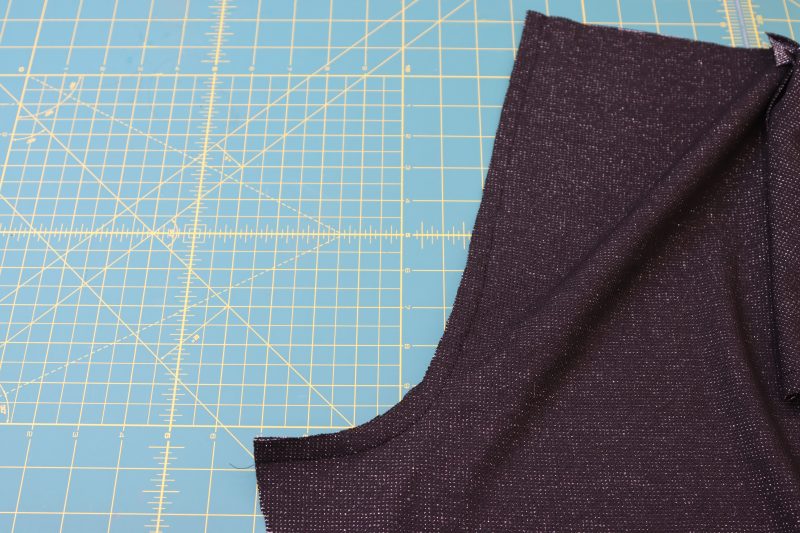
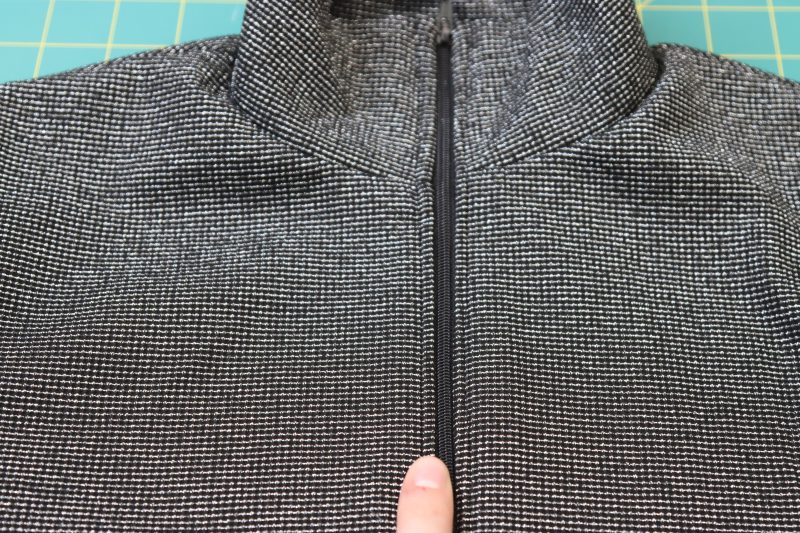
Step 11
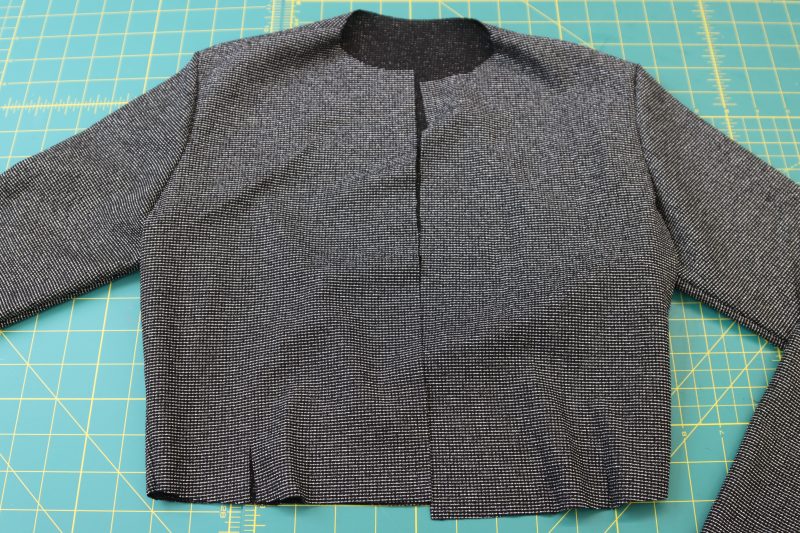
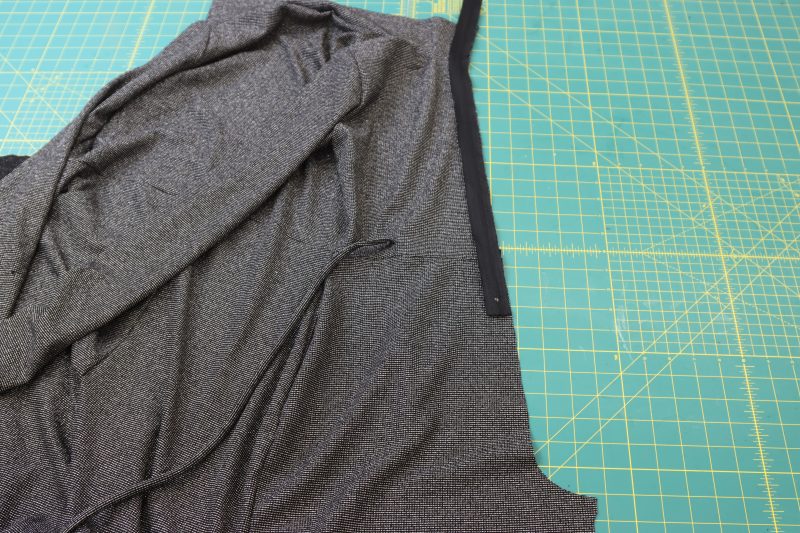
ZIPPER
- Place the zipper right sides together with one of the sides of the center front opening.
- Pin and sew the side of the zipper tape closest to the raw edge of the fabric.
- Flip the jumpsuit inside out.
- Pin the other side of the zipper tape to the opposite side of the center front opening, right sides together.
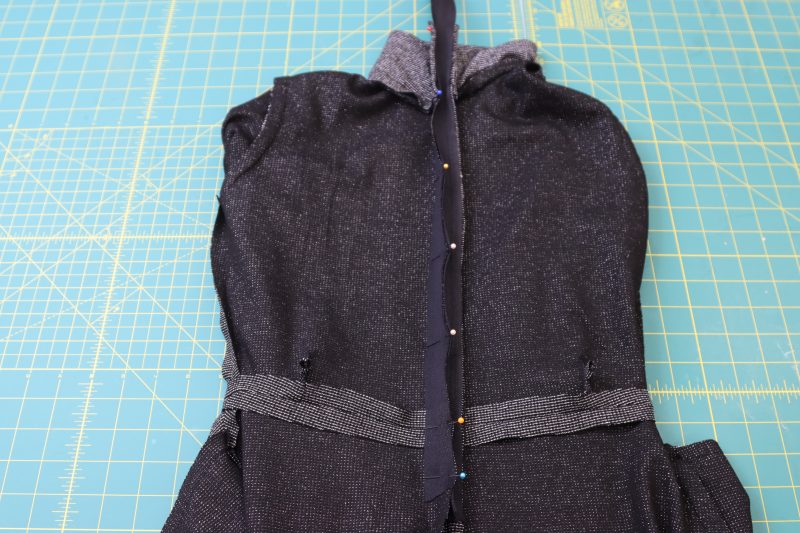
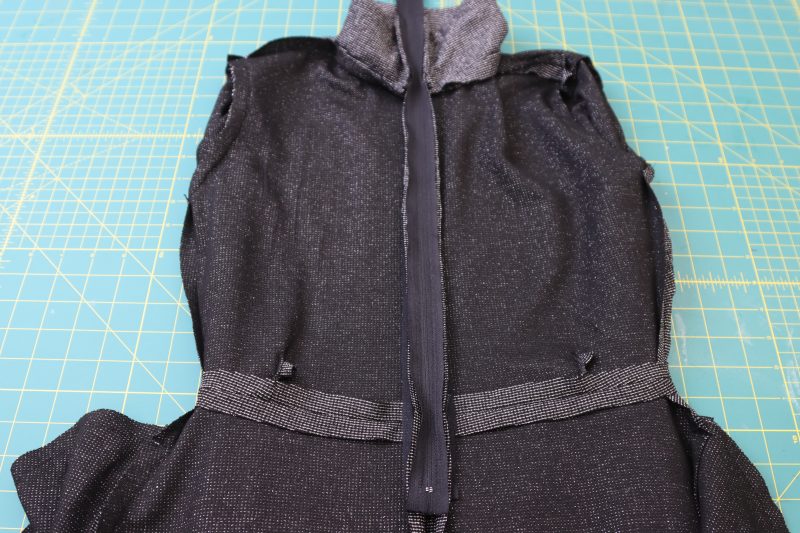
- Sew the other side of the zipper.
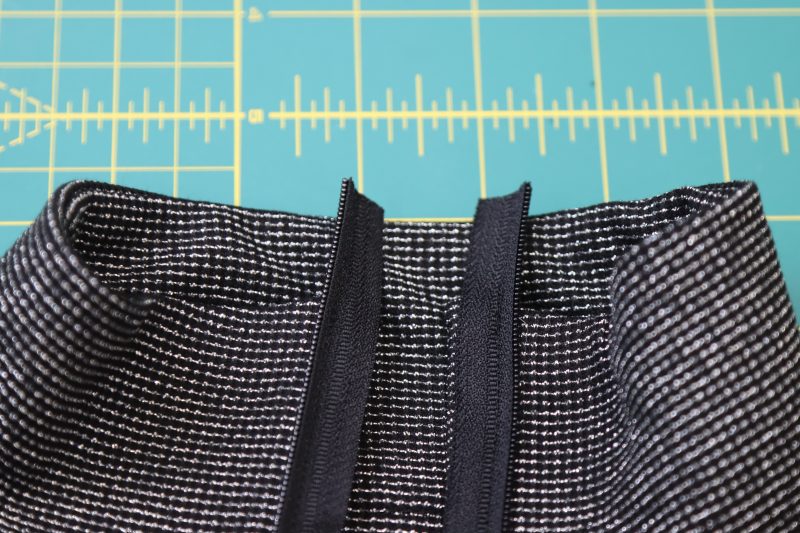
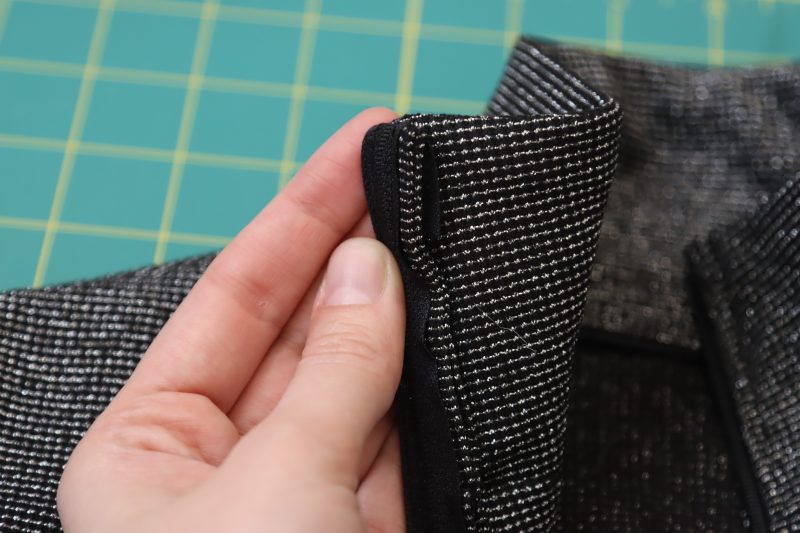
- Trim the excess zipper tape at the top of the collar.
- Tuck the ends of the zipper tape under the seam allowance of the zipper.
- Topstitch over the sides of the zipper, being sure to catch the ends of the zipper tape at the top of the collar.
Step 12
FRONT CROTCH
- Place the front pants pieces right sides together with the front crotch lined up.
- Pin and sew the front crotch seam under the zipper.
Step 13
INSEAM
- Place the front and back pants pieces right sides together with the crotch seams lined up.
- Pin and sew the inseam.

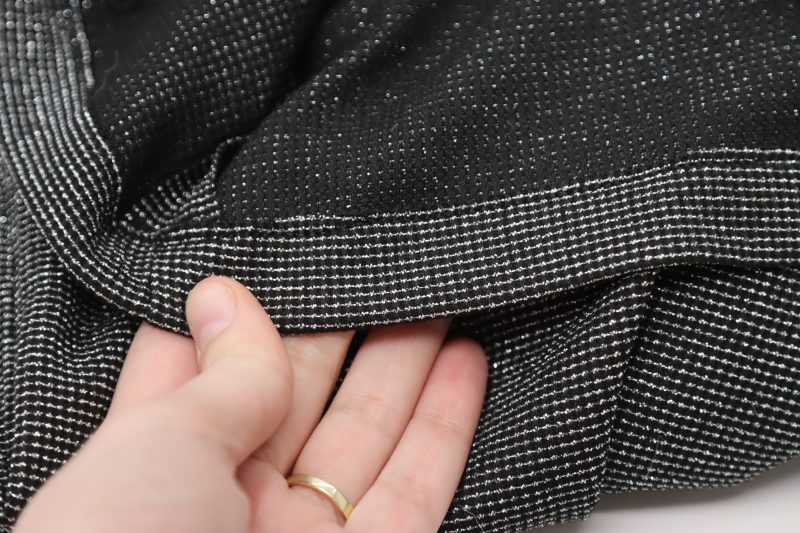
Step 14
HEM
- Fold a 1 inch hem at the bottom of the pants.
- Iron the fold into place.
- Sew the hem with ⅞ inch seam allowance.
Sewing Success: The Finished Zola Zip Front Jumpsuit
Share this post with a friend (or two!), download the Zola Zip Front Jumpsuit free sewing pattern, and show us which fabrics and colors you choose, using the hashtags #MoodZolaPattern & #MadeWithMood—and don’t forget to tag us @MoodFabrics, too.


Free Sewing Pattern Inspiration for Your Next Project
With 500+ free sewing patterns and counting, your opportunities for sewing with Mood are endless!
We hope you had as much fun sewing this jumpsuit pattern as we did! As always, we want to hear from you—share your thoughts and comments below and let us know where you’ll be wearing the Zola Zip Front Jumpsuit free sewing pattern!
Can’t get enough sewing with Mood? Browse your next make with our latest free sewing patterns.
I appreciate all the free patterns you give freely but I would like to request that they be available in AO copy shop file if possible. Thank you!
Hey Missy, we really appreciate your feedback and have been getting this comment a lot lately from other sewists. We definitely plan on offering other print formats in the future, so if you sign up for our email list, you’ll be notified as soon as we offer them.
Es muy bonito
i just want to receive the pattern! i’ve tried several times and still didn’t receive it
Hey Adrianne, I’m going to send it directly to your email right now. Check your inbox when you see this.
Hi
Thanks a lot for the pattern. I’ll try to do it. I have some problems with the shoulder pattern. When I lay the front and back piece paper patterns together, they don’t fit. If the line of the armholes fit then the neck parts don’t. Is there a mistake in the paper pattern?
thanks and greetings
Hey Heidi, the shoulder pieces might be slightly askew, but not by more than 1/2 inch. The dress won’t lay perfectly flat when you sew the shoulders and side seams, it will still be slightly wrinkled. Other than that, the shoulder should still be fine even if they’re not perfectly lined up.
Thank you for this pattern ! This JUMPSUIT is very amazing.
Hi! I want to use this pattern to make a costume race suit. If I didn’t add the tie waist do you think the structure would still be generally the same? Or should I add elastic inside if I want a similar fit? Thank you!
Hey Bridget. If you’re sewing it out of stretchy fabric, you don’t necessarily need to add the waist ties or any elastic. It should be nice and fitted around the waist as long as you cut out your size.