
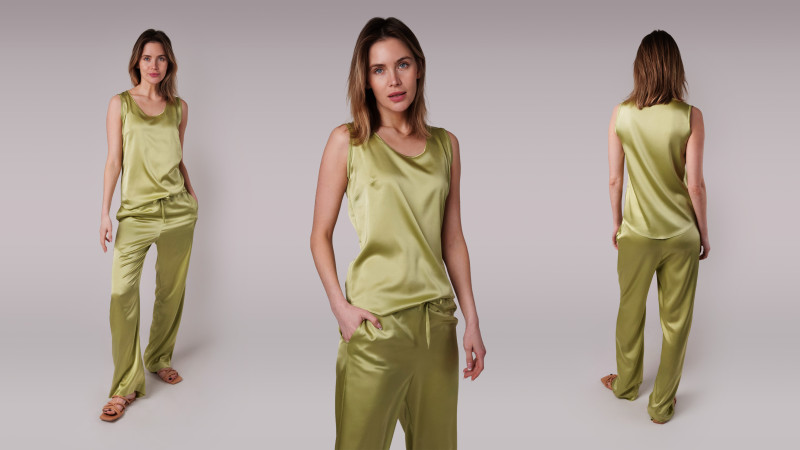
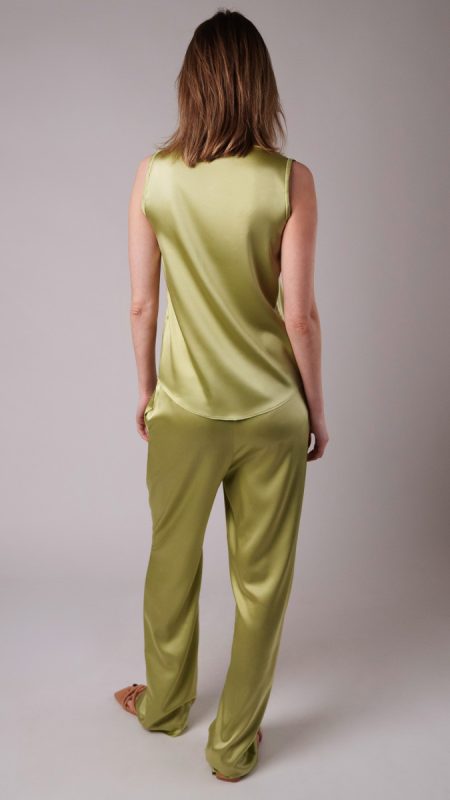
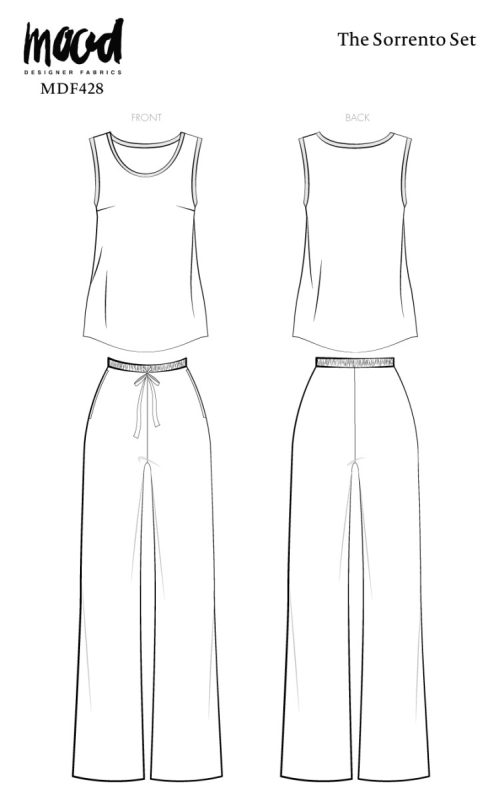
Effortlessly stylish—the Sorrento Set Free Sewing Pattern strikes the perfect balance between elegance and ease. The adaptable two-piece ensemble features a chic tank top and a breezy pair of pants. Suitable for a variety of occasions, this sewing pattern will have you feeling confident and looking your best! Whether you’re lounging at home or stepping out for an elegant evening, the Sorrento Set offers a sleek and sumptuous look.
The top is designed with front darts, a curved hem, and binding tape around the arms and neck for a refined touch. The matching pants complete this look with a relaxed-fit, a drawstring waist for adjustability, and convenient side pockets for functionality. With its fluid drape, smooth texture, and soft sheen, silk charmeuse enhances the beauty of this outfit. While this fabric exudes luxury, alternatives such as stretch cotton offer a more relaxed style, stretch rayon provides breathability with a gentle drape, and stretch sateen presents a more tailored silhouette.
Style the Sorrento Set with flat sandals and delicate accessories for a laid-back yet stylish outfit, or dress it up with heels and statement jewelry for an elevated ensemble. To make this timeless outfit work all year round, choose light pastels for spring, vibrant hues for summer, earthy tones for fall, and jewel tones for winter. No matter your choice, this free sewing pattern can be customized with endless options to suit your personal style and seasonal wardrobe needs.

Essential Materials & Sizing Guide for The Sorrento Set
Here is the breakdown of what knowledge and materials you need for creating your very own ensemble! We’ve got you covered with the recommended materials we used—if you want to follow along exactly—as well as a curated list of alternative fabric recommendations if you want to customize your own version. The Sorrento Set free sewing pattern download includes technical drawings for seam and silhouette visibility, plus a size chart to help you find your perfect fit!
Purchase Products Used Below:
Quantities indicated are for sewing a size small set. Toggle the ‘SHOP THIS LOOK’ box to find quantities for other sizes.
- 4 yards of Stretch Silk Charmeuse – Nile Green – Premium Collection
- 1 spool of Gutermann Sew All Thread 100m – 721 Mist Green
- 1 each of Clover Bias Tape Maker – 18mm
- 1 each of Schmetz Microtex Sharp Machine Needles – 80/12 – 5 ct
- 1 each of Dritz Extra-Fine Satin Pins Size 17 – 1-1/16″ – 500 ct
- MDF428 – Sorrento Set Sewing Pattern (Free download below!)
Alternative Fabric Recommendations:
The Sorrento Set is best suited for lightweight and medium-weight fashion fabrics.
Download Your Free Sewing Pattern
Submit your name and email in the form below to receive the Sorrento Set free sewing pattern directly in your inbox. Mood Sewciety Patterns will send your free download via email with the subject line: ‘Your Free Download from Mood Sewciety’ (in PDF format for A4 and letter-size printing).
Find Your Perfect Fit
The size guide below is based on the suggested design & wearing ease for this style. You can choose the size according to your desired finished garment measurements, blending between sizes as needed. Measure the printed patterns to make sure the dimensions are according to the desired fitting and adjust—if needed—before cutting the fabric. For best results, sew a test garment in a similar fabric to adjust your pattern.
Note: Measurements may vary after adjustments. If using non-stretch fabrics, reference the approximate finished garment measurements chart to choose your size.

How To Sew The Sorrento Set
Sew with a 1/2″ seam allowance for all seams unless otherwise specified.
Use extra-fine needles to avoid leaving punctures in the fabric.
Finish the edges of the fabric with a serger or an overcast stitch.
Step 1
FRONT DARTS
Sew the darts at the front of the top.
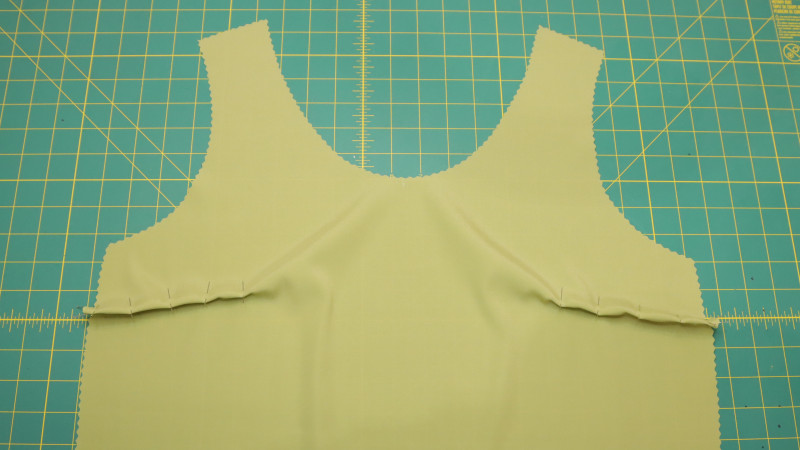
Step 2
SHOULDER SEAMS
Sew front and back together at the shoulder seams.
Step 3
SIDE SEAMS
Sew front and back together at the side seams.
Step 4
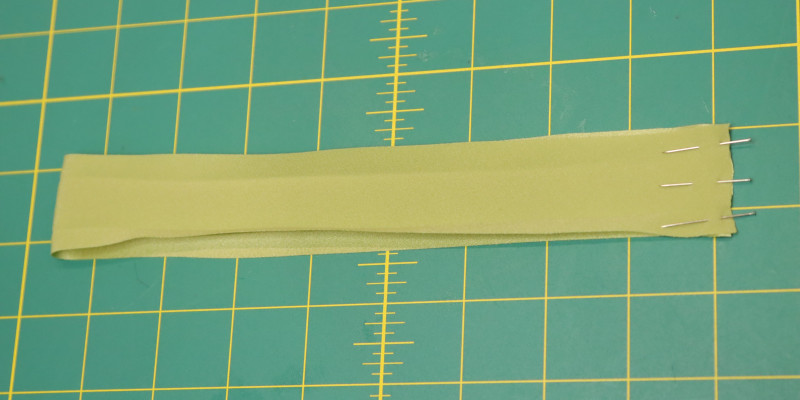
ARMHOLE BINDING
Use a bias tape maker to press the seam allowance of the binding.
Sew the ends of the armhole binding to create a loop that matches the armhole circumference.
Step 5
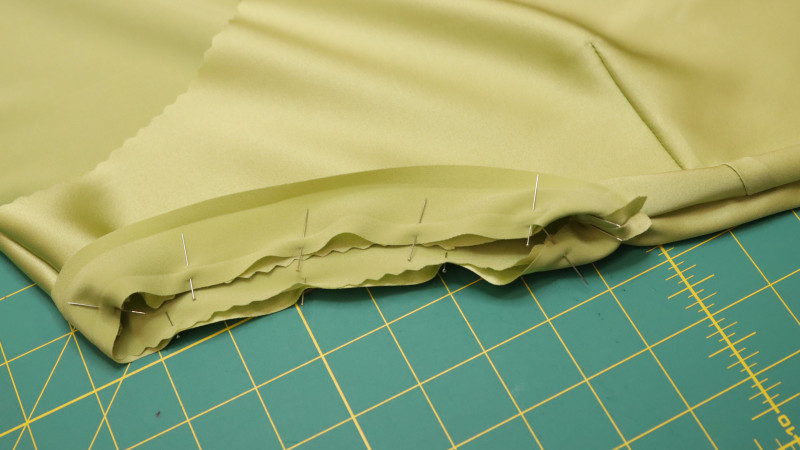
ATTACH ARMHOLE BINDING
Sew one side of the binding with 1/4″ around the outside of the armhole.
NOTE: you can also sew the binding directly to the armhole without making the loop
Sew around it, and close the loop in the side seam.
Step 6
FINISH ARMHOLE BINDING
Fold the other side of the binding toward the inside of the armhole.
Pin in place with the seam allowance tucked in.
Stitch in the ditch from the outside to finish the armhole binding.
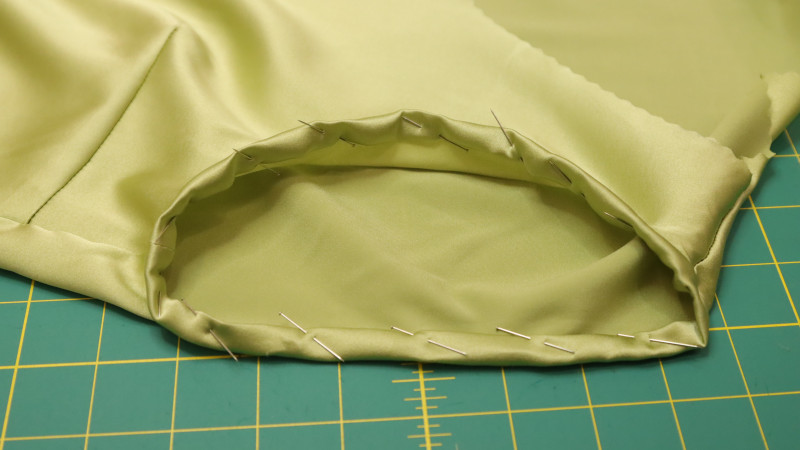
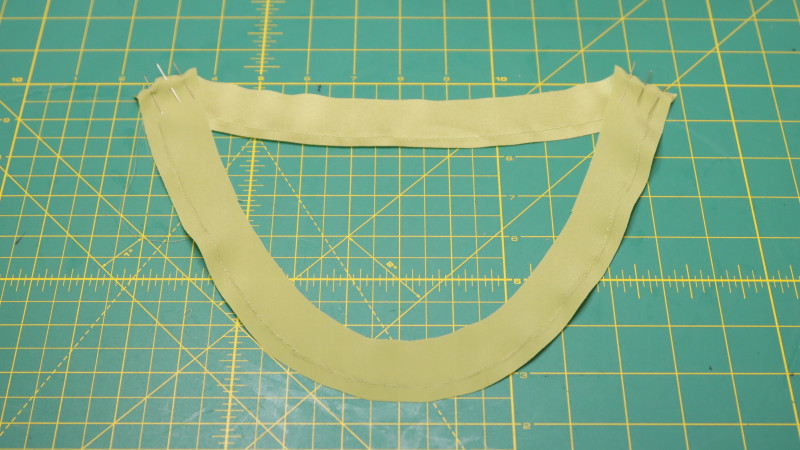
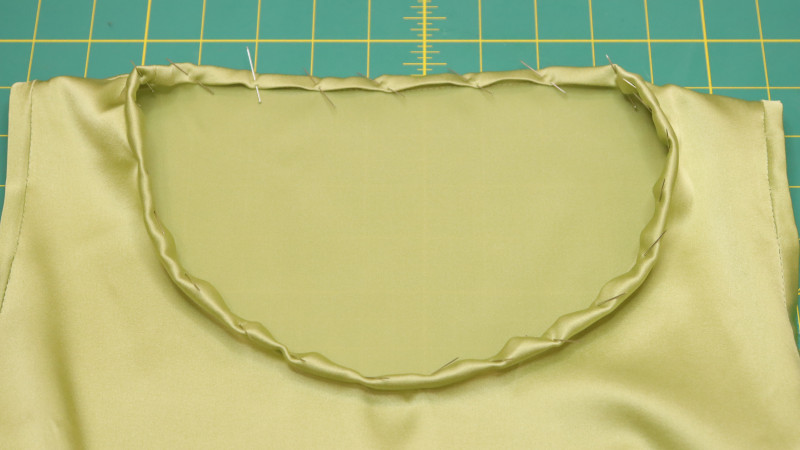
Step 7
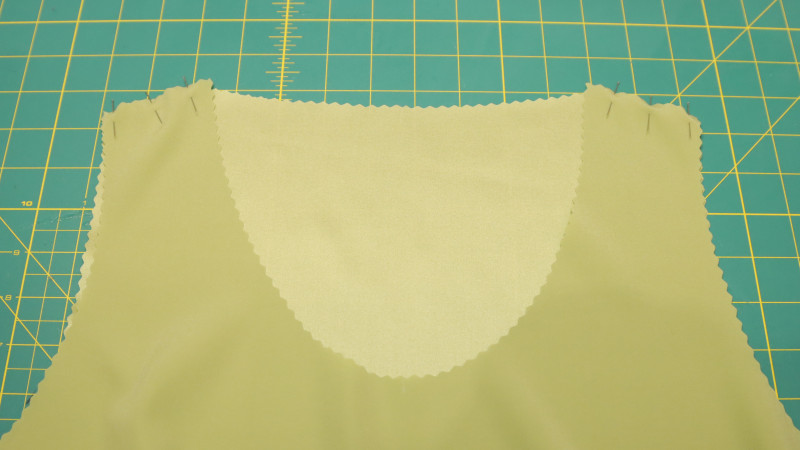
NECKLINE BINDING
Join the front neckline binding to the back neckline binding by sewing at the shoulder seams.
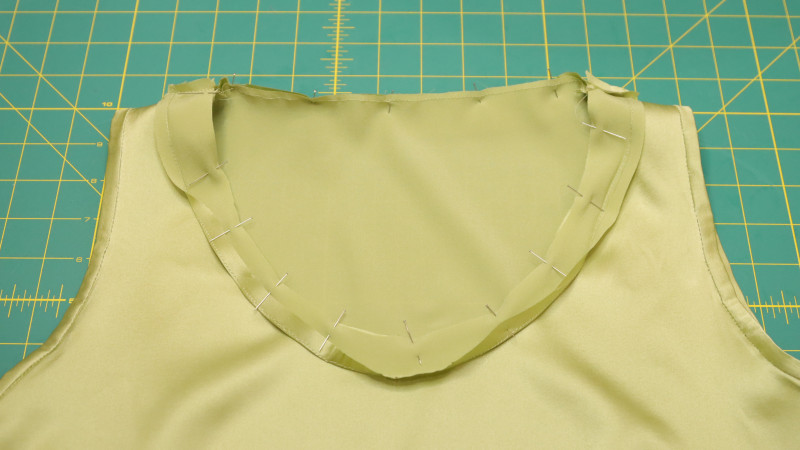
Step 8
ATTACH NECKLINE BINDING
Align the shoulder seams of the binding with the shoulder seams of the top.
Sew one side of the binding tape with 1/4″ to the outside of the neckline.
NOTE: for beginners, you can bind the necklines before sewing the shoulders to ensure a neat finish at the shoulder seams.
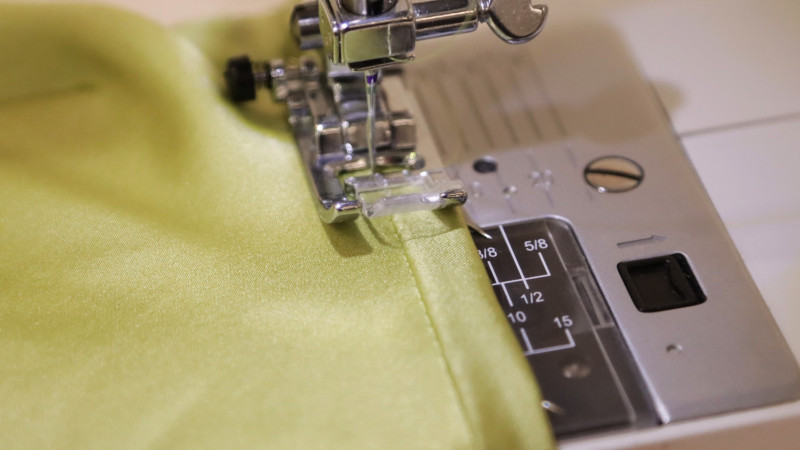
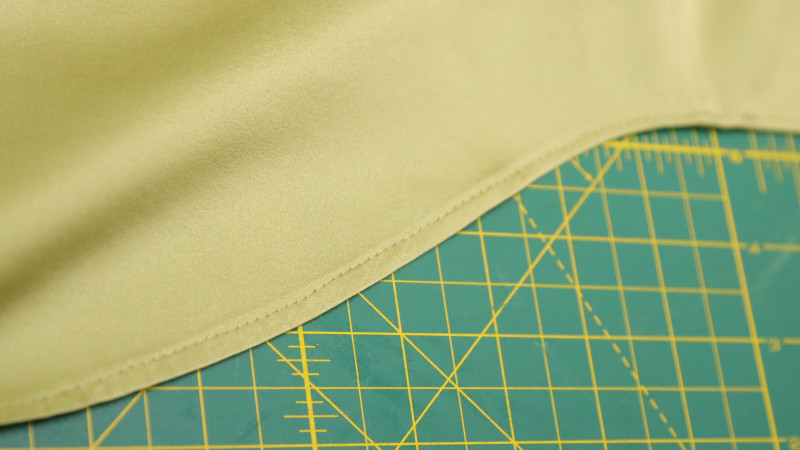
Step 9
FINISH NECKLINE BINDING
Pin the other side of the binding over on the inside of the neckline.
Pin in place with the seam allowance tucked in.
Stitch in the ditch from the outside to finish the neckline binding.

Step 10
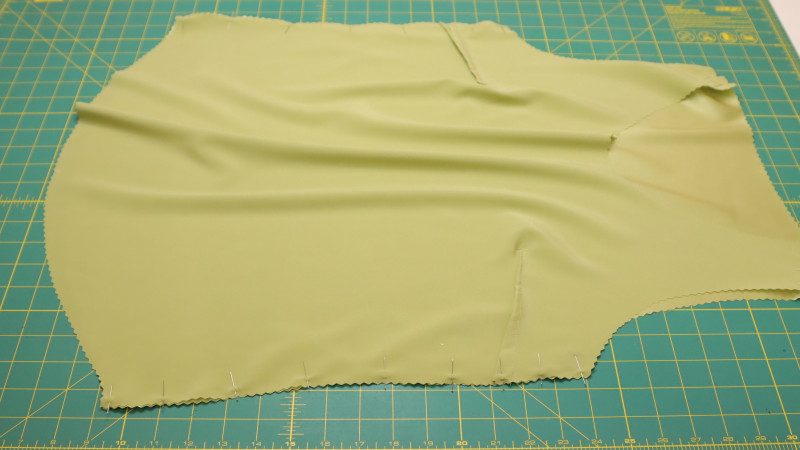
HEM
Sew 1/4″ double-folded hem to finish the bottom of the shirt.
Step 11
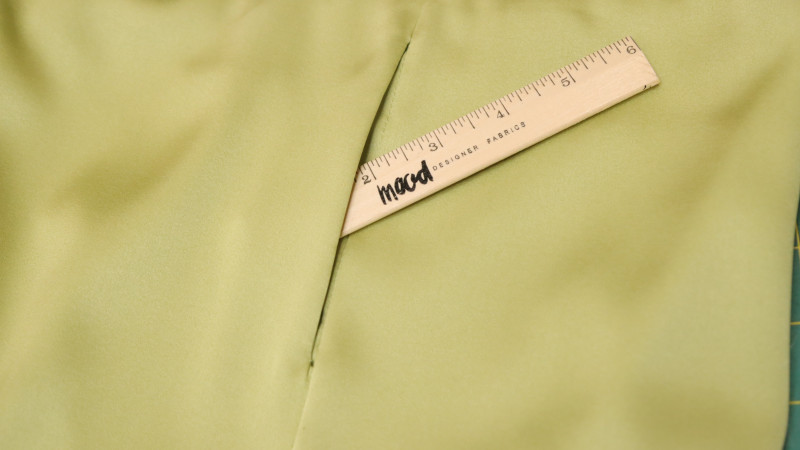
PANTS CENTER FRONT
Sew the front pants together at center front.
Step 12
PANTS CENTER BACK
Sew the back pants together at center back.
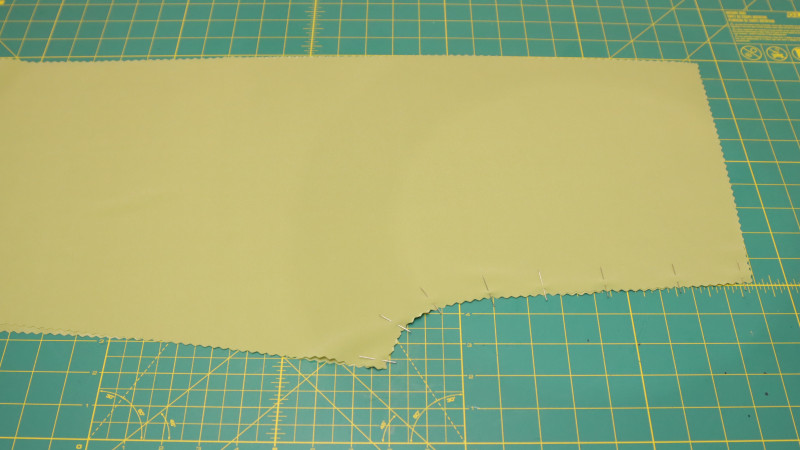
Step 13
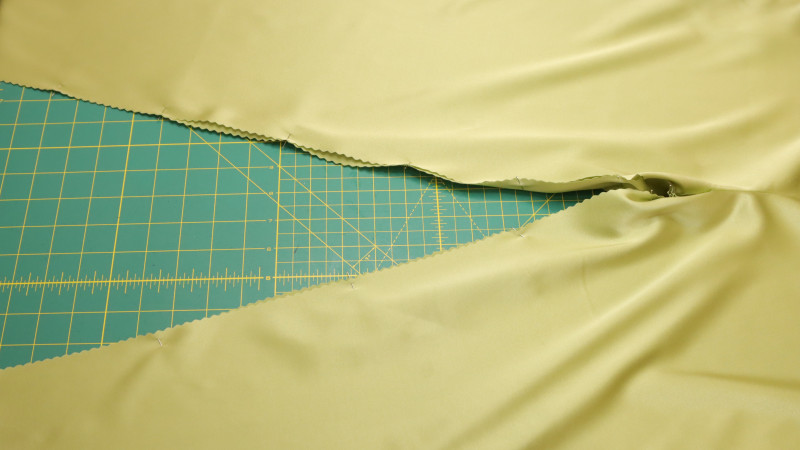
SIDE POCKETS
Match up the notches on the pocket with the notches on the front pants.
Pin one of the pocket pieces to each side of the pants.
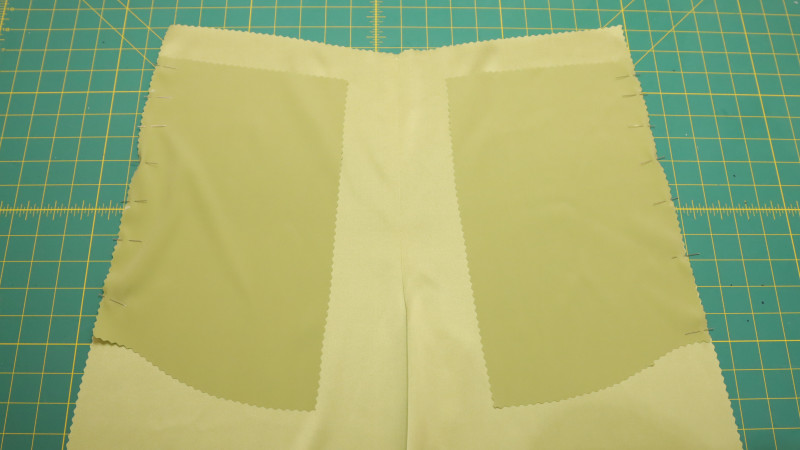
– Sew from one notch, pivot at 1/2″, sew down the seam allowance, and pivot again to sew up to the other notch.
– Trim 1/4″ from the seam allowance and snip toward the corners.
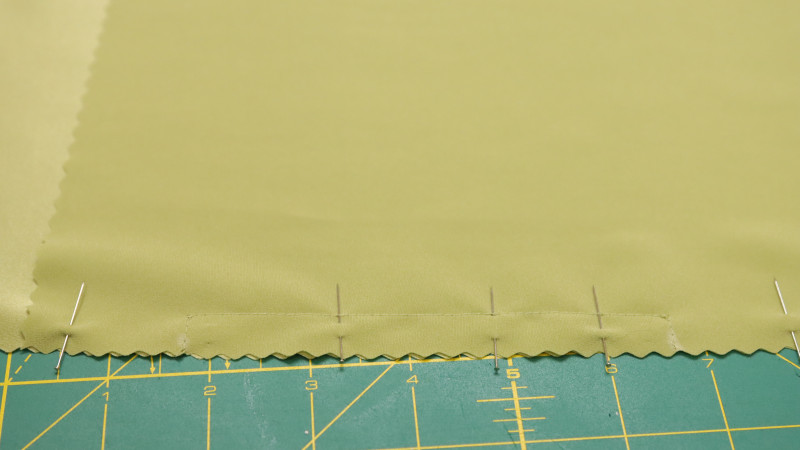

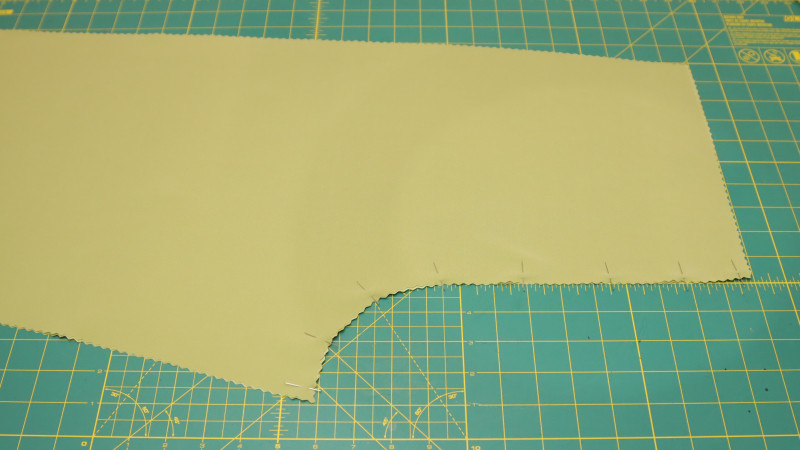
Step 14
FINISH POCKETS
Flip the pocket toward the wrong side and press neatly.
Join the other pocket pieces and sew them together around the edges.
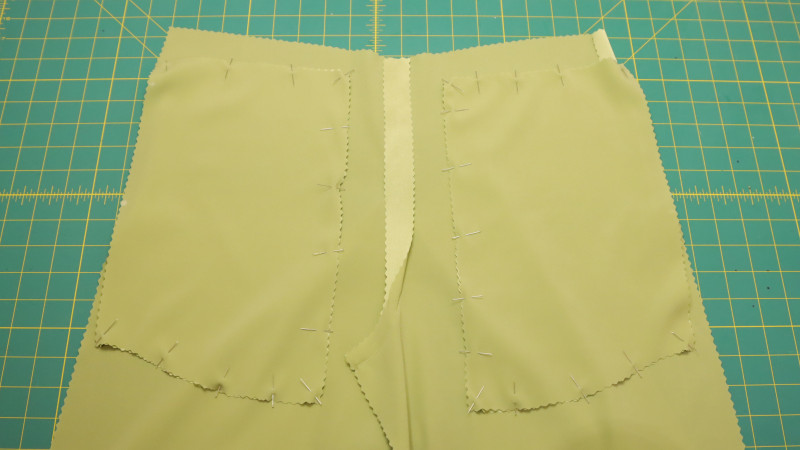
Step 15
PANTS SIDE SEAMS
Join the back pants to the front pants by sewing them at the side seams.
Step 16
PANTS INSEAM
Sew front and back of the pants together at the inseam.
Step 17
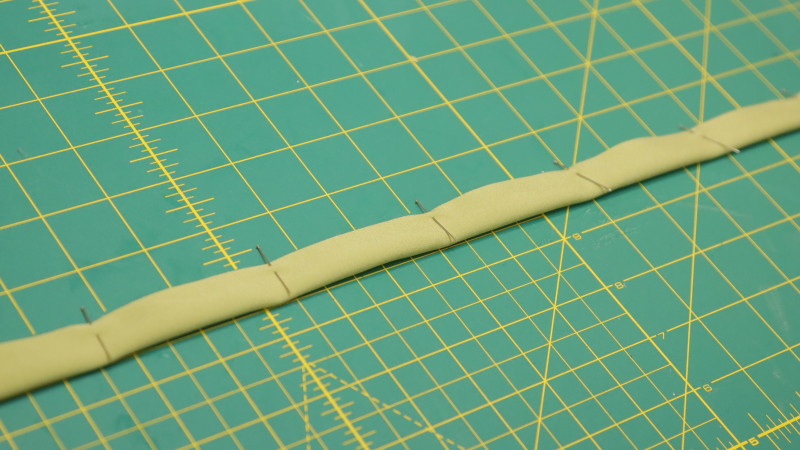
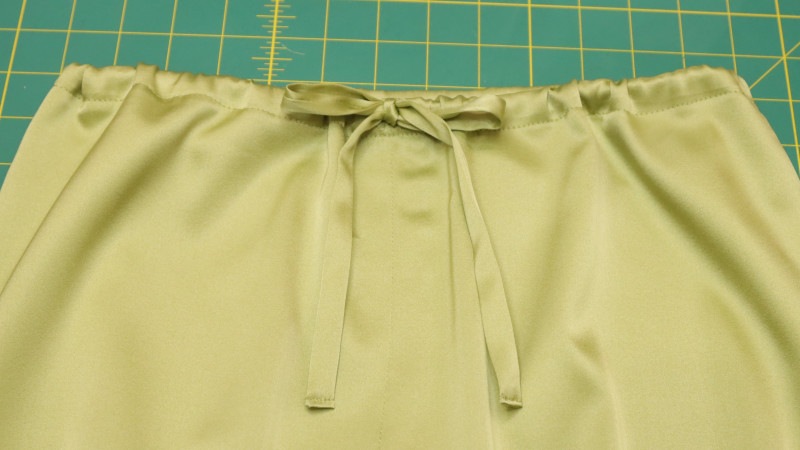
DRAWSTRING
Fold and sew the edges of the drawstring with 1/4″.
Use a loop turner to turn it right side out.
Fold the ends in and top stitch to finish the edges.
Step 18
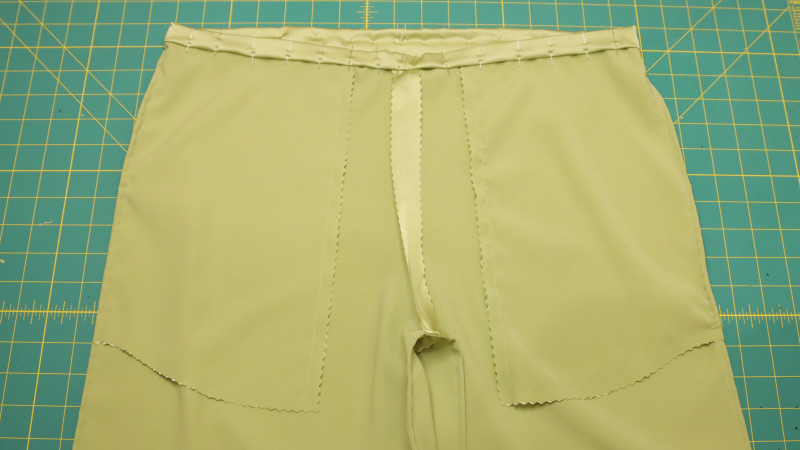
CASING
Sew two small button holes at the front of the casing.
Pin and sew the casing all around the waistline.
Make sure the top of the pockets get sewn in between the casing.
Pass the drawstring through one buttonhole and back out the other.
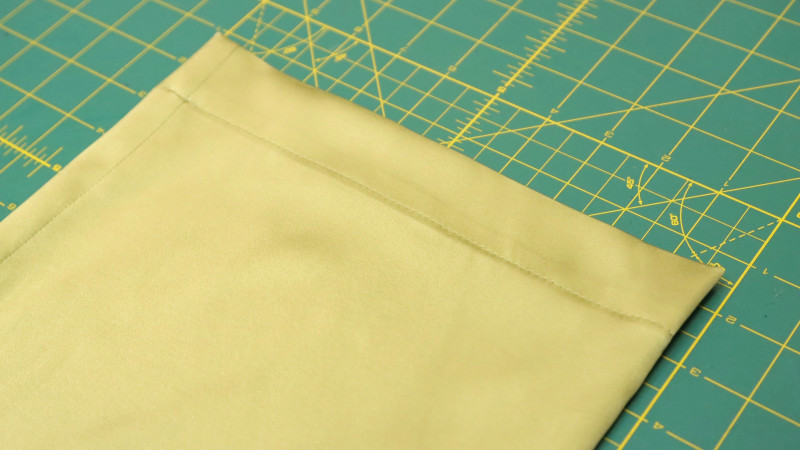
Step 19
PANTS HEM
Press the 2” hem
Press 1/2″ seam allowance.
Sew and finish the bottom of the pants.
The Completed Sorrento Set Free Sewing Pattern by Mood Fabrics

We can’t wait to see your version of the Sorrento Set! Whether you choose stretch cotton, stretch sateen, or rayon jersey, this pattern is the perfect canvas for your creativity and sewing skills.
Share this post with a friend (or two!), download The Sorrento Set Free Sewing Pattern, and show us which fabrics and colors you choose, using the hashtags #MoodSorrentoPattern & #MadeWithMood.
Thank you for your free patterns they are such a help for those of us in Africa who cannot get anything posted. Your fabric choices also help guide and sewing notes especially photos help with beginners. Much appreciated.
You are very welcome! We hope you continue to enjoy the free sewing patterns that Mood has to offer.
Thank you for this pattern, just what I was looking for. Much appreciated
We are happy to hear! Happy sewing 🙂
Your free patterns are always a life saver! I’ve tried tracing garments I already own but nothing beats a real pattern to follow
Thank you, we are so glad to hear! Happy sewing 🙂
What am I missing. I see nothing as far as the armhole binding – no pattern piece. What size should it be so I can make my own.
Hello, the binding should be 2 inches wide. Please refer to the the bottom left side on page 3 of the pattern download, where you can find the size chart for the binding.
Hi, Mr Sibaja. Thanks for the pattern. really helpful.
You’re very welcome, we hope you are able to learn & enjoy! Happy sewing 🙂
Hello,
How much yardage would I need to just make the top? Also, if I want to add lace to the front neckline, how much should I get?
Thank you!
Hello, the top of this pattern would require 1 yard of fabric and 1 yard of lace.
So glad to find you online! All the good fabric stores in Tucson are gone so it’s good to find a really good store via electric shopping!
We are happy to hear and we hope you enjoy from all that Mood has to offer!
on step 15 it looks like the wrong sides are together. Are you supposed to do a french seam?
Yes, this pattern was sewn with French seams but it is not required.
Hi, love this pattern! Is there a video version of the instructions available somewhere? I’m having trouble understanding steps 14 and 15.
Thanks!
Hello, although we do not have a video for this pattern, you can view our tips and tutorials on our youtube page!
My first wearable just became a fact with there trousers.
Thank you for the clarity in the description and the pattern.
That’s amazing—congratulations on your first wearable! We’re so glad the pattern and instructions helped. Can’t wait to see what you make next! ✨
Hi there! Love this. Could this pattern be made in a non-stretch or woven light fabric like Georgette or rayon Challis?
Thank you! With the added ease and drawstring on the pants, you are able create this pattern using non-stretch fabrics.
I extremely confused on the pockets and dont know what im doing wrong. Do you have a video tutorial?
Hi! The pattern pocket pieces are a bit tricky!
Please follow the instructions below for steps 13–15 in the blog post, respectively.
1. First, cut 2 mirrored sets of the Pants Pocket Pieces (G) — so you’ll have 4 pocket pieces in total.
2. Second, take 1 mirrored set (2 pocket pieces) and place each piece onto the front pants, with the wrong side of each pocket piece facing the right side of the pant legs. (This happens when you place the pocket piece “right sides down” onto the “right sides facing up” pants.)
3. Third, match up the pattern notches you marked on the pocket pieces to the pattern notches you marked on the front pants. (Reference the first photograph currently shared underneath step 13 of the blog post.)
4. After that, pin the mirrored pocket pieces to the front of the pants to secure before stitching. (Note that so far we have only used 1 set out of the 2 mirrored pocket sets.)
5. Begin sewing by aligning the first marked notch with the stitching direction of your sewing machine (situate the pants leg and secured pocket piece perpendicularly as you’ll be sewing straight into the seam allowance). Stitch a couple stitches and then back-tack before continuing to sew for only a ½” total (up to the edge of the ½” seam allowance). Once you reach the seam allowance, keep your machine needle at the down-most position with the fabric in place, next, lift up your presser foot and pivot the fabric 90°. (Reference the second image currently shared underneath step 13 of the blog post.)
6. Continue sewing straight down until your machine needle is in-line with the second marked notch. Repeat step 5, by keeping your machine needle at the down-most position with the fabric in place, lift up your presser foot and pivot the fabric 90°. Next, stitch toward the fabric edge and then back-tack. (The stitching results should look like a 3-sided rectangle with two very short ½” sides.) (Again, reference the second image currently shared underneath step 13 of the blog post.)
7. Cut a ¼” deep “rectangle” out of the seam allowance of your newly sewn ½” “rectangle”—or, in other words, cut a ¼” out of the seam allowance while keeping a ¼” perimeter around the sewn lines. (Reference the third image currently shared underneath step 13 of the blog post.)
8. Snip carefully toward the inner corners of the seam allowance, being sure to not cut into the stitching. (Again, reference the third image currently shared underneath step 13 of the blog post.)
9. Turn the pocket pieces right sides out, then flip the pocket pieces around to the wrong side of the front pants. Press neatly. (The right sides of the pocket pieces should be facing up.) (Technically, this step is referenced in the first image currently shared underneath step 14 of the blog post, but it is hidden by the 2nd set of mirrored pants pocket pieces.)
10. Take your 2nd set of mirrored Pants Pocket Pieces (G) and match them up—with right sides facing down, on top of the sewn pocket pieces. Pin and sew around the pocket edges, without catching the front pants. (Reference the first image currently shared underneath step 14 of the blog post.)
11. Since we sewed the side seams using a french seam, next, pin the front pants to the back pants—with right sides out (wrong sides facing) and the pockets sandwiched between. Sew down both outer side seams with just shy of a ¼” seam allowance.
12. Turn the pants wrong sides out, press neatly. Then sew down the side seams again, using a ¼” seam allowance while being mindful to fully encase the initial ¼” seam allowance. When sewing near the pockets, be sure not to catch the finished edge created during steps 7–9. (Reference the two images currently shared under step 15 of the blog post.)
Please note: As per Step 18 in the blog post, make sure the top of the pockets gets sewn in between the casing.
I see that the pants can be made in a no stretch material mentioned in a previous comment. Can the top be made in a non stretch material as well? The neckline looks comfortable, but I’m wondering about getting into the armholes and pulling over the chest and torso? Perhaps a bigger fit with darts added would be required- or a separate top pattern. Thanks. Working with medium weight linen for pants and no stretch cotton for top
I think its loose enough that it could be made in non-stretch. If you’re worried, maybe try cutting it on the bias so that it has a little bit of give around the chest and arm holes.
Cannot wait to make this
Wauw
Looking good
Trop beau
Thank you for this pattern
Merci beaucoup
Thanks for this free pattern
Preciosos
Merci !
Super
Exactly what I’m looking for !!!!
J’adorrre ce modèle
Thanks !
So nice !
Nice!!
Merci
Tanks!
Merci pour les patrons du mercredi !
Good
Thank you for the pattern
Merci pour ces patrons
Thank you for the pattern
Merci beaucoup pour ce patron
Merci pour ce patron
Merci pour le patron!!
Merci pour le patron
Thanks à lot
Merci!
merci
Merci d’avance
Obrigada
Merci d’avance pour ce patron
Merci pour ce cadeau. J’espère pouvoir coudre ce pantalon très vite !
Thanks
Merci
Merci
Merci pour ce très joli pantalon
Merci pour ces patrons
Thank you !
J’adore!!!
J’ai hâte d’essayer !
Merci pour le patron…
Merci
Merci pour ce partage gratuit
Merci beaucoup pour ce joli patron
Merci beaucoup
Very Nice
Thank you so much!
So beautiful set! Thank you
Merci pour ces patrons
Merci pour ce patron.
Je compte le coudre dans un tissu léger pour supporter en beauté la chaleur de cet été . ☺️
Very nice
J’adore
Nice
Thanks
I want to si this pantà. Thanks from Barcelona
Thanks
Merci
Thank you