

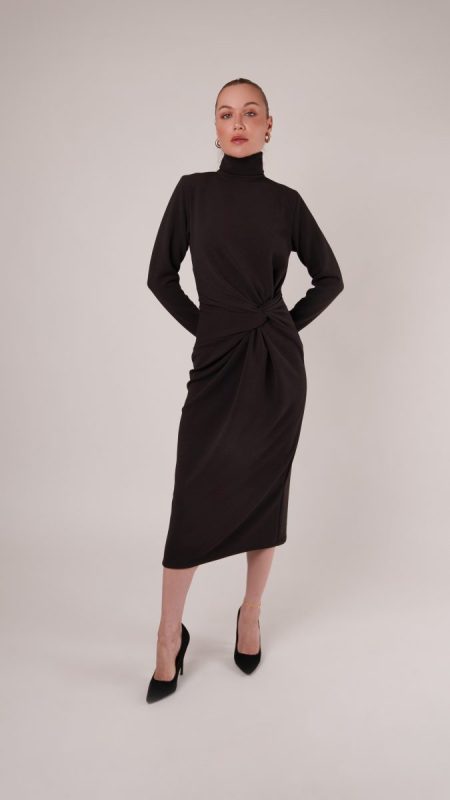
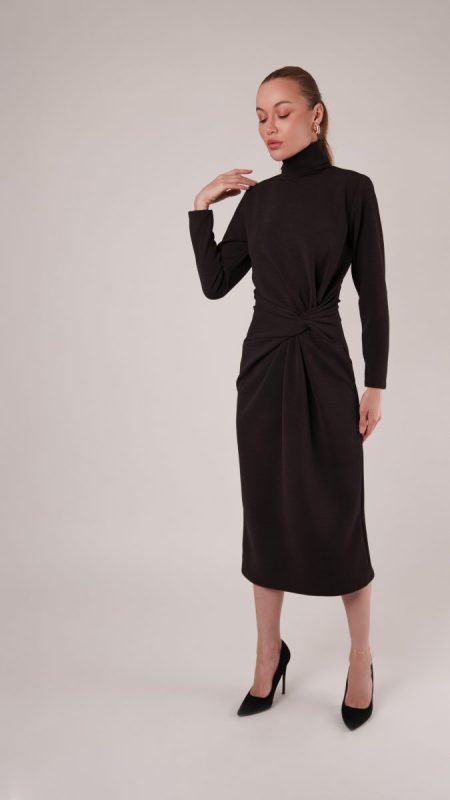
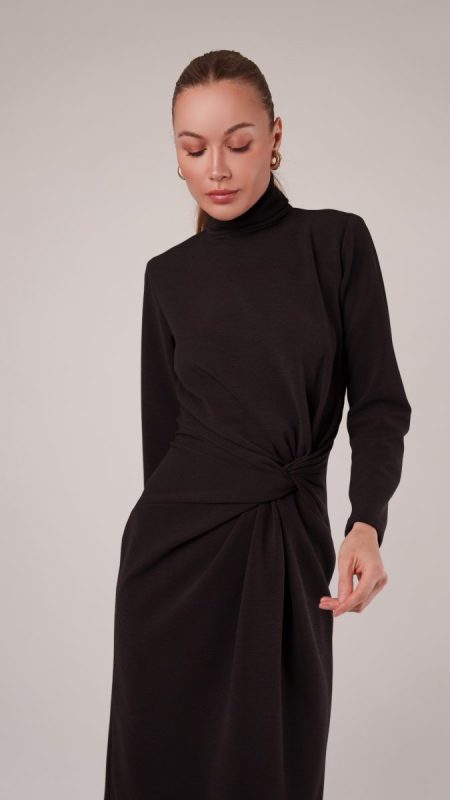
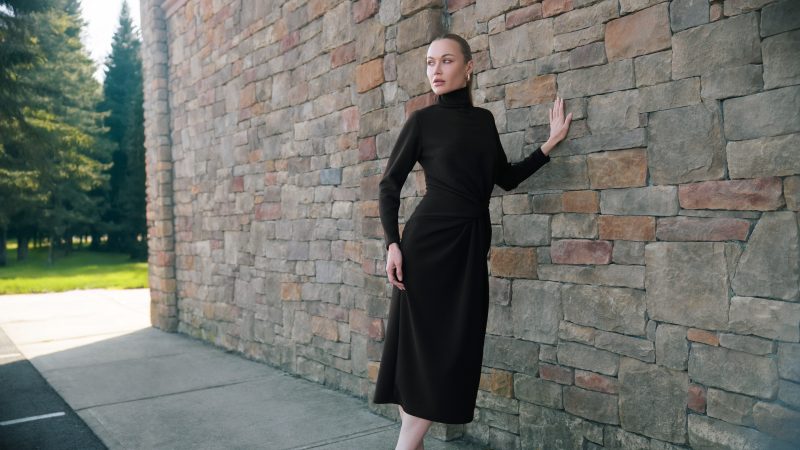
Inspired by the rhythm of late summer evenings and the crisp energy of early fall, the Nob Hill Draped Midi Dress free sewing pattern is the definition of understated sophistication. Designed in a deep, rich chocolate hue, it channels the refined elegance of city life, making it perfect for transitional seasons where style and versatility are essential. Slip it on, and you’ll instantly feel polished, whether you’re heading to an after-work cocktail hour or stepping into a semi-formal event.
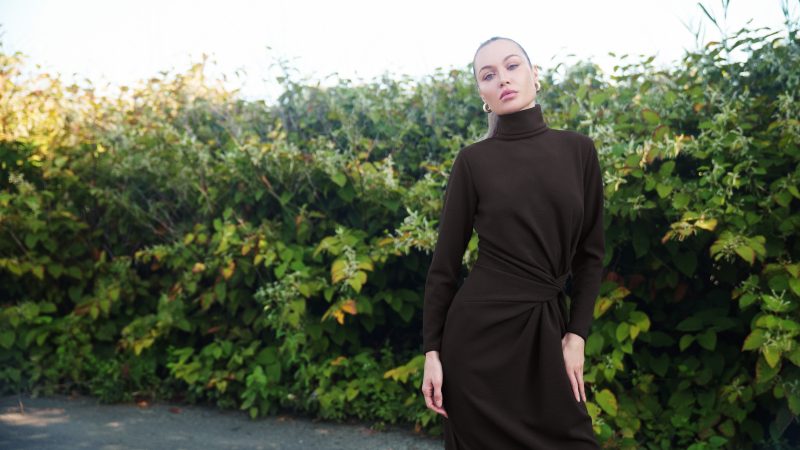
Crafted in stretch polyester crepe knit, the fabric drapes effortlessly while offering just the right amount of comfort and movement. Its tailored silhouette flatters without overwhelming, striking that delicate balance between ease and elegance. Picture yourself striding through the streets of New York or Los Angeles, the dress catching soft evening light as you move from day to night with ease.
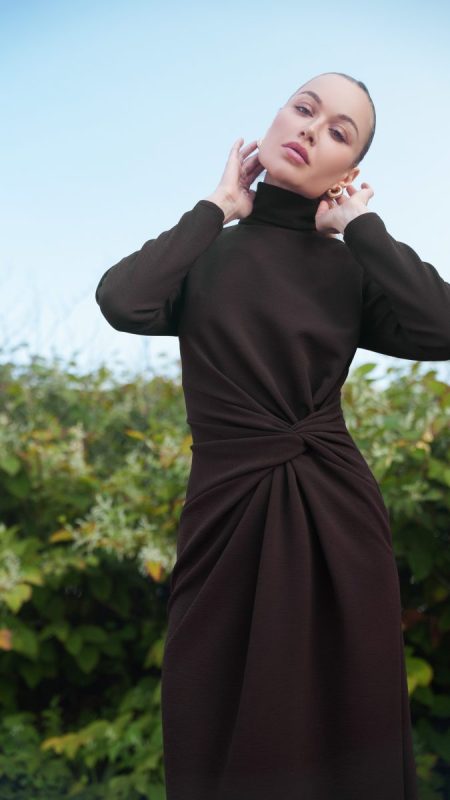
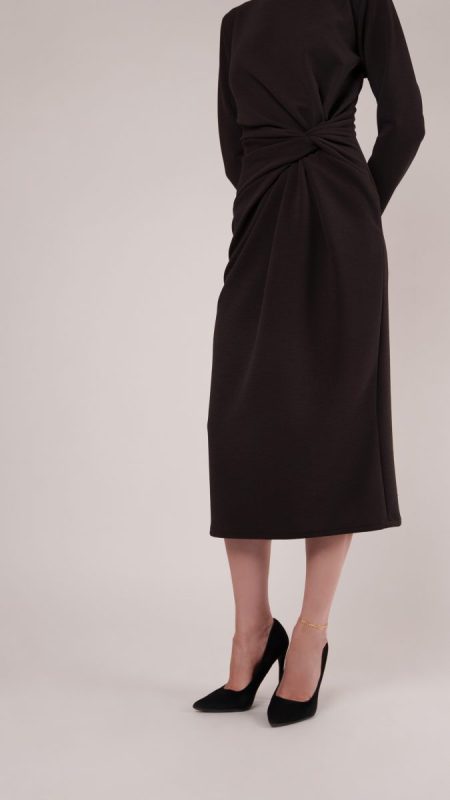
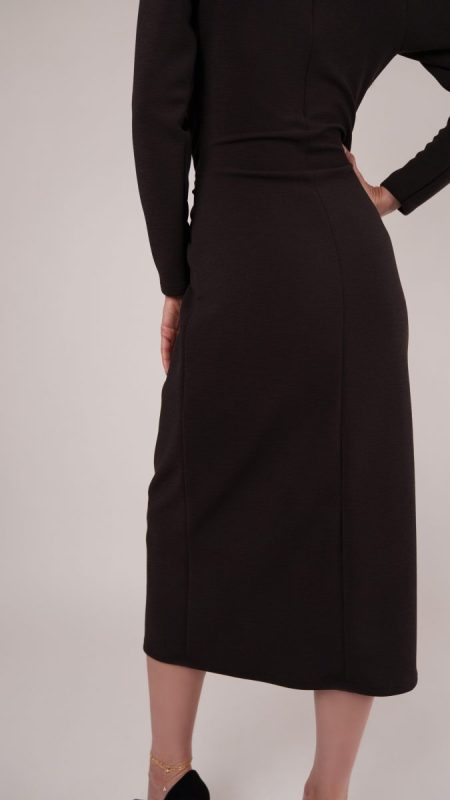
With its timeless midi length and refined draping, this design adapts seamlessly to any occasion. Dress it up with heels and sleek jewelry for a wedding guest look, or keep it chic and simple with flats and a blazer for a business-casual meeting. However you style it, this piece is meant to be a sophisticated, versatile, and endlessly wearable wardrobe staple.
Our version uses a dark chocolate stretch crepe knit to embody that urban, cosmopolitan spirit. But the pattern is yours to interpret: try a jewel-toned fabric for a bolder look, or a lighter neutral for a softer transition into fall. No matter your choice, this draped midi dress is designed to bring effortless elegance to every season.

Essential Materials & Sizing Guide for the Nob Hill Draped Midi Dress
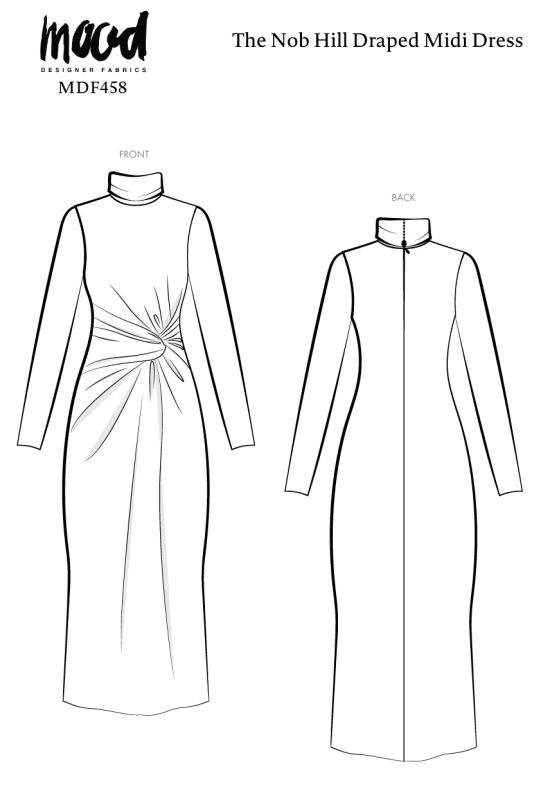
Continue reading for a breakdown of what knowledge and materials you need for creating your very own draped midi dress! We’ve got you covered with the recommended materials we used—if you want to follow along exactly—as well as a curated list of alternative fabric type recommendations if you want to customize your own version. The Nob Hill Draped Midi Dress free sewing pattern download includes technical drawings for seam and silhouette visibility, plus a size chart to help you find your perfect fit!
Purchase Products Used Below:
Quantities indicated are for sewing a size small draped midi dress. Toggle the ‘SHOP THIS LOOK’ box to find quantity estimates for other sizes.
- 3 yards of Dark Chocolate Stretch Polyester Crepe Knit
- 1 each of Invisible Zipper 24″ by YKK – 917 Dark Chocolate
- 1 each of Gutermann Sew All Thread 250m – 593 Seal Brown
- MDF458 – Nob Hill Draped Midi Dress Sewing Pattern (Free download below!)
Additional Products Used:
Alternative Fabric Type Recommendations:
The Nob Hill Draped Midi Dress sewing pattern is best suited for medium weight fashion fabrics. Explore other fabric types or colors from our featured collections for your draped midi dress with the links below.
Download Your Free Sewing Pattern
Submit your name and email in the form below to receive the download link for the Nob Hill Draped Midi Dress free sewing pattern directly in your inbox. Mood Sewciety Patterns will send your free download link via email with the subject line: ‘Your Free Download from Mood Sewciety – The Nob Hill Draped Midi Dress’ (in PDF format for A4 and letter-size printing).
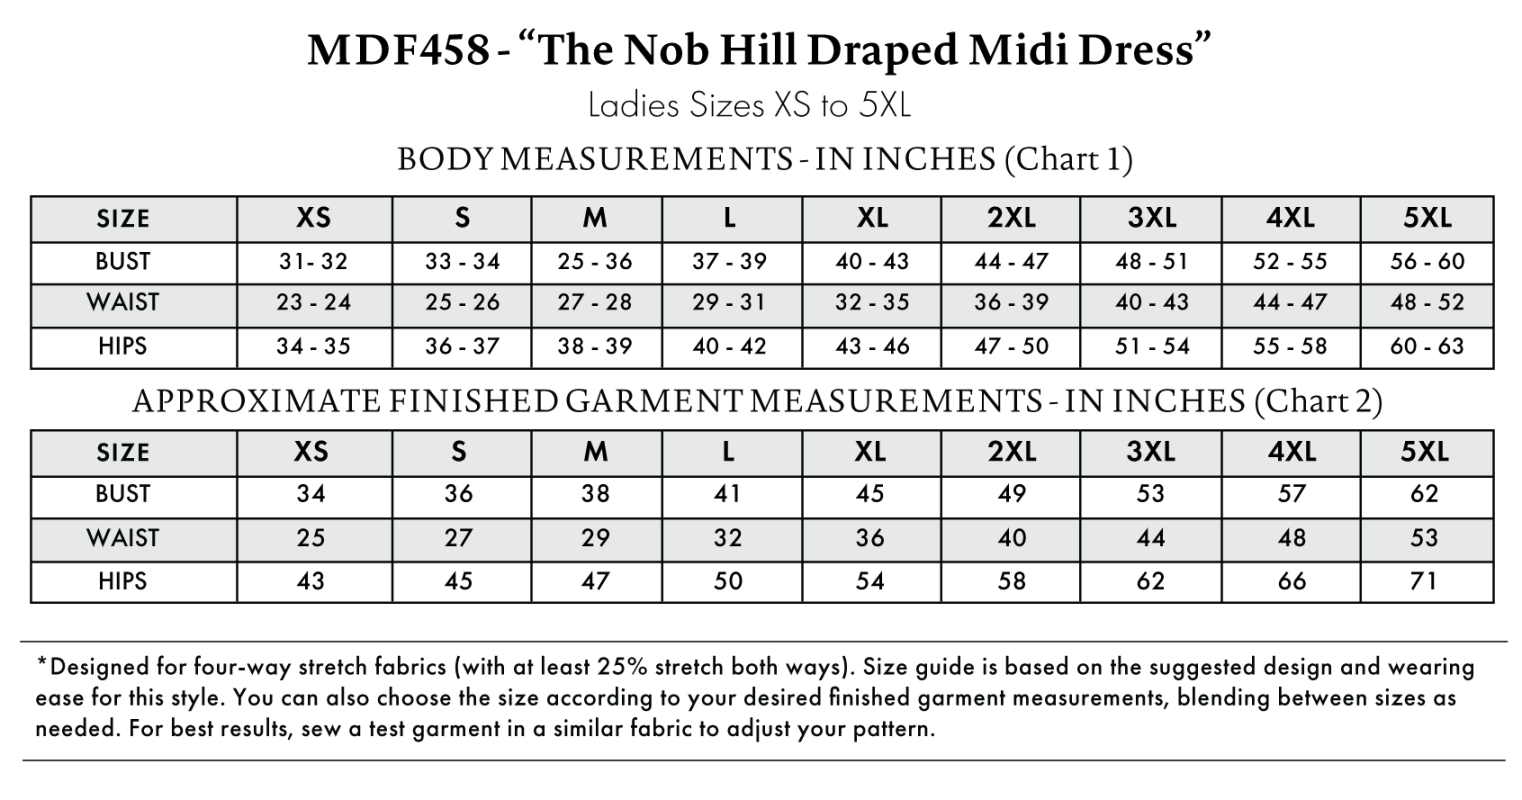
Find Your Perfect Fit
The Nob Hill Draped Midi Dress Sizing Guide is based on the suggested design & wearing ease for this style. You can also choose the size according to your desired finished garment measurements, blending between sizes as needed. Measure the printed patterns to make sure the dimensions are according to the desired fitting and adjust if needed before cutting the fabric. For best results, sew a test garment in a similar fabric to adjust your pattern.
*Designed for four-way stretch fabrics (with at least 25% stretch both ways).
Note: Always read all the instructions before cutting the fabric!
How to Sew The Nob Hill Draped Midi Dress
The instructions provided below are designed to guide you through sewing the Nob Hill Draped Midi Dress from start to finish.

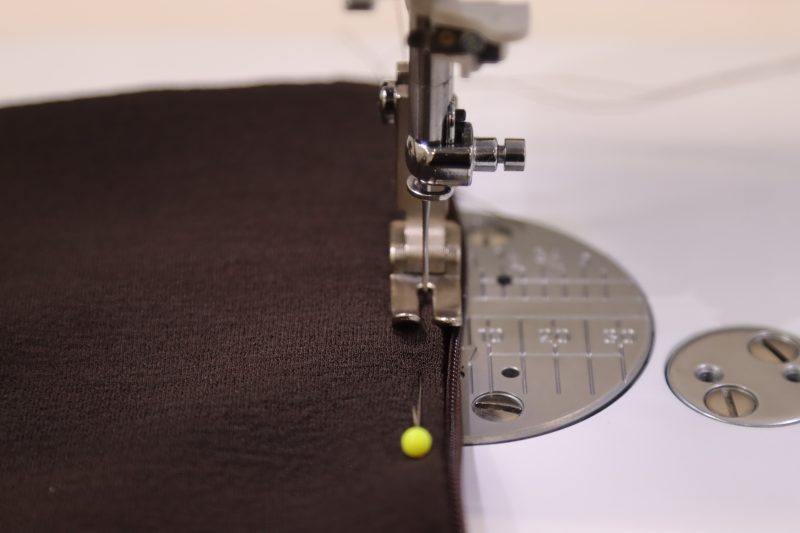
3 Tips for Sewing with Stretch Polyester Crepe
- Sometimes it can be difficult to get the pins to lay flat when pinning through multiple layers of this thick fabric. Try using clips to hold your pieces together if the pins aren’t cooperating.
- Some sewing machines have a dial or button that adjusts the pressure at which the presser foot holds down the fabric. If possible, lower the presser foot pressure when sewing over this thick fabric to prevent a wavy finish.
- A stitch length of 2.5mm is generally recommended for most sewing projects, but a stitch length of 2mm is sometimes more suitable for thick knit fabrics because it allows them to stretch slightly without the thread immediately breaking.

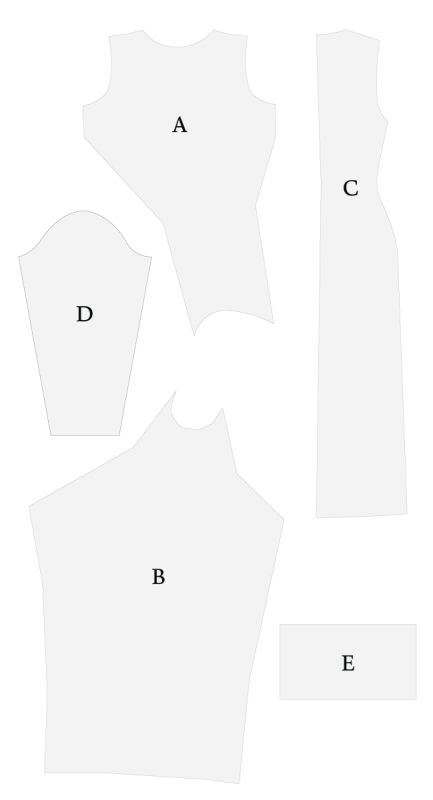
Pattern Pieces & Fabric Cuts Needed
- (A) PATTERN PIECE
- Fabric – Cut 1
- (B) FRONT LOWER
- Fabric – Cut 1
- C) BACK
- Fabric – Cut 2 Mirrored
- (D) SLEEVES
- Fabric – Cut 2 Mirrored
- (E) COLLAR
- Fabric – Cut 1
Sew with a 1/2″ seam allowance for all seams unless otherwise specified.
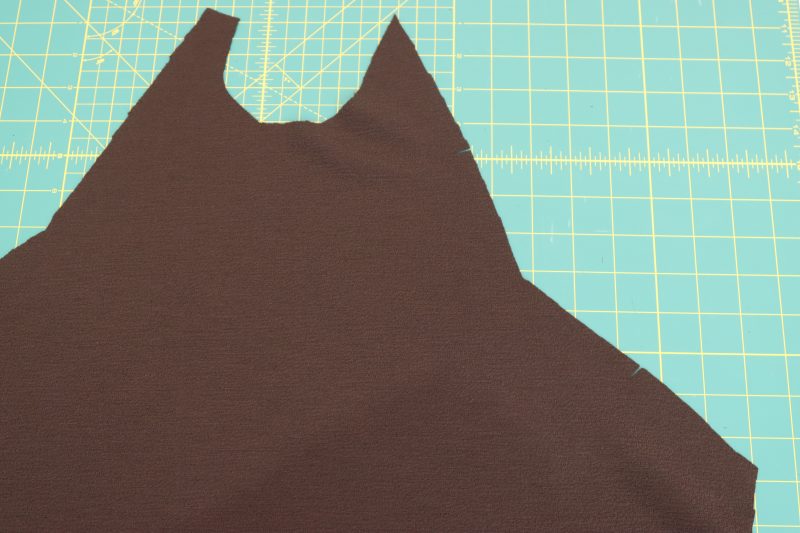
Step 1
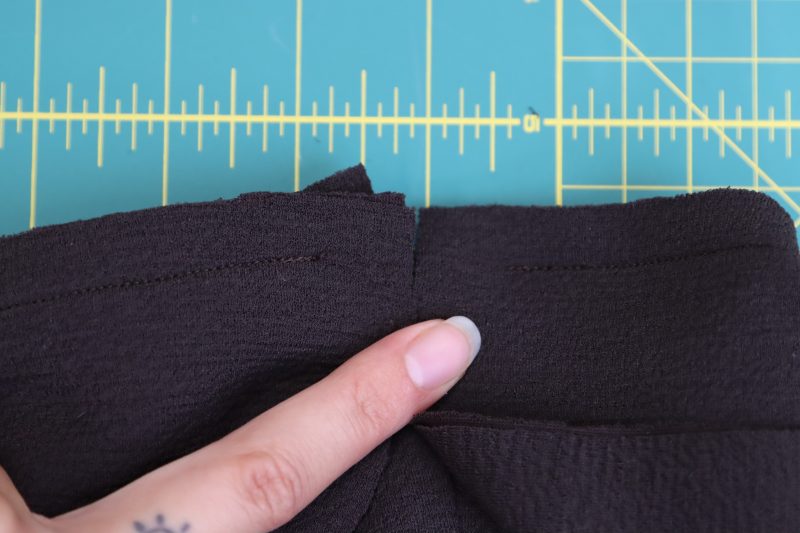
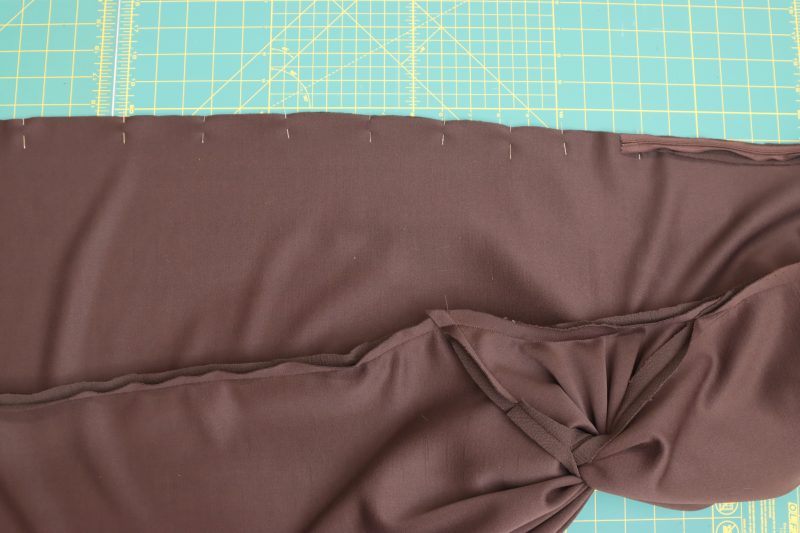
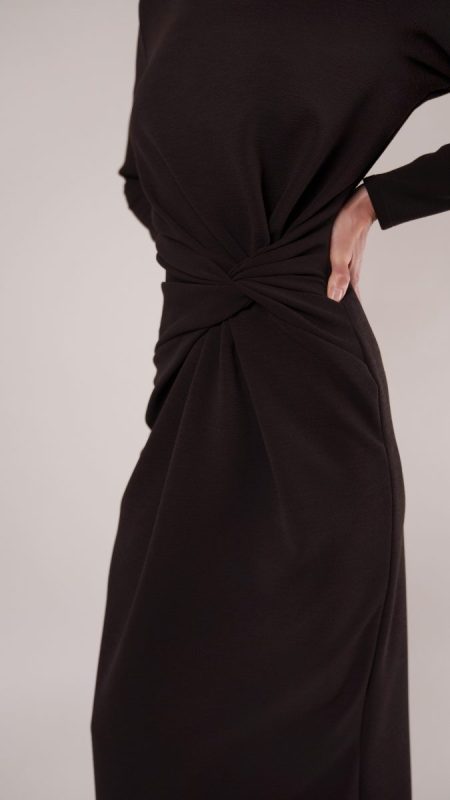
PREPARE FRONT LOWER TWIST
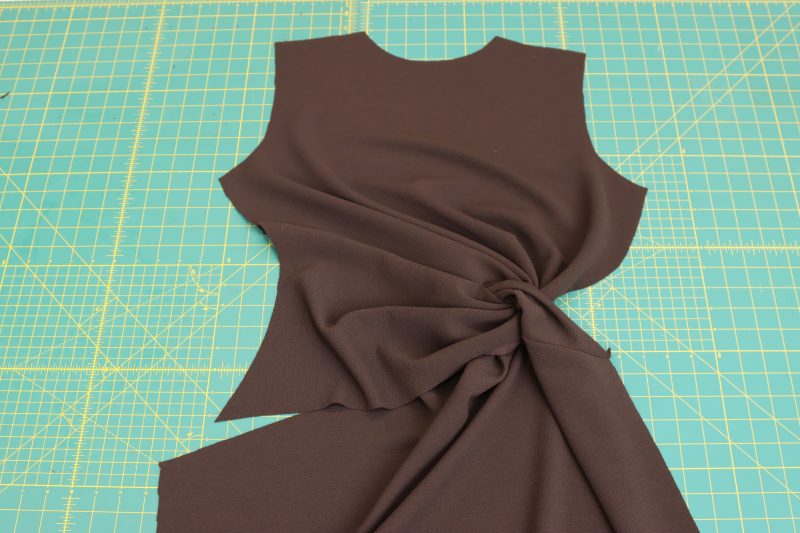
- Lay out the two notches on the front lower twist of the dress.
- Fold the front lower twist so that the notches are matched up, as shown in the photograph below.
- Pin and sew a seam perpendicular to the notches, but leave an opening with 1 inch width next to the folded edge of the fabric.
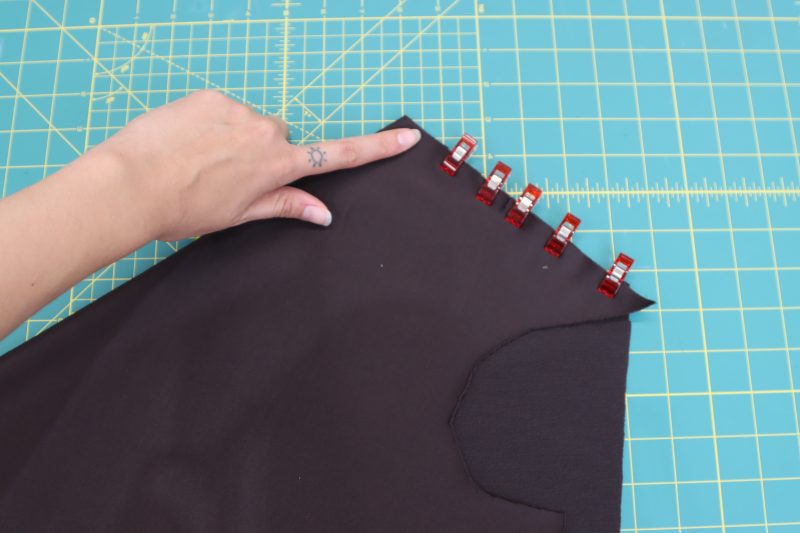
Step 2
PREPARE FRONT UPPER TWIST
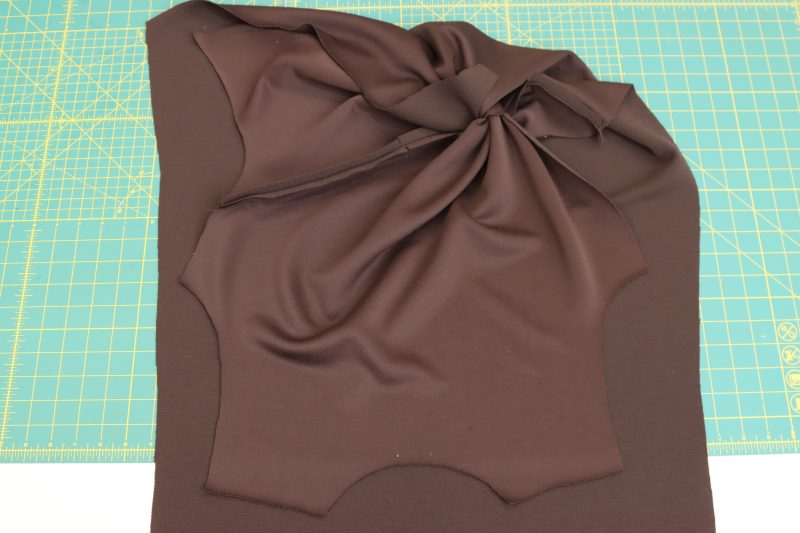
- Insert the long tail of the front upper twist into the opening that was left near the fold of the front lower twist. Ensure that the pattern piece for the front upper twist stays right sides up after inserting it into the opening.
- Fold the long tail of the front upper twist back onto the chest section and line up the two notches on the front upper twist with one another, as shown below.
- Pin and sew a seam perpendicular to the notches on the front upper twist, but leave an opening with 1 inch width next to the folded edge of the fabric.


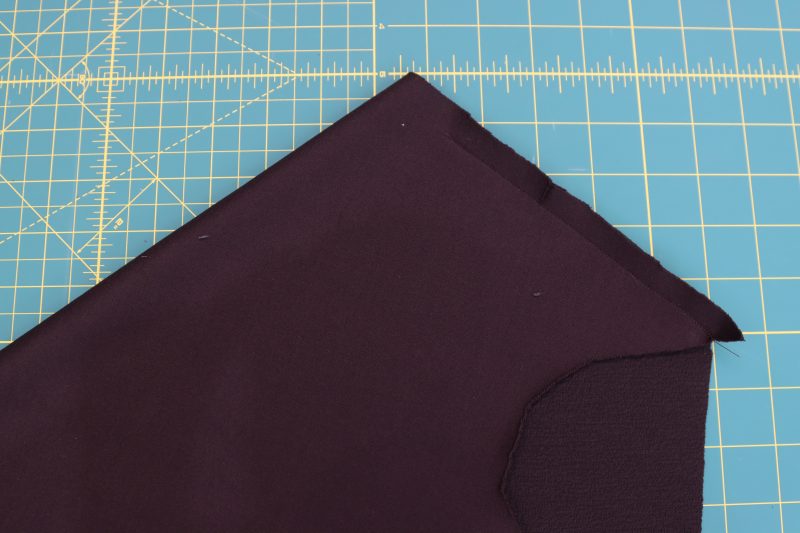
Step 3
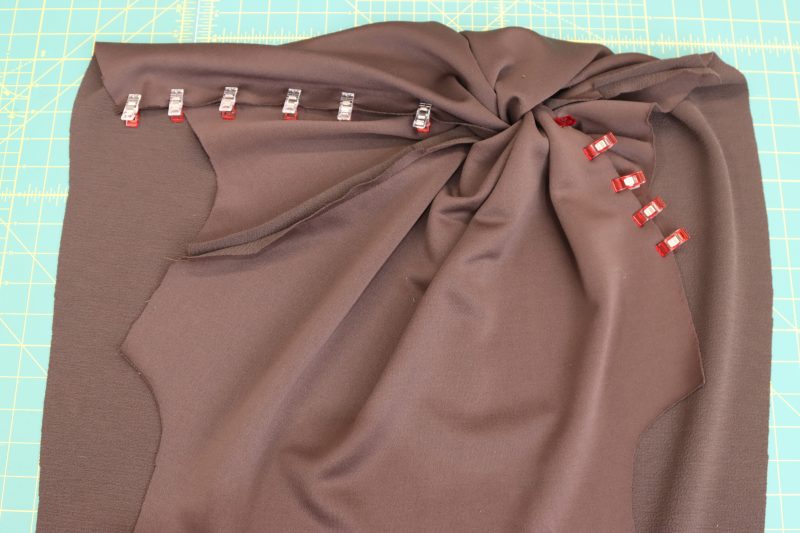
ATTACH FRONT PIECES
- Fold the upper front twist on top of the lower front twist and begin lining up the remaining raw edges on both sides of the dress. Note: The curved “U” shaped parts of the upper and lower front twists will actually become the side seams in the end. This part is the waist of the dress, which is why they are curved the way they are. This may help in visualizing and assembling this step of the dress.
- Pin and sew the remaining raw edges on the right side of the dress to one another, leaving a 1 inch opening near the twisted part of the dress. The short curved edge of the pattern piece should now be oriented on the side seam of the dress.
- Repeat step 3.2 on the left side of the dress.
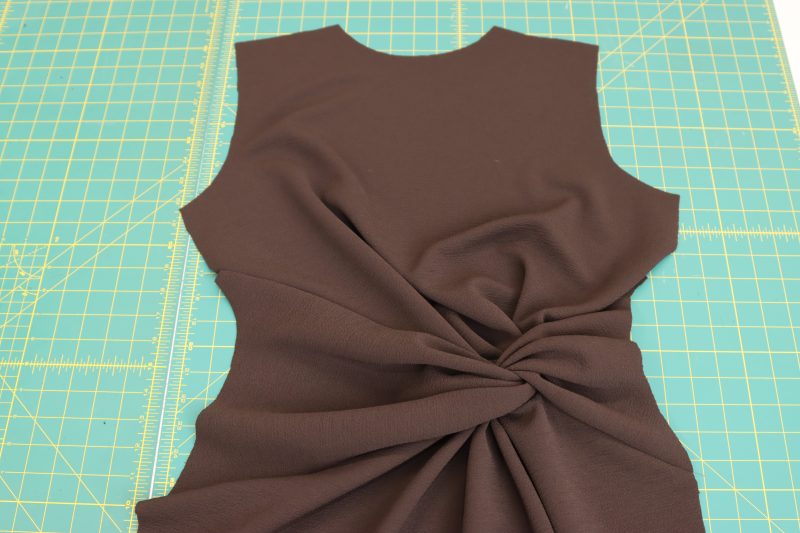
- Unfold the two front pieces and lay the pattern piece flat to prepare for attaching it to the back of the dress.
Step 4
ATTACH SHOULDER
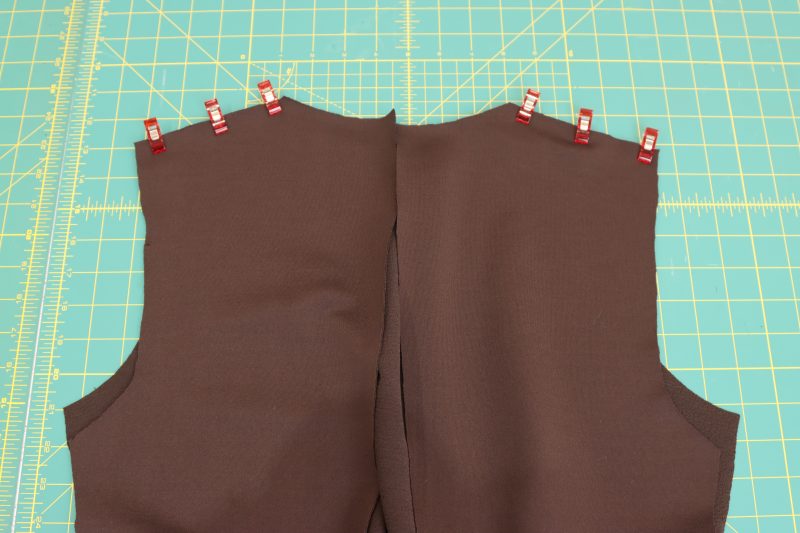
- Line up the two back pieces of the dress with the front piece, right sides together, lined up at the shoulder seams.
- Pin and sew the front and back pieces together at the shoulder.
Step 5
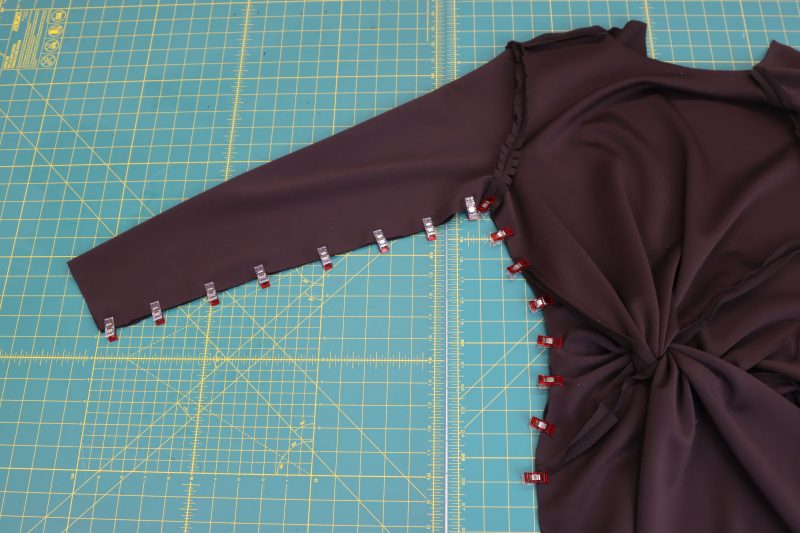
ATTACH SLEEVES
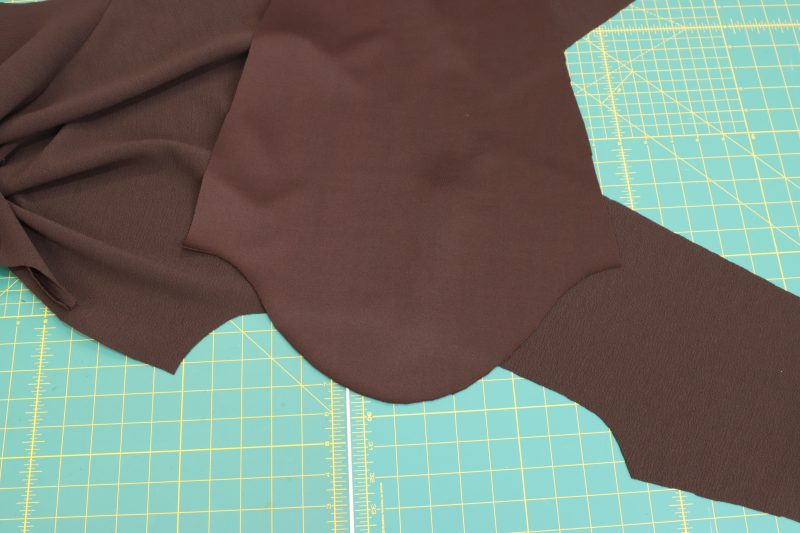
- Open the shoulder seams and lay the entire dress completely flat.
- Identify the front and back of each sleeve pattern.
- Begin pinning the curved edge of each sleeve into the armscyes, with the corners of the sleeves matching up with the corners of the armscyes, right sides together.
- Sew along the pinned edge to attach the sleeve to the armscye.
- Optionally, clip the seam allowance of the seam that was just made to allow the seam to lay flatter and drape more naturally.


Step 6
HEM SLEEVES
- Fold the short edge of the sleeves (by the wrists) ½ inch and then again another ½ inch. This will create double folded hem with the raw edge enclosed.
- Pin and sew the folds on both sleeves with 1/8th inch seam allowance. Note: Hemming the sleeves can be done much later in the pattern to allow for trying on the dress and perfectly fitting the sleeve length. However, hemming the sleeves before closing them into a tube eliminates the need to sew around a narrow rolled cuff, which can sometimes be difficult.
Step 7
SIDE SEAMS
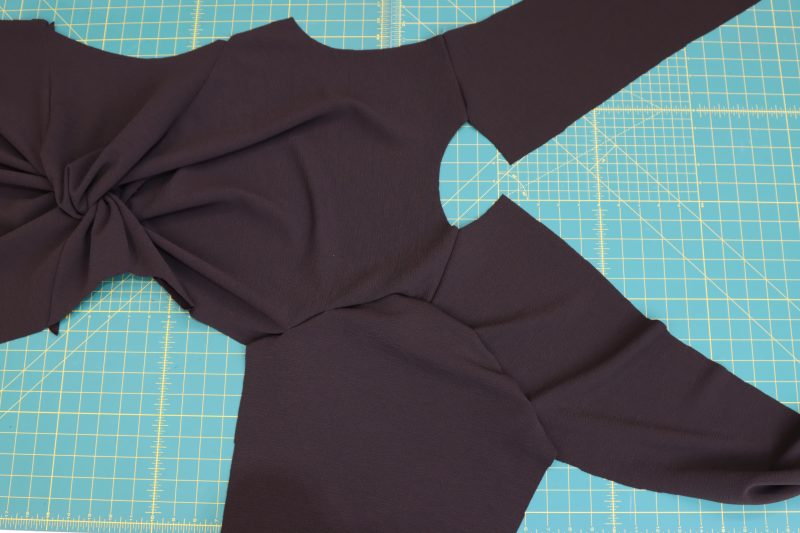
- Fold the dress in half at the shoulders and begin lining up the raw edges of the sleeves, the seams at the armpits, and the side seams of the dress.
- Pin the entire curve from the wrist of the sleeve to the bottom hem of the dress.
- Sew a single stitch from the wrist of the sleeve to the bottom hem, ensuring that the ends of the sleeves and the seams at the armpits perfectly line up.

Step 8
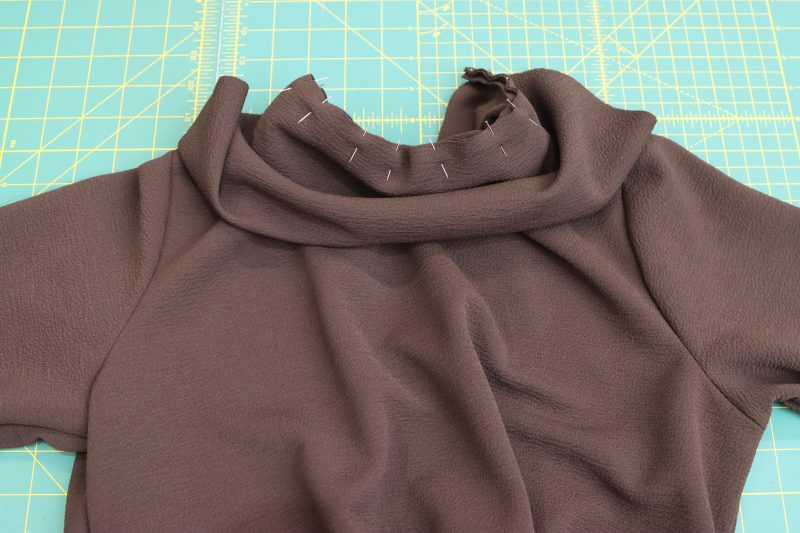
ATTACH COLLAR
- Fold the collar piece along the fold line denoted on the paper pattern, wrong sides together.
- Pin the raw edge of the collar to the raw edge of the neck opening, lining up the corners in along the back seam. Note: The collar piece is meant to be slightly shorter than the neck opening to keep the neck opening from stretching and bulging after its sewn. The collar piece may need to be stretched slightly in order to perfectly line it up with the neck opening.
- Sew the collar to the neck opening, but leave a 1 inch gap at the back opening of the dress to leave room to enclose the zipper in the next step.
Step 9
ATTACH ZIPPER
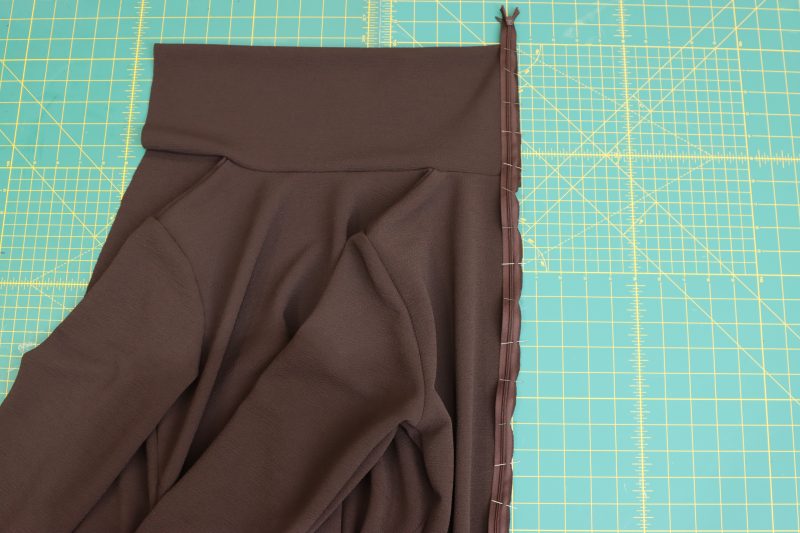
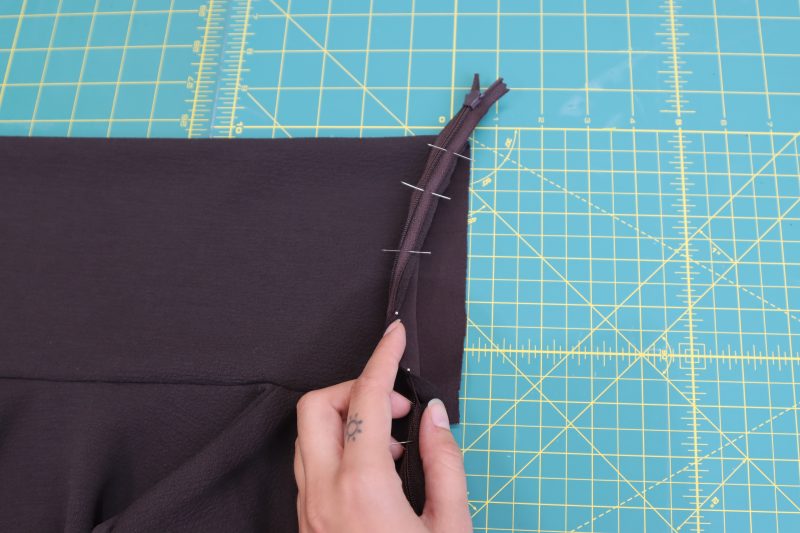
- Place the zipper right sides together with one of the raw edges of the center back of the dress, as shown in the photo below. Ensure the center of the zipper is positioned ½ inch away from the raw edge of the center back.
- Pin the length of the zipper in place, ensure that the top of the zipper is only pinned to one layer of the folded collar piece (the other layer of the fold will be used later to encase the top of the zipper.
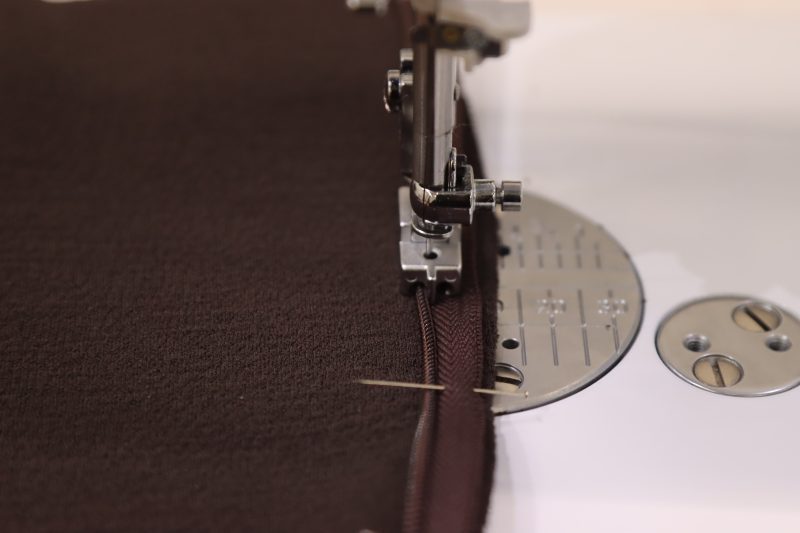
- Sew the side of the zipper closest to the raw edge of the center back, as close to the teeth of the zipper as possible without sewing directly over the teeth. Invisible zipper feet attachments for sewing machines work best for this step.
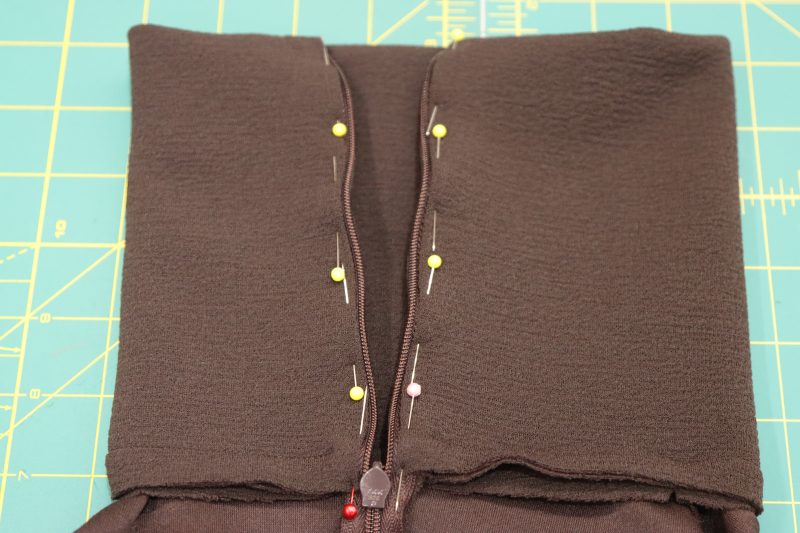
- Turn the dress inside out and place the other side of the zipper right sides together with the other side of the center back.
- Pin this side of the zipper the same way as the other side and sew it down.
Step 10
ENCASE ZIPPER
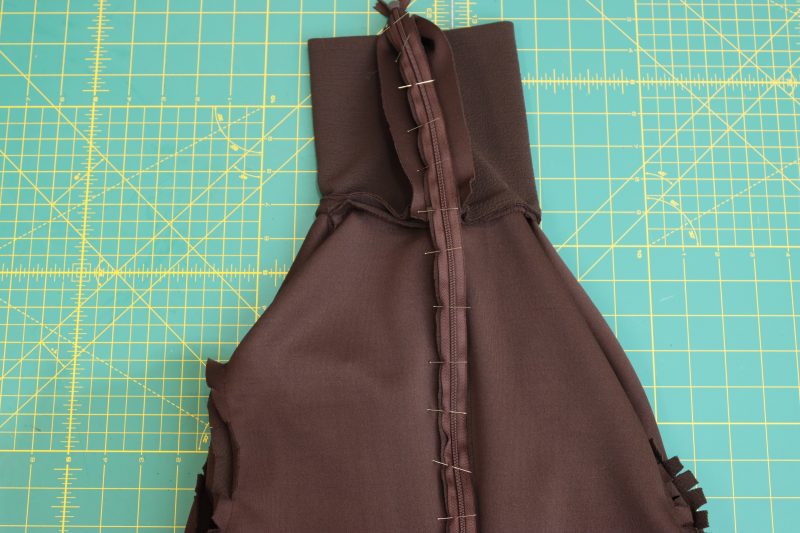
- Keeping the dress inside out, tuck the upper end of the zipper tape into the folded edge of the collar.
- Fold over the raw edge of the end of the collar ½ inch and pin the fold to the zipper tape.
- Sew a straight stitch over the back of the collar and the zipper tape.
Step 11
CLOSE BACK OF DRESS
- Keeping the dress inside out, fold the dress in half along the center back seam.
- Pin from the bottom hem of the dress to ½ inch above the zipper stopper at the bottom of the zipper.
- Sew the center back seam of the dress closed, stopping just past the zipper stopper, ensuring that the zipper teeth do not get caught in the center back seam.
Step 12
BOTTOM HEM
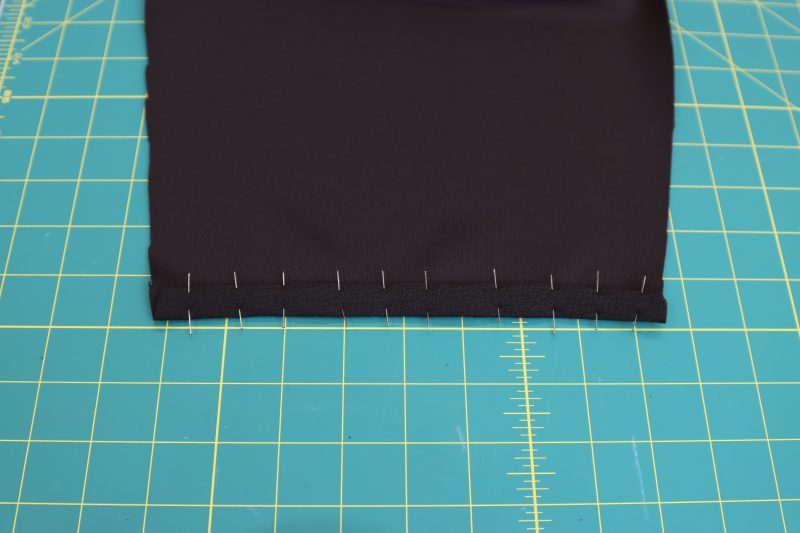
- Similarly to how the sleeves were hemmed, create a double folded hem by folding the bottom edge of the dress ½ inch and then another ½ inch, encasing the raw edge.
- Pin and sew with 1/8th inch seam allowance around the entire bottom edge of the dress.

Sewing Success: The Finished Nob Hill Draped Midi Dress
Share this post with a friend (or two!), download the Nob Hill Draped Midi Dress free sewing pattern, and show us which fabrics and colors you choose, using the hashtags #MoodNobHillPattern & #MadeWithMood—and don’t forget to tag us @MoodFabrics, too.

Free Sewing Pattern Inspiration for Your Next Project
With 450+ free sewing patterns and counting, your opportunities for sewing with Mood are endless!
We hope you had as much fun sewing this draped midi dress pattern as we did! As always, we want to hear from you—share your thoughts and comments below and let us know where you’ll be wearing the Nob Hill Draped Midi Dress free sewing pattern!

This is super cute! I love this in a nice wool crepe in white or burgundy. Appropriate for work or an evening dinner. Even a first date! Well done I can’t wait to make one~
Hello
Does the is latest pattern comes in A0 layered file ?
Unfortunately we only offer the pattern in A4 format as of right now, but stay tuned for the future!
I’m going to sew this but with a couple changes. Make the length of sleeves and skirt shorter and make a regular neckline.
I’m pretty much and intermediate sewer. I copy things due to dyslexia I have a hard time following diagrams on patterns. I try to order from mood when ever I get the chance.
I hope our instructions are helpful! If you ever have any questions, feel free to leave a comment or send us an email at patterns@moodfabrics.com.
Oh my God that’s a fabulous dress pattern. I’m going to order it now and make it as soon as I can find my net fabric I want to use that’s just incredible so elegant so dramatic just perfect.
I love this silhouette, but I can’t wear turtlenecks. In addition to having a larger chest, I feel as if I’m strangling all day. Is there an easy modification for a round or V neck that wouldn’t be pulled wonky by the knot thing at the hip? Thanks!
Absolutely! The turtle neck is totally optional. Instead of cutting out the whole rectangle for the turtle neck, just cut a 2 inch wide strip from the turtle neck and use it as a binding around the neckline (like a t-shirt) and leave the neckline the way it is.
no se muy bien como terminar la costura del cuello
Hola
La pieza del cuello como puedes ver en las fotos, va doblada por la mitad para que quede a la mitad de su ancho. Asi que primero cose uno de los lados más largos de la pieza al escote, derecho con derecho, luego cose el zipper desde la mitad de lo alto del cuello hacia abajo. Te va a quedar entonces, la mitad de lo alto del cuello sin zipper. Dobla esa mitad hacia el revés del vestido cubriendo con ella el zipper y la costura del escote y cose.
Si tu tela es lo suficientemente stretch, tambien podrías hacer el vestido sin zipper.
If using jersey, is the zipper necessary?
Great question! If the jersey has enough lateral stretch so that the turtle neck fits over your head without a zipper, you don’t necessarily have to add one. I made this dress the other day without the turtle neck and opted for no zipper and it fit perfectly fine. If you make this with jersey, let us know how it turns out and tag us using @MadeWithMood so we can feature it!
What is the best way to taper between sizes on this pattern, potentially need L at bust, XL at waist and L at hips? Also if needing to adjust top length between shoulders and waist where is the best place to make that adjustment
Thanks,
Hi Persephone, this is such a great question. If you are a large at the bust and hips but an extra large in the waist, I would do your best to blend the pattern lines between those sizes specifically at the part of the pattern that is used for the twisted waist section.
For the length of the torso of the dress, I would extend the length of the portion of the pattern under the armpits before the extension used for the twisted waist section as well as the length of the back pieces of the dress. Try to imagine cutting the front torso and back pieces at roughly the underbust and then separating it by a few inches to give some extra length.
All of this being said, if you’re using a knit fabric, the waist measurement of this dress is designed to be very forgiving. Let us know how your final project turns out by tagging us with #MadeWithMood!
I had exactly the same dilemma, I was 1 inch “short” on the waist, opted for L allover and it fits perfectly. If you have more than an inch then maybe adjust a bit, It feels snug on the waist, but still comfortable but it hugs the hips beautifully, and hides every imperfection on stomach and hips! I only made a test with thick jersey, can’t wait to make it properly in ponte roma!
How do recommend to shorten since the pattern does not have a lengthen or shorten line?
Great question Alice! Thank you for asking. To shorten the dress, all you have to do is measure from the bottom hem of both the front bottom twist and the back panels and cut the same length off of both. Our model is 5’11” for reference and the dress falls to her mid calf.
How to determine how many meters of fabric are needed for a given L-XL dress!?
Hi Azi! Try using the “Shop This Look” feature and choose your size to see how many yards are recommended for your chosen size. You don’t necessarily need to buy the fabric in the “Shop This Look” feature, but it will tell you how many yards you need.
This is a really simple and fast sewing project! I am really pleased with how it came out for me. I think it took more time to tape the pattern pages together than it did to make a quick muslin and put together the actual dress. I thought the waist twist would be far more complicated than it is!
I’d like to make this dress with a crepe satin material that doesn’t stretch. Would the sizing stay the same?!
Hey Joelle! If you’re making this dress with a woven fabric that doesn’t stretch, just make sure you cut out the size with final garment measurements that match your measurements so that the dress fits you properly.
Struggling with front twist to line up . I don’t understand how to get the “tails “ in correctly. I’ve been sewing my whole life and I just can’t wrap my grain around it.
Please help❣️
We will be posting a video tutorial on our instagram in the near future. Please stay tuned!
Schnittmuster
Does it have to be stretchy fabric?
Awesome question Fay. Since the pattern calls for a zipper, you don’t technically need to use stretchy fabric. If you choose to use a woven/non-stretchy fabric, just make sure you reference the final garment measurements because that will tell you how much room you’ll actually have in the dress.
My measurements are Bust 37″/Waist 29″/Hips 38″. According to the chart, I fall between the Medium and Large, however, I don’t really want to grade (not sure how to with the twists) and I’d rather just sew with 1 size. The fabric I’m using has 70% stretch. I’m worried if I go Large, then the fit will be too baggy. Which size would you recommend I go with, and do you think I could go without the zipper?
If your fabric has a lot of stretch you’re probably safe to use the smaller size. It won’t hurt if it’s a little tight around your waist, I think it would be cute that way with the twist there.
Thank you so much! I’ll try this out
how can i make the “skirt” of the dress less tight? more like an A pattern
Hey Sally! To make this skirt more of an A line silhouette, you’ll have to extend the side seam from the hip down. This means extending the hips on pieces B and C, so that the side seams of the front and back match up with each other.