

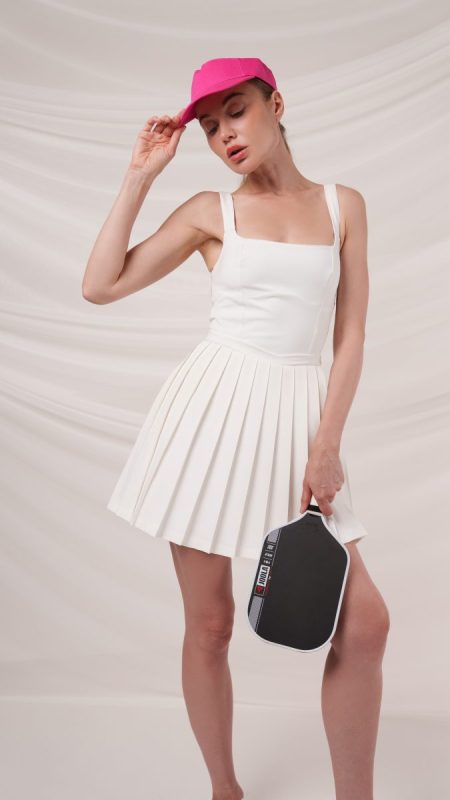
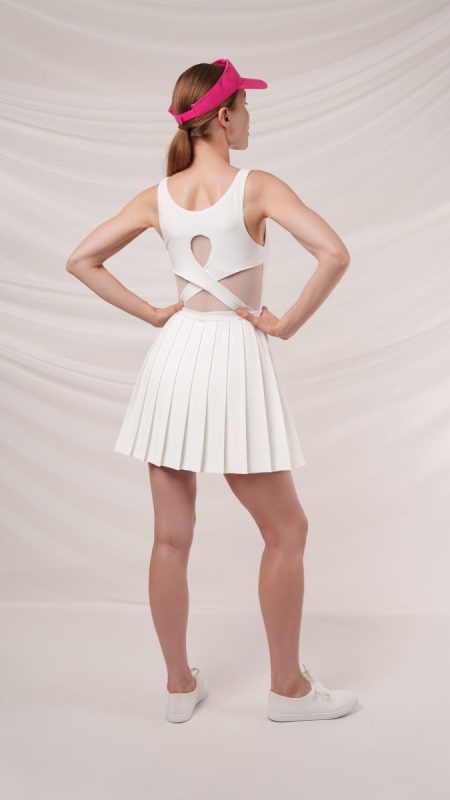
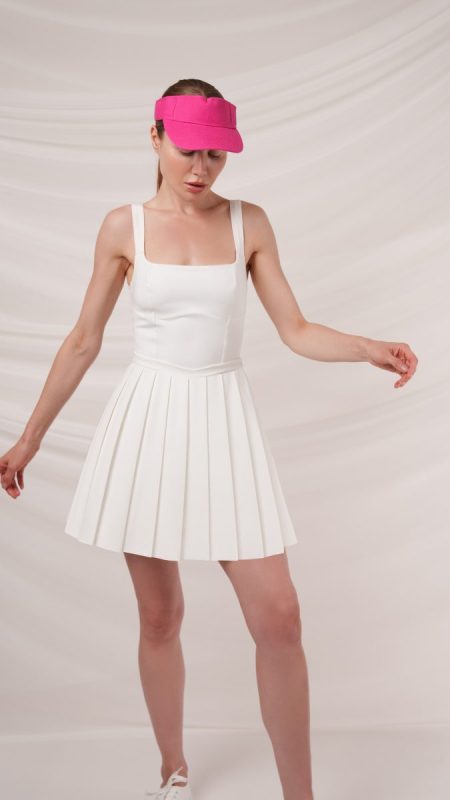
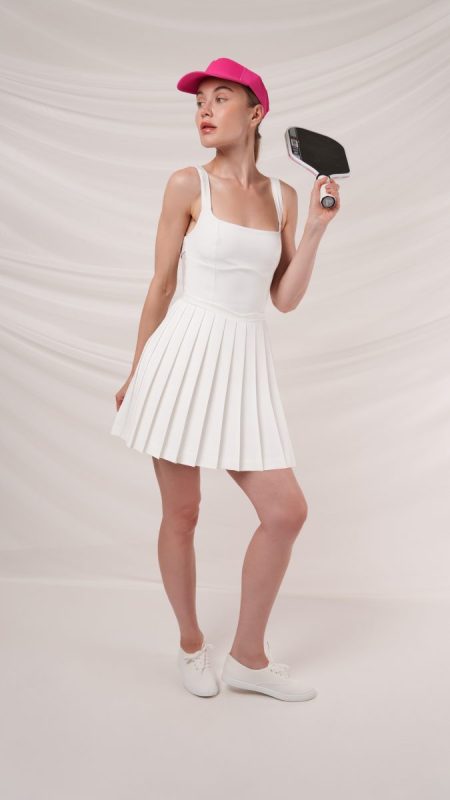
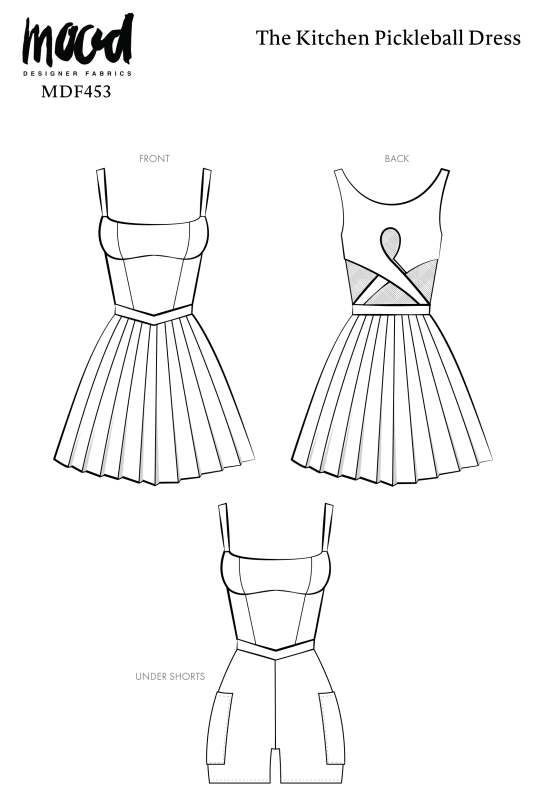
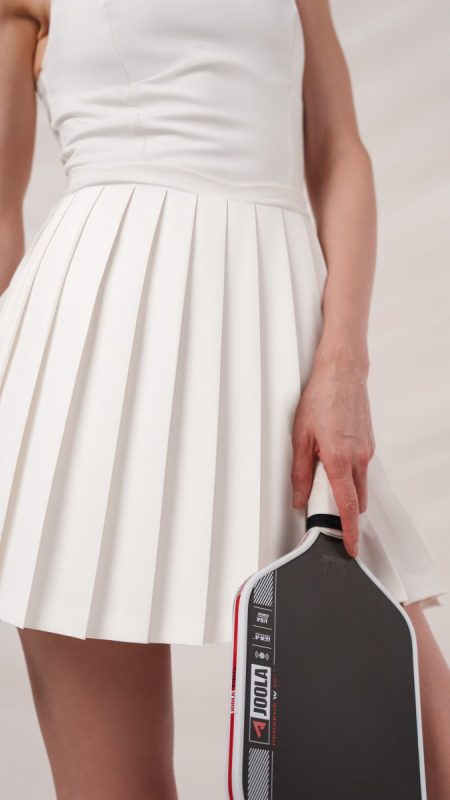
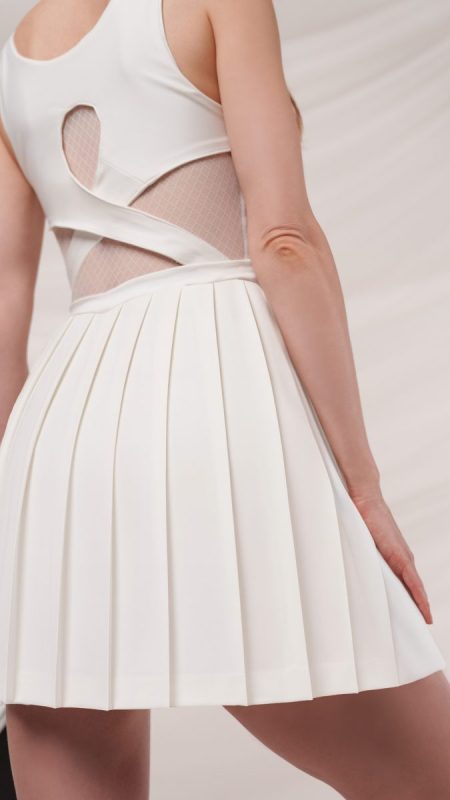
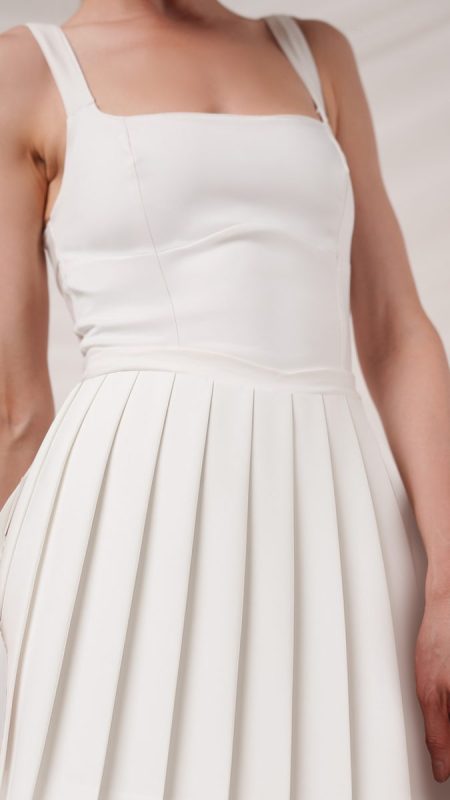
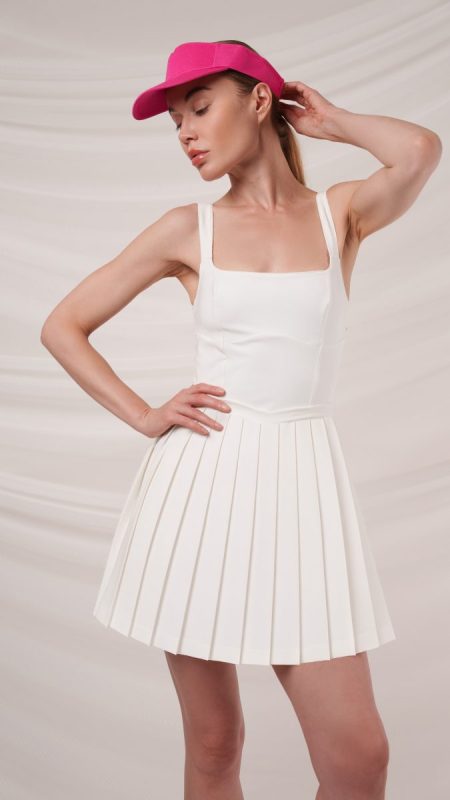
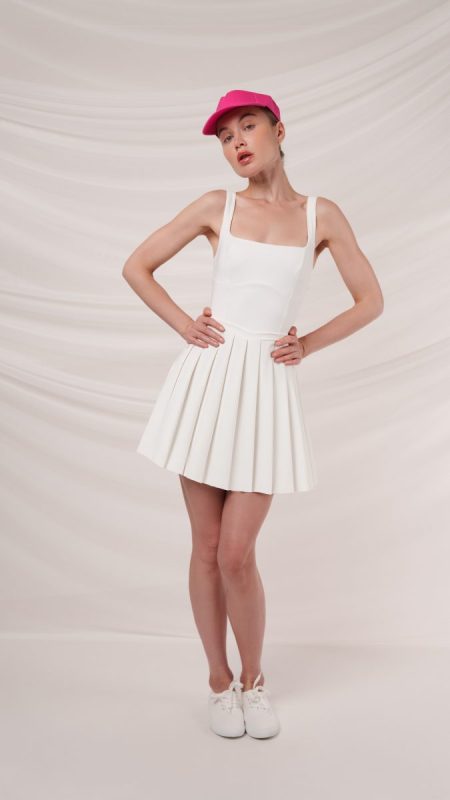
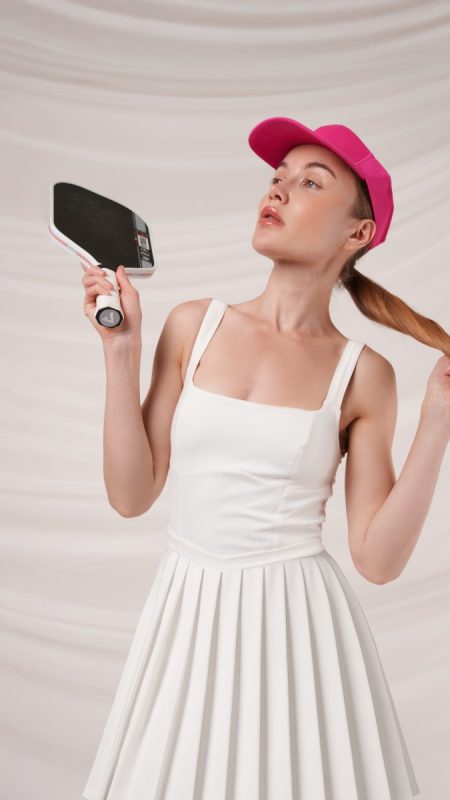
We’re thrilled to introduce our newest free sewing pattern, the Kitchen Pickleball Dress! Perfect for the player who knows their way around a no-volley zone (the “kitchen” in pickleball, for the uninitiated!), this pattern will have you looking absolutely smashing on the court. But you don’t have to be a pickleball pro to love this design. With its sleek, form-fitting silhouette and playful pleats, the Kitchen Pickleball Dress is the perfect companion for any active adventure. The attached shorts, complete with pockets, are a real game-changer—they’re just the right size to hold your phone, keys, or a few extra pickleballs. Plus, with a show-stopping diamond-netting mesh cutout in the back, you’ll be turning heads whether you’re serving up a winner or just running errands.
The Kitchen Pickleball Dress is an advanced pattern, so get ready to sharpen your sewing skills! We’ve crafted this beauty from our Compression Swimwear Tricot, a fabric that’s not only UV protective but also infused with aloe vera microcapsules for a soothing feel against your skin. This makes the dress a double threat—it’s perfect for pickleball, and it doubles as a full-coverage swimsuit! The possibilities for customization are truly endless. Imagine creating a version in a bold neon color, a vibrant floral print, or a classic black for a chic, sporty look. You could even use a different color for the shorts to create a fun, color-blocked effect. The pleated skirt allows for a beautiful drape and movement, making it a joy to wear.
It’s time to get our dill-icious new pickleball dress pattern on your sewing table!
Don’t be surprised if you become the envy of the court. People will be clamoring to know where you got this chic and sporty masterpiece. When they ask, you’ll love sharing that you made it yourself and that the free pattern is available on Mood’s Sewciety Blog! Style it with your favorite sneakers for a day on the court, or dress it up with a denim jacket and some stylish sandals for a casual day out. This sleeveless, tight-fitting silhouette is so comfortable and versatile, you’ll want to wear it everywhere. So go ahead, get in the kitchen and whip up your very own Pickleball Dress—you’re going to love it!
Essential Materials & Sizing Guide for the Kitchen Pickleball Dress
Continue reading for a breakdown of what knowledge and materials you need for creating your very own pickleball dress! We’ve got you covered with the recommended materials we used—if you want to follow along exactly—as well as a curated list of alternative fabric type recommendations if you want to customize your own version. The Kitchen Pickleball Dress free sewing pattern download includes technical drawings for seam and silhouette visibility, plus a size chart to help you find your perfect fit!
Purchase Products Used Below:
Quantities indicated are for sewing a size small pickleball dress. Toggle the ‘SHOP THIS LOOK’ box to find quantity estimates for other sizes.
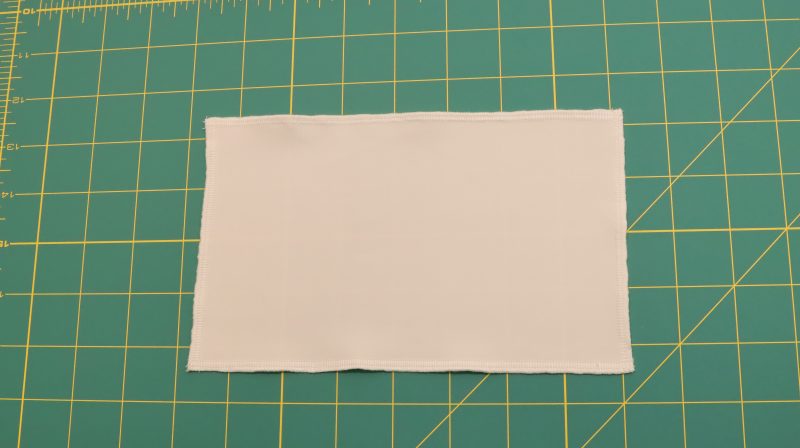
- 2.5 yards of Compression Swimwear Tricot, UV Protective with Aloe Vera Microcapsules – White
- 1 yard of White Stretch Diamond Mesh
- 0.5 yard of Soft Knit Fusible Interlining, Single Sided – White
- 1 each of Heat & Bond Lite Soft Stretch Web Adhesive – 5/8″ x 10 yards
- 1 each of Gutermann Sew All Thread 250m – 20 White
- MDF454 – Kitchen Pickleball Dress Sewing Pattern (Free download below!)
Alternative Fabric Type Recommendations:
The Kitchen Pickleball Dress sewing pattern is best suited for lightweight to medium weight fashion fabrics. Explore other fabric types or colors from our featured collections for your pickleball dress with the links below.
Download Your Free Sewing Pattern
Submit your name and email in the form below to receive the download link for the Kitchen Pickleball Dress free sewing pattern directly in your inbox. Mood Sewciety Patterns will send your free download link via email with the subject line: ‘Your Free Download from Mood Sewciety – The Kitchen Pickleball Dress’ (in PDF format for A4 and letter-size printing).
Find Your Perfect Fit
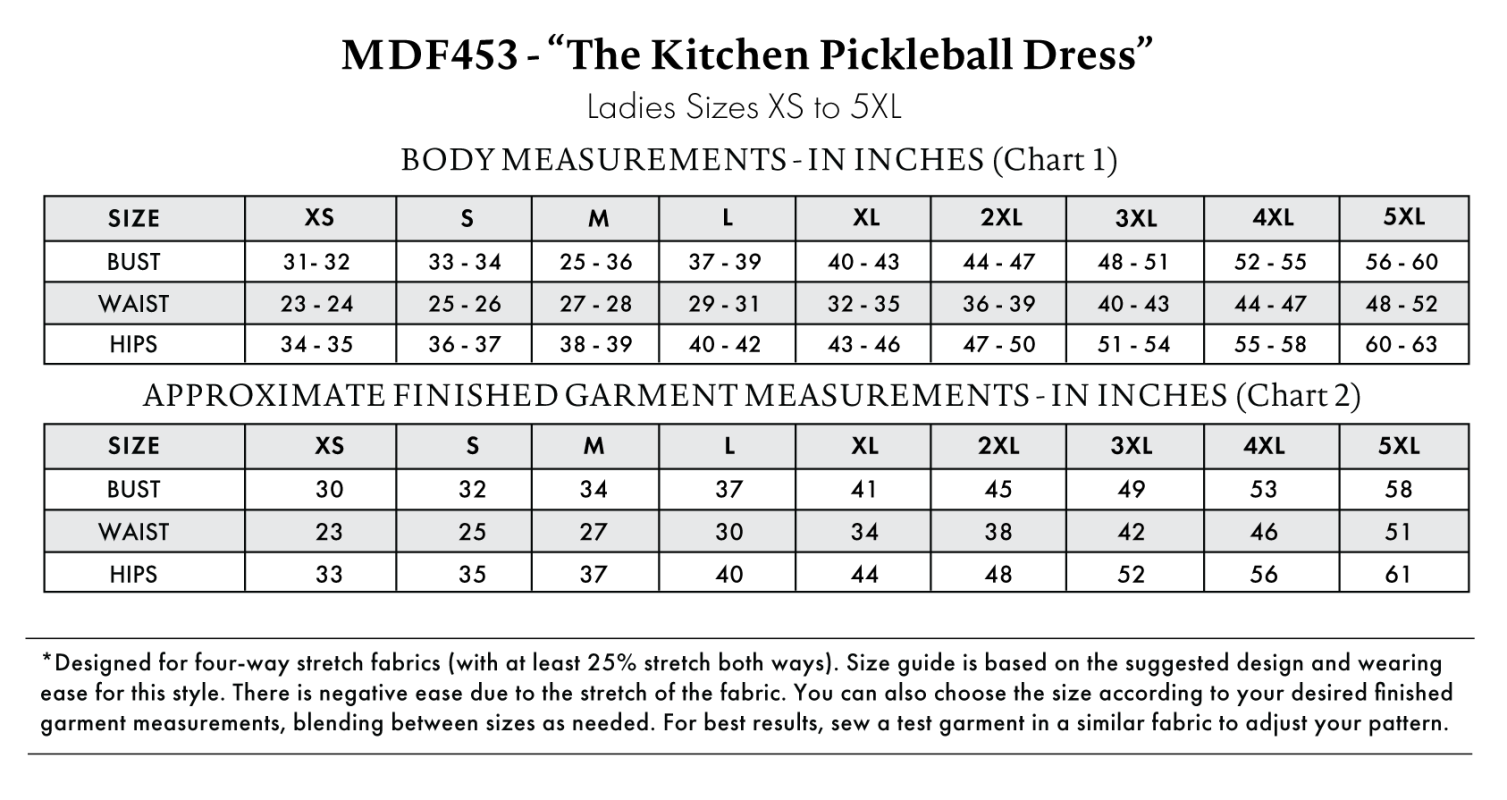
Designed for four-way stretch fabrics (with at least 25% stretch both ways), the Kitchen Pickleball Dress Size Guide is based on the suggested design & wearing ease for this style. There is negative ease due to the stretch of the fabric. Measure the printed patterns to make sure the dimensions are according to the desired fitting and adjust if needed before cutting the fabric. You can also choose the size according to your desired finished garment measurements, blending between sizes as needed. For best results, sew a test garment in a similar fabric to adjust your pattern.
Important: Always read all the instructions before cutting the fabric!
How To Sew The Kitchen Pickleball Dress
The instructions provided below are designed to guide you through sewing the Kitchen Pickleball Dress from start to finish.

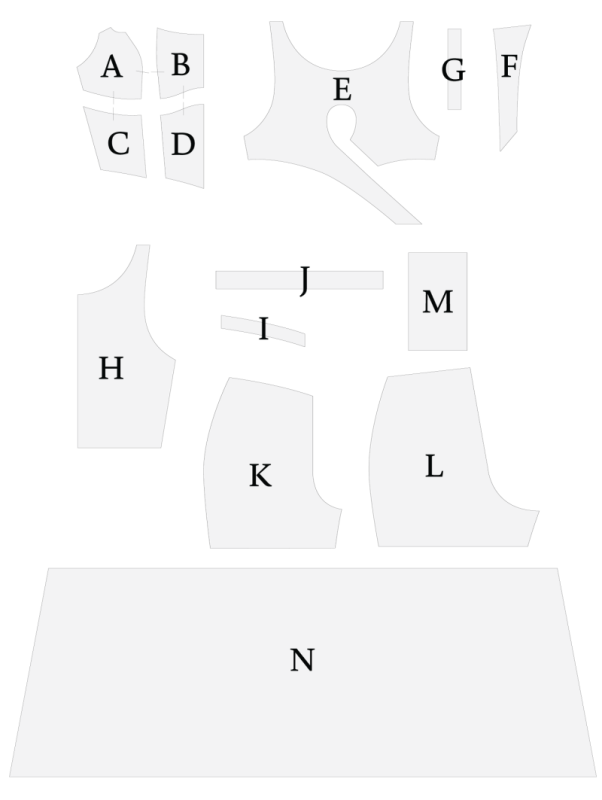
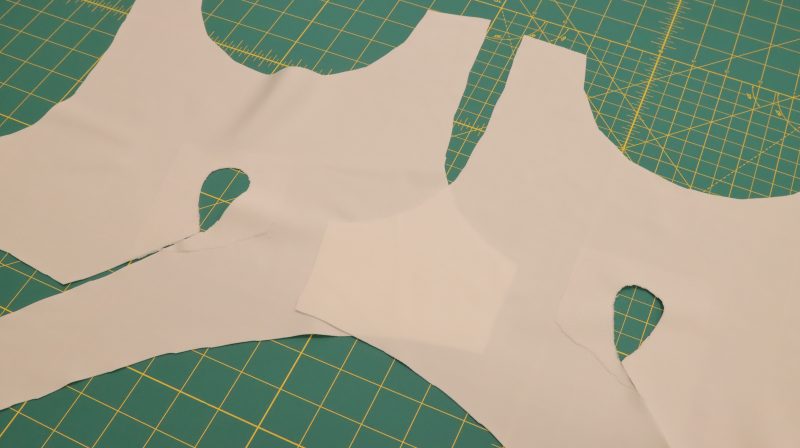
Pattern Pieces & Fabric Cuts Needed
- (A) TOP FRONT SIDE UPPER
- Fabric – Cut 2 Mirrored
- Lining – Cut 2 Mirrored
- (B) TOP FRONT CENTER UPPER
- Fabric – Cut 1 on Fold
- Lining – Cut 1 on Fold
- (C) TOP FRONT SIDE LOWER
- Fabric – Cut 2 Mirrored
- Lining – Cut 2 Mirrored
- (D) TOP FRONT CENTER LOWER
- Fabric – Cut 1 on Fold
- Lining – Cut 1 on Fold
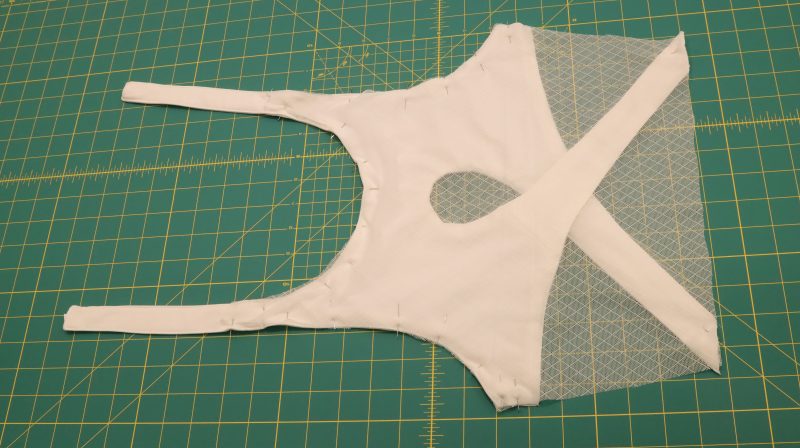
- (E) TOP BACK
- Fabric – Cut 1
- Lining – Cut 1
- (F) TOP BACK LEFT STRAP
- Fabric – Cut 1
- Lining – Cut 1
- (G) SHOULDER STRAPS
- Fabric – Cut 2
- Lining – Cut 2
- (H) TOP BACK MESH
- Mesh – Cut 1 on Fold
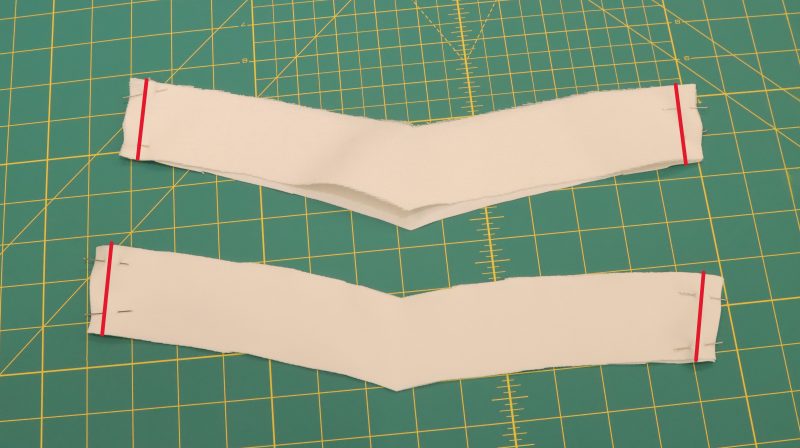
- (I) FRONT WAISTBAND
- Fabric – Cut 1
- Lining – Cut 1
- (J) BACK WAISTBAND
- Fabric – Cut 1
- Lining – Cut 1
- (K) SHORTS FRONT
- Fabric – Cut 2 Mirrored
- (L) SHORTS BACK
- Fabric – Cut 2 Mirrored
- (M) POCKETS
- Fabric – Cut 2
- (N) SKIRT
- Fabric – Cut 2
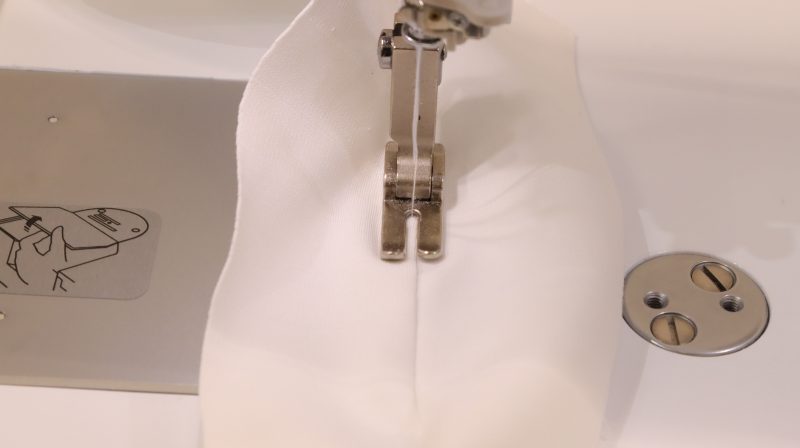
Sew with a 1/2″ seam allowance for all seams unless otherwise specified.
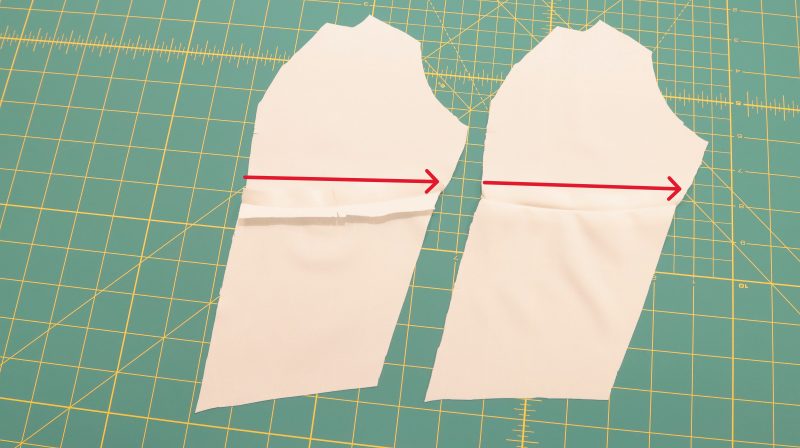
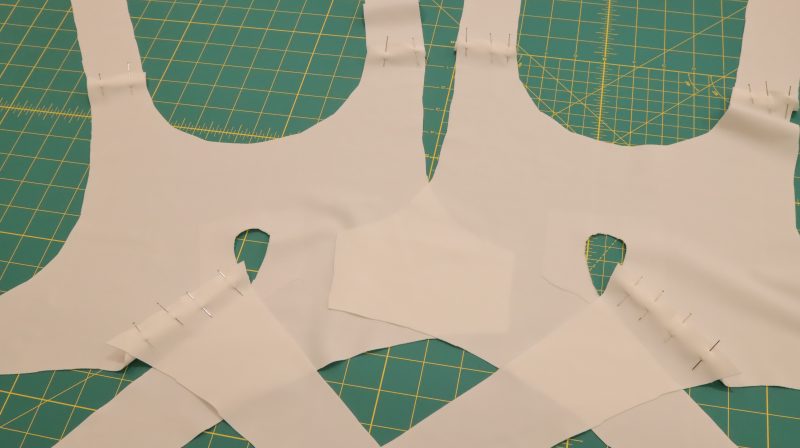
Step 1
FRONT BODICE
(A) TOP FRONT SIDE UPPER, (B) TOP FRONT CENTER UPPER, (C) TOP FRONT SIDE LOWER, (D) TOP FRONT CENTER LOWER
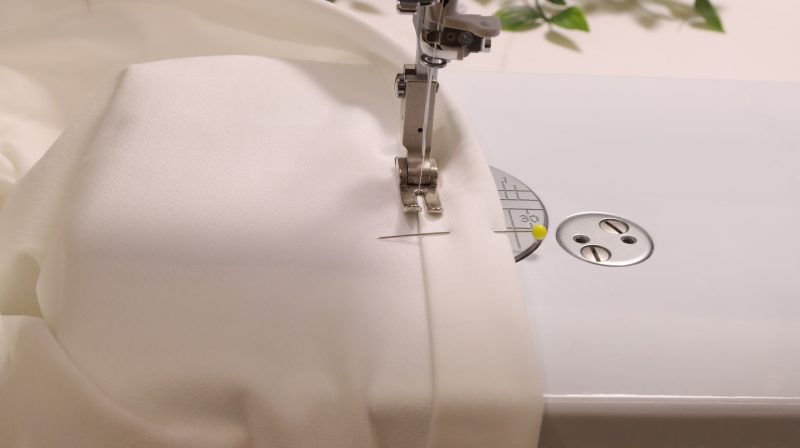
- Sew/serge the center front top and bottom together (½” seam allowance). Press seam allowance down.
- Sew/serge front side top and bottom together for both sides and press seam allowance down. Sew the side to the center piece and press seam allowance facing toward the side seams.
- Repeat the same steps for the lining. Attach the lining facing the shell right side to right side. Sew only the top, leaving the bottom and side seam free. Turn the front bodice to the right side. Top stitch the top area and baste shut the side seams and bottom.
Step 2
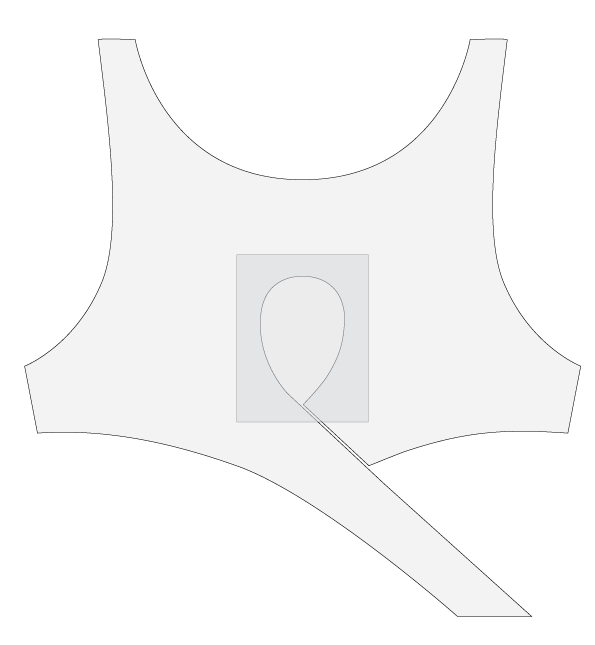
BACK BODICE – INTERFACING
(E) TOP BACK
- Cut 2 squares of interfacing, bigger than the tear-shaped cut-out by 1”.
- Press the interface on the wrong sides of the shell and lining. Cut clean the interface from the center of the hole.
- This will prevent the fabric from over-stretching while you sew.
Step 3
BACK BODICE
(E) TOP BACK, (F) TOP BACK LEFT STRAP, (G) SHOULDER STRAPS
- Sew on both shells and lining at the right bottom strap and shoulder straps. Remember the lining has to be mirrored.
- Pin the lining to the shell facing right side to right side. Sew all around but leave the neckline, top of shoulder straps, bottom of the back straps and side seam open.
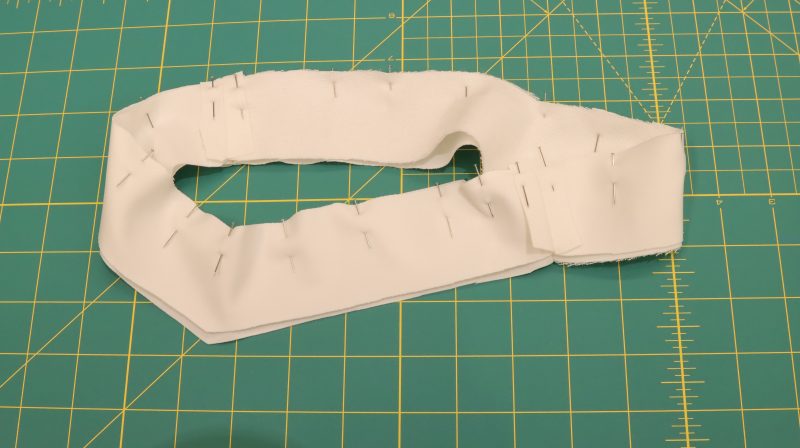
- Turn the back piece to the right side. Press the seams open and tuck the neckline ½” seam allowance to the inside. Top stitch all around the back piece.
⇒ Pro Tip: Clip the seam allowance of the teardrop shape before turning right side out for a clean curved finish.
Step 4
BACK BODICE MESH
(H) TOP BACK MESH
- Pin back mesh part to the inside of the top back piece.
- Top stitch around it.
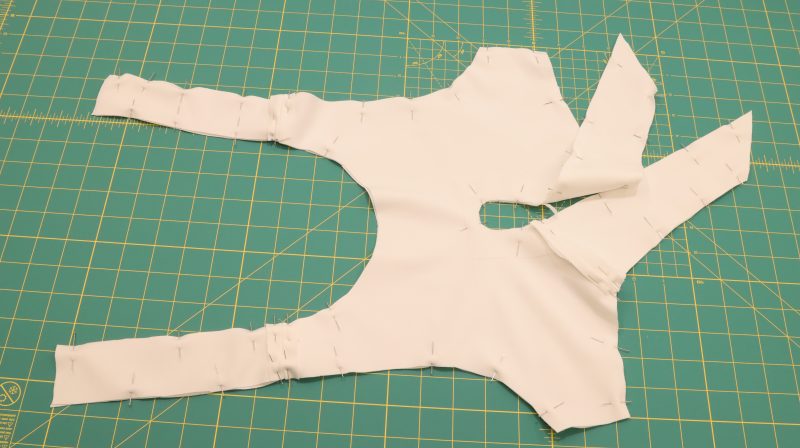
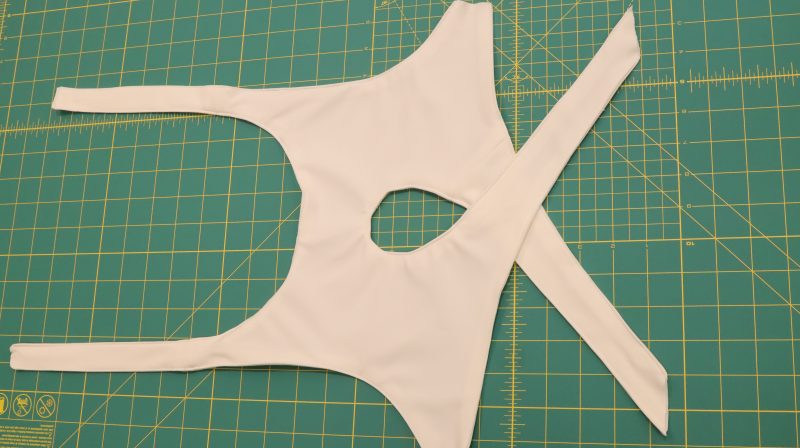
Step 5
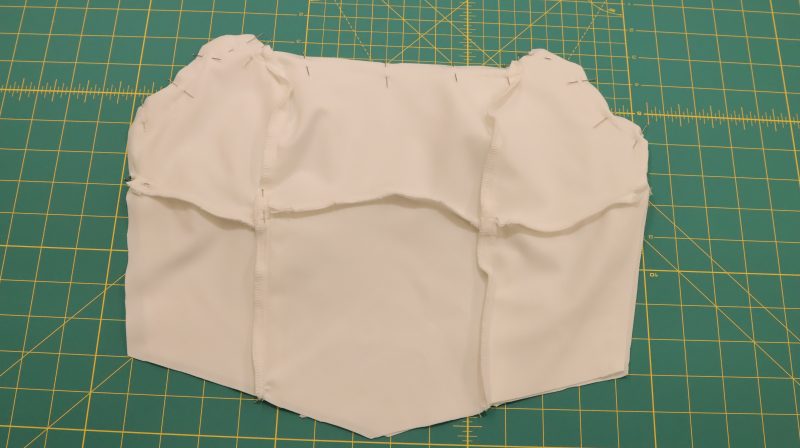
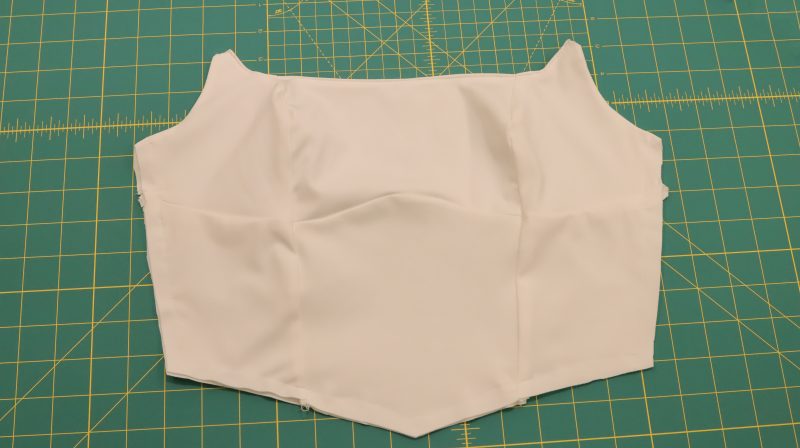
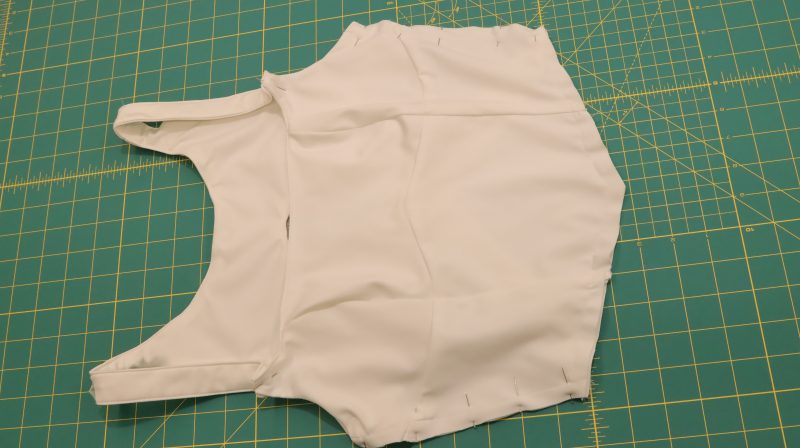
ASSEMBLE FRONT & BACK BODICE
- Pin the right side of the front facing the right side of the back piece.
- Sew/serge side seams and straps together.
- Press strap seams down and top stitch them.
Step 6
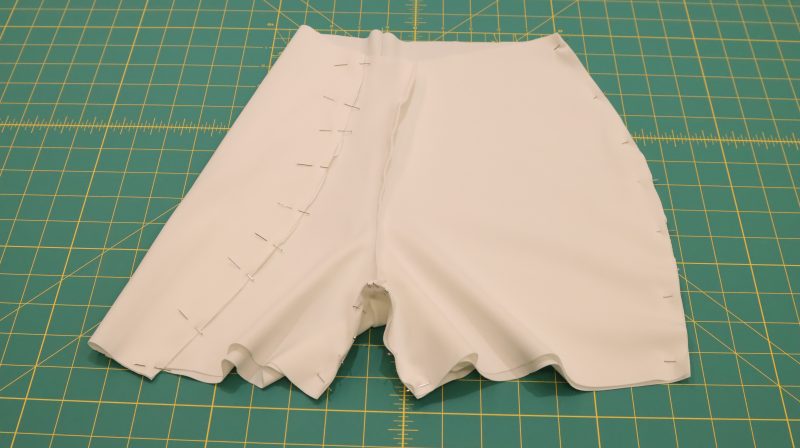
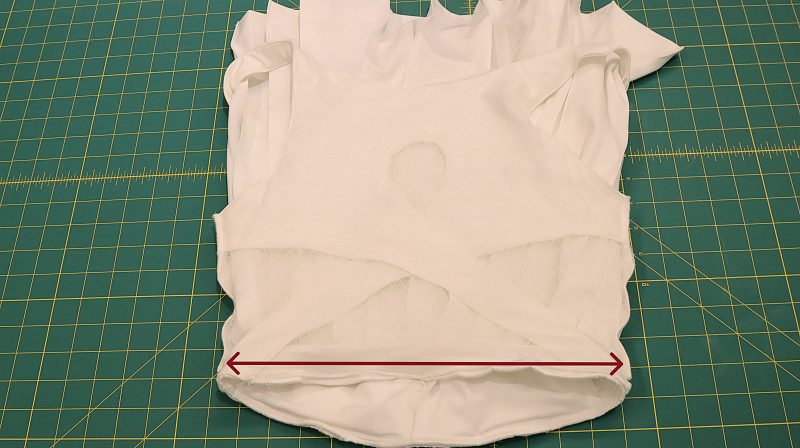
SHORTS
(K) SHORTS FRONT, (L) SHORTS BACK, (M) POCKETS
- Pin crotch line of front pieces right side to right side together. Sew/serge them together. Repeat the same step on center back.
- Pin along the outer and inner seams of front and back pieces facing right side to right side. Sew/serge them together closed.
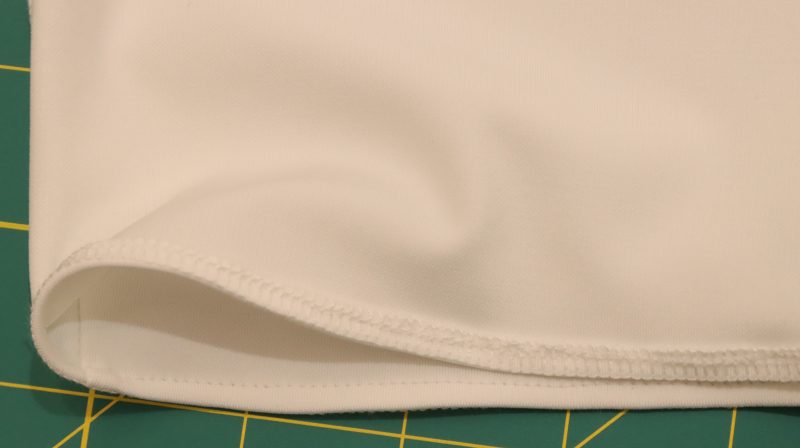
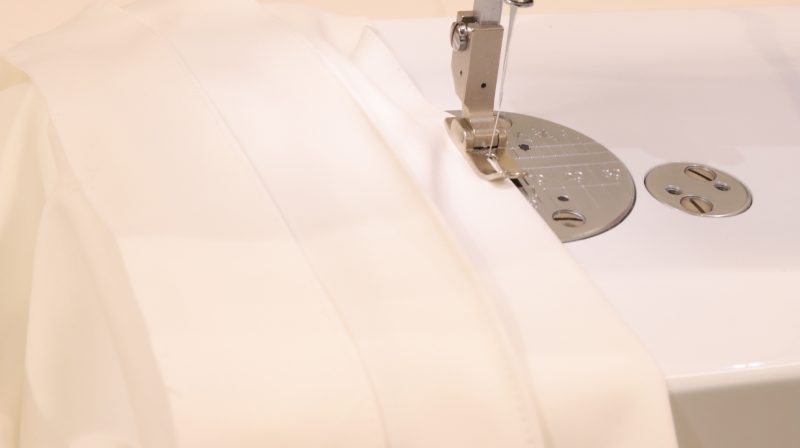
- Serge the bottom hem and fold it a ¼” up to the wrong side. Top stitch it in place. If you do not have a serger, roll the hem ¼” twice.
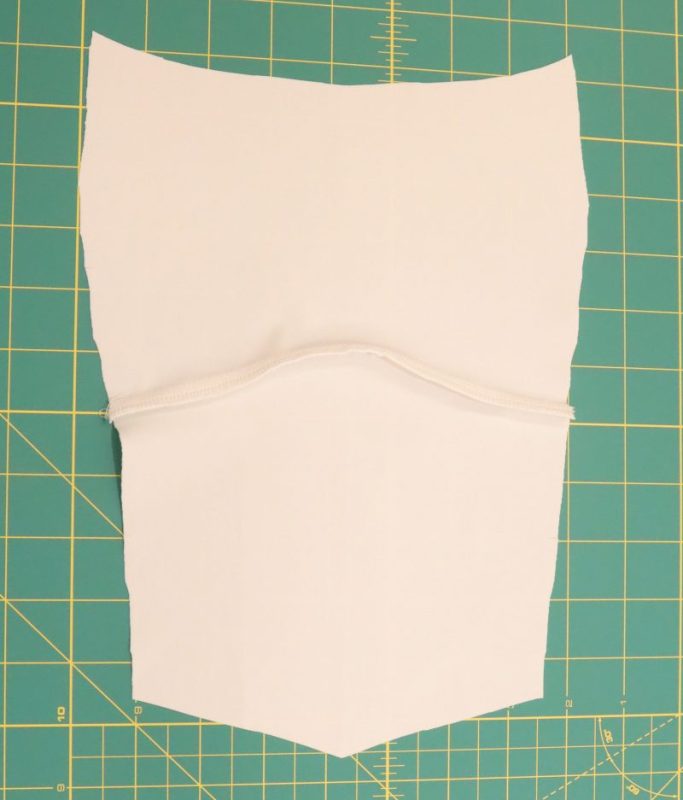
- Serge the pocket all around, press a ¼” of seam allowance to the wrong side and top stitch.
- Center the pocket in the middle of side seams, 2” above the hem. Pin in place and top stitch 1/16” away from the edge.
- Repeat for other side (second pocket).


Step 7
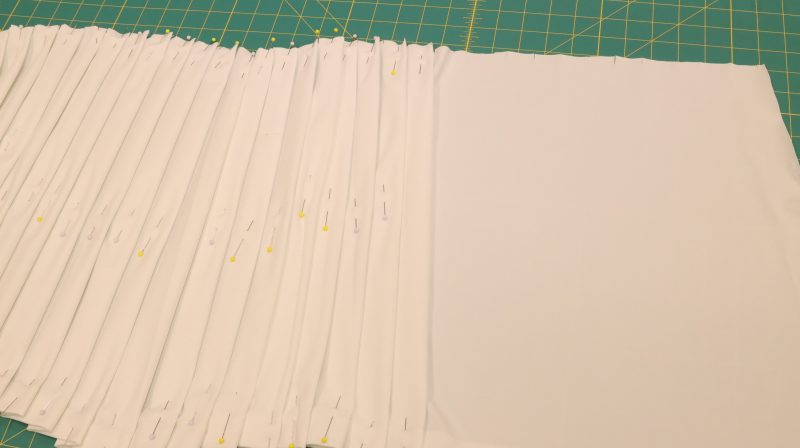
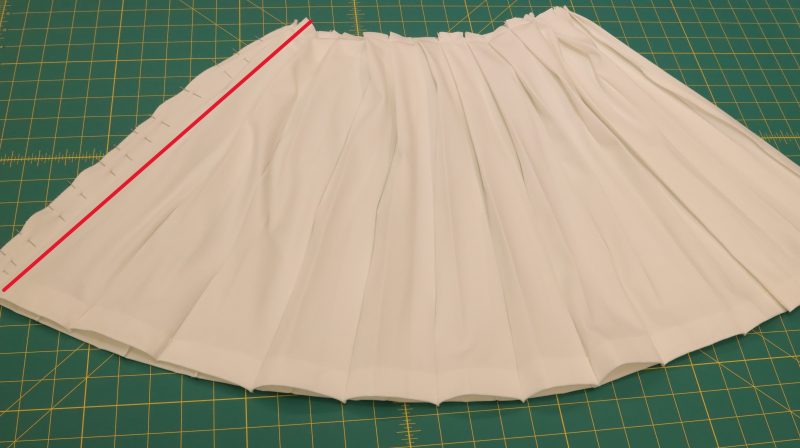
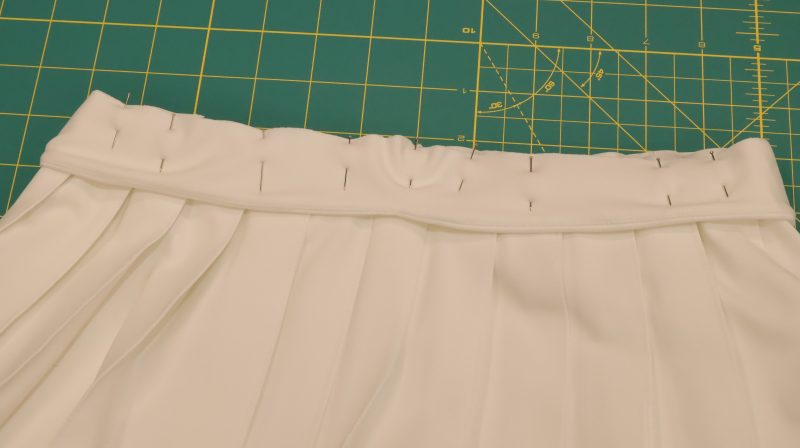
PLEATING THE SKIRT
(N) SKIRT
Note: To ensure the best finish for the pleats, the skirt should be cut parallel to the fabric’s grainline. For larger sizes where the fabric width is not enough, the skirt piece can be made by joining multiple sections.
After sewing the bodice, measure the waist (the measurement can sometimes vary depending on the fabric and other factors). Multiply it by 3 — this should be the waist measurement of the skirt before pleating. Make sure it matches the waist measurement on the pattern before cutting the fabric. If necessary, make adjustments. Remember that the pattern is cut twice, so the waist on the pattern represents only half the full measurement.
- Sew only the right side seam on the skirt.
- Fold hem 1” up to the wrong side and stabilize it by using heat bonding, double sided witchery tape or top stitch it.
- Start pleating from the front left. Each pleat should be 1”. You can also take the fabric to a professional pleater to pre-pleat the skirt.
- Top stitch each pleat from top to bottom. Make sure to not catch the fabric underneath. Baste the pleats along the waistline.
- Once you are done with the pleats, sew/serge the left side seam closed.
Step 8
ATTACH SHORTS AND SKIRT
- Pin the shorts waist along the waistline inside the skirt. Right side of shorts should be facing the wrong side of the skirt.
- Baste.

Step 9
PREP WAISTBAND
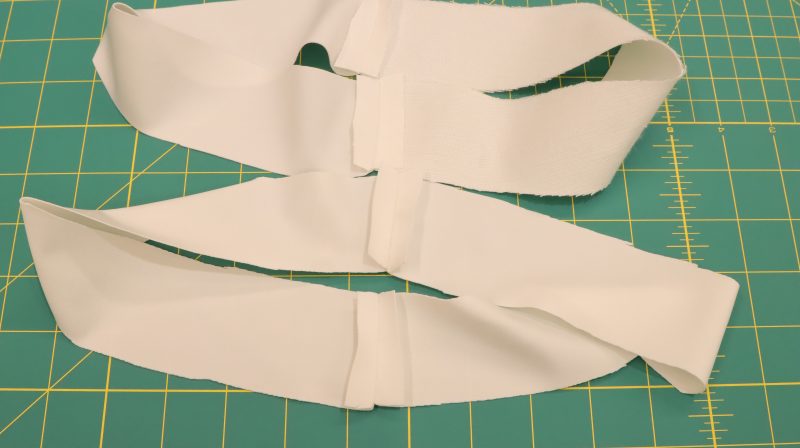
(I) FRONT WAISTBAND, (J) BACK WAISTBAND
- Pin right side to right side both pieces of the waistband. Sew only the side seams.
- Press side seams open on both sides.
- Pin from the top right side of the waistband to the right side of the facing waistband. Sew it closed, leaving the bottom open.
- Press seams toward facing and understitch it. This will ensure the facing will stay in place without sliding forward.
Step 10
ATTACH WAISTBAND, SKIRT & TOP
- Pin waistband right side to the right side of the skirt. Baste in place.
- Slip the skirt facing the right side to the right side of the top. Match the side seams accordingly. Make sure the front top matches the front bottom.
- Serge the waist closed. Serger is highly recommended for this step, but you can also baste everything together closed, trim seam allowance to a ¼” and zigzag stitch with the width of a ¼” zigzag.
Sewing Success: The Completed Kitchen Pickleball Dress
Share this post with a friend (or two!), download the Kitchen Pickleball Dress free sewing pattern, and show us which fabrics and colors you choose, using the hashtags #MoodKitchenPattern & #MadeWithMood—and don’t forget to tag us @MoodFabrics, too.


Free Sewing Pattern Inspiration for Your Next Project
With 450+ free sewing patterns and counting, your opportunities for sewing with Mood are endless!
We hope you had as much fun sewing this pickleball dress pattern as we did! As always, we want to hear from you—share your thoughts and comments below and let us know where you’ll be wearing the Kitchen Pickleball Dress free sewing pattern!
This is very cute
Thank you! We’re so glad you’re enjoying our patterns. If you make any of them, we’d love to see your creations!
I have a vintage 1950’s dress that is similar to this. It could double as a retro dress with the right fabric too! <3
The idea of giving it a retro twist with the right fabric sounds amazing!Such a fun way to blend vintage charm with a modern pattern. Thank you for sharing it with us.
I keep entering my name and email, but I’m not getting the confirmation message or the pattern link in my email. Is anyone else having this problem?
Please make sure that when the “Subscribe & Download” button is clicked, a confirmation appears in a green box with the following message: “Thank you for registering! Please check your email for your link to your free download”.
Also, check your email spam folder. If you continue having issues, please email us at: patterns@moodfabrics.com
I just bought several yards of olive green super stretch lightweight denim (7 oz), and the second I saw this dress I scrapped my original plans for it–it MUST be made into this adorable dress! It’s not as stretchy as the Tricot, obviously so I’m thinking I’ll cut the pattern pieces in a bigger size and maybe add some light boning in the bodice or a bit of super-compression mesh as a lining. I’d love to hear anyone’s thoughts or suggestions!
Every year I resolve to Wear More Dresses; thanks to Mood, I’m building up quite a wardrobe of them! I’ve made four Axel shirtdresses so far (cut to above-the-knee length because I’m too short for the original length), a Taos dress, and I’m working on a (also shortened) Asheville dress now. Thank you, Mood!
BTW, I have to say that I LOVE the photos you guys have been using lately for your patterns; the model against a plain backdrop, in “plain” poses, really allows us to see the full clothing item with the details. In the past it’s been difficult occasionally to really see what the garment looks like, but this new “method” is much more helpful. The model is lovely, too. Thank you!
Hi Stacey!
That fabric sounds amazing, like a perfect match for giving this dress a unique twist. Your idea to size up and add some structure with light boning or compression mesh is super smart, especially with a less stretchy fabric. I’d say go for it! Just make sure to test the fit with a muslin if you can, especially around the bodice, since stretch can change things quite a bit.
So impressed by your dress-making streak! Four Axel dresses and more on the way? That’s some serious sewing inspiration right there. We are so happy the patterns have become part of your journey to wearing more dresses. Keep sharing your makes. We’d love to see how this one turns out!
And thank you so much! We’re really happy to hear the new photo style is helping. It’s exactly what we were aiming for.
Happy sewing!
This is lovely if you’re 25 and have no body fat. what about if you’re 62 and don’t. perhaps you could design a pickleball outfit for those of us? (in the majority if you don’t know!) it would be nice if mood would design some clothes for those of us who aren’t a size 0 and over the age of 40. at least design something for us that isn’t a caftan or a tent posing as a dress!
Hey Jamie! We really appreciate the feedback. It helps us a lot to know the demographic of people downloading our patterns. I want to recommend a few other patterns that might be a bit less revealing than the Pickleball Dress that you could mix and match for a cute activewear set. We published the Venture Sweatsuit Ensemble in April 2024 which consists of a hoodie and some stretchy shorts, there’s the Olympia Tennis Dress, which could always be lengthened into longer leggings instead of shorts, and then there’s the Arbor Skort, which has built in pockets which I think are super practical. Let me know if any of these interest you!
You could try with a thicker material or add boning to the bust and bodice. I am using a thicker jersey knit. Its a little heavier but covers the extra curves I like to hide.
Please consider my comment a challenge rather than a criticism.
Thank you so much for the lovely pattern. So loving this. Can it be made with a woven fabric?
Hi Anna
Thank you for the comment. Yes, you could do it with woven fabric, but since woven fabrics are generally not stretchy, you would need to add a closure so the dress can be put on. For example, a zipper on the side. To do this, it would be necessary to reinforce the mesh fabric on the back, or add a panel on the side where the zipper will go.
Thanks Sandy.
I would love to first make this as a top and shorts set, is that possible? I’m not a pro but not exactly a begginner either, is it a diffcult alteration to make?
Hi Camilla, you can totally make the top and shorts separate. When you get to step 6 (after the top is finished but before you start the bottoms), you’ll want to hem or add elastic to the bottom of the top. Then, after you make the shorts, you will have to put elastic in the waistband as well. Basically you just follow the tutorial as it’s written but don’t attach the top to the shorts.
Hello please could you email me this pattern?
Thanks!
You can download the pattern for free by entering your name and email address into the field under “Download Your Free Sewing Pattern”. Then, check your email inbox (and your spam, just in case) for an email from Mood Sewciety Patterns with the subject line “Your Free Download from Mood Sewciety”. Scroll down to the blue link under the title of the email and click on that. It will bring you to a web browser page where you have to scroll down and find the orange button that says “click here to download your free sewing pattern”. That button will redirect you to the webpage with the PDF of the pattern, which can be printed on 8.5×11 paper on your printer at home. Let me know if you need any additional help accessing the pattern!
I loved how the dress turned out, but I would have really appreciated a little more detail on how to do pleats, especially on stretchy fabric, as I didn’t want to take it to a professional pleater. But thank you for a cute dress – I can’t wait to play pickleball again!
Such a cute dress! Will the pattern work if H, the mesh, is skipped?
Hey Heidi! Yeah it will still work, it’ll just be totally open in the back which could be a really cute look!
Hi there! This is SUPER cute and I’m very interested in making this for my next project. I am curious what you would recommend as the best stitch and stitch settings this project. I’ve never worked with tricot before and have never made any sort of athletic wear either, and I’m reading a couple different options on the best way to handle seams for tricot across the internet.
Also, just to clarify, are you just using a second layer of the tricot as the lining fabric? I am assuming this is the case since nothing else is listed in the materials but just wanted to clarify.
Thank you!
Excellent question Nicole! I would recommend a zigzag stitch with a stitch length of 2 millimeters and a width of 3.5 millimeters for attaching most of the seams. If you’re topstitching anything, I recommend using a straight stretch stitch or a lightning stitch.