

In 2021, I’m all about a garment that’s as comfy as it is cute. The Idra Dress free sewing pattern is an adorable take on a non-stop recent trend: the sweatshirt dress. Rather than being a simple longline sweatshirt though, this dress brings a subtle statement sleeve into the mix. Pair this in a knit fleece with sneakers for a sporty look or opt for something more elegant with a pair of heels or boots.


Purchase Materials Used Below:
- 2.5 yds Heretic Red Bamboo and Cotton Stretch Knit Fleece
- 1 pc Italian Black Drawstring with White Accents – 49″
- 1 pkg Nickel Grommets
- Optional: Dritz Magenta Grommet Plier Kit – 0.375″
- MDF231 – The IdraSweatshirt Dress Sewing Pattern (free download below!)
Alternative Recommended Fabrics:
All seam allowances are 1/2″ unless otherwise stated. See chart below for sizing specifications. Note, this specific pattern is available up to a size 30.

Step 1
Begin your dress by attaching the front and back panels at the side seams. In order to not lose the fabric’s stretch, I’d recommend an overlock or similar stretch stitch for these seams.
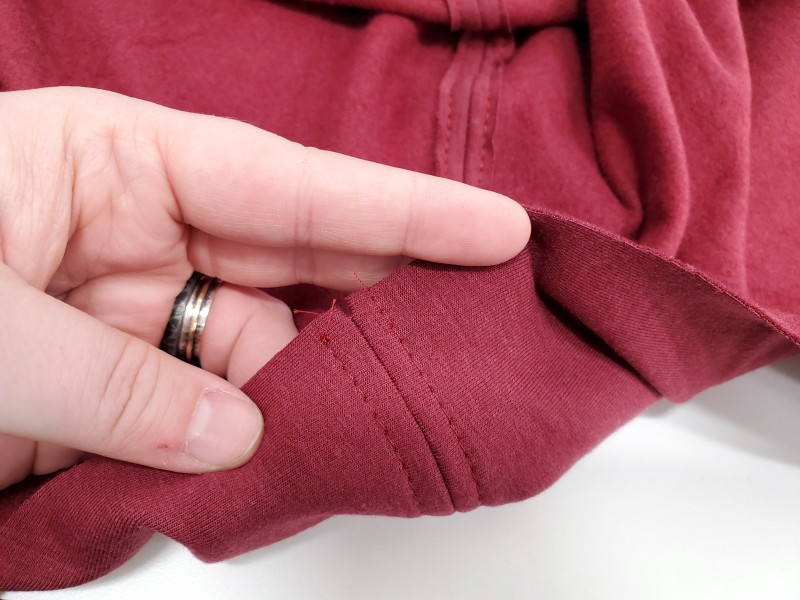
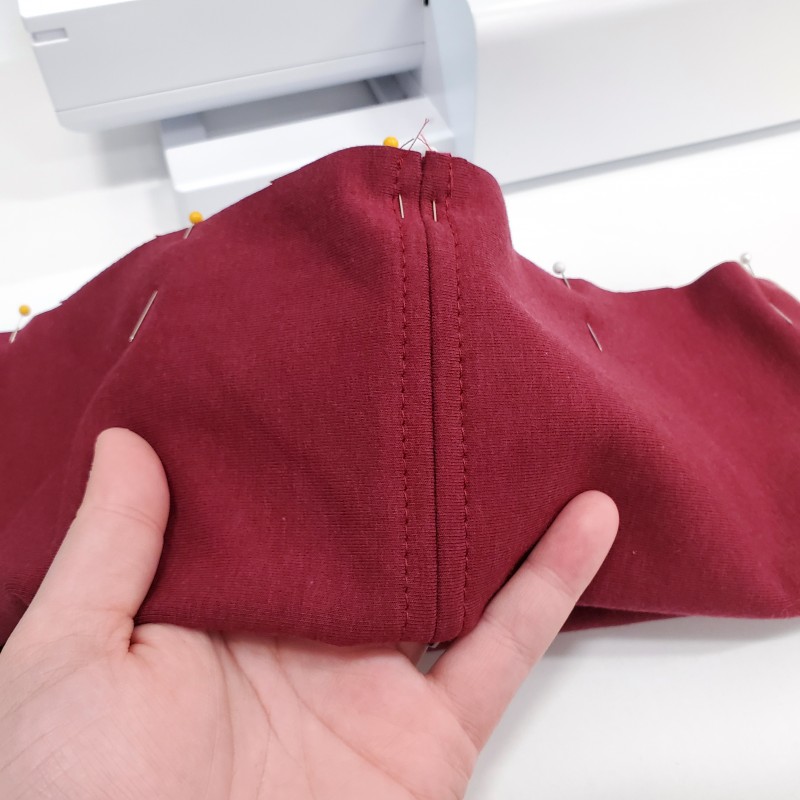
Step 2
Create your hood next, attach the two panels at the center seam. Since this part doesn’t need to stretch, I sewed them face to face with a regular seam and topstitched the seam allowance down, as you see below.
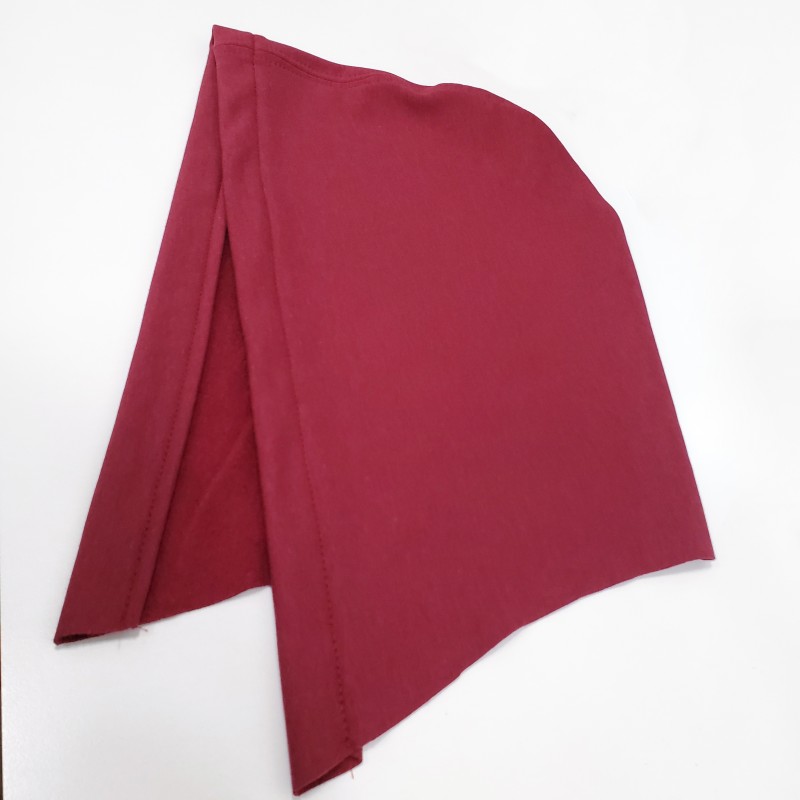
Step 3
Fold the front edge inward half an inch, followed by a full inch. Pin and stitch into place to create your drawstring casing.
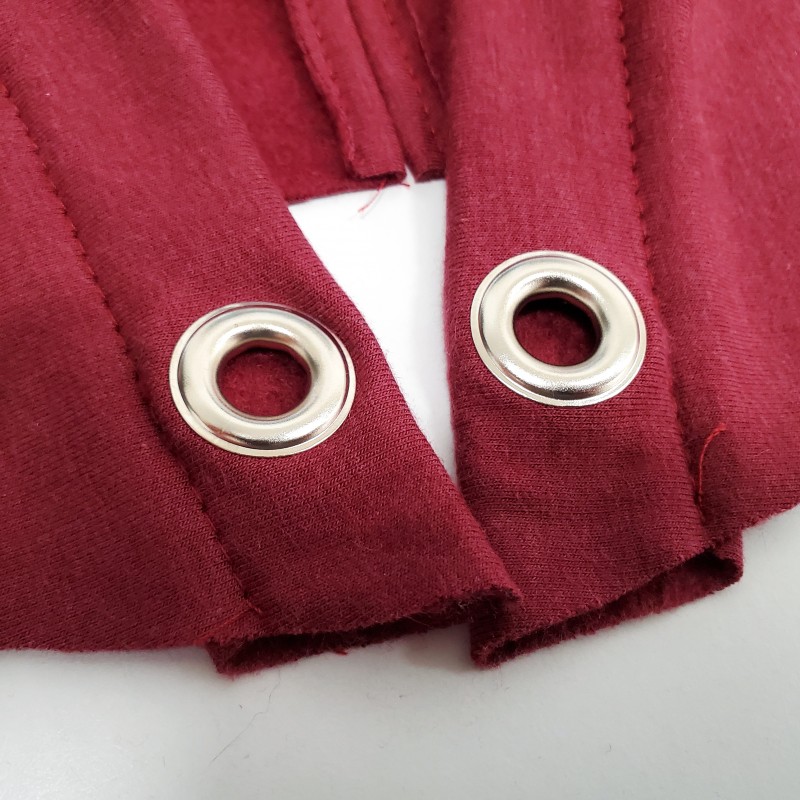
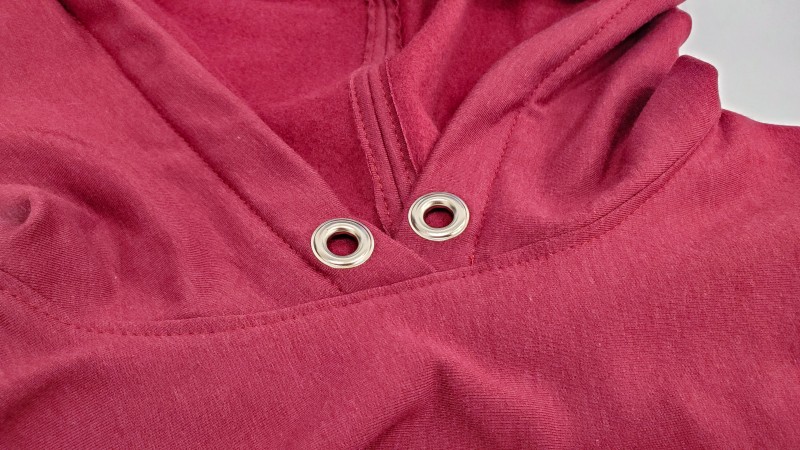
Step 4
About an inch to an inch and a half from the bottom of your casing, insert your grommets following the directions on the package.
Step 5
Overlapping the casings about an inch, pin your hood around the neckline of your dress, fabric faces together. Since the neckline is pretty wide, I used a straight stitch here and then topstitched the seam allowance down, as you can see in the lower righthand image. However, you can choose an overlock stitch instead, if you’d like to preserve some stretch.
Step 6
Create your bottom cuff by folding it in half, face to face, and sewing along the short edge. I sewed this seam the same way I did my hood, topstitching the seam allowance down.
This seam can be placed at the center back of your dress. Pin the cuff around the bottom edge, evenly gathering the dress into the cuff. Stretch the cuff as you sew using an overlock or stretch stitch.
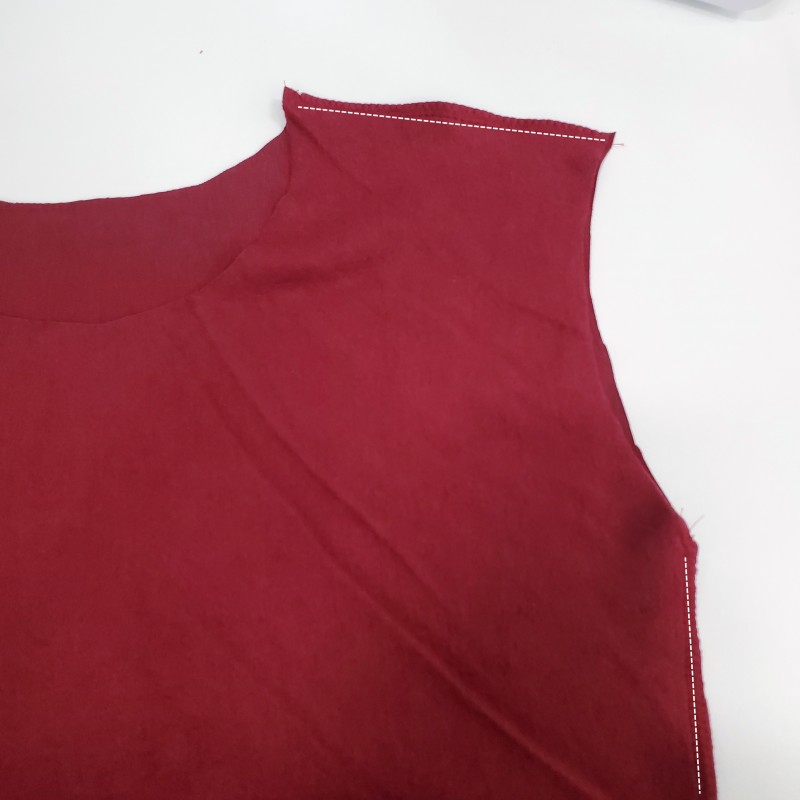
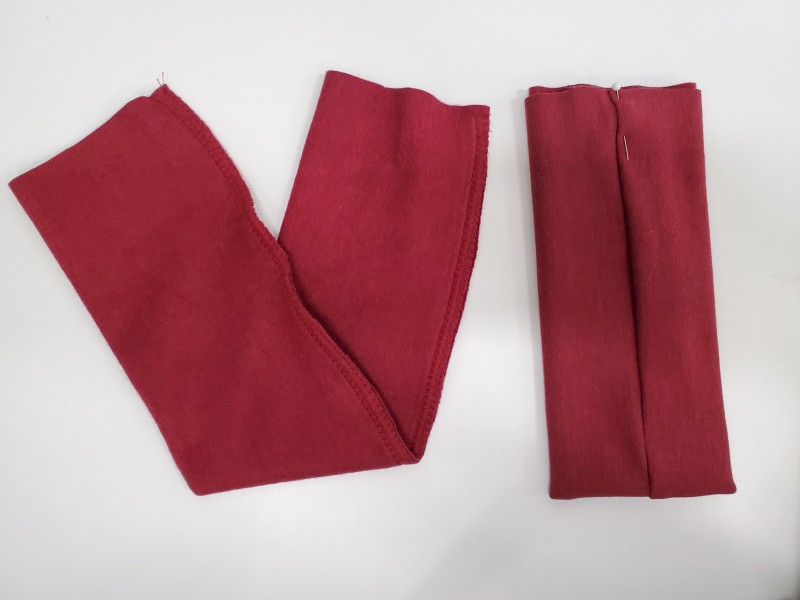
Step 7
Create each of your lower sleeves, folding them in half and sewing along the inseam to create a long tube. Fold the tube in half, wrong sides together, and pin the raw edges at the seam, as you see below.
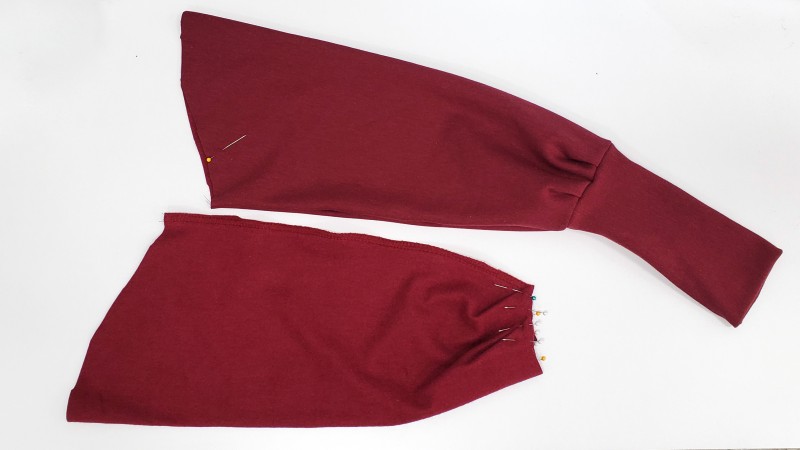
Step 8
Form your upper sleeves by sewing up the inseam. Following the guide on your pattern, fold the tucks along the bottom edge. Face to face, pin the gathered edge along the raw edge of your lower sleeve and sew.
Step 9
each sleeve to its respective armscye on your dress.
Step 10
Lastly, feed your drawstring through the casing in your hood and your new dress is ready to wear!
Very cool dress!
I love this and need to make it ASAP! Thank you for the pattern share.
I found that the bottom bands were way to small to sew on the sweatshirt. I bought the fabric that is shown, the red bamboo cotton fleece. I had to swap the bottom band piece for a contrasting white rib knit to make this pattern work.
When I first laid eyes on this dress, my first thought was of comfort! Who doesn’t love a comfy feeling dress? this is just what I need to get my sewing mojo back. I want to make this soon Thanks Courtney for designing it & sharing.
I love the sleeves on this dress!! But, you forgot the directions for the bottom band! 🙂
Hi, Susan! Those instructions are just beneath the hood grommets. 🙂
Hello! Seam allowances are included? Thanks
Yes, a 1/2″ seam allowance is already included! 🙂
I am so in love with this dress!!!!! I made in a scuba knit and paired it with sneaker wedges I refashioned. OMG!!!! i can’t wait for spring….
Thanks so much for this pattern.
Love this dress!!
Made it up in heavy sweatshirt and sized up as there’s not much stretch. Turned out perfect for winter/spring, so comfy and versatile. Going to try some different fabrics next.
Thanks for sharing ☺️
Thank you so much for the patterns. I am always greatly surprised when I visit your site. I need to visit more often. Thank you again.
Nice! Love that it can be dressed up or down, and is comfortable, comfortable, comfortable!
Excelente patrón en este momento lo estoy haciendo y ya lo quiero terminar
I too found fabric to that the bottom band was far too small .
J’adore l’idée !!! Mais cela fait deux fois que je fais un projet de Mood Sewciety et les manches sont a chaques fois trop petites … La bande du bas est aussi trop serrée ! J’ai du refaire les manches car je ne rentrais même pas ma main dedans
I appreciate all the warnings about the bottom band. I added extra fabric and still had to really stretch. Getting the grommets in the casing was the most puzzling thing for me. They kept slipping out of the whole after I i stalled them. and I damaged the back part of the hood casing getting them to stay in. I really recommend a 2-inch hood casing to make it easier to get the grimmet tool in the casing.
I think I want to make the hood, sleeves, and bands in a contrasting color. Would 1.5 yards for the body and 1 yard for the sleeves, hood, and bands work?
Hi Tiffany, we’re sorry for the delay in responding to your question! We get dozens of comments and questions each day, and so many questions get buried and, unfortunately, unanswered. We are now focusing user support on patterns 2 years and newer. We hope this will prevent questions on our more current patterns from going unanswered. Although this is late, we wanted to respond in case anyone else has the same question: yes that would work perfectly! Happy sewing 🙂
Very cool dress!
Looks beautiful! I have a question about the sleeves, does the seam of the sleeve match up with the seam of the front and back panel? Or is it supposed to be a bit off?
Hello, the seam of the sleeve should match up with the side seam of front and back.
Hello, I am having a hard time trying to figure out where the pattern is. When it went to my email and the link was sent, I had to copy and paste and it brought me to https://blog.moodfabrics.com/mdf231-the-idra-dress/. I do not see a pattern or an icon for a pattern. Can you help me to locate where the printable pattern is please.
Thank you
Hello, if you scroll down the page a bit, there should be a yellow bar that says “Click Here To Download Your Free Sewing Pattern”.
Thank you for sharing your design of the Idra Dress, I made it for my girlfriend and the only problem I had was after I was completely done and adding the drawstring into the casing did I realize that I should have only put it thru 1 thickness, but I fixed it and she loved it!
Thanks again!
We are glad you were able to complete the Idra dress and we hope that it fits great!
I can’t get it to send me the link to download it 🙁 Pleae help!
Hello, please email info@moodfabrics.com if you have any issues downloading patterns.
Do NOT make what should be your size. I have very skinny arms, and made my size. The arms do not fit. Where the cuff connects to the sleeve is extremely tight. The cuff is too long for a connection that does not fit, I think it will be cute when I can get it to fit right. Because my arms are so lean, I didn’t heed other comments here, and should have. My jersey is a lower % stretch than I’m normally working with but it still is about 40%.
The hood is too small for the neck, too, I could not get an inch of overlap out of it, I barely was able to cross the drawstring channels. I did not want to stretch the hood fabric to make the overlap 1″, it’s more important to get it over my noggin than to have 1″.
I spent yesterday taping the pattern together and sewing it, and had to rip the sleeves open to try to make them fit. Reducing the seam to 1/4″ did not get me enough (1/2″ total). I put entirely new cuffs on, twice, in an attempt to get that seam to fit, just in case it was the cuffs. It was not, it is a flaw in the sleeve itself. I cut the sleeve to be the length of the sleeve bottom, and tapered slightly so it fit my forearms better in the bottom half of them. I made sure to check that it could fit over my hand before connecting the cuff to the sleeve by stitching a few inches and leaving the top flat.
I didn’t sew the side seams before attaching the sleeves, which I also did not stitch. Then I stitched from cuff to bottom in one long seam. I think this is a better way to put this together, so you don’t have to mess with the armscye being a closed circle, IMO lots less frustrating.
I am a 34C/28/38. I graded the hips. That part did fit. The bust fit. The waist is loose as it should be. Grading the hips gave me ease in the bottom, which I think is a good modification for easier strolling if you take long steps like I do as a 5’9″ gal with a 36″ inseam.
Grade the sleeves with a slash and spread at the midline to get an extra 1 1/2″ at the bottom. Well, that’s what I’m doing so they can get past my elbow without feeling like I’m going to bust the seam, and not cut off circulation at the point it is supposed to hit. The bicep fit me fine, but mine is 10″ with a slightly taught measuring tape, 11″ flexed. I had no issue with the fit there.
If your arms are normal or endomorph, you may want to double-check the bicep measurement before cutting the pattern. And 100% increase the bottom of the sleeve, upon measuring, the darts reduce the measurement significantly. A rookie mistake on my part. I stitched it with a lightning bolt stretch on my sewing machine. I do not own a serger and have never had issues before with it not having enough give, so it is the sleeve itself.
Also make sure to put the cuffs with stretch horizontally. I missed that detail the first time. And don’t forget to put interfacing or clear elastic on the shoulder seam to ensure it doesn’t bag out over time, this isn’t mentioned in the instructions but as it is jersey, you’ll want to make sure your garment holds up.
I like the style a lot, it’s really cute! Even as a girlie girl. I wish it had worked on the first try. Fortunately, I had a different pattern in mind for the fabric I used, and with it being hijacked for this, I have enough yardage to do it again. Really happy with it once I get it to work out.
I havent recieved the pattern in my email 🙁
You can download the pattern for free by entering your name and email address into the field under “Download Your Free Sewing Pattern”. Then, check your email inbox (and your spam, just in case) for an email from Mood Sewciety Patterns with the subject line “Your Free Download from Mood Sewciety”. Scroll down to the blue link under the title of the email and click on that. It will bring you to a web browser page where you have to scroll down and find the orange button that says “click here to download your free sewing pattern”. That button will redirect you to the webpage with the PDF of the pattern, which can be printed on 8.5×11 paper on your printer at home. Let me know if you need any additional help accessing the pattern!
I love this dress. I want to make it longer, to hit between the calf and knees. Problem is I don’t know how to make that adjustment. Not new to sewing, but resuscitating my skills after 35+ yrs without touching a sewing machine or pattern. HELP PLEASE…
Hi Tiffani 🙂
To make your deress longer, take the measurement from your shoulder down to the point where you want the length to be (not including the waistband). Tape or glue your printed and cut pattern onto a larger sheet of paper. Mark the length you measured from the shoulder downward, then simply extend the side seams until they reach that point. Finally, connect the ends of those two lines to create the new hemline of the dress.
Happy sewing!