

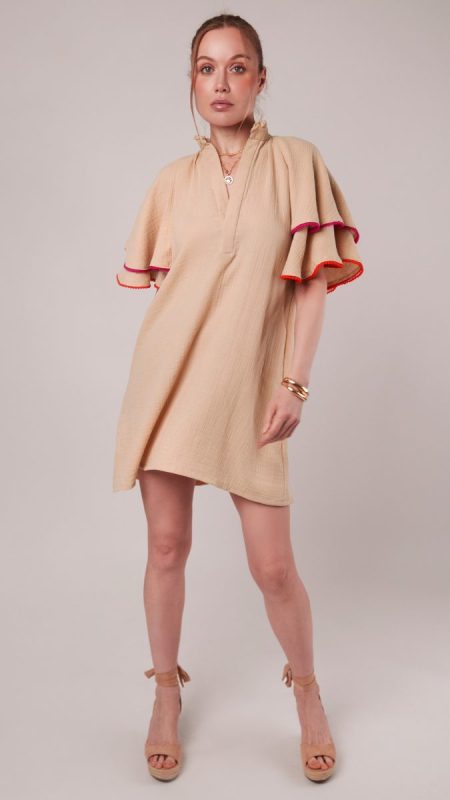
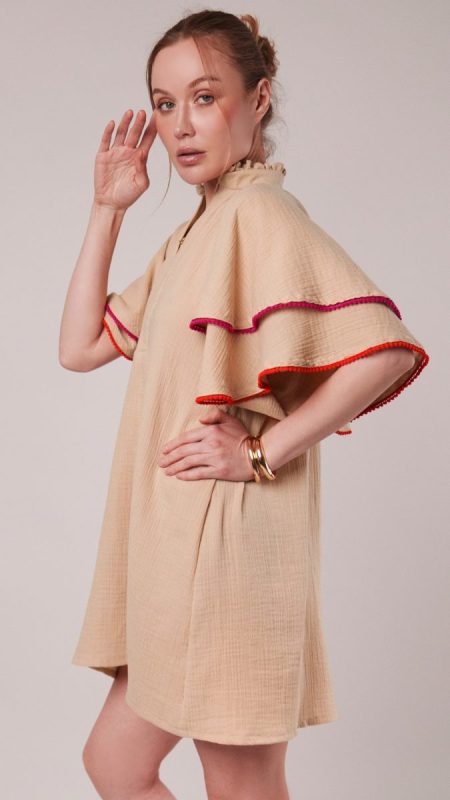
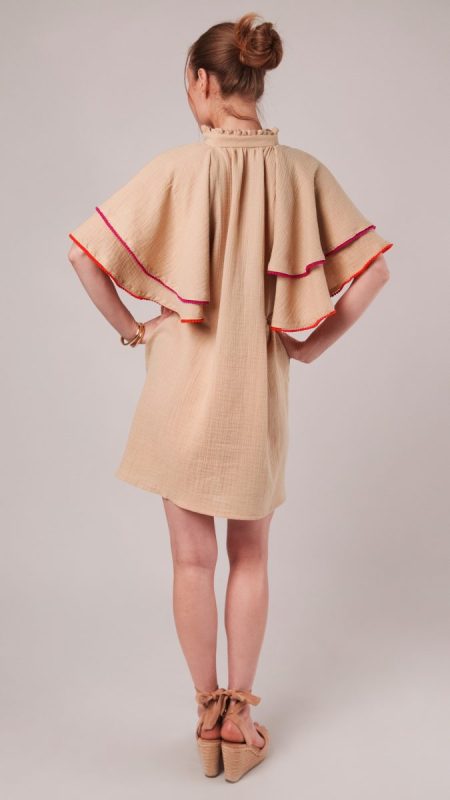
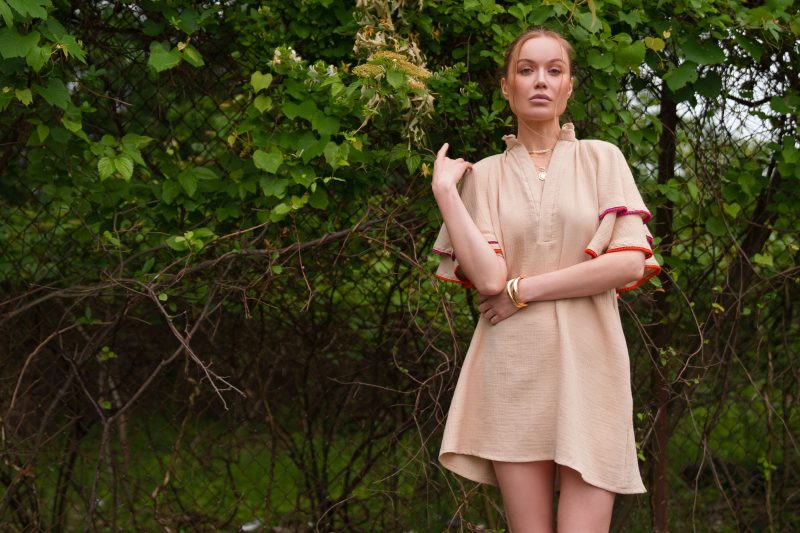
Step into the whimsical sophistication of the Mendocino A-Line Dress free sewing pattern—a breezy silhouette that brings playful detail and romantic structure together in perfect harmony. From the elegant stand-up collar to the mini pom pom-trimmed sleeves, the Mendocino A-Line Dress is made to turn heads and capture hearts!
Designed for sewists who love subtle drama and colorful trims, the Mendocino A-Line Dress is both a joy to make and a dream to wear. The sewing pattern features a relaxed A-line shape that gently floats over the body, while the standout double-sleeve design is brought to life with dainty pom pom details. The gathered neckline is finished with a delicate front placket opening and a ruffled stand-up collar.
Created from a lightweight double cotton gauze, this dress is as wearable as it is eye-catching. Its soft volume and thoughtful details make it a canvas for creativity—style it in linen for a sunny daytime look or choose a floaty rayon for a sumptuous drape. Whether finished with a delicate floral print or a solid pastel tone, this dress elevates everyday wear.
Ready to stitch your new favorite wardrobe piece? Download the Mendocino A-Line Dress free sewing pattern and follow our step-by-step sewing tutorial to bring this charming design to life. Don’t forget to browse our curated selection of double cotton gauze fabric, pom pom trims, and sewing notions to make it truly your own. With the Mendocino A-Line Dress, every detail speaks to effortless creativity and timeless style!

Essential Materials & Sizing Guide for the Mendocino A-Line Dress
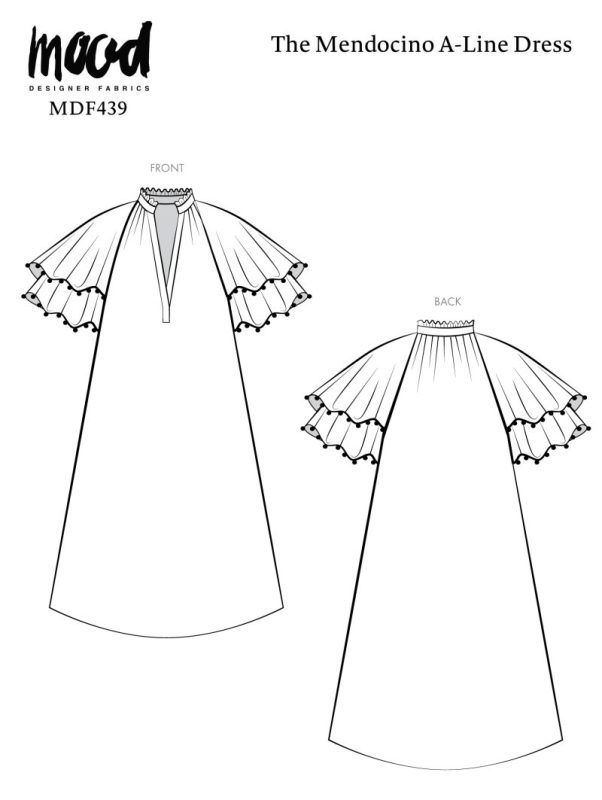
Here is the breakdown of what knowledge and materials you need for creating your very own A-line dress! We’ve got you covered with the recommended materials we used—if you want to follow along exactly—as well as a curated list of alternative fabric recommendations if you want to customize your own version. The Mendocino A-Line Dress free sewing pattern download includes technical drawings for seam and silhouette visibility, plus a size chart to help you find your perfect fit!
Purchase Products Used Below:
Quantities indicated are for sewing a size small. Toggle the ‘SHOP THIS LOOK’ box to find quantities for other sizes.
- 3.5 yards of Double Cotton Gauze – Beige – Talamanca Collection
- 2.5 yards of European Deep Orange Single Row Mini Pom Pom Trim
- 2 yards of European Fuchsia Single Row Mini Pom Pom Trim
- 1 each of Schmetz Universal Machine Needles – 70/10 – 5 ct
- 1 spool of Gutermann Sew All Thread 250m – 505 Cashmere
- MDF439 – Mendocino A-line Dress Sewing Pattern (Free download below!)
Alternative Fabric Recommendations:
The Mendocino A-Line Dress free sewing pattern is best suited for lightweight fashion fabrics. If you want to explore other fabric types for sewing the Mendocino A-Line Dress check out the links below.
Download Your Free Sewing Pattern
Submit your name and email in the form below to receive the Mendocino A-Line Dress free sewing pattern directly in your inbox. Mood Sewciety Patterns will send your free download via email with the subject line: ‘Your Free Download from Mood Sewciety’ (in PDF format for A4 and letter-size printing).
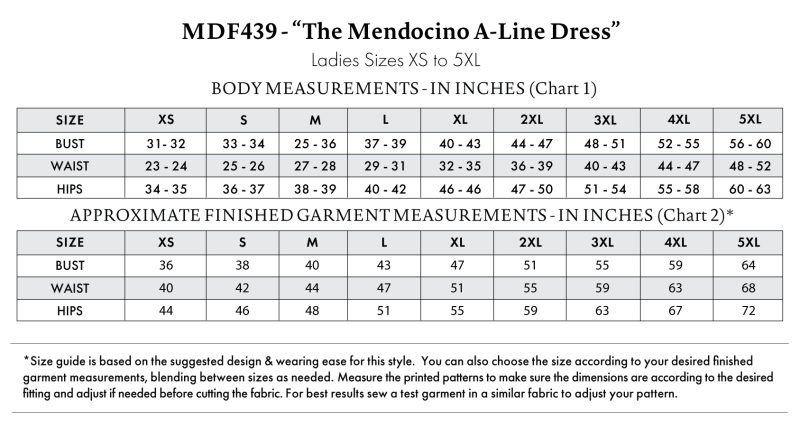
Find Your Perfect Fit
The size guide below is based on the suggested design & wearing ease for this style. You can choose the size according to your desired finished garment measurements, blending between sizes as needed. Measure the printed patterns to make sure the dimensions are according to the desired fitting and adjust—if needed—before cutting the fabric. For best results, sew a test garment in a similar fabric to adjust your pattern.
Note: Measurements may vary after adjustments. If using non-stretch fabrics, reference the approximate finished garment measurements chart to choose your size.
8 Tips for Sewing with Double Cotton Gauze
[Tip #1] Prewash & Press Before Cutting:
Double gauze shrinks significantly. Prewash and tumble dry before cutting, then gently press to flatten out the crinkled texture for more accurate pattern placement.
[Tip #2] Cut in Single Layer:
Because the fabric can shift and distort, avoid folding. Lay your pattern flat on a single layer and cut carefully—use pattern weights and a rotary Cutter for best results.
[Tip #3] Universal or Ballpoint Needle:
Double gauze has a soft, loose weave. A size 70/10 or 80/12 universal or ballpoint needle will prevent snagging and help the needle pass between fibers instead of piercing them.
[Tip #4] Low Tension & Medium Stitch Length:
Reduce thread tension slightly and use a 2.5–3.0 mm stitch length. This allows the fabric to breathe and prevents seams from looking tight or puckered.
[Tip #5] Walking Foot:
The loosely woven layers can shift while sewing. A walking foot helps feed the fabric evenly, preventing stretching, puckering, or misaligned seams.
[Tip #6] Staystitch Curved Edges:
Double gauze tends to stretch out of shape, especially along curves like necklines and armholes. Staystitch these areas right after cutting to maintain their shape.
[Tip #7] Press Gently:
Double cotton gauze can flatten permanently under high heat. Use a warm iron with steam and press lightly—never drag the iron. Use a press cloth when necessary.
[Tip #8] Finish Seams to Prevent Fraying:
Double cotton gauze can fray easily. Finish seams with French seams, serging, or binding to keep the inside of your garment clean and durable.
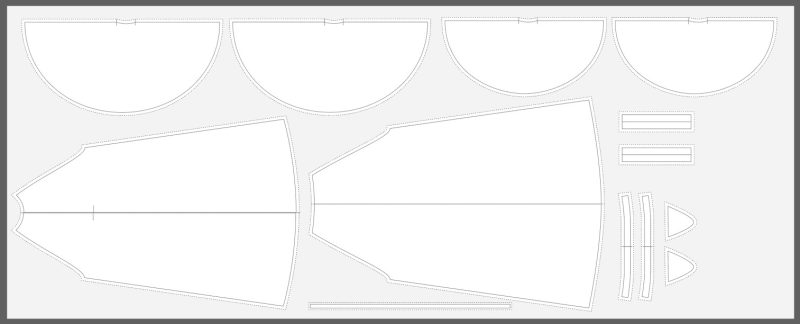
CUTTING LAYOUT
How To Sew the Mendocino A-Line Dress
Sew with a 1/2″ seam allowance for all seams unless otherwise specified.
Step 1
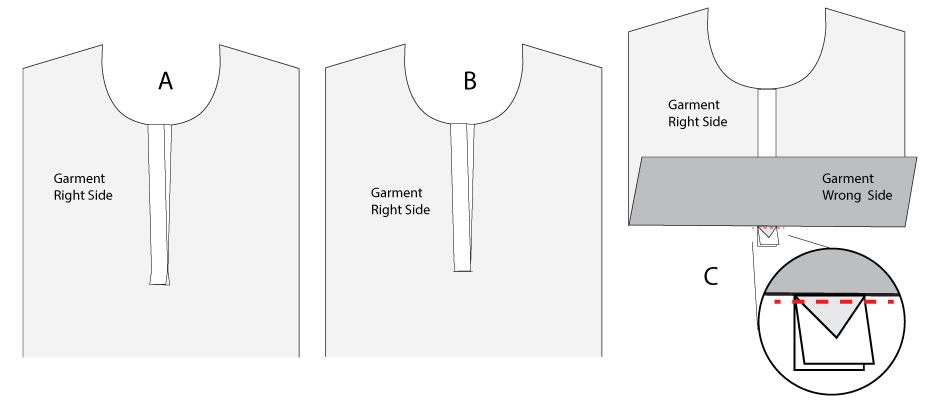
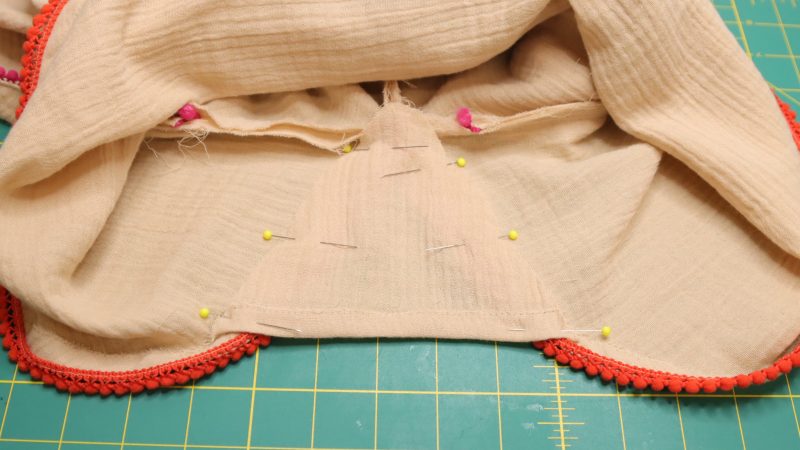
FRONT PLACKETS
Attach the front plackets to both sides of the front opening.
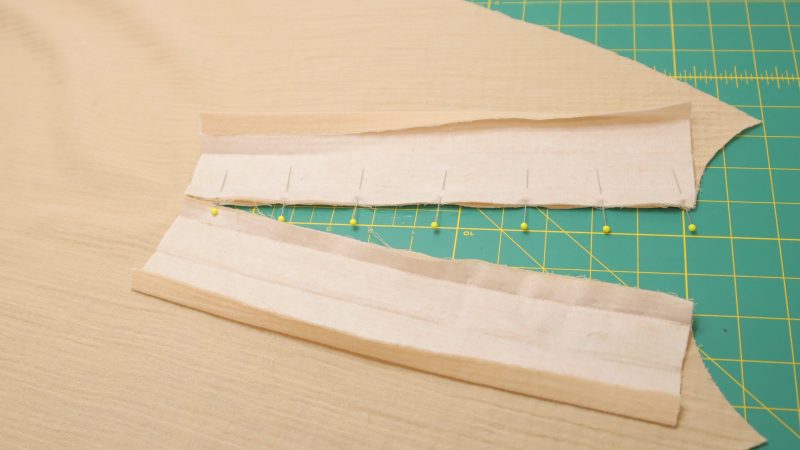
- Stabilize the front opening by applying a strip of interfacing
- Apply interfacing to each placket.
- Press the seam allowance on both sides of the placket.
- Press the placket at the fold line.
- Cut the bottom of the front opening diagonally forming a triangular flap.
- Sew one side of the placket to the outside of the front.
- Repeat this step for the other side of the opening.


Step 2
FINISH PLACKETS
Complete sewing the other side of the plackets to the front opening.
- Flip the placket over to the inside.
- Pin the other side of the placket with the seam allowance folded in.
- Stitch in the ditch over the first seam on the outside.
- Repeat this step for the other placket.
- Bring the bottom of the plackets through the opening to the wrong side.
- On the wrong side, sew the bottom ends & the triangle flap together.

Step 3
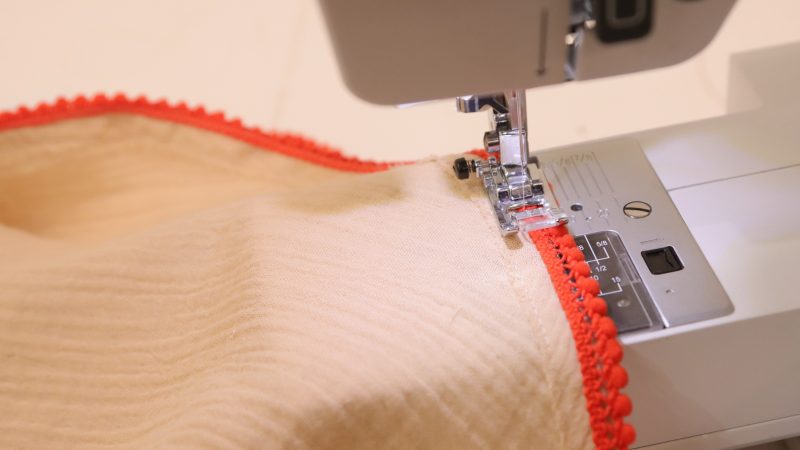
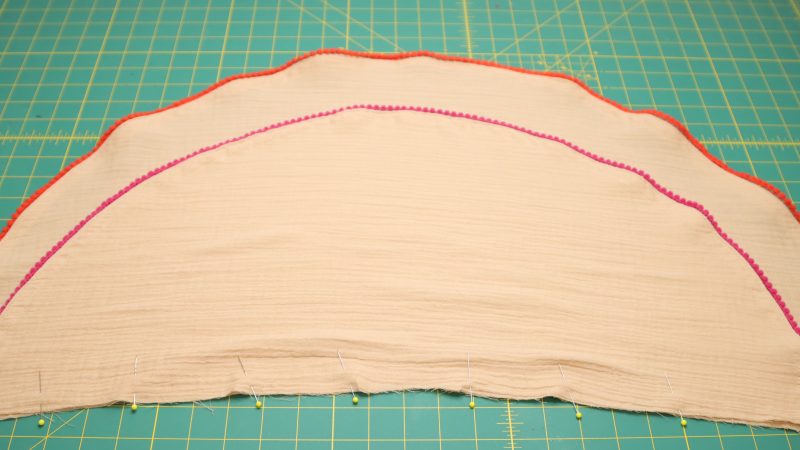
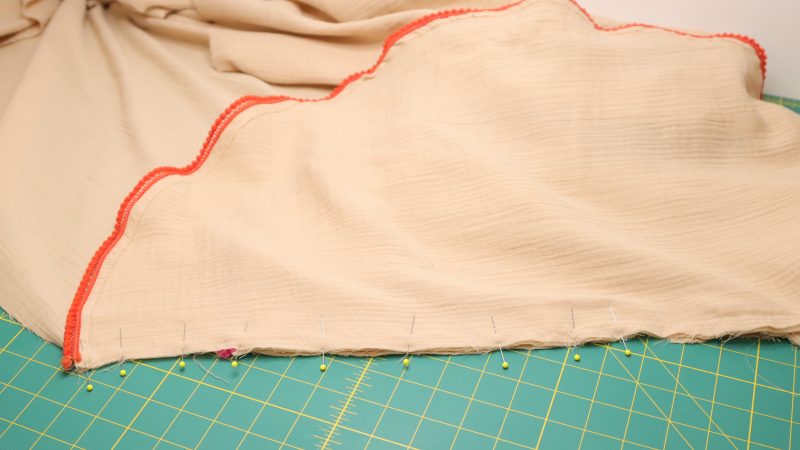
SLEEVE HEM & POM POM TRIM
Finish the bottom edges of the sleeves.
- Sew an overlock stitch across the bottom of each sleeve.
- Hem the upper sleeves & the lower sleeves with a 1/2″ regular hem.
- Sew the miniature pom pom trim along the back edge of every sleeve.
Step 4
JOIN SLEEVE LAYERS
Attach the upper sleeve to the lower sleeve along the top.
- Place the upper sleeve over the lower sleeve.
- Align the shoulder notches together.
- Sew both sleeves with a 1/4″ basting stitch across the upper edge.
- Repeat this step for the other set of sleeves.
Step 5
ATTACH SLEEVES
Join the sleeves to the front & back armholes.
- Align the shoulder notches to the neckline of the dress.
- Pin each notch to the corresponding front & back piece.
- Sew from the shoulder notch to the bottom of the armhole.
Step 6
SIDE SEAMS
Sew the front & back of the dress together at the side seams.
Step 7
ARMHOLE PANELS
- Hem the upper edge of the armhole panel.
- Overlock the edges around the bottom & the sides.
- Sew the panel around the bottom of the armhole.
- Repeat this step for the panel on the other side.
Step 8
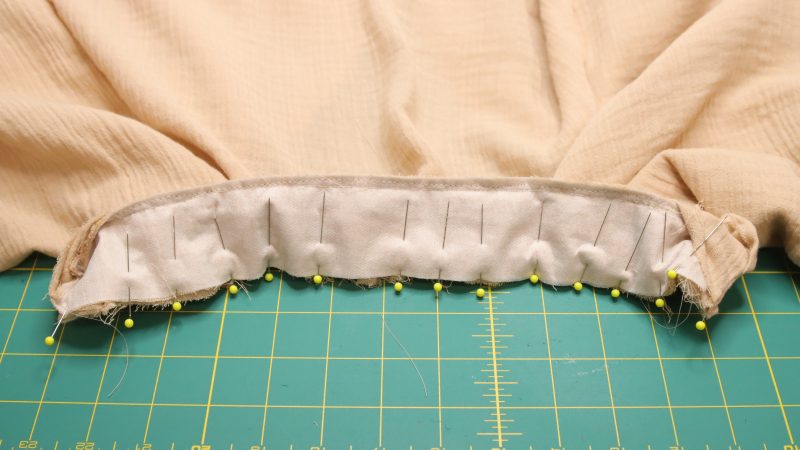
COLLAR & RUFFLE
Create the ruffled collar.
- Apply interfacing to one of the collar pieces.
- Sew 1/4″ hem at the top edge of the ruffle piece.
- Sew a basting stitch & gather the bottom of the ruffle.
- Baste the ruffle onto the upper edge of the collar piece.
- Right sides together, pin the other collar piece with the ruffle in between.
- Sew the collar pieces together across the top & around the sides.


Step 9
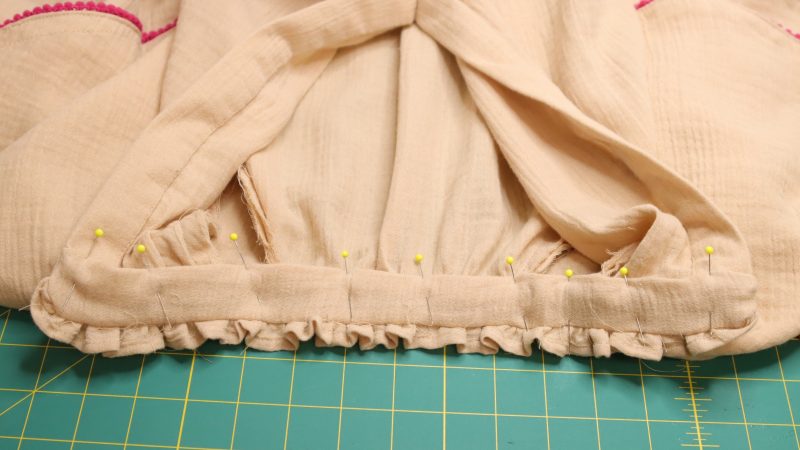
ATTACH COLLAR
Join one side of the collar to the neckline.
- Sew a basting stitch to gather the neckline all around.
- Sew one side of the collar to the outside of the neckline.
Step 10
FINISH COLLAR
Sew the other side of the collar to enclose the raw edges of the neckline.
- Pin the other side of the placket with the seam allowance folded in.
- Stitch in the ditch from the seam on the outside.
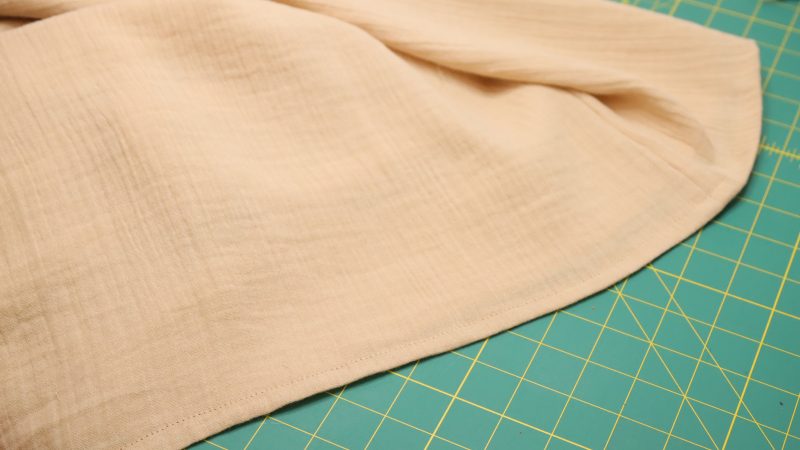
Step 11
BOTTOM HEM
Finish the hem at the bottom of the dress.
- Sew an overlock stitch along the bottom edge.
- Sew a 1/2″ regular hem all around.
The Completed Mendocino A-Line Dress Free Sewing Pattern by Mood Fabrics
We can’t wait to see your version of the Mendocino A-Line Dress! Whether you choose rayon, linen, or polyester crepe, this pattern is the perfect canvas for your creativity and sewing skills.
Share this post with a friend (or two!), download the Mendocino A-Line Dress free sewing pattern, and show us which fabrics and colors you choose, using the hashtags #MoodMendocinoPattern & #MadeWithMood.
<3
We are happy that you love it!
Oh I’d definitely wear this! I had a shirt similar to this as a teen!
That is awesome! We hope you enjoy this pattern!
Thank You!!!!
You are very welcome!
Such a fun dress, can’t wait to make it!!
Indeed! We hope you enjoy making this amazing pattern 🙂 Happy sewing!
Véritable coup de coeur pour cette robe quand je l’ai vu, bravo pour cette création que j’ai hate de voir sur moi
Thank you very much, we hope it comes out great! If you post on social media, make sure to use the hashtags #MadeWithMood #MoodMendocinoPattern
I absolutely LOVE this dress and all your other free patterns!! I’ve used them many times and they are so chic and so well-made! Could you make a prom dress pattern in the future? I really want to make my senior prom dress and it would be so special to make it with a Mood pattern!
Thank you very much and we hope you continue to enjoy from our free sewing patterns! We will note your request for a prom dress pattern as we always explore new ideas for free sewing patterns!
I am excited about this pattern. I plan to shorten it to shirt length, and it will be perfect for summer!
That sounds great, we hope your project comes out beautifully!
How much should I gather the front and the back at the neckline?
Hello, the neckline must be gathered evenly all around to equal the same measurement of the collar.
Thank you. But if I look at the photos, the collar is too short (shorter than the neck circumference).
Before sewing the collar on, you must sew a basting stitch around the neckline to create the gatherings. When you gather the neckline from one notch to the other, the circumference of the neckline will get smaller, and you will be able to match it to the size of the collar.
First, thank you for a super cute pattern! But I am a beginner and am stuck on one part. Do I match the tip of the dress neckline to be flush with the notch near the dip in the sleeve shoulder? The hem of the sleeve doesn’t seem to meet the side seam of the dress (I’m assuming that’s what the panel is for). I don’t have any more of the fabric I’m using and don’t want to ruin it. Thank you for any help
You must place the sleeve over the armhole with the front and back matching accordingly to the labels of the sleeve pattern. The front shoulder notch should be aligned with the top of the front neckline, and the end of the sleeve should reach down to align with the bottom of the armhole. You then will continue to sew the side seams and add the armhole panels after.
I cannot WAIT to make this dress for a destination wedding in Denmark this summer! I’ll be using Sangria double gauze but would love suggestions on trim colors. Thank you for this pattern! It’s amazing!
That sounds absolutely dreamy! We love the idea of the Mendocino dress in the Sangria double cotton gauze for a Denmark wedding—it’s going to be stunning! For pom-pom trim colors, we’d suggest 116429, 116402, or 116430 to complement that beautiful shade. You’ll likely need about 2.5-3 yards of each trim (if sewing a size small/medium). We can’t wait to see your amazing creation! If you post your finished garment on socials, feel free to tag us using #MoodMendocinoPattern and #MadeWithMood for a chance to be featured! Happy sewing!
I love the way the dress looks in your photos, however I made it and it is extremely large, like floor length and probably a 3xl, instead of the large that I measured myself to be and cut out. I measured the box and it was 2 in – is there something I did wrong?
Hi Becca
The dress pattern has been designed with added length to accommodate different styles and personal preferences for a variety of body types. If you’d like to create the shorter version, measure from the shoulder down to your preferred length, mark and draw the new hemline, and trim the pattern accordingly. After that, you can move on to cutting the fabric.
We’re currently working on a section with this information that will be added to the post and pattern. Thank you so much for your helpful feedback!
This is really lovely. Its there any chance of Mood Sewciety offering layered pdf patterns in the future?
So glad you find it lovely! We truly appreciate you asking about layered PDF patterns—it’s a very popular request and definitely something we’re actively exploring for future improvements to our free patterns!
Why not a tower placket? It’s far easier and looks just as nice.
That’s a fantastic suggestion! We appreciate you sharing your expertise—a tower placket is indeed a great technique that offers a beautiful finish. Thanks for the valuable feedback!
Hello; I was wondering how I would go about making this dress sleeveless for summer. And is it possible? Thank you.
Hi Cynthia,
I wouldn’t recommend transforming a dress with raglan sleeves into a sleeveless version. However, you can create a sleeveless version of this style using our Emberly Dress pattern. It has a very similar silhouette to the Mendocino dress. Just omit the sleeves, make the plackets longer, and dont forget to adjust it to your desired length. If you have any questions during the process, don’t hesitate to reach out to us.
Thanks for this pattern, I’ a real fan of the final look ! Here are a few notes if you’re looking to make the same pattern
I chose size M but it fits quite big on me, its okay because I’m currently pregnant but I could have easily sized down to a S or even an XS.
Fabric wise, I ended up using 3 yards but the dress came out much much longer than in the picture (mid chins) so I probably could have taken 15 inches off !
Also, trim wise, I have needed 2,5 and 3 yards respectively.
Hope it can help you twitch the pattern to your liking ! Happy sewing
Thanks so much for sharing your detailed notes on the Mendocino Dress pattern! We truly appreciate you taking the time to provide such helpful insights on sizing, fabric yardage, and trim amounts—especially for fellow sewists who might be pregnant or looking to customize the length. Your feedback is invaluable, and we’re thrilled you’re a fan of the final look! We’d love to see the finished garment. Feel free to tag us using #MoodMendocinoPattern and #MadeWithMood if you post it on social media!
Pattern cut out and ready to go! Looking forward to getting started on this soon! Love!
That’s wonderful to hear! We’re so happy you’re enjoying sewing the Mendocino A-Line Dress pattern. If you post your finished garment on socials, feel free to tag us using #MoodMendocinoPattern and #MadeWithMood for a chance to be featured! Happy sewing!
Bonjour
L’ouverture de devant messure de combien de mm ou inches, le patron de la robe petite taille vient jusqu’à 100 mm du bas du pied c’est très long je fais 1m62 et y a t’il un côté droit et retourné pour les manches car la plus grande à un côté rond et coupe en morceaux droits qui tournent
Merci pour vos beaux modèles gratuits, j’adore
Bonne journée
I am having this dress made for me and can’t wait to have it. Just wanted to confirm-how much of the double gauze fabric is needed for a size 2XL allowing a little extra to make longer?
Thanks!
I would recommend at least 6 yards of the double gauze for a 2XL. If you’re planning to lengthen it, I would get 7 yards just to be safe.
When are you going to offer AO I do not have time to paste together all of these patterns. I know many people who feel the same way. Is this a money issue? Thanks for your help.
Hi Wendy
Thank you for your interest! We often get requests for A0 size printing. We appreciate you letting us know this is important to you, as we’re always working to expand our offerings and hope to provide more formats in the future, your feedback helps us prioritize these improvements! Happy Sewing!
You can use PDF STITCHER to create the A0 size.
Great pattern, but from just looking at the paper pieces its clearly going to be VERY long and as a result not at all like the cute picture – has the one used in the imagery been adjusted to make it shorter? be useful to know before i cut the fabric and potentially waste a lot 🙂
Hi Nigel
The dress pattern includes extra length to allow for adjustment to different styles and preferences across various body types. If you want to make the short version, mark your desired length from the shoulder down to the hem, draw the new hemline, and cut the pattern. Then proceed to cut the fabric.
We are preparing a section that we will add to the post with this information. Thank you very much for your feedback.
Kind Regards
Mood Sewciety
Merci pour ce patron.