

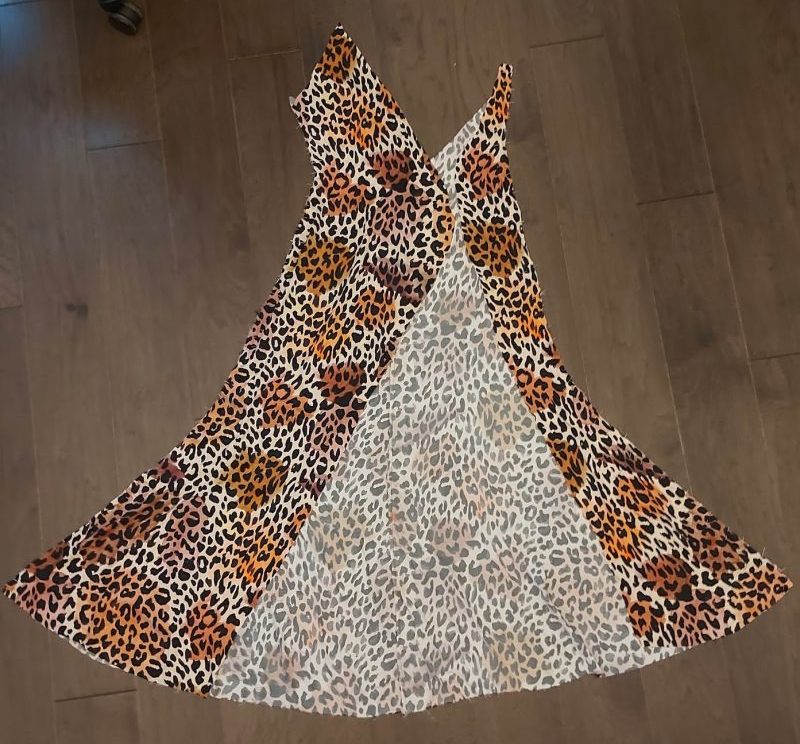
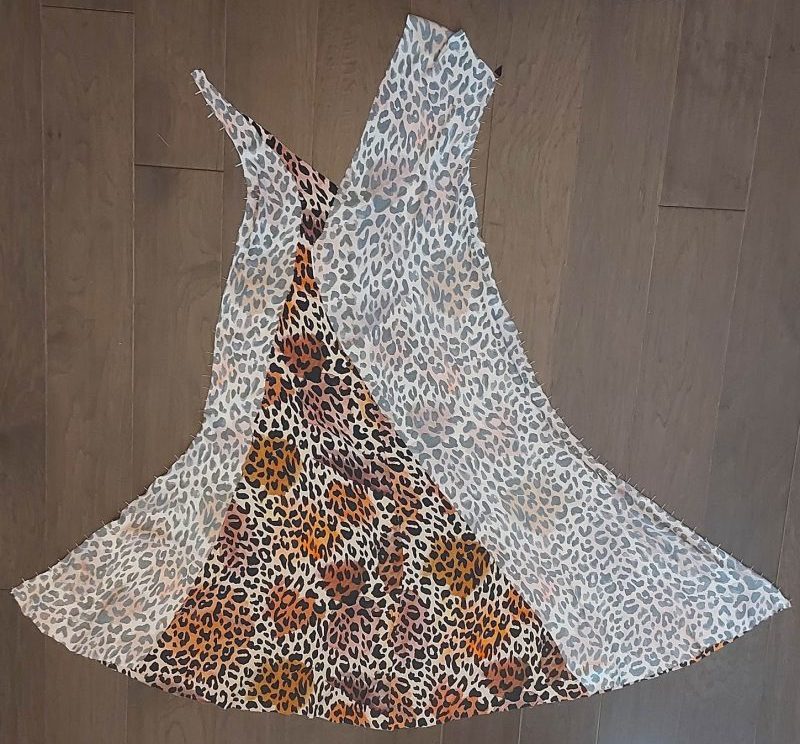
Dreaming of a tropical escape? The Tropea High Slit Slip Dress free sewing pattern is your perfect companion, ensuring you make both a dramatic and stunning entrance for your water-side adventures! Envision this: Just moments ago, you were enjoying the sun and surf. Now, stepping out from the beach entrance of the pool, you dry off and zip into your high-slit slip dress. Feel that instant shift? You’re not just dressed; you’re transformed. Walking fiercely, turning heads as you head to meet your pals for an outdoor lunch, you’ll seamlessly embody effortless resort glamour.
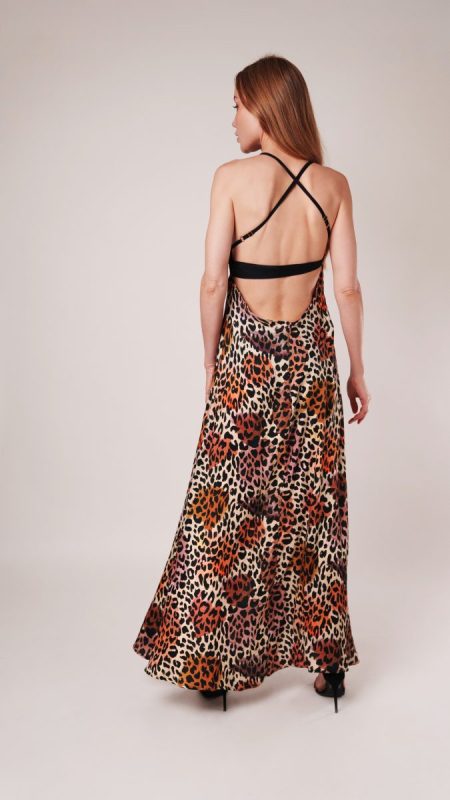
All that is needed to create your personalized, resort-inspired cover up is a well-threaded sewing machine, at least one fantastical fabric, Mood’s expert guidance—not to mention the Tropea High Slit Slip Dress free sewing pattern!—and your passion for sewing handmade clothing! A lively sight for travelers’ eyes, we sewed our Tropea dress with an adventurous leopard-printed rayon challis from our Mood Exclusive Viso Collection. As if warmed by the Mediterranean sun, this soft and smooth lightweight printed fabric is excellent for crafting warm-weather garments as it features a sunset color scheme and offers incredible breathability alongside a fabulously fluid, billowy drape.
How to get this look in a way that fits best for YOU? Layering the Tropea high slit slip dress over your favorite bathing suit is a slam dunk for establishing your utmost confidence! Dare to be as bold as pairing our new resort favorite with a string bikini, or gift yourself with its luxurious sway as you strut in your full-coverage swim shirt and trunks. The key to capturing the glamorous feel is to truly feel comfortable and allow the sweeping gown to do the rest.


Essential Materials & Sizing Guide for the Tropea High Slit Slip Dress
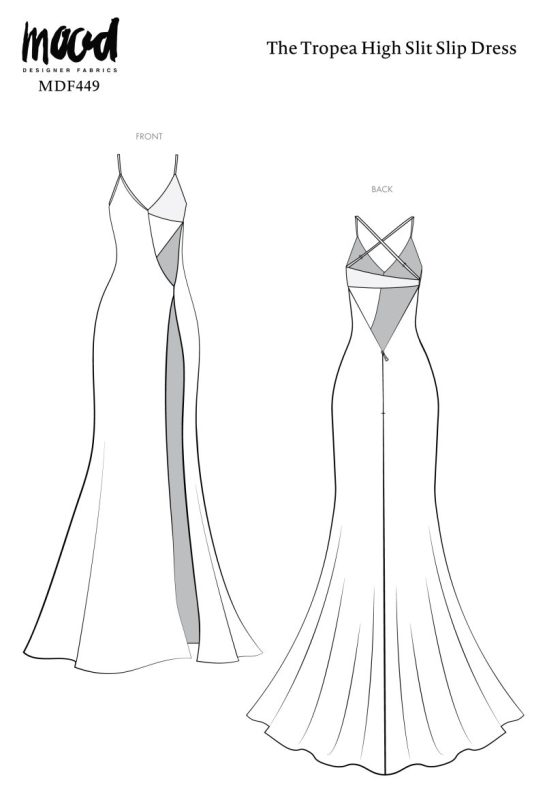
Here is the breakdown of what knowledge and materials you need for creating your very own high slit slip dress! We’ve got you covered with the recommended materials we used—if you want to follow along exactly—as well as a curated list of alternative fabric type recommendations if you want to customize your own version. The Tropea High Slit Slip Dress free sewing pattern download includes technical drawings for seam and silhouette visibility, plus a sizing guide to help you find your perfect fit!
Purchase Products Used Below:
Quantities indicated are for sewing a size small high slit slip dress. Toggle the ‘SHOP THIS LOOK’ box to find quantity estimates for other sizes.
- 4.5 yards of Rayon Challis – Beige and Black Leopard Spots – Animato Print
- 1 yard of Medium Weight Rayon Batiste – Black – Loreto Collection
- 1 each of Invisible Zipper 9″ by YKK – 580 Black
- 1 each of Dritz Black Sew On Snaps Size 1 – 8ct
- 1 each of Wrights Black 1/2″ Extra Wide Double Fold Bias Tape
- 1 bag of Gold Metal Sliders for 3/8″ Strap – Set of 4
- 1 spool of Gutermann Sew All Thread 250m – 10 Black
- MDF449 – Tropea High Slit Slip Dress Sewing Pattern (Free Download below!)
Additional Products Used
- 1 each of Dritz Loop Turner
- 1 each of Dritz Tailor’s Chalk & Lance Center Finding Tailoring Ruler
- 1 each of Dritz Wax Free Tracing Paper & Clover Serrated Edge Tracing Wheel
Alternative Fabric Type Recommendations:
The Tropea High Slit Slip Dress Sewing Pattern is best suited for lightweight fashion fabrics. Check out the links below If you want to explore other fabrics types or fabrics from the Viso Collection for sewing your personalized version of the Tropea High Slit Slip Dress.
Optional: Triangle Bra Cups (not pictured or used in tutorial)
Download Your Free Sewing Pattern
Submit your name and email in the form below to receive the download link for the Tropea High Slit Slip Dress free sewing pattern directly in your inbox. Mood Sewciety Patterns will send your free download link via email with the subject line: ‘Your Free Download from Mood Sewciety – The Tropea High Slit Slip Dress’ (in PDF format for A4 and letter-size printing).
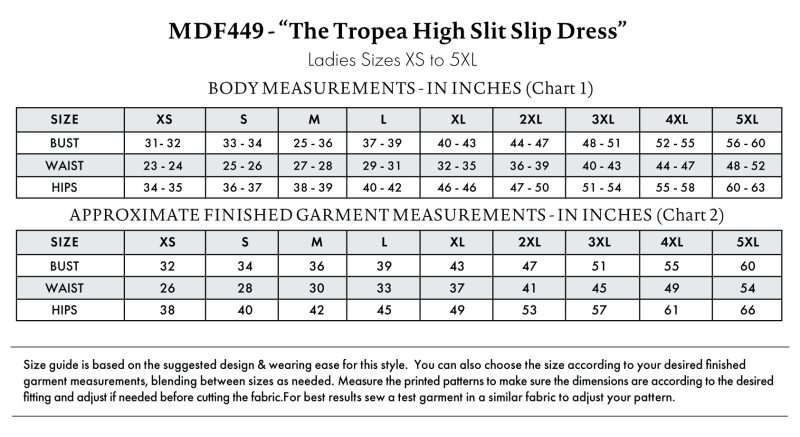
Find Your Perfect Fit
The Tropea High Slit Slip Dress Sizing Guide is based on the suggested design & wearing ease for this style. You can also choose the size according to your desired finished garment measurements, blending between sizes as needed. Measure the printed patterns to make sure the dimensions are according to the desired fitting and adjust if needed before cutting the fabric. For best results, sew a test garment in a similar fabric to adjust your pattern.
If using stretch fabrics, close the darts on the pattern prior to cutting out the fabric pieces.
How to Sew the Tropea High Slit Slip Dress
The instructions provided are designed to guide you through sewing the main fabric and the contrast fabric for the Bra Top and High Slit Slip Dress simultaneously.
Pattern Pieces & Fabric Cuts Needed
- (A) Front Right – Cut 1 – Main Fabric
- (B) Left Front – Cut 1 – Main Fabric
- (C) Back – Cut 2 Mirrored – Main Fabric
- (D) Cups – Cut 4 (2 Mirrored Sets) – Contrast Fabric
- (E) Back Band – Cut 2 Mirrored – Contrast Fabric
- (F) Shoulder Straps – Cut 2 – Main Fabric
Sew with a 1/2″ seam allowance for all seams unless otherwise specified.
Side seams for pieces A, B and C have 5/8″ seam allowance for sewing French seams.
Step 1
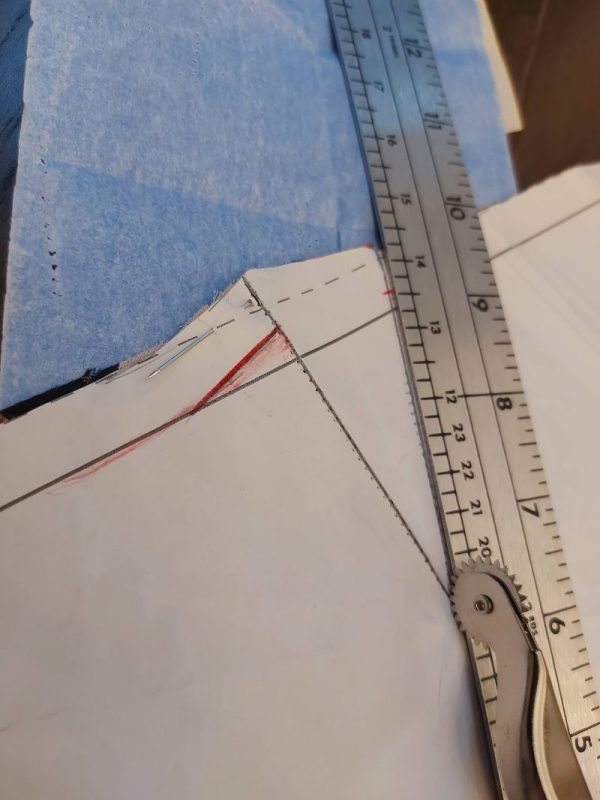
TRACE THE DARTS FOR (D) CUPS
Skip this step if sewing with a stretch fabric, instead be sure to close the darts on the pattern before cutting out your Cup pieces.
- Cut out 2 mirrored sets (4 pieces total) of the Cups pattern piece.
- Mark the Darts onto the first mirrored pair of Cups (Cup Shells) and 2nd mirrored pair of Cups (Lining Cups), using a combination of either Tracing Paper and a Tracing Wheel or mark the dart points with a Chalk Pencil or Tailor’s Chalk and use a straight-edge ruler to connect the points by drawing lines.
Pro Tip: Adjust the bust darts according to your bust size. If you need to perform a dart adjustment:
- Pin one Cup piece to a dress form or wear one Cup.
- Fold a Dart into the Cup piece until you find the best fit your bust.
- Mark the newly created Dart with chalk, then remove from dress form or body.
- Proceed to follow the steps listed under tutorial Step 2.
Note: If you want more coverage, add a pair of our triangle bra cups to your Mood Shopping cart. We will outline how to add (optional) bra cups for more coverage in tutorial step 5.

Step 2
SEW AND PRESS THE DARTS (CUP SHELL & CUP LINING)
Apply the steps outlined below to each mirrored pair of Cups.
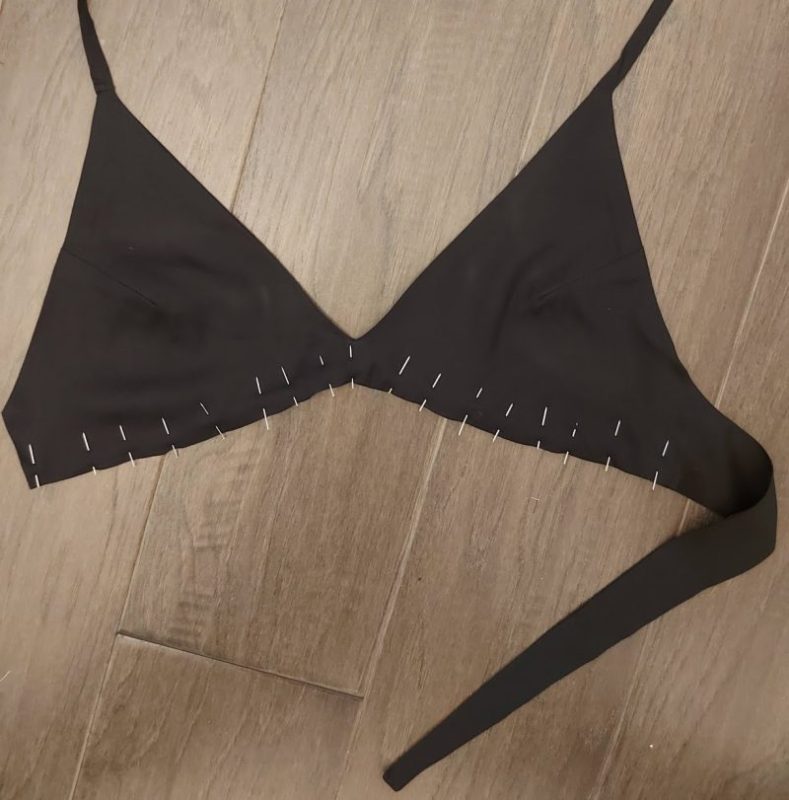
- Pin along the marked darts using straight pins, making sure the pins go through the marked lines on both sides of the fabric.
- Sew the darts in place by using a reverse stitch to secure it at the raw edge, and then follow the line until the stitch tapers off of the fabric—leave the threads long enough to hand tie the threads together—do not backstitch.
- Press the darts downward.
Step 3
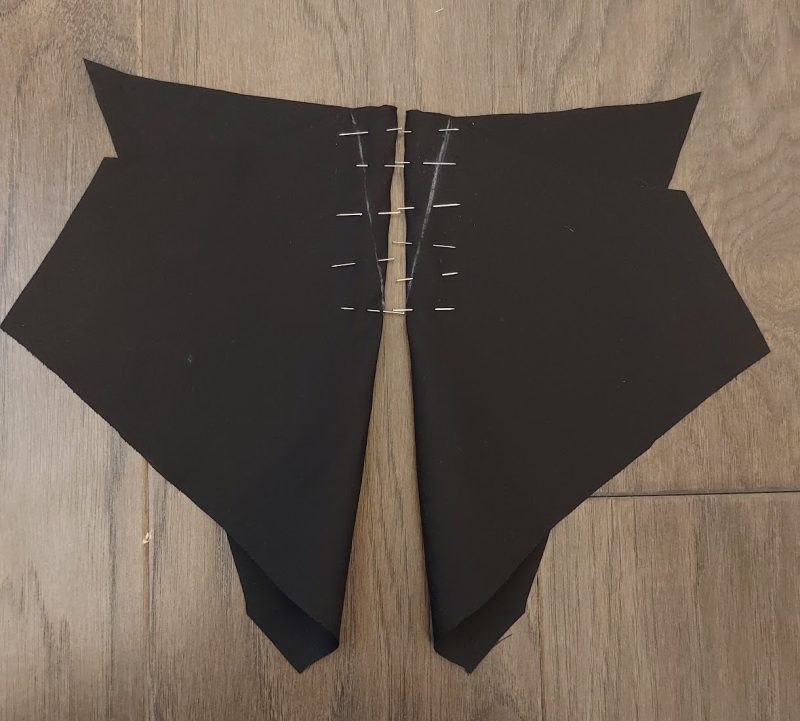
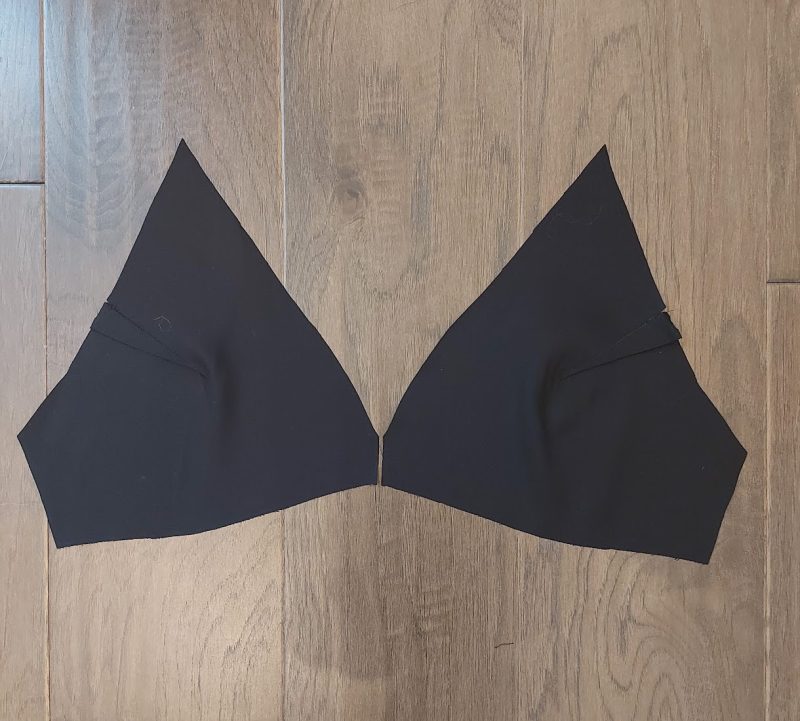
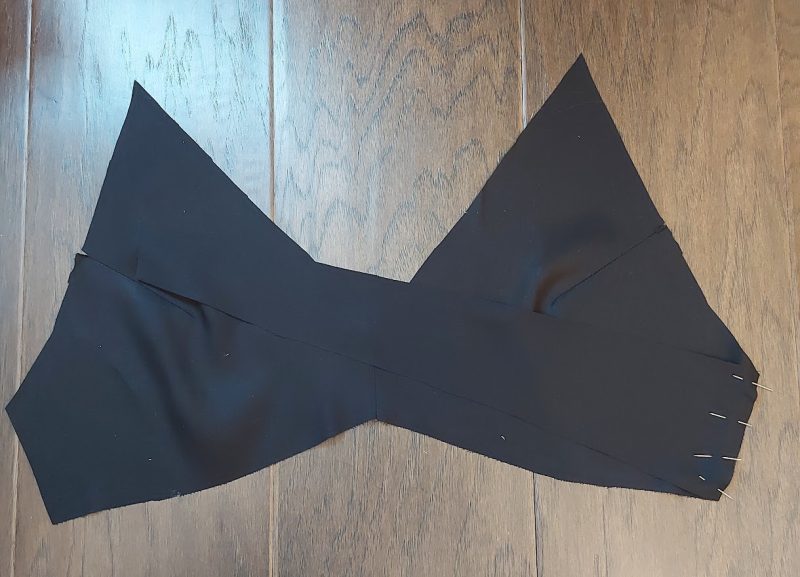
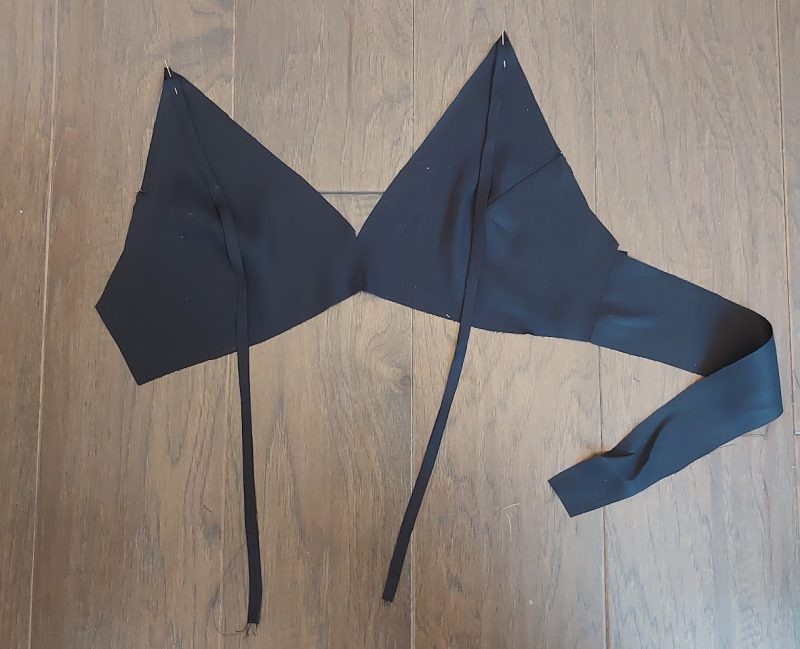
SEW CUPS TOGETHER & JOIN WITH (E) BACK BAND
Apply these steps to the first mirrored pair of Cups—to create the Cup Shell set:
- Pin the center front (short side) of the Cups together, then stitch along the ½” seam allowances.
- Press the seam open, then trim the top and bottom of the seam allowance.
- Match and pin the wider side of the Back Band to the right side Cup, then stitch along the ½” seam allowances to join the pieces with right sides facing together. (Note the orientation of the pieces in the third photo underneath step 3.)
- Press the seam open and trim—the same way as we did for the center front seam.
Apply these steps to the second mirrored pair of Cups—to create the Cup Lining set:
- Follow steps 1-2 (outlined above) to create the Cup Lining, or mirrored version of the Cup Shell.
- Match and pin the wider side of the mirrored Back Band to the left side Cup.
- As with the first set, stitch along the ½” seam allowances to join the pieces with right sides facing together. (Note the orientation of the pieces in the forth photo underneath step 3.)
- Press the seam open and trim.
Step 4
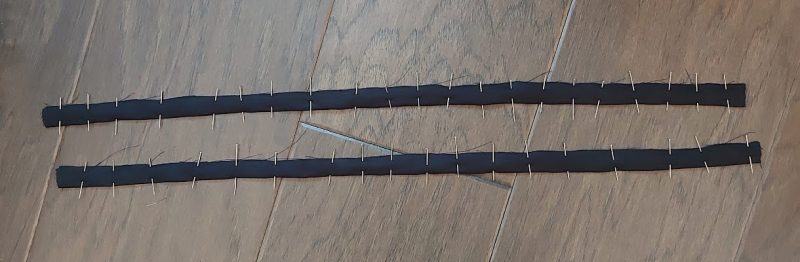
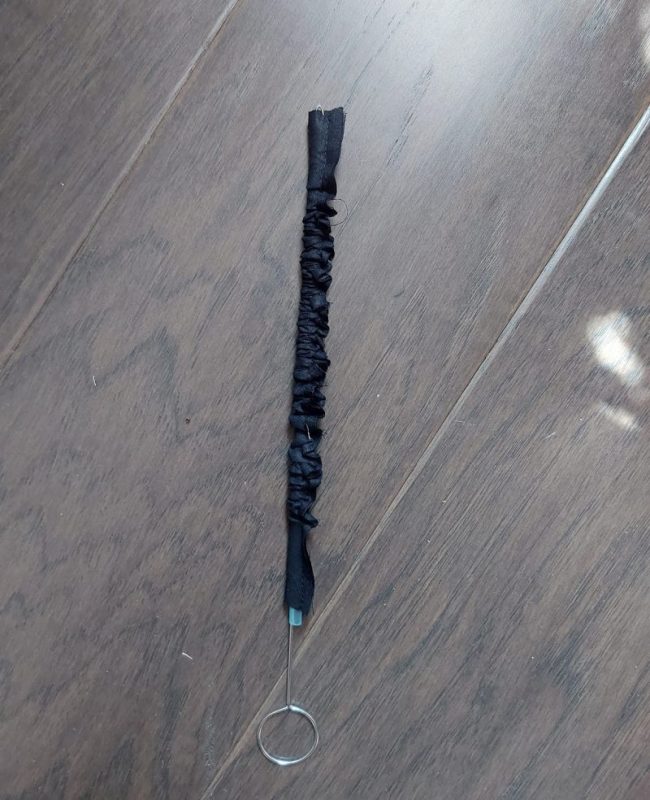
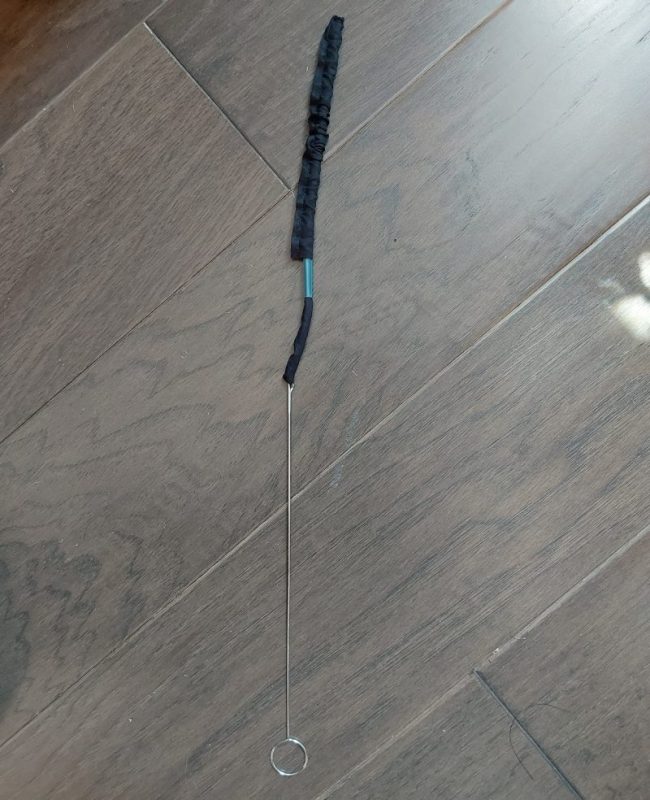
ASSEMBLE THE (F) SHOULDER STRAPS
- Cut 2 Shoulder Strap pieces out of your contrast fabric.
- Fold each Shoulder Strap piece in half—length-wise—with right sides together, then pin continuously to keep the raw edges perfectly aligned.
- Sew down each Shoulder Strap—parallel to the raw edge, using a 1/4″ seam allowance.
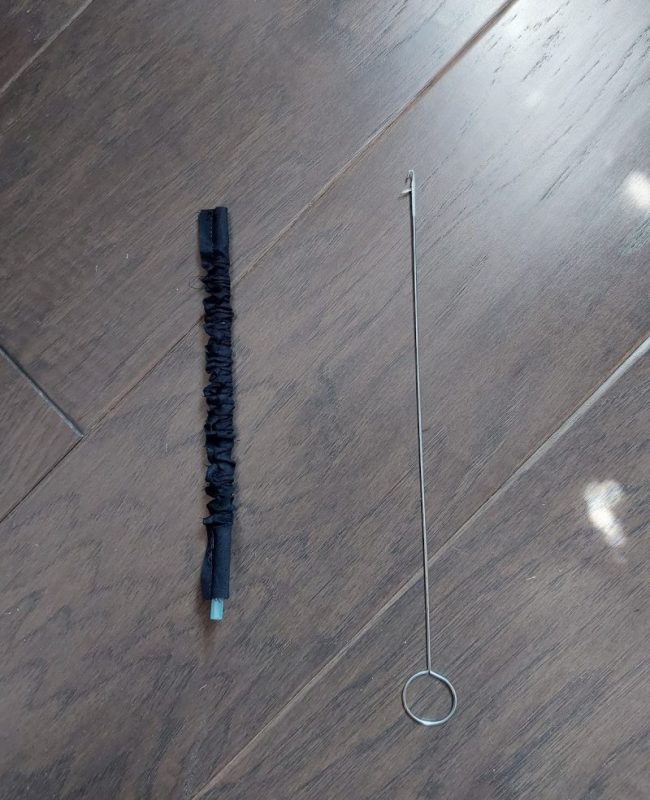
- Use a Loop Turner to turn each Shoulder Strap piece right sides out. (Review the second, third, and fourth photos underneath step 4.)
- Press each Shoulder Strap so that the seam is centered on the ‘back-facing’ side.
- Pin and match each Shoulder Strap with the tip of each Cup Shell, with the straps directed down, and with right sides together. (Note the orientation of the pieces in the fifth photo underneath step 4.)
- Sew the straps onto the tips of the cup shell.
Note: We will outline the steps for making the straps adjustable in the tutorial’s Step 10.
Step 5
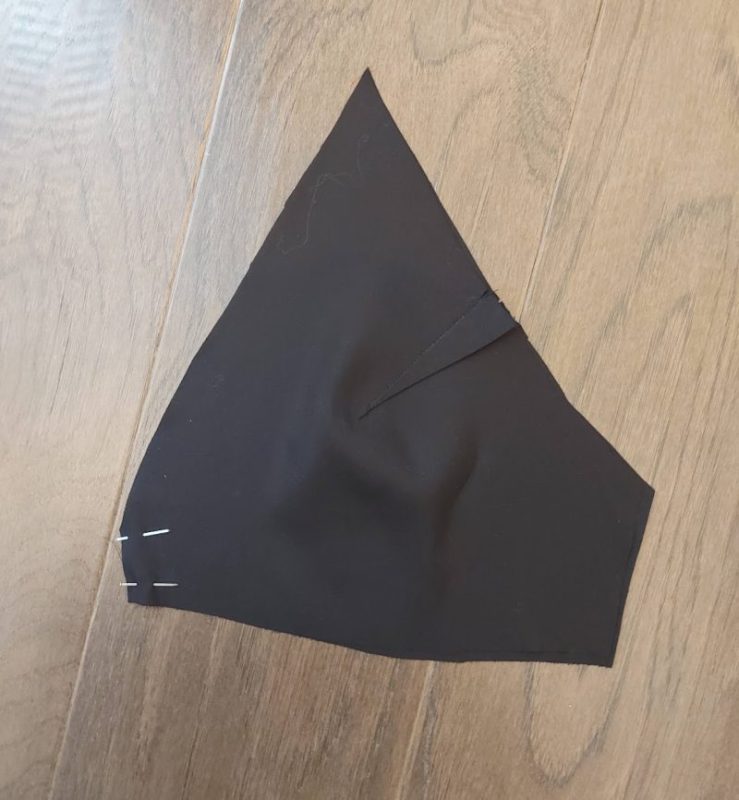
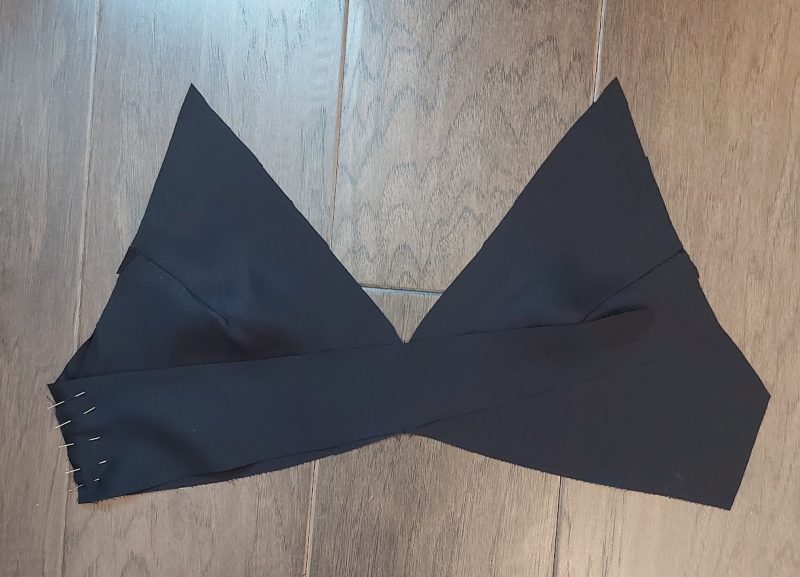
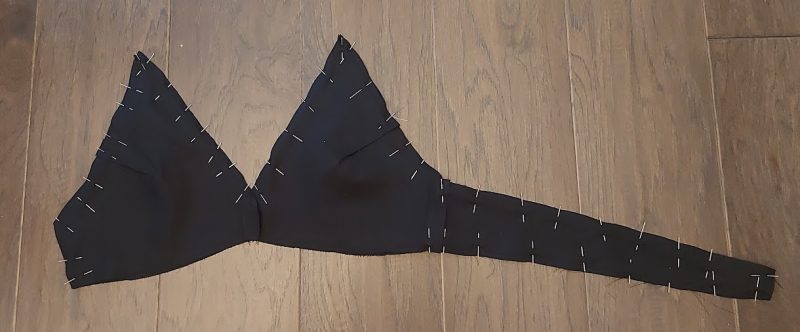
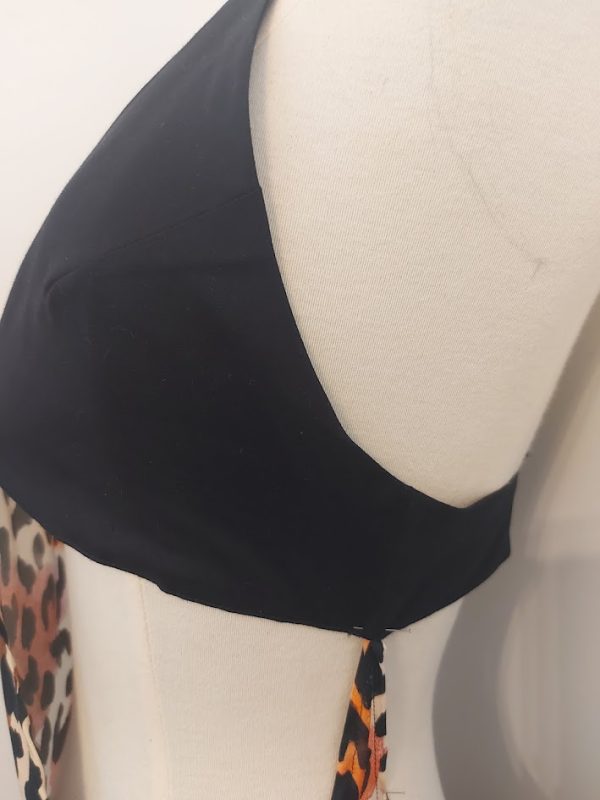
SEW CUP SHELL SET TO CUP LINING SET
The steps outlined below do not include how to sew the top with bra cups.
Want more coverage? Finish the raw edges of the Cup Lining side seams. Then, proceed to the following steps while leaving the side seams of the Cup Lining open, and unattached to the Cup Shells—that will allow Bra Cups to be inserted and removable. OR—Tack down a set of Bra Cups in between the Cup Shell Set and the Cup Lining Set, then proceed to the following steps—note, with this strategy the Bra Cups would not be removable.
- Place the Cup Lining Set and the Cup Shell Set right sides together.
- Pin the pieces all around the edges to keep them in place. (Note: Keep the straps away from the edges by pinning them down—ensuring they won’t be accidentally sewn into your seam allowance in the next step.)
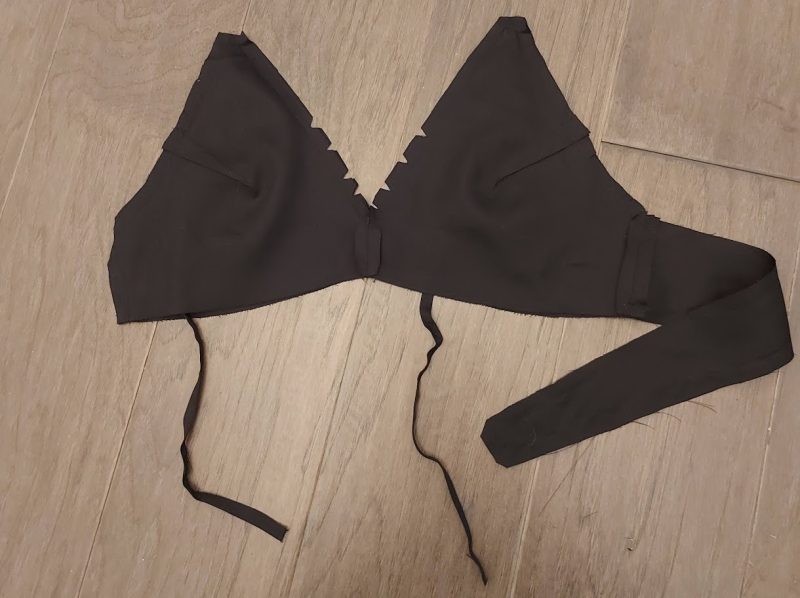
- Sew, using a ½” seam allowance, starting from the bottom of the side of the Cup, pivoting around the top of the Cup Sets, then across the top and bottom edges of the Back Band, stopping and back-tacking at the Cup Sets and Back Band seam.
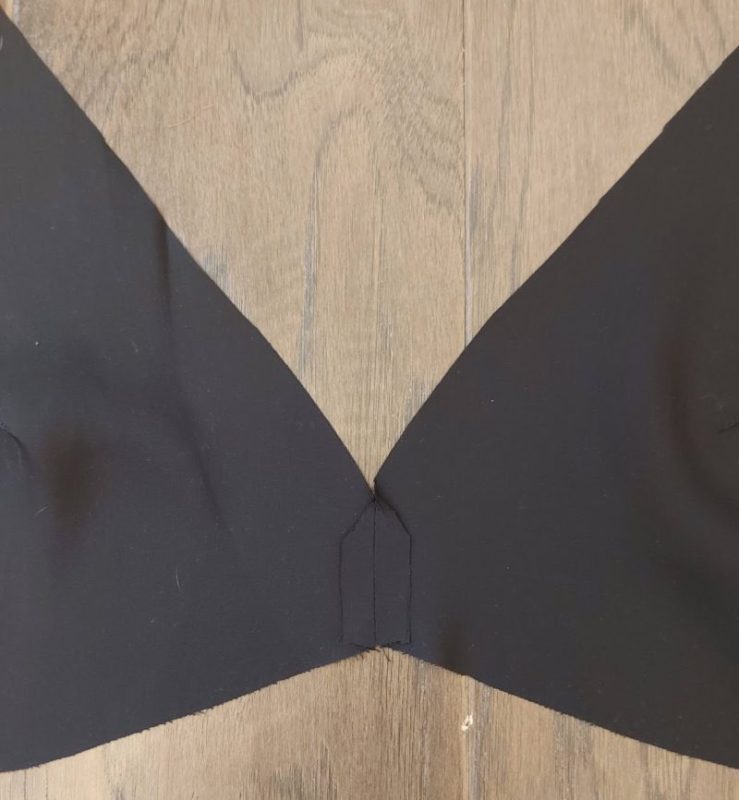
- Make v-shaped cuts into the rounder areas of the seam allowance, snip the upper center front, and cut off the sharp point edges. Be sure to cut a ¼” away from the stitching.
- Flip to the right side and press.
- Press the ½” seam allowance inwards along the opened bottom edge, then keep the turned-in edges in place with pins.
- Topstitch across the folded edges.
Step 6
PREP (C) BACK DRESS PANELS & INSERT ZIPPER
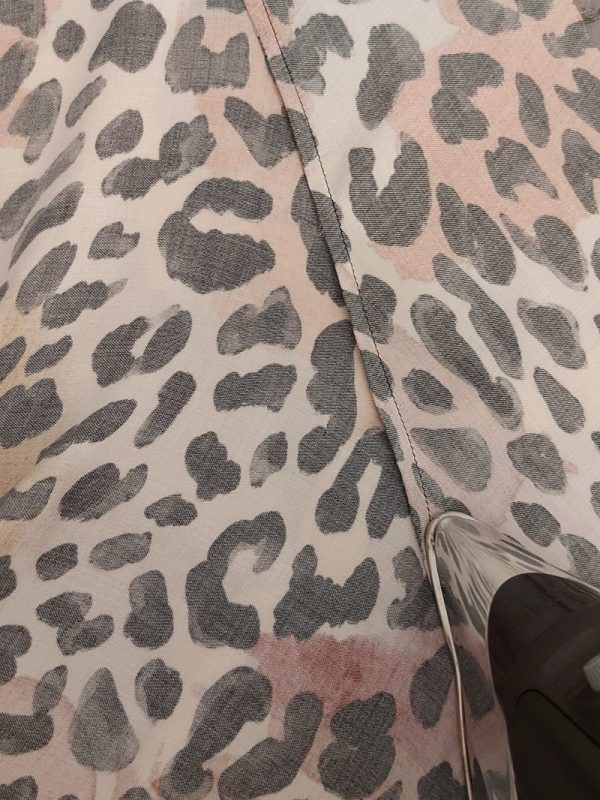
Please note: We used French Seams for sewing the dress pieces.
- Cut 2 Mirrored (C) Back pieces out of your main fabric.
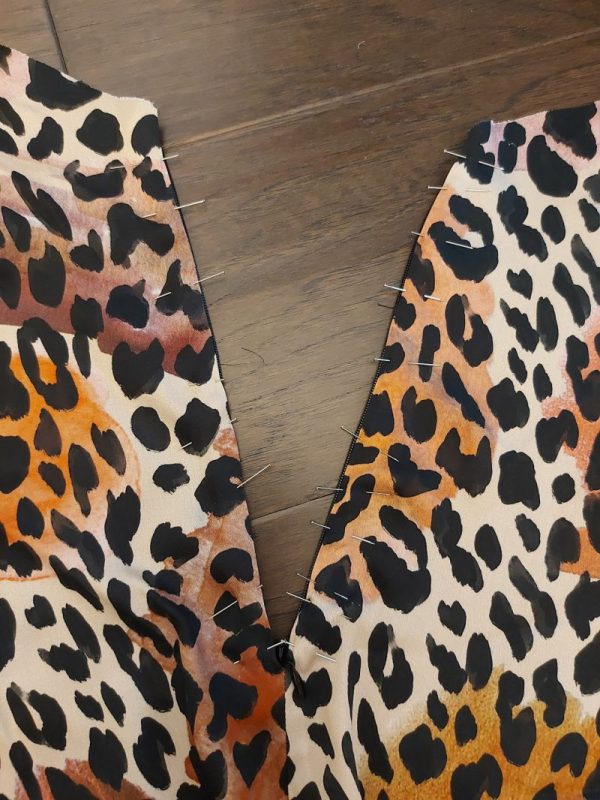
- Place Back Panels with wrong sides together and pin from the bottom of Center Back up until 9” down from the top of the Back Panels.
- Sew with a ¼” seam allowance along the pinned area, being sure to leave the top 9” open.
- Press the seam open and flip the panels so they are facing with right sides together.
- Again, sew from the bottom edge at Center Back up until about 9″ down from the top using a ¼” seam allowance, press open.
- Fold and press the unsewn ½” seam allowance inwards, along the 9″ opening at the Center Back of each Back Panel.
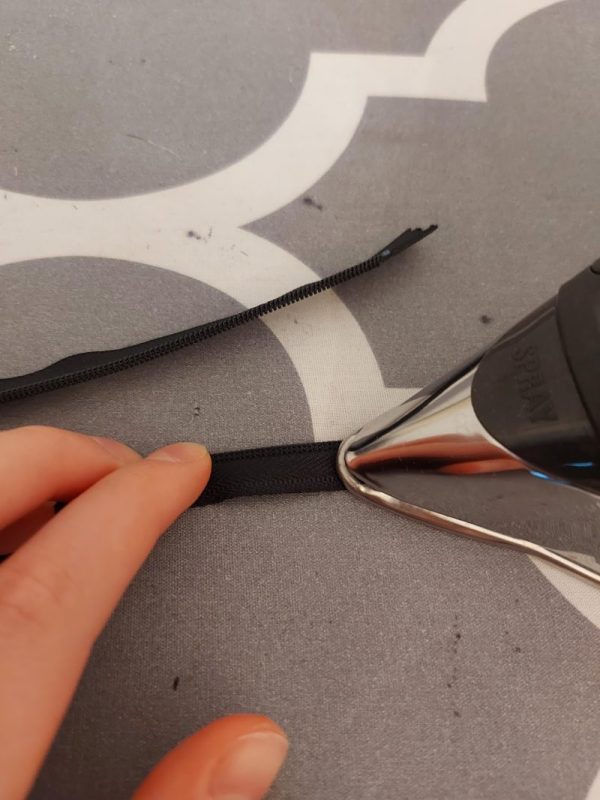
- Take your 9” invisible zipper and press the teeth open. Make sure to lower the heat and use a press cloth so that the zipper does not get damaged!
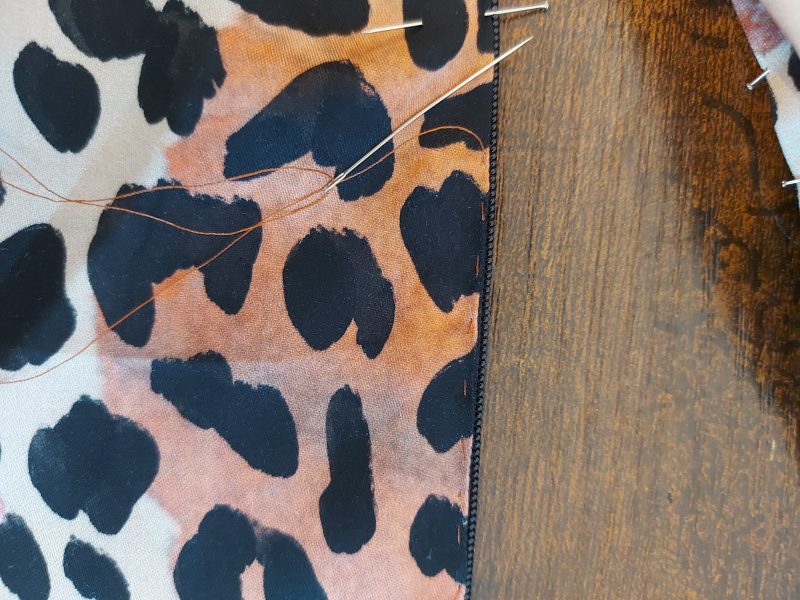
- Pin the edge of the Center Back opening close to the zipper teeth, and baste stitch the zipper in place using a hand sewing needle.
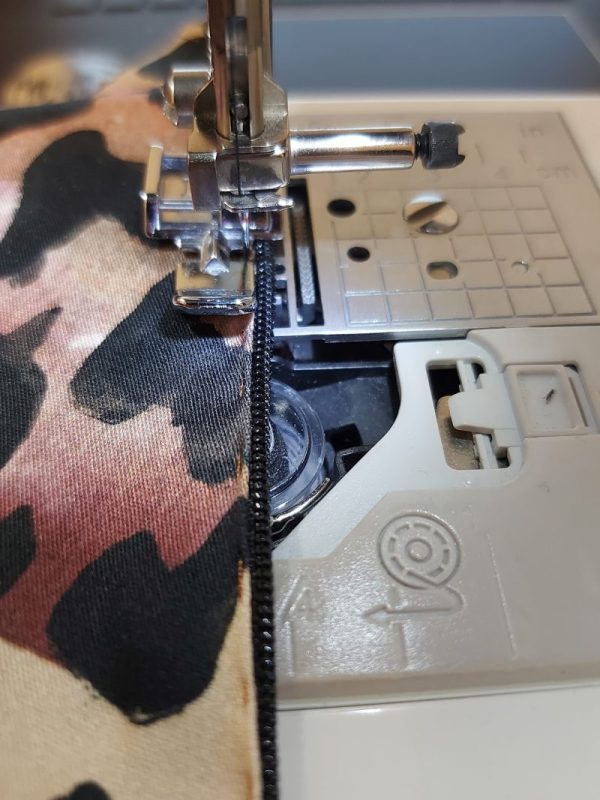
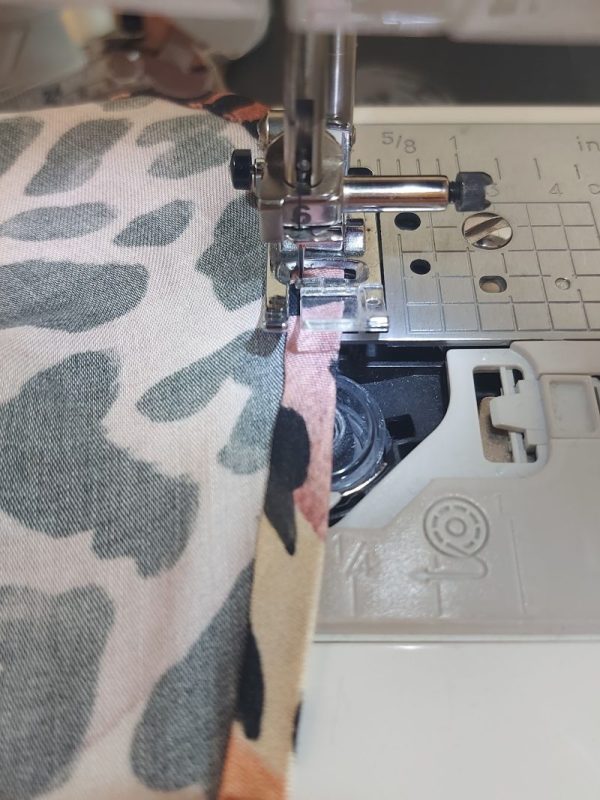
- Replace your regular machine presser foot to a zipper foot or invisible zipper foot, and topstitch around both sides and the bottom of the zipper.

Step 7
PREP (A) FRONT RIGHT & (B) FRONT LEFT DRESS PANELS
Please note a ⅝” seam allowance is allotted in the pattern pieces for sewing the side seams of the dress.
- Cut out one (A) Front Right dress piece and one (B) Front Left dress piece from your main fabric.
- Use french seams—as outlined for the Back Panel pieces in tutorial step 6—to sew the Front Right Piece to the Back Panel with wrong sides together. Sew with half of the allotted seam allowance, using a 5/16” seam allowance. Flip and press.
- Similarly, use french seams to sew the Front Left piece to the Back Panel with wrong sides facing together. Sew with half of the allotted seam allowance, using a 5/16” seam allowance. Flip and press.
- Sew down the Front Right/Back Panel seam with right sides together, using the second half of the allotted seam allowance (5/16”). Press the seam allowance toward the back.
- Sew down the Front Left/Back Panel seam with right sides together, using the second half of the allotted seam allowance (5/16”). Press the seam allowance toward the back.
- Stitch the right side hip closed, stitching 3” down to the notch with a ½” seam allowance.
- Press the seam open, and fold a ¼” inwards on both sides.
- Press again. Then, topstitch to secure.
Step 8
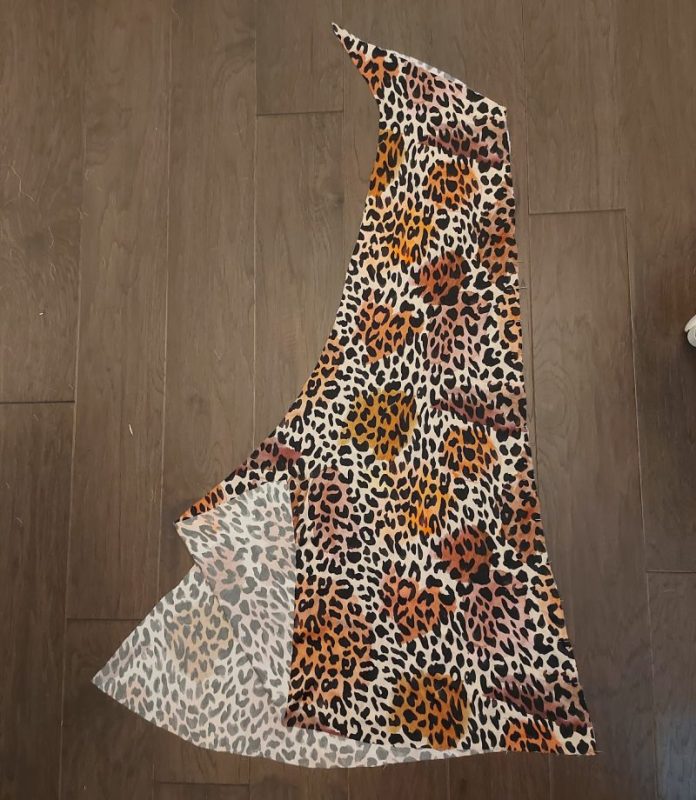
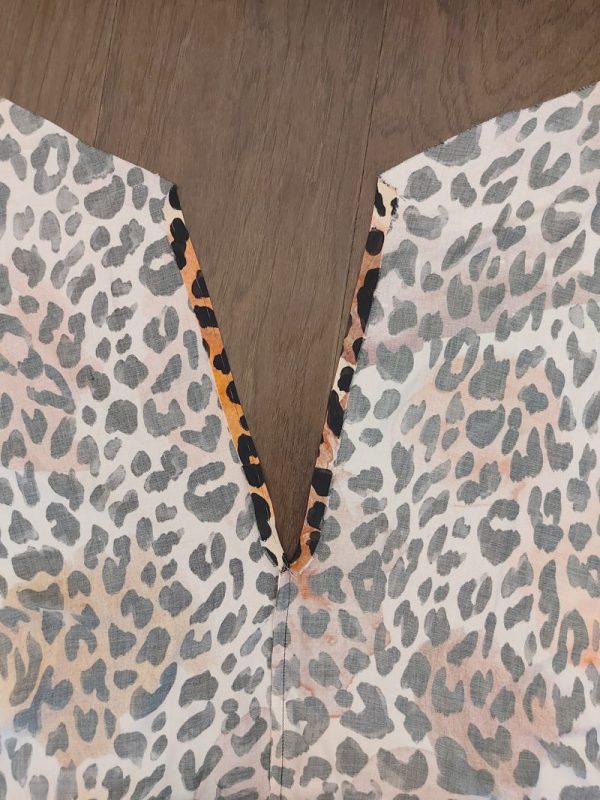
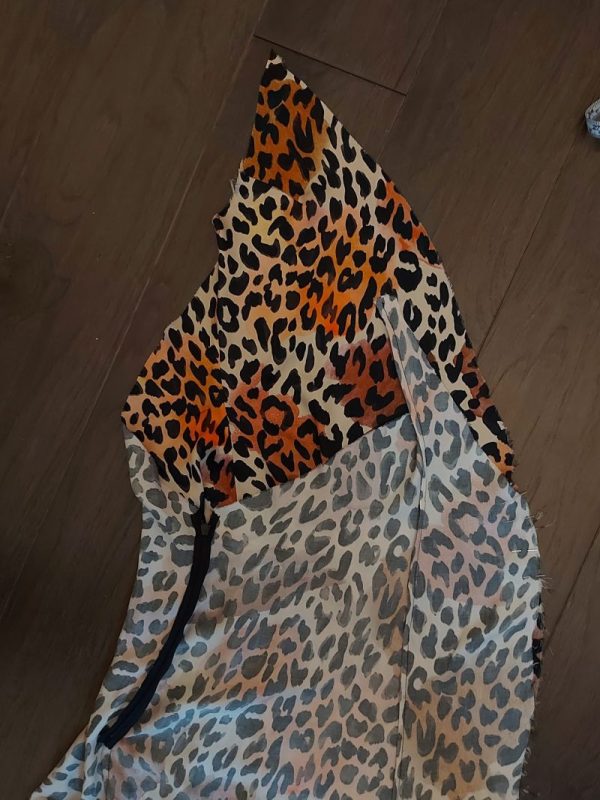
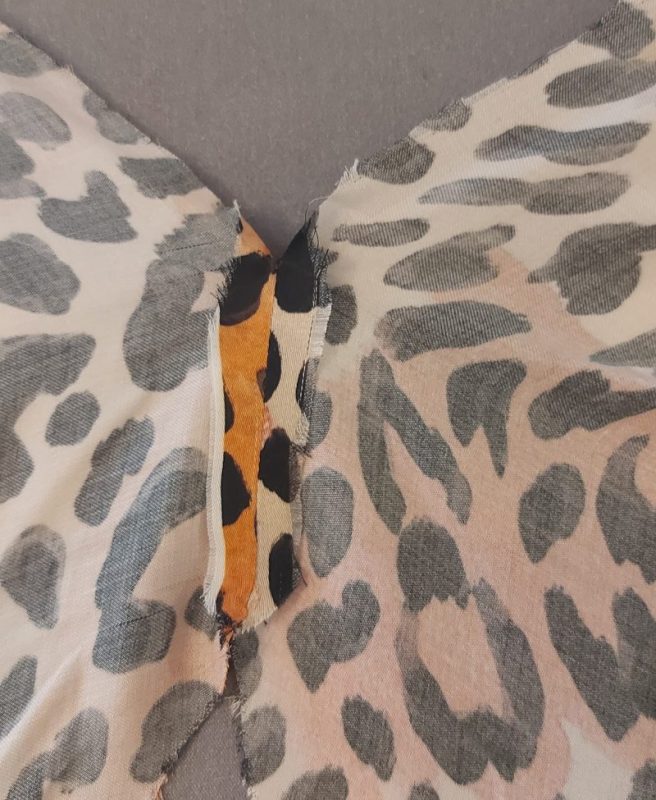
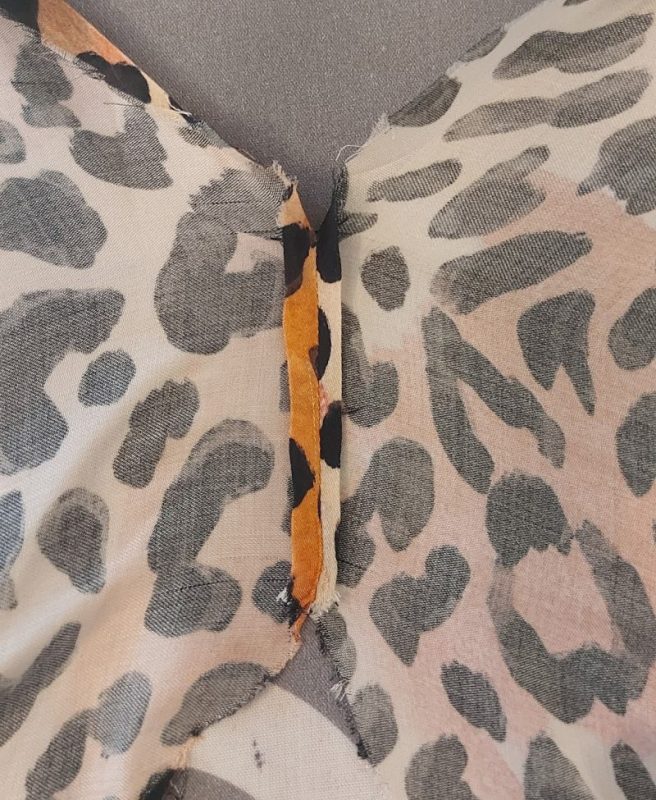
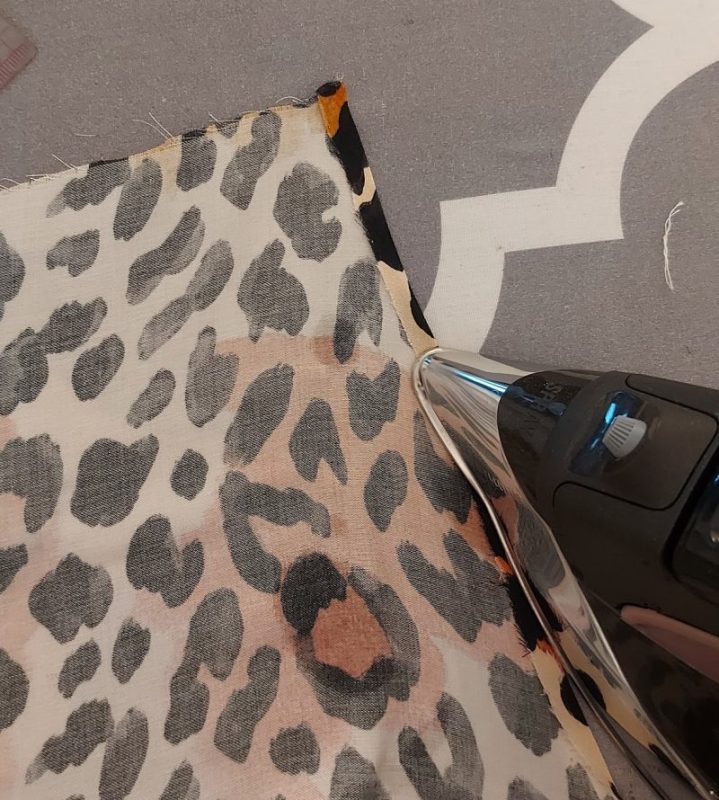
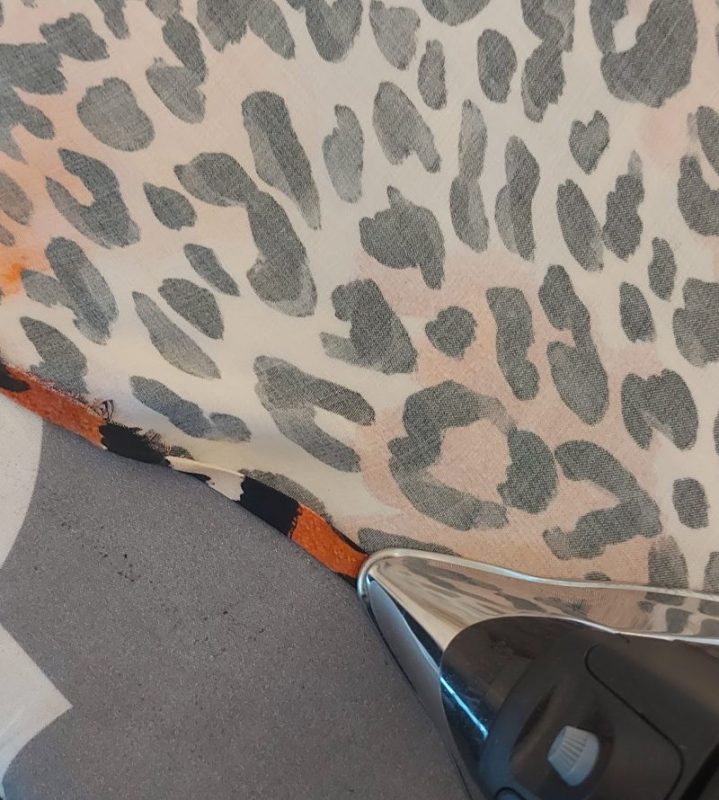
ROLLED HEM & BIAS BINDING
- Finish the Upper Center Front raw edges (of both Front Right and Front Left) by creating a ¼” roll above the seam along the high slit.
- Fold ¼” inwards and press. Fold another ½” inwards and press. Secure, using an edge stitch to lock down the rolled hem.
- Use the same method for hemming the bottom of the dress.
- Sew the Bias Binding along Lower Center Front raw edges (of both Front Right and Front Left) below the seam along the high slit.
Step 9
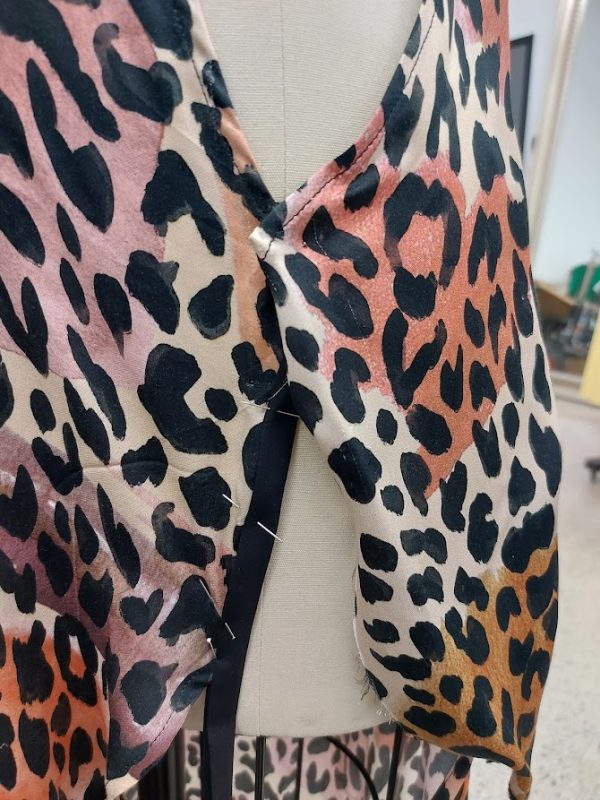
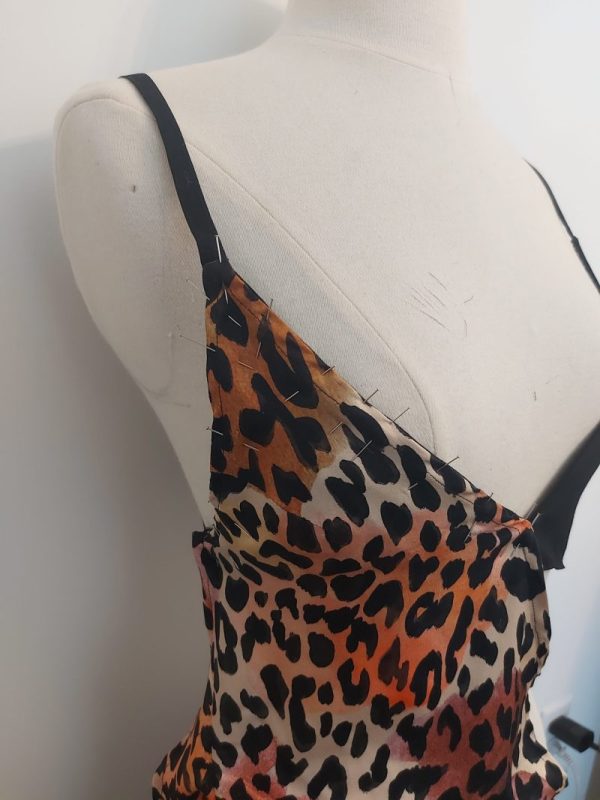
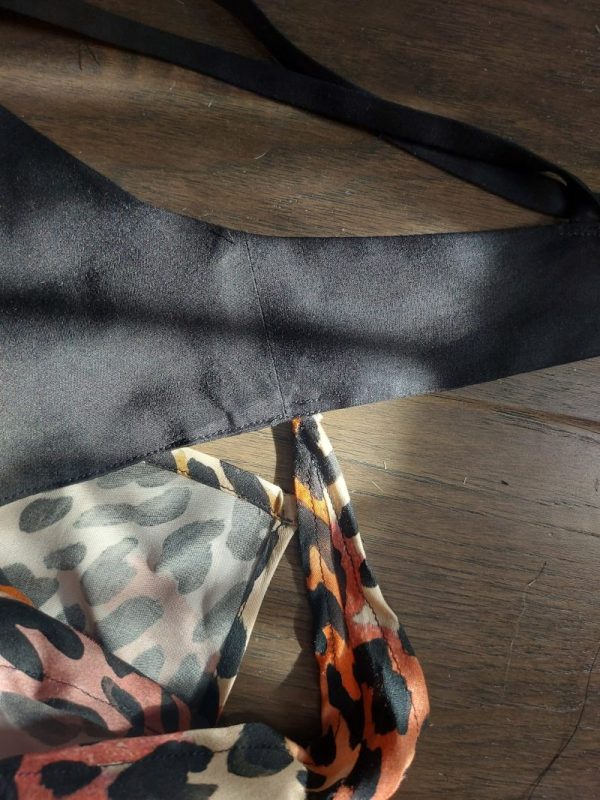
ATTACH BRA TOP & DRESS TOGETHER
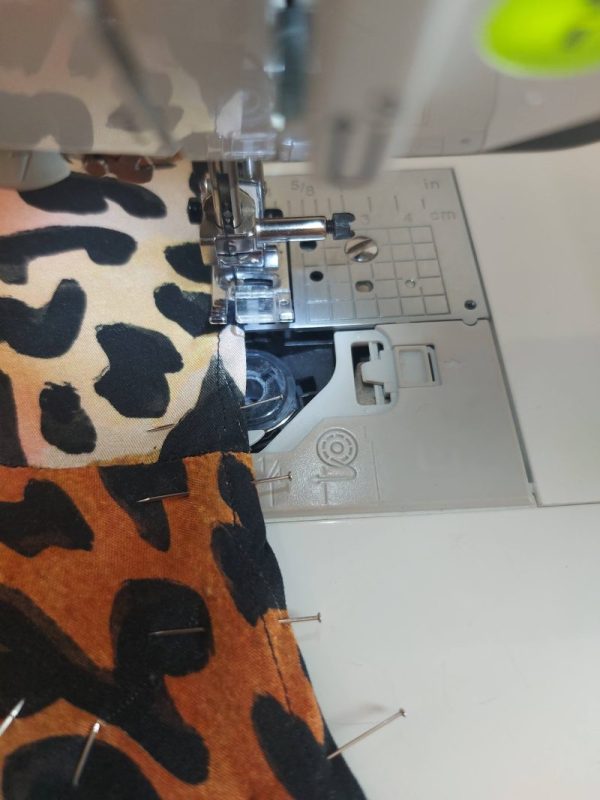
- Attach the Bra Top underneath the Left Side of the dress by, first, pinning the pieces in place.
- Fold a ½” of the Right Side of the dress and pin underneath the Bra Top’s Back Side Seam.
- Top stitch around the Left Side, joining the dress and bra top as one.
- Double tuck stitch the Right Side, joining the dress underneath the Back Side Seam.
Step 10
CREATE ADJUSTABLE STRAPS
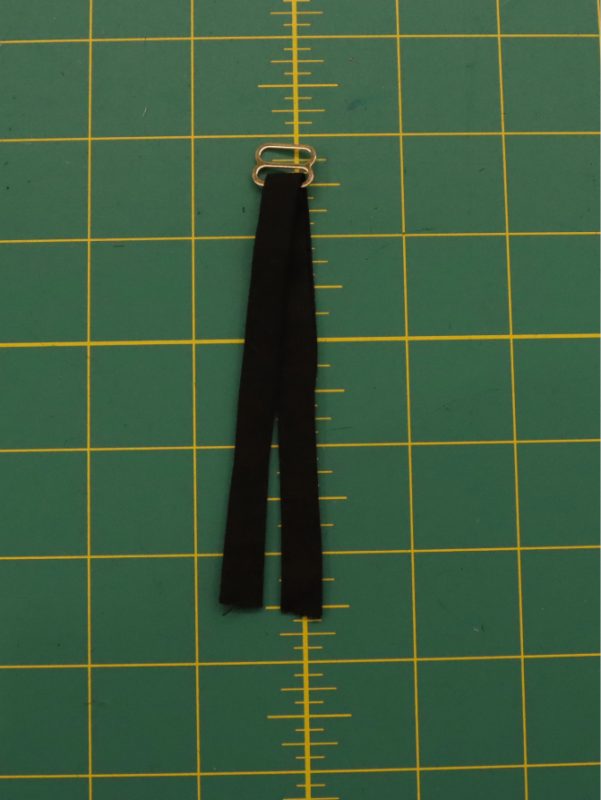
- Cut two 8” lengths (for size XS-S) from the (F) Shoulder Straps (sewn in Step 4).
- Slide each strap through 1 loop of the Adjustable Slider. Fold in half.
- Sew one loop to each dress Front Side Seam. (Do not sew to Back Band.)
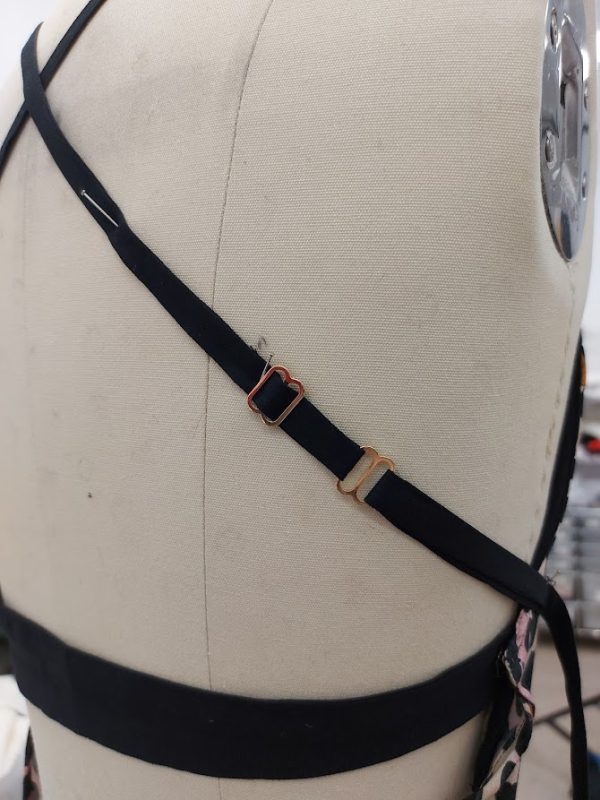
- To make the Shoulder Straps adjustable, pass the longer Shoulder Strap through one side of the metal slider first—under then over.
- Bring the longer Shoulder Strap across the back and pass through the top of the shorter looped Shoulder Strap slider.
- Bring the end of the longer Shoulder Strap back to the first slider, and pass it under the first route again.
- Sew the end of the longer Shoulder Strap to the side of the Shoulder Strap with the metal slider.
For other sizes, increase the two lengths for the looped Shoulder Straps by a couple inches, or more—as needed to create an optimal, comfortable fit.
Step 11
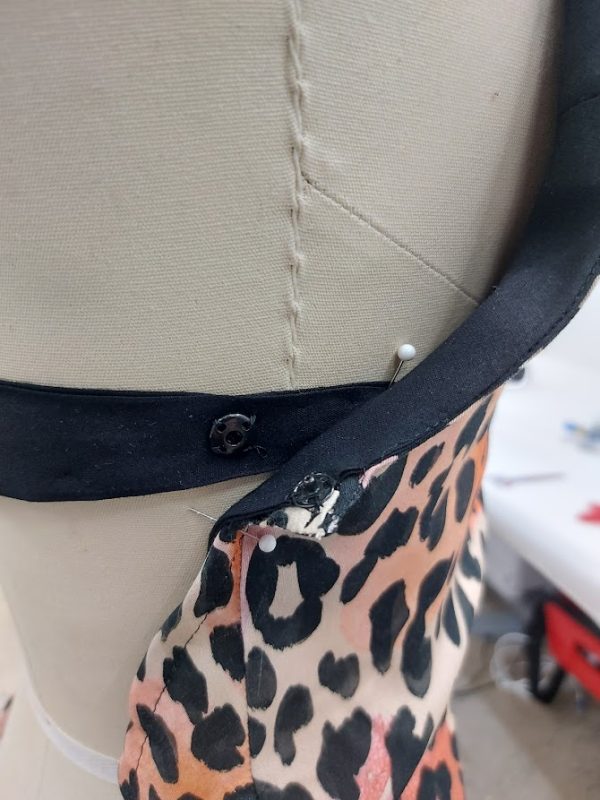
ATTACH SEW-ON SNAPS
- Attach the Sew-On Snaps to the Right Back side, using a hand-sewing needle and matching thread.
- Sew one side onto the Right Back Band and the other side of the Sew-On Snap to underneath the Right Back side of the dress.
Pro Tip: Mark each side of the sew-on snap with chalk and press the fabric pieces together. Utilizing a chalk transfer method will help you pinpoint the right places for sewing on your snaps!
Sewing Success: The Finished Tropea High Slit Slip Dress

We can’t wait to see your version of the Tropea High Slit Slip Dress! Whether you choose rayon challis, silk crepe de chine, or silk charmeuse, you’re new resort-style slip dress will be your go-to water-side cover up style for years to come!


Share this post with a friend (or two!), download the Tropea High Slit Slip Dress free sewing pattern, and show us which fabrics and colors you choose, using the hashtags #MoodTropeaPattern & #MadeWithMood.
Now that you’ve completed the Tropea high slit slip dress, may we tempt you with sewing your very own bathing suit? If you haven’t sewn it already, our Naxos Swim Suit free sewing pattern paired with a swimwear tricot fabric from our exquisite Santorini Plus collection is calling your name!
As always, we want to hear from you! Make your comments below and tell us where you’re wearing the Tropea High Slit Slip Dress free sewing pattern.
How can we make this without the cut out?
Hi Kristi, you absolutely could! But it will require some manipulation to the pattern before cutting it out. If I were to make this without the cutout, I would alter piece A so that instead of the cutout going all the way down to the waist, it end up going straight across the under bust of the cup that it doesn’t cover. Alternately, you could mirror the bust part (with dart) of piece A so that it covers both bra cups and there is no front cutout at all. Let me know if that makes sense and if you end up trying it!