
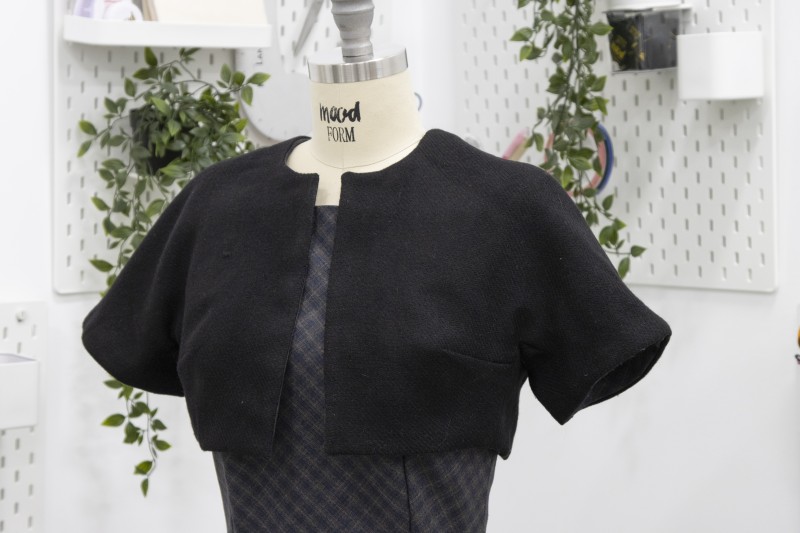
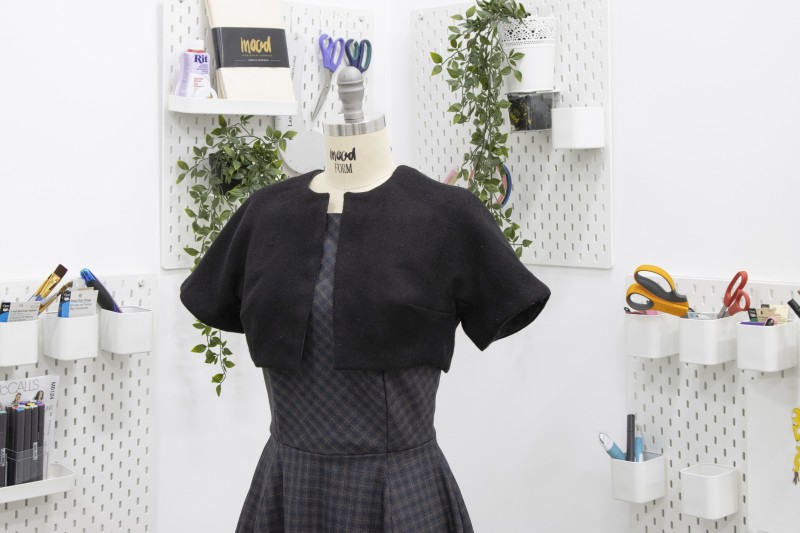
Purchase Materials Used Below:
- 1 yard Italian Black Blended Wool Twill
- 1 yard Italian Blueberry and Charcoal Plaid Wool Suiting
- MDF235 – The Layton Bolero Sewing Pattern (free download below!)
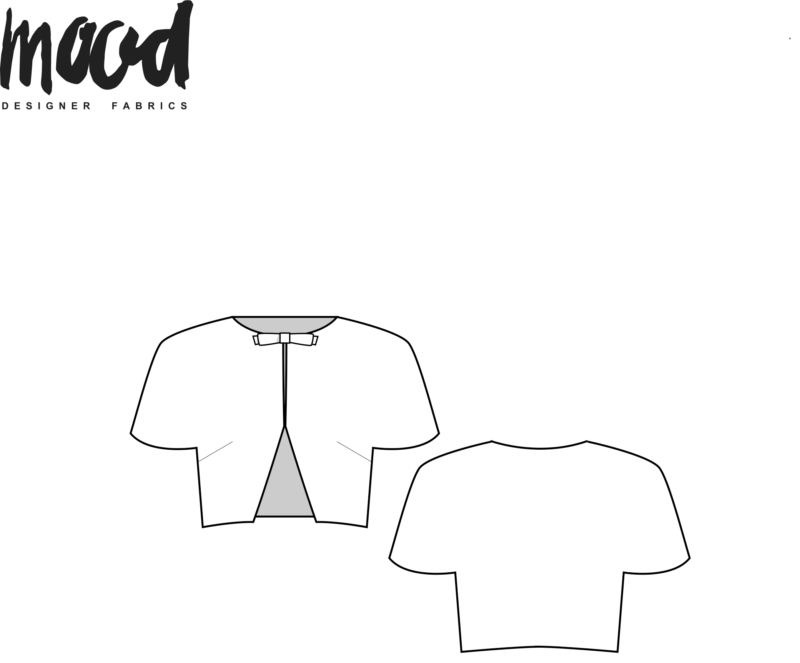
All seam allowances are 1/2″ unless otherwise stated. See chart below for sizing specifications. Note, this specific pattern is available up to a size 30.

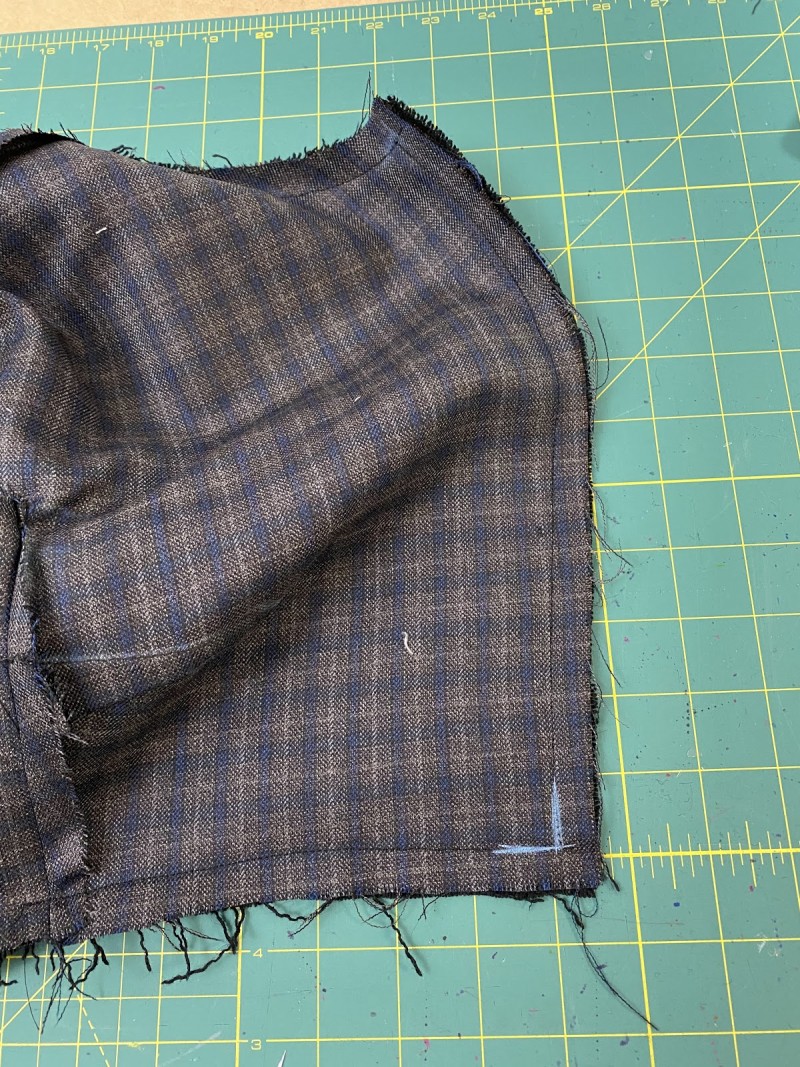
Step 1
Cut your Bolero pattern pieces: Front cut 2, Back cut 2 (or fold back the center back seam allowance ½” and cut on the fold).
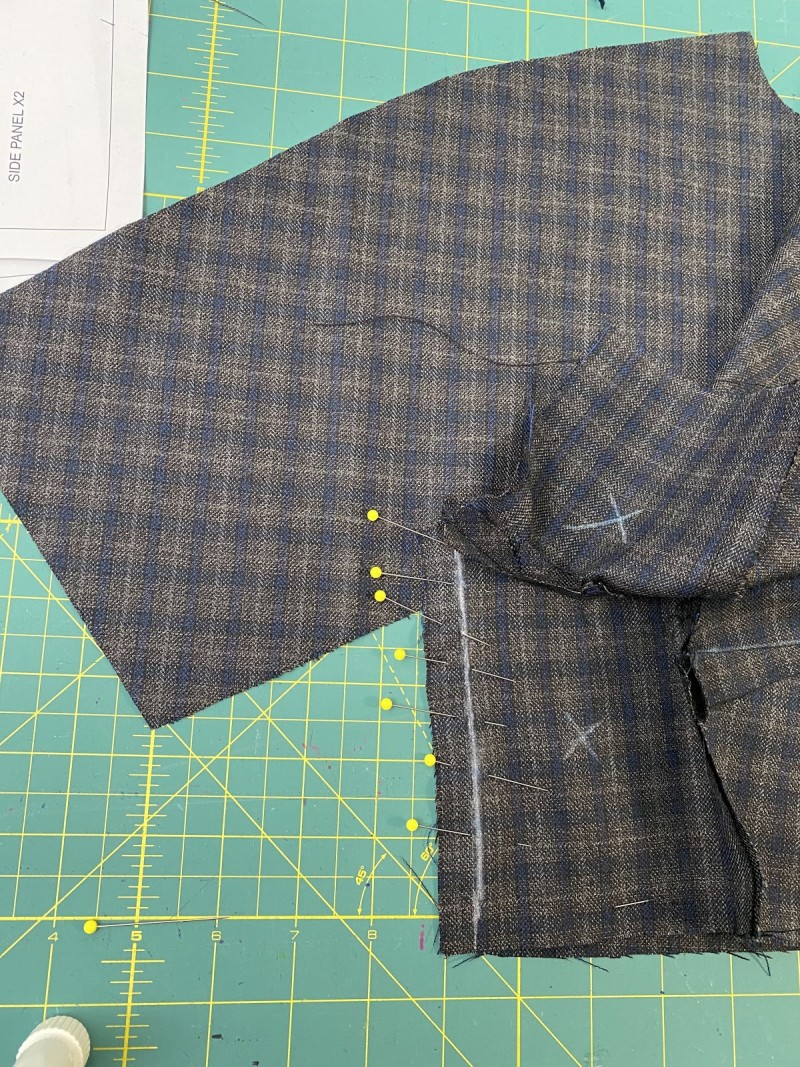
Attach ‘Side Panel’ to ‘Sleeve Gusset’ along the curved seam, making sure to align notches, clip seam allowance, and press open.
Pictured will represent your sewing line where you will attach the Side Panel (side gusset) in to the extension line marked in chalk with right sides together (there is no front and back edge of the gusset inserts so you can choose to begin attaching to Front bolero or Back bolero first).
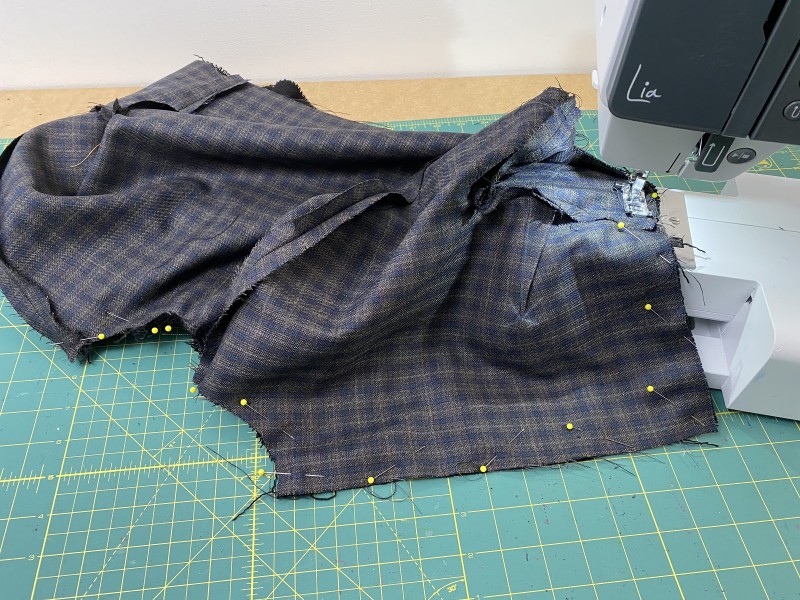
Step 2
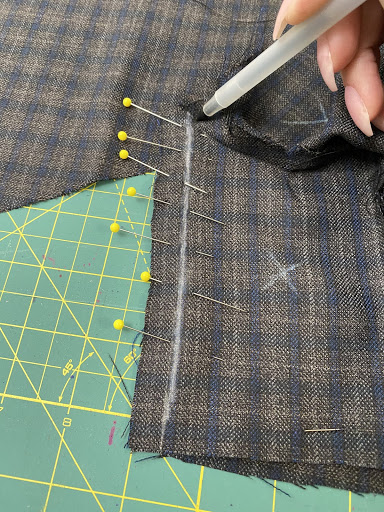
Pin the Side Panel along the hem to the hem location of the front or back of Bolero, you will repeat for the front or back bodice of the Bolero depending on which side you attach to first, you will repeat this step for each ‘side panel’ to its corresponding bodice side location:
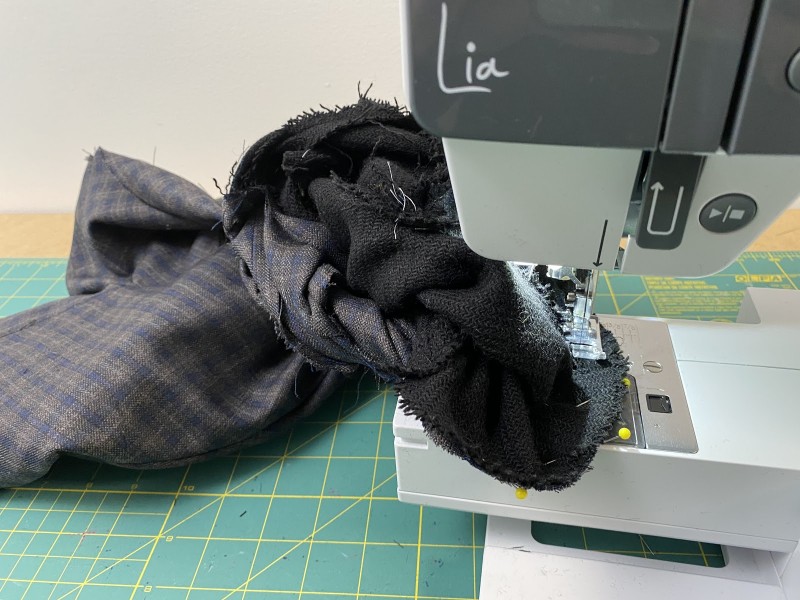
Step 3
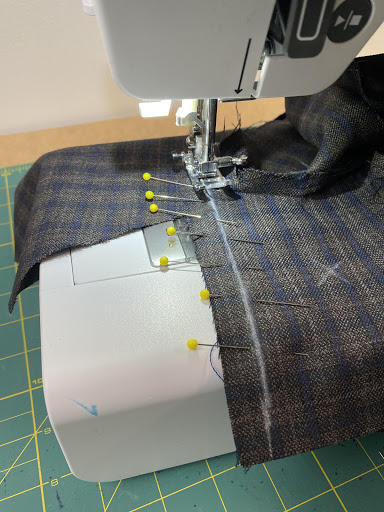
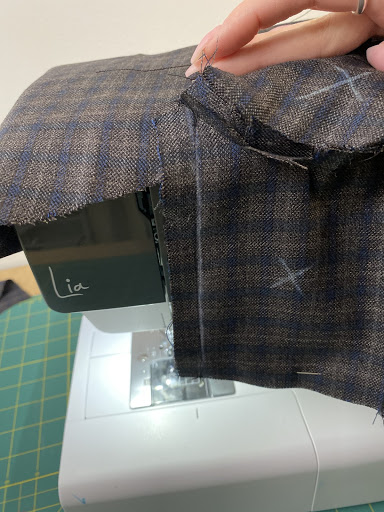
Begin by attaching the Side Panel of the gusset where the SEAM LINE of ‘Side Panel’ and ‘Sleeve Gusset’ meet. Push the seam allowance up so that you can drop your needle at the machine flush against that seam stitching and sew down towards the hem of Bolero:
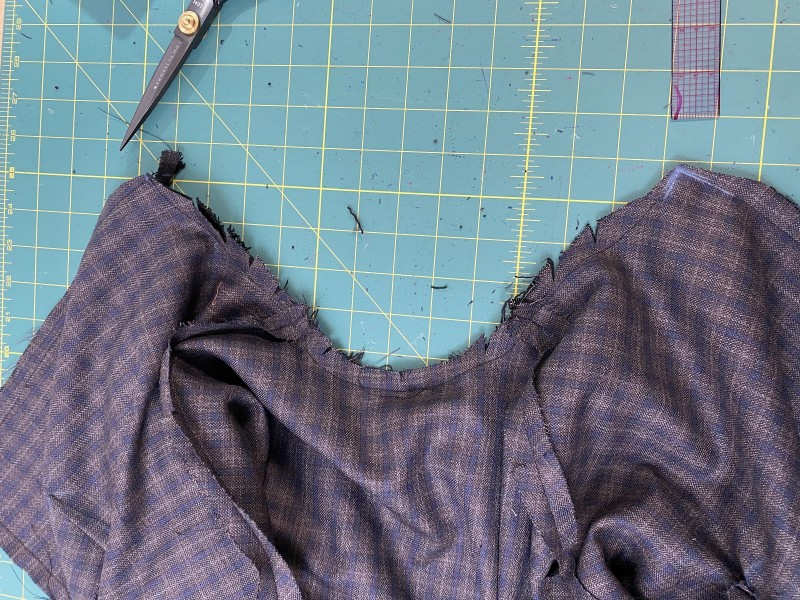
Step 4
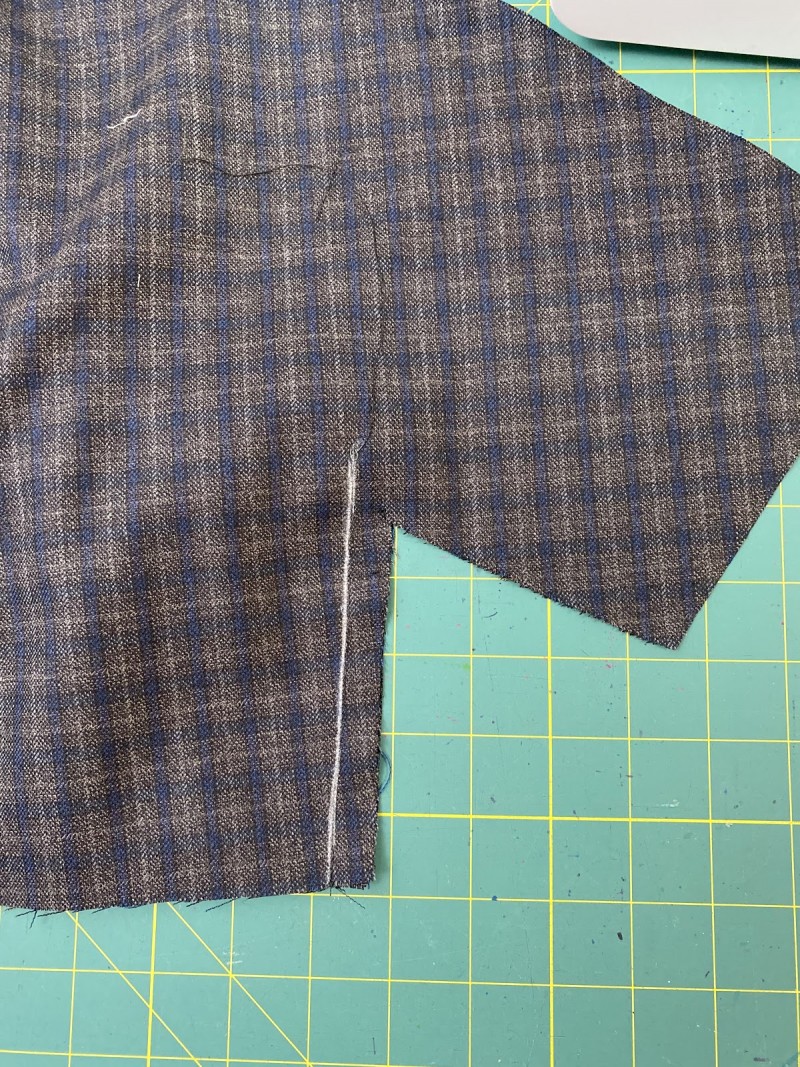
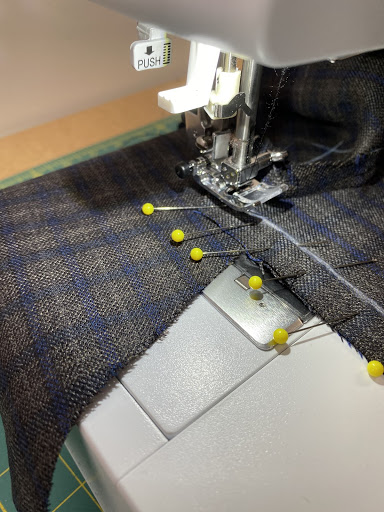
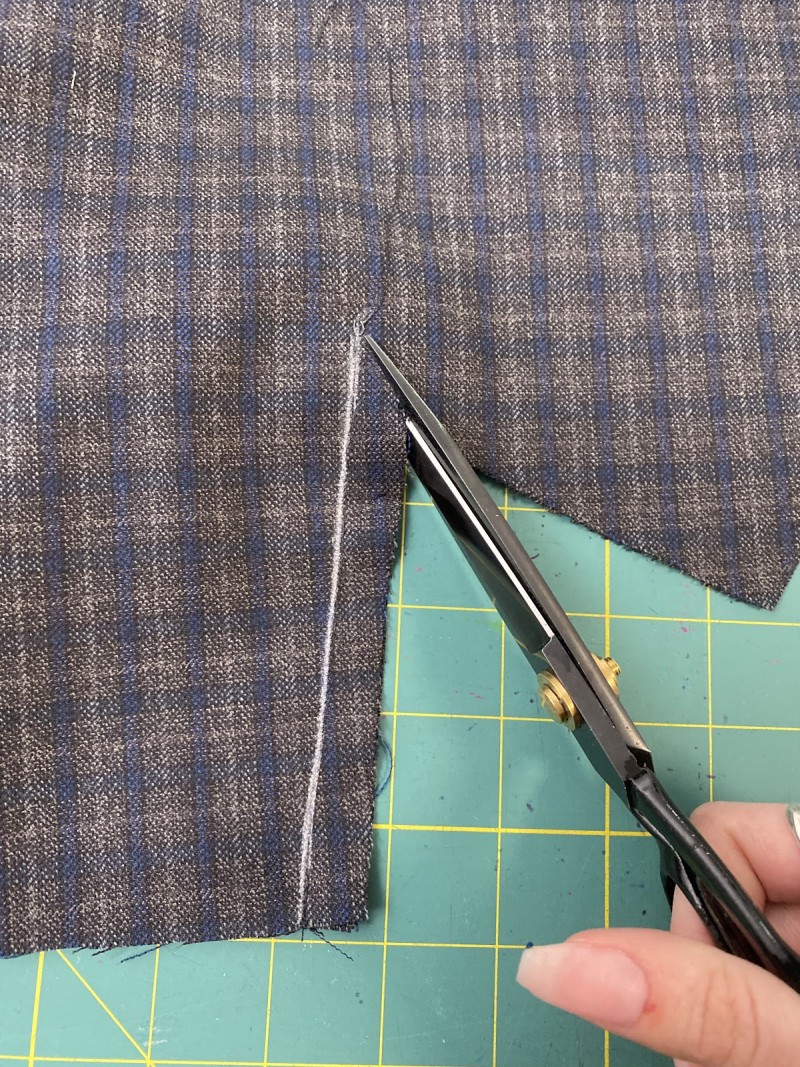
After you have attached that area of the Side Gusset to the side area of the bodice (this step will be repeated for all 4 side areas of the bodice), you will clip to within 1/16”-1/8″ of where your stitch line began. In the picture below you will see where the angle is being cut and this location is indicated on the pattern:
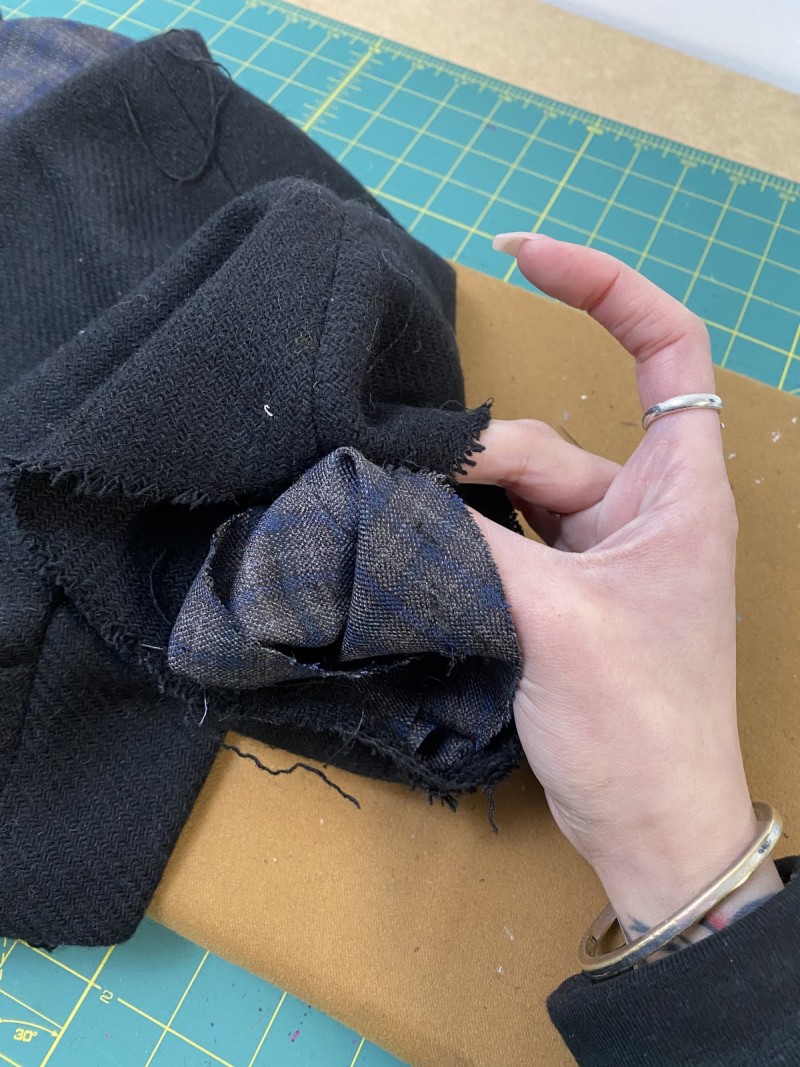
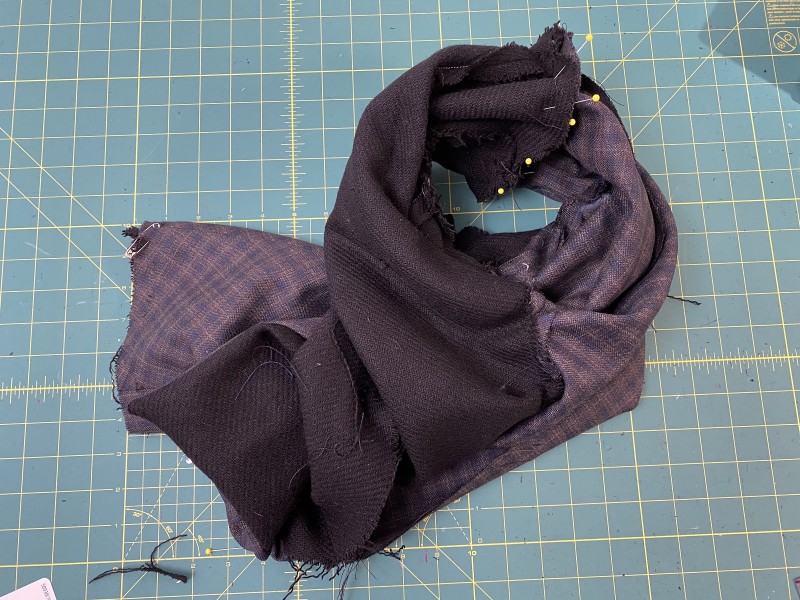
Step 5
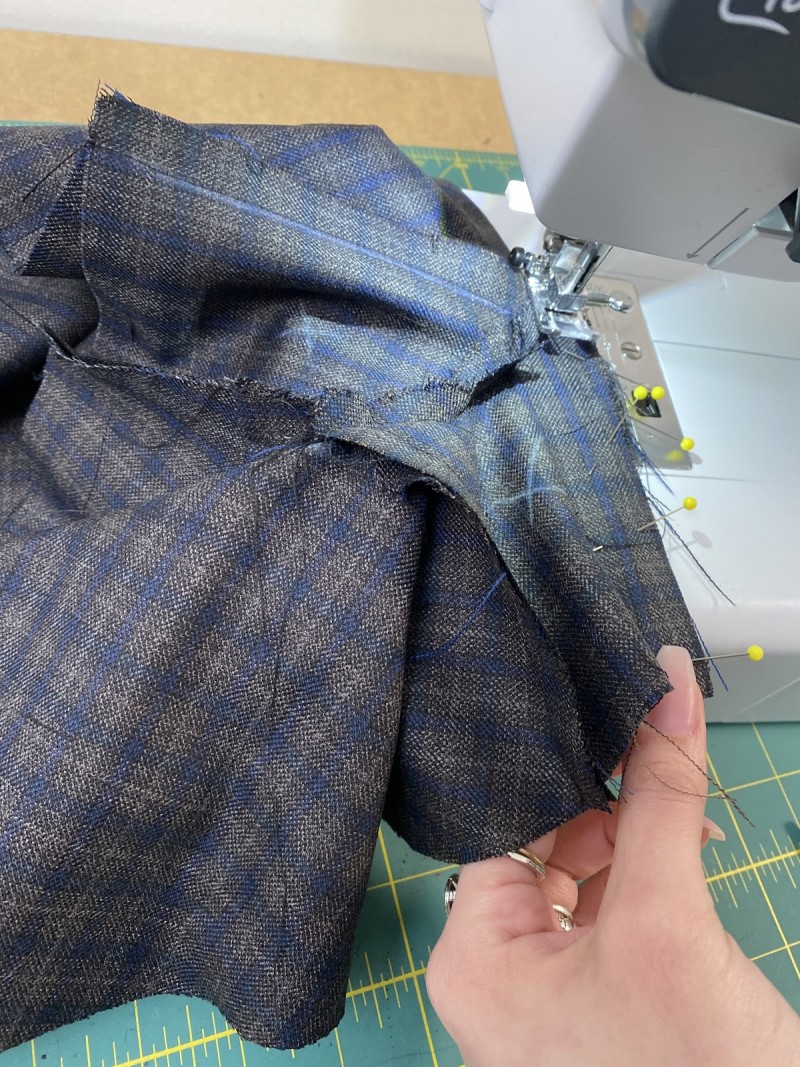
Now you will have released in that corner area so you can attach the Sleeve Gusset to its corresponding sleeve seam. Repeat for each Sleeve Gusset to sleeve seam placing right sides together to achieve. You will repeat this process as above but working from the other side of the Gusset’s seam allowances and sewing towards the hem of the sleeve, be sure to manipulate the fabric to lay flat as you join – it may be easier to see what area you are sewing from the bodice side when joining Sleeve Gusset to sleeve area.
Step 6
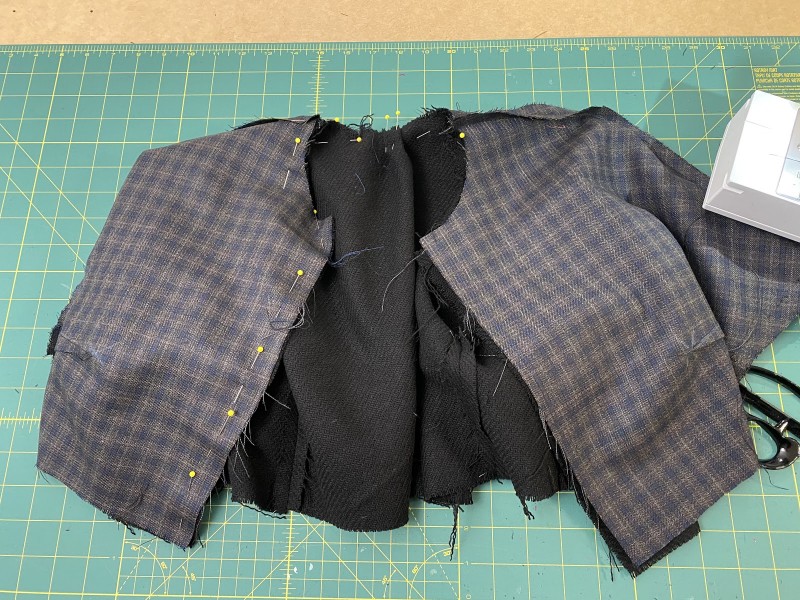
Once your gussets are attached to either side of the Bolero (front and back bodice), you will sew the shoulder seams joining Front and Back with right sides together.
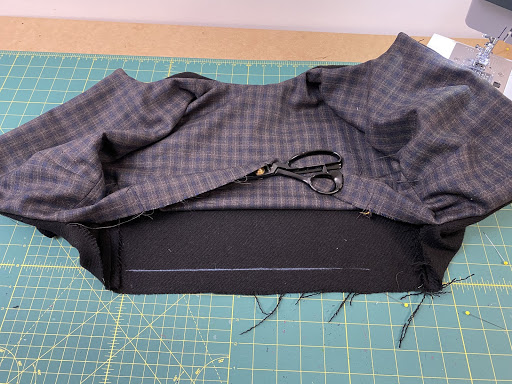
Attaching Bolero lining/Attaching second shell fabric to make reversible:
Step 7
With self Bolero and Lining Bolero, begin by pinning necklines, center fronts, and hemline until the Side Panel seam allowance and sew closed with 1/2″ seam allowance.
When coming to corner or squared areas of the neckline, be sure to back-tack and reinforce those corners as you will trim them after sewing.
Step 8
*You may want to mark the 1/2″ seam allowance distances at your squared seam areas to ensure they are symmetrical down your center front so when you wear the garment it looks even.
Step 9
You can begin sewing from your side panel seam allowance in order to hide your back-tack stitch in that area, continue to the opposite side panel seam allowance area.
Step 10
Once you have attached these areas, clip the neckline seam allowance to release tension so it will press flat when flipped right side out.
Optional: Understitch your seam allowances to your inside layer 1/8″ from the stitch line (ON TO THE SEAM ALLOWANCE) to ensure the neckline and the center front will lay flat and clean.
Clip all seam allowances at angled seams to allow for those areas to have clean angles from the right side of the garment.
Step 11
Understitch areas that you want to lay flatter by attaching both seam allowances to the lining/inside layer of fabric.
Step 12
Flip your Bolero right side out and place the sleeves inside each other with wrong sides facing, place a safety pin to attach both Boleros by aligning the shoulder seams:

Step 13
Where you have pinned those two seam allowances together at the SHOULDER SEAMS turn those so they are right sides facing and replace the safety pin INSIDE the sleeve, so it can be pulled from inside the garment and sleeves be attached at their hems with RIGHT SIDES FACING:
Step 14
Place your hand up in to the unattached hem BETWEEN both layers of the Bolero and pull the pinned sleeves so they are inside out, repeat for other sleeve:
Step 15
Pin both sleeves to one another with right sides facing, and sew with 1/2″ seam allowance, repeat for other sleeve:
Step 16
Once sleeves are attached to one another you can understitch at this point or turn them to be right sides out, this will be fully lined or fully reversible so be sure you push one layer of Bolero into the other at the sleeves. At this point, you can press.
Step 17
The last step is to finish your hem, as pictured below you can mark 1” from the bottom raw edge of the hem and press up 1/2″ (your raw edge of hem will automatically be 1/2″ as it meets that 1” mark:
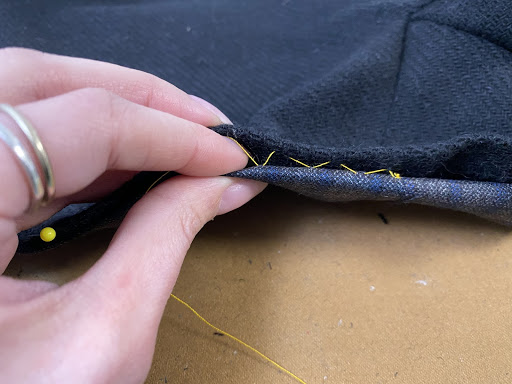
Step 18
You can make an invisible stitch by catching 1/8″ above the folded edge of the hem INSIDE the seam allowance and catch the opposite fabric, be sure to pin those two hems to one another before hemming so they are aligned.
Beautiful!
Does the patent include a seem allowance?
Yes 1/2″ Seam allowance
Love the inclusion of line drawings, but this particular one shows a cutaway front that the actual pattern doesn’t.
There is an optional cut line on the front piece for the more angled cutaway. You should see it on page 7. 🙂
Wonderful pattern. Super easy, took me 2 days. Thank you!
How would I turn this into a long sleeved jacket? Is it doeable?
Hi Marcia! Yes, it is certainly doable. Simply extend your sleeve pattern piece at the hem to your desired length, tapering the sleeve to your desired wrist circumference. 😀
Hi! What size paper are you printing your pattern on? Thanks!
Hi Ciara, our patterns are formatted for US Letter size (8.5″x11″). Enjoy!
could i use a tulle type, sheer fabric for this?
Hi Chloe! It’s certainly possible, but I would recommend something with a stiffer drape, as well as adding interfacing. 😀
I’m having a hard time figuring out how the side and sleeve gussets are attached to the front or back panels, pictures are not very clear.
Hello there!
Thanks for visiting the Mood Sewciety Blog! We’re proud to have released over 350 free sewing patterns, and we hope you’re enjoying them.
Behind the scenes we’re a dedicated team of three, and we want to be able to offer top notch support. We have exciting plans for our patterns on the horizon, and as we continue to grow, we’ve decided to focus our sewist support on patterns from the last 2 years. If this pattern hasn’t been recently reduxed or updated, we won’t be able to respond to technical questions on these older posts.
If you come across any pattern errors, rest assured our team is on it – just let us know!
Don’t miss out on our Mood Sewciety Facebook Group – a fantastic space for fellow sewists to connect, share wins, and tackle challenges together.
Thank you for your understanding and happy sewing!
Best regards,
The Mood Sewciety Blog Team
You should have really used some other fabric… I am completely lost as to what to do from the “Now you will have released in that corner area so you can attach the Sleeve Gusset ” on. This looks to me as a pile of plaid, I can’t see the edges of the fabric, I can’t even tell which edges are attached to which. A diagram would be helpful, certainly.
Hello!
Thank you for your feedback. Most of the instructions on our 350+ patterns, especially these older ones, do reflect their no-cost nature. But we understand your frustration!
Unfortunately we can’t update the instructions on every pattern in our archive, especially if they are over 2 years old, however, if there are errors we will correct them! We encourage you to take a look at the improved in newer patterns, offering more thorough guidance! We appreciate your engagement and invite you to explore these updated options for a better sewing experience!
The dart on the front for the breasts, how do you know which of the triangles to cut?
Hi Andrea, if you’re struggling to find which dart is associated with your size, count the lines instead of trying to find the line with the correct dot pattern.
For example, if you’re a size 10, the line for size 10 is the 7th line from the smallest. Therefore, you have to count from the smallest line on the inside of the pattern to find which line is associated with size 10. Let me know if that helps.
I’m wondering if it would work to use a stretch sequin fabric with this?
Yes, that sounds like it would work nicely and give it more of a pop!
Would satin work for this if I line it? Would I need interfacing inside too?
First time making a jacket so just wanted to check. Want satin to go with a crushed velvet top and satin skirt so it matches.
Thanks in advance.
Hi Ruby, we’re sorry for the delayed response! We get dozens upon dozens of questions each day, and sometimes a few might slip through the cracks! Regardless, we wanted to answer this: you could make this in satin, as long as you used interfacing!
Hi ! I’m not sure I understood the instructions on how to attach the gussets to the rest of the pieces. I don’t understand how to cut the bodice pieces at the underarm area.
I did finish the bolero, but I’m not sure it’s as ot should be at the underarm area.
Hey Sarah, sorry for the late reply, but I wanted to answer this question in case other people had the same one. If you look at the pattern, the sleeves and back of the bolero are one piece. This is the same with the front pieces, there is no seam connecting the sleeve. However, if you were to just sew a seam to connect the sides of the front and back pieces and the fronts and backs of the sleeves, it would end up being a flat garment that doesn’t fit a 3D body. Therefore, you have to add additional fabric in between the front and back side seams. This is what the gussets are for.
Place the front and back pieces right sides together with the side seams and sleeves lined up. Now, instead of sewing the front and back side seams directly to one another, you have to sew the front side seam to one side of the gusset and the back side seam to the other side of the gusset. You’re going to do the same exact thing with the sleeve seams. Then, you attach the tops of the gussets to each other to close the hole in the underarm. I hope this provides a little more detail to the instructions.
Hello to the team and happy new year! Could you please suggest how to choose the right size? Is ease already included in the pattern pieces? This is the first time I sew a jacket and I am not sure which size to pick. Thank you!
Hi Pamela, The ease is already included in this pattern! Here is a guide for measuring for sewing. Once you have your measurements, please refer to the size chart above in this blog post to find what size bolero would work best for you! Happy sewing 🙂
Can this be done in a cotton fabric? I purchased a cat printed cotton. I thought about going one size up, to make up for movement. As the cotton has no stretch. It’s for my kid.
Yes, you can also make the Layton Bolero with Cotton fabric! Although it might not have stretch, the front opening allows you to easily put it on while sizing up will give more ease for movement.
Hello! I have organza fabric that I’d like to use. Will it work? If so, what fabric can I line it with? Or do I just use interfacing? Thank you!
I don’t know if organza would be the best fabric choice for this project, but if you do choose organza, I would finish your raw edges with bias tape OR french seams so that the organza doesn’t fray like crazy.
Good evening, I’m trying to download the Layton Bolero Jacket, I’ve filled out my info and have not received the actual pattern, just the instructions, can you please send me the pattern?
You can download the pattern for free by entering your name and email address into the field under “Download Your Free Sewing Pattern”. Then, check your email inbox (and your spam, just in case) for an email from Mood Sewciety Patterns with the subject line “Your Free Download from Mood Sewciety”. Scroll down to the blue link under the title of the email and click on that. It will bring you to a web browser page where you have to scroll down and find the orange button that says “click here to download your free sewing pattern”. That button will redirect you to the webpage with the PDF of the pattern, which can be printed on 8.5×11 paper on your printer at home. Let me know if you need any additional help accessing the pattern!
I did not understand what the function of the quadrilateral in the pattern is and where to place it in the pattern. Could you please explain it to me?
Are you talking about the sleeve and side gusset pieces? So basically, since the front and back pieces of the bolero are just one piece connecting the sleeves to the body, you need to have some extra fabric under the armpit and at the side seams to give the bolero a 3D shape so that it can be worn on the body. That’s what the gussets are for. Instead of sewing the front and back side seams together, you sew the front and back side seams to the side gusset. Same with the sleeve seam.
love the pattern! if I want to want the sleeves and it to be longer, do I just make a copy of the pattern and follow the length until my desired length? Will that still work. Thanks!
Yes exactly! The length of the sleeve pattern can be extended to your desired length.
I made this 2 days before Halloween for my daughter’s Pinkamina costume and those extra small pieces got on my nerve so instead I took those out and send the front and back of the bolero. It came out perfect. Too bad I can’t add a photo of it. But you can find it on my fb page Yazmin Escobedo Atelier. My daughter loved the bolero so I was happy. Thank you for sharing this awesome easy patteen. You saved my life
Hi! I’m a little confused about how to cut the darts. Would I cut the line that is closer to the chest or cut to the outer triangle?
I’m confused on how to cut the dart. Would I cut the inner or outer line?
Hey Sam! This is a great question. When placing darts, what I usually do is cut the dart out of the paper pattern, then I trace the lines I just cut onto the fabric to mark the darts. The chalk lines will be your sew lines.
This was a really hard pattern to follow, particularly because the pictures aren’t very clear. I was unconfident every step of the way because I could not tell if what I was doing looked even remotely similar to what was shown in the pictures of the tutorial, because I couldn’t really tell what I was looking at in the majority of pictures, or certain aspects of the steps I needed to visualise weren’t shown. Unfortunately for me, I’ve been struggling to find free patterns for bolero designs I actually liked and this was one of the few that fit what I was looking for with the cosplay I’m making, so I didn’t really have a choice (unless I wanted to change the entire costume, which is not-time efficient at this point).
Despite this though, the bolero turned out nicely, I was eventually able to piece together what was supposed to be sewn where by eyeballing it. Thank you for providing the pattern for free even if I struggled with the tutorial.