

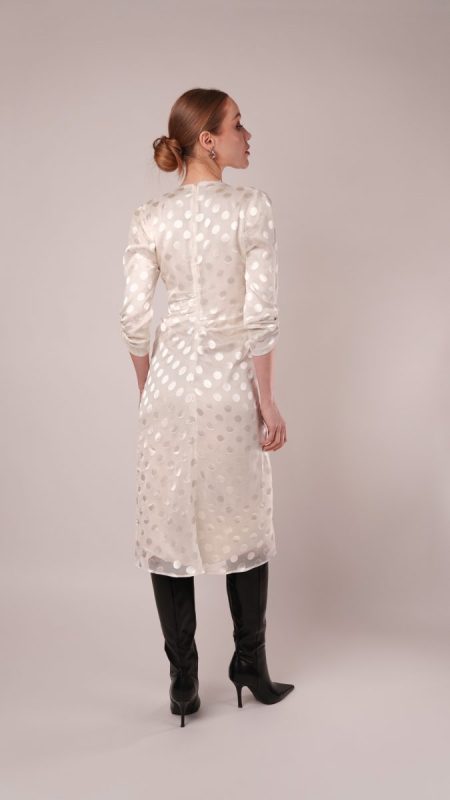
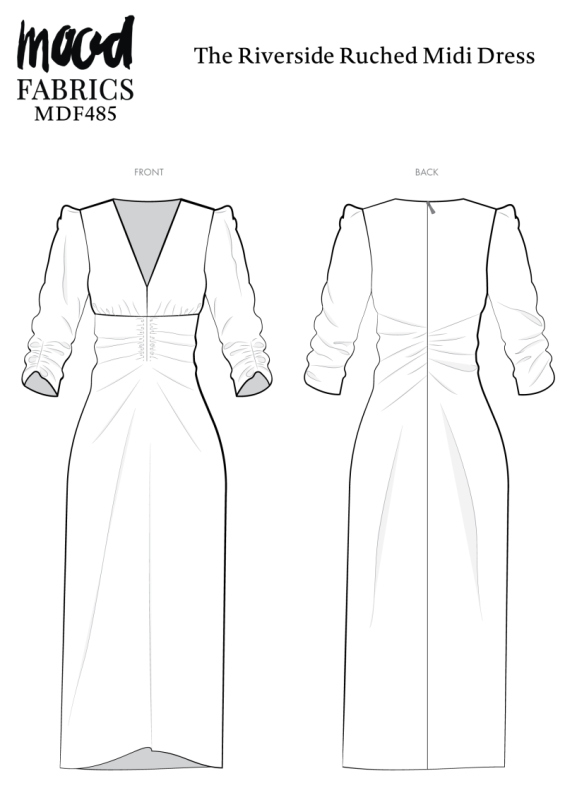
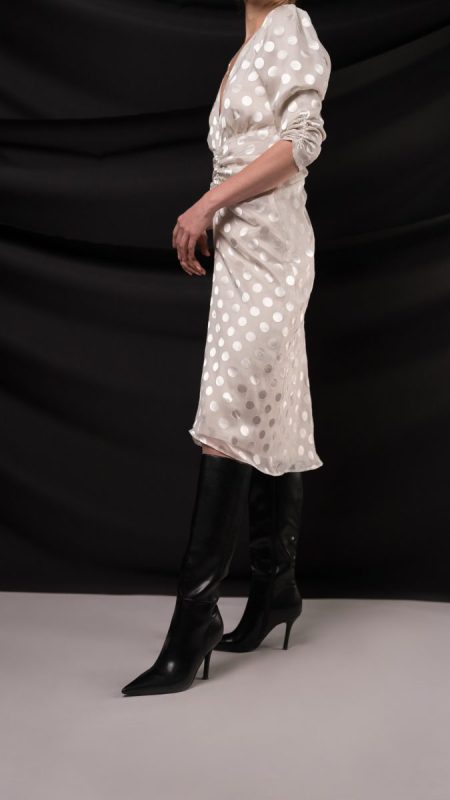
They say that fashion trend cycles repeat every twenty years, but this design reaches even farther back in time. The Riverside Ruched Midi Dress is inspired by the graceful silhouettes of the 1930s, when clothing was fluid, romantic, and thoughtfully constructed to flatter the natural form. This dress captures that unmistakable vintage mood while blending in a few modern details that make it feel fresh and wearable.
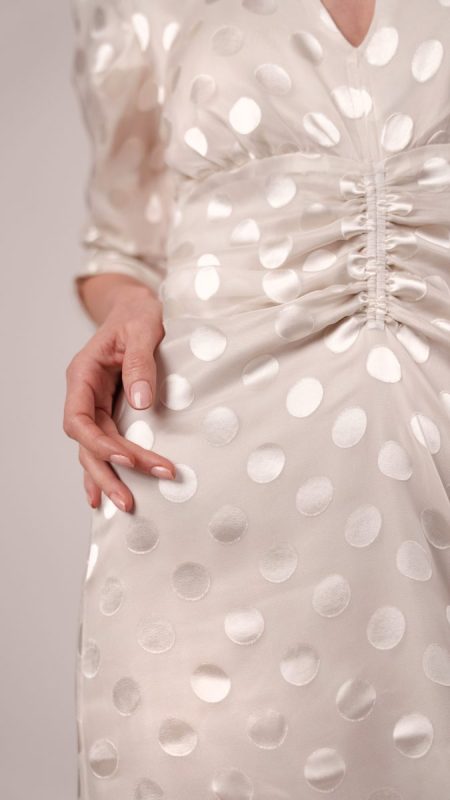
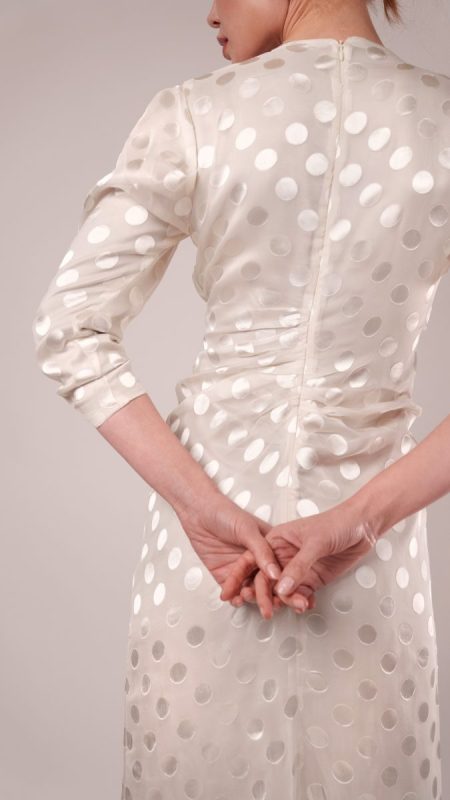
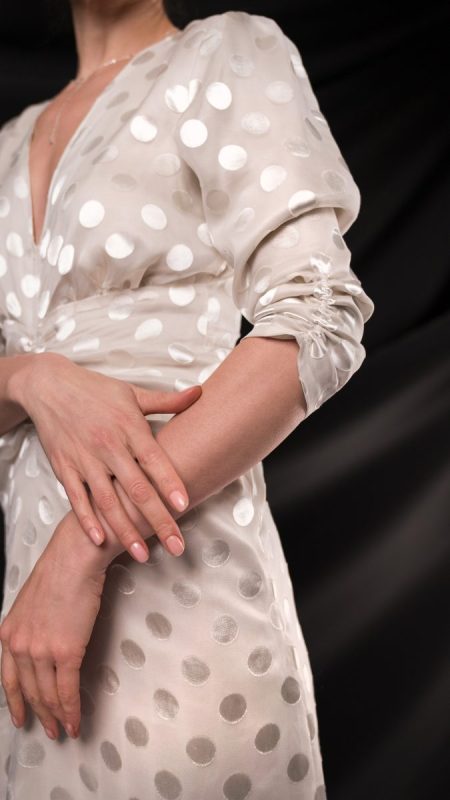
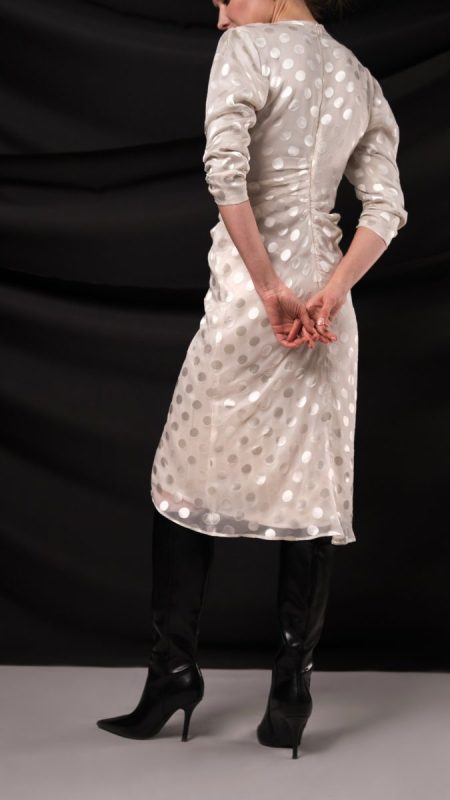
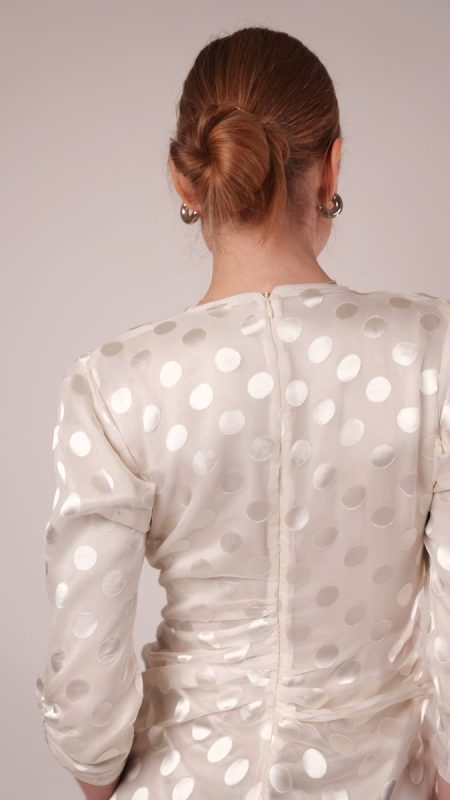
The outer layer is made from a silk and viscose polka dot georgette that glides over the body with a soft, airy movement. Beneath it is a viscose satin lining that drapes like water and adds a subtle glow beneath the georgette. This ruched midi dress is also gathered under the bust, along the sides of the sleeves, and at the lower back, creating gentle fullness where you want a little shape and sculpted drape where you prefer smooth lines. The sleeve caps are finished with delicate pleats that give them just the right amount of volume around the shoulder—allowing them to look refined, yet still slip comfortably under a winter coat.
A V-shaped neckline frames the collarbone and adds a playful touch of skin while the asymmetrical hem moves beautifully as you walk. Pair the Riverside Ruched Midi Dress with knee high boots for a look that is both modern and nostalgic, or dress it up with heels for an occasion that calls for a little extra glamour. This ruched midi dress pattern is a tribute to timeless style, waiting to be worn for your next special occasion.

Essential Materials & Sizing Guide for the Riverside Ruched Midi Dress
Continue reading for a breakdown of what knowledge and materials you need for creating your very own ruched midi dress! We’ve got you covered with the recommended materials we used—if you want to follow along exactly—as well as a curated list of alternative fabric type recommendations if you want to customize your own version. The Riverside Ruched Midi Dress free sewing pattern download includes technical drawings for seam and silhouette visibility, plus a size chart to help you find your perfect fit!
Purchase Products Used Below:
Quantities indicated are for sewing a size small ruched midi dress. Toggle the ‘SHOP THIS LOOK’ box to find quantity estimates for other sizes.
- 3 yards of Famous Australian Designer Cream Burnout Satin Polka Dots Silk and Viscose Georgette
- 3 yards of Sustainable Viscose Fluid Satin – Light Stone – Mood Exclusive Elliana Collection
- 1 yard of White Elastic – 0.25″
- 1 each of Gutermann Sew All Thread 250m – 21 Oyster
- 1 each of Invisible Zipper 24″ by YKK – 121 White Asparagus
- MDF484 – Riverside Ruched Midi Dress Sewing Pattern (Free download below!)
Additional Products Used:
Alternative Fabric Type Recommendations:
The Riverside Ruched Midi Dress sewing pattern is best suited for feather and lightweight fashion fabrics. Explore other fabric types or colors from our featured collections for your silhouette with the links below.
Download Your Free Sewing Pattern
Submit your name and email in the form below to receive the download link for the Riverside Ruched Midi Dress free sewing pattern directly in your inbox. Mood Sewciety Patterns will send your free download link via email with the subject line: ‘Your Free Download from Mood Sewciety – The Riverside Ruched Midi Dress’ (in PDF format for A4 and letter-size printing).
© MoodFabrics.com / MoodSewciety.com – Mass production, resale, or distribution of this pattern in any form is strictly prohibited.
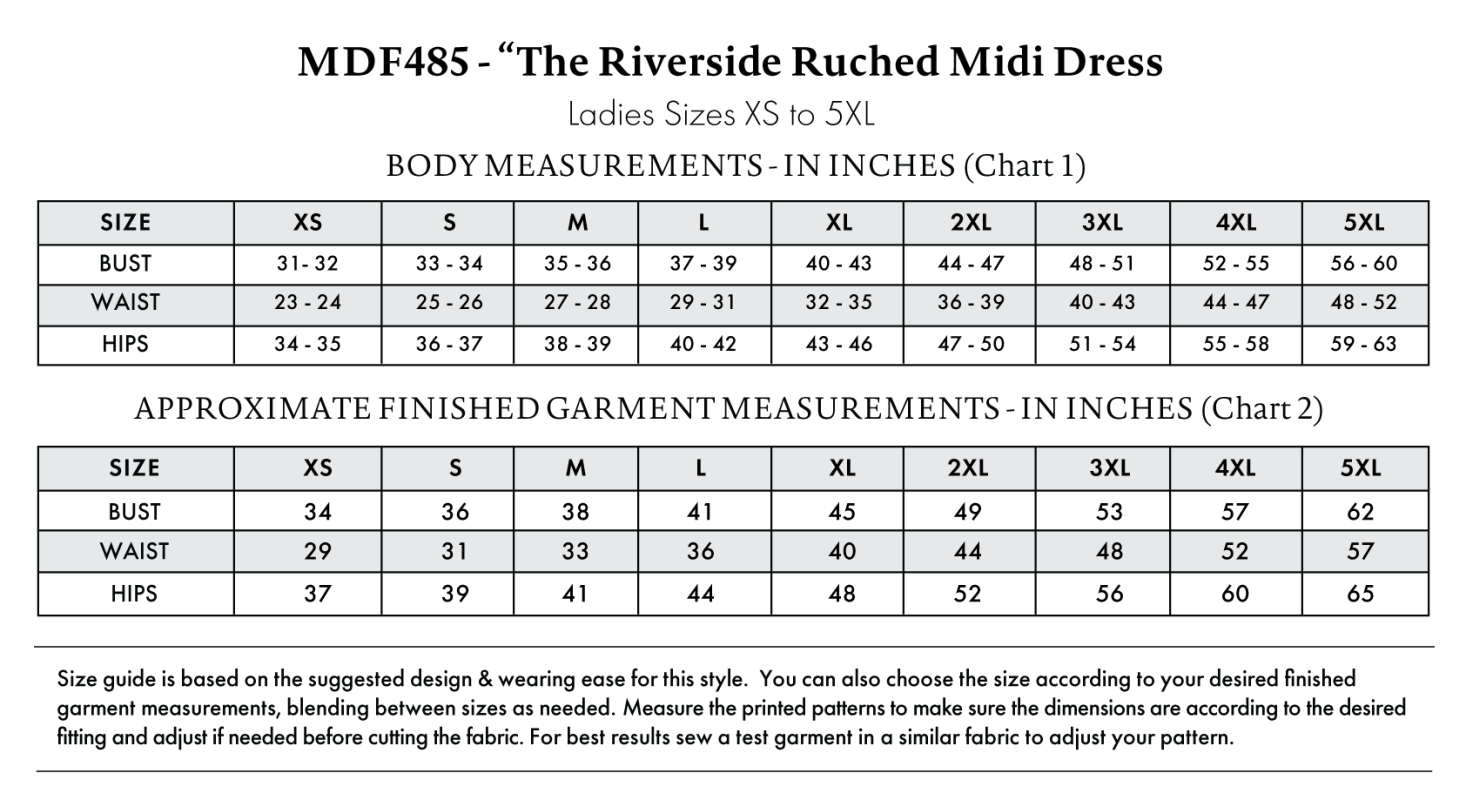
Find Your Perfect Fit
The Riverside Ruched Midi Dress Sizing Guide is based on the suggested design & wearing ease for this style. You can also choose the size according to your desired finished garment measurements, blending between sizes as needed. Measure the printed patterns to make sure the dimensions are according to the desired fitting and adjust if needed before cutting the fabric. For best results, sew a test garment in a similar fabric to adjust your pattern.
Note: Always read all the instructions before cutting the fabric!
How to Sew The Riverside Ruched Midi Dress
The instructions provided below are designed to guide you through sewing the Riverside Ruched Midi Dress from start to finish.


2 Tips for Sewing Viscose Satin and Silk Georgette
⇒ This dress is lined with viscose satin because the polka dot georgette is totally sheer, but you don’t have to line the dress if your main fabric is opaque enough. If you choose not to line the dress, you can just hem the neckline and sleeve openings with a small rolled hem.
⇒ Use a sharp new sewing machine needle for these thin fabrics. They’re prone to thread pulls.
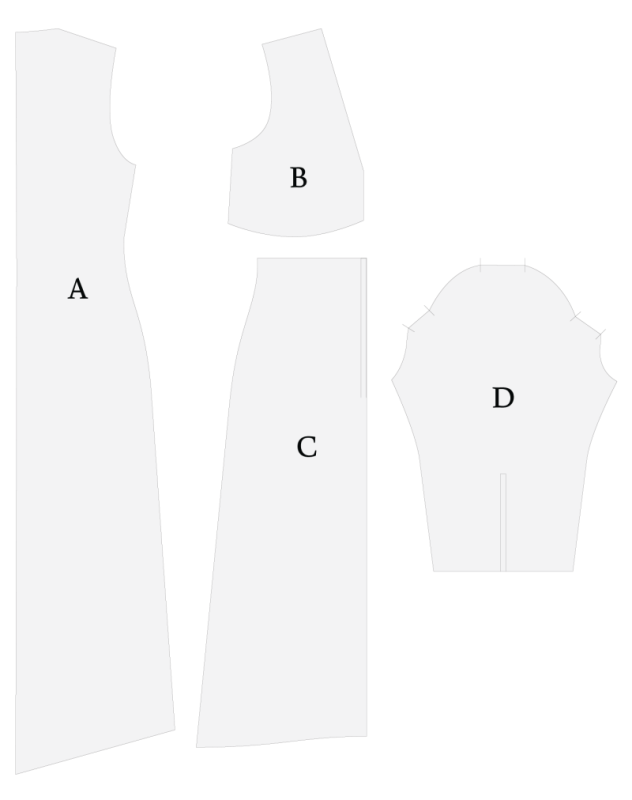
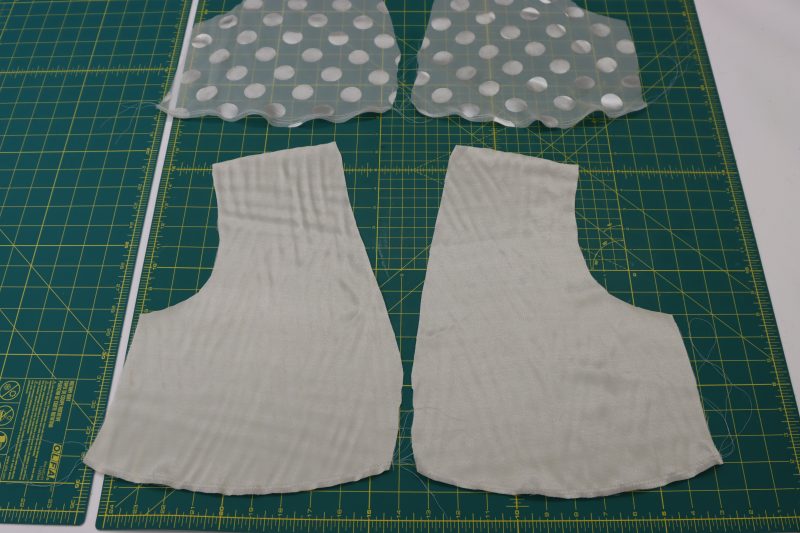
Pattern Pieces & Fabric Cuts Needed
- (A) BACK
- FABRIC – CUT 2 MIRRORED
- LINING – CUT 2 MIRRORED
- (B) FRONT UPPER
- FABRIC – CUT 2 MIRRORED
- LINING – CUT 2 MIRRORED
- (C) FRONT LOWER
- FABRIC – CUT 1 ON FOLD
- LINING – CUT 1 ON FOLD
- (D) SLEEVES
- FABRIC – CUT 2 MIRRORED
- LINING CUT 2 MIRRORED
Sew with a 1/2″ seam allowance for all seams unless otherwise specified.
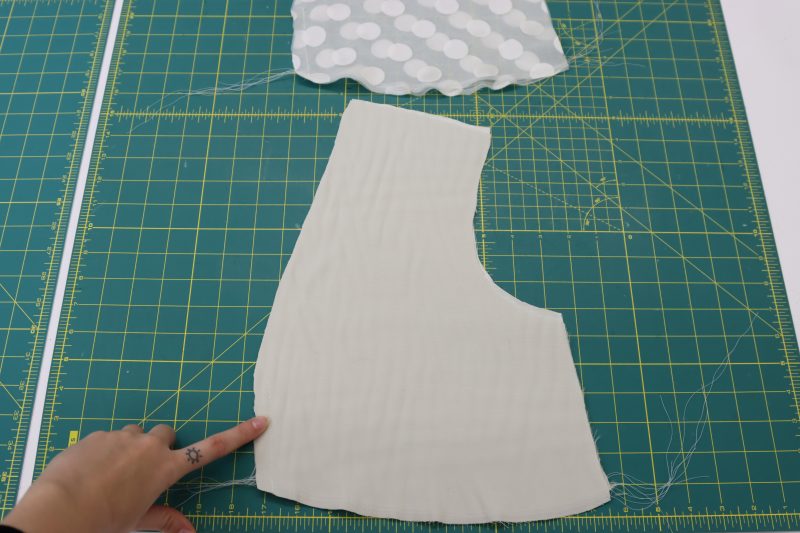
Step 1
BUST
- Sew two parallel straight stitches with a stitch length of 3.5 millimeters on the bottom of each of the front upper pieces to gather in the next step.
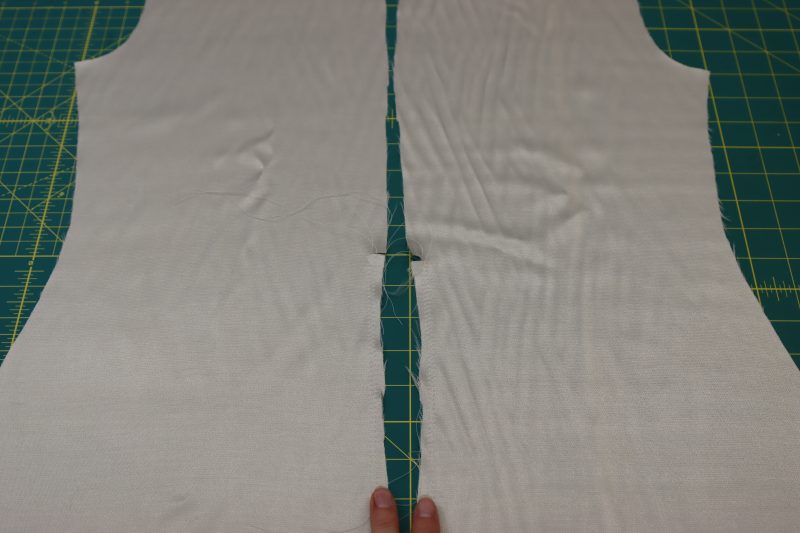
- Place the front upper pieces right sides together and sew them together at the front center seam.
- Open the front upper pieces and iron the center seam flat.
- Gather each of the front upper pieces with the bulk of the gathers towards the center of each piece.
- Pin the front upper pieces right sides together with the top of the front lower skirt.
- Sew the front upper pieces to the front lower skirt, making sure the gathers stay in place.
- Repeat all these steps for the main fabric and the lining.
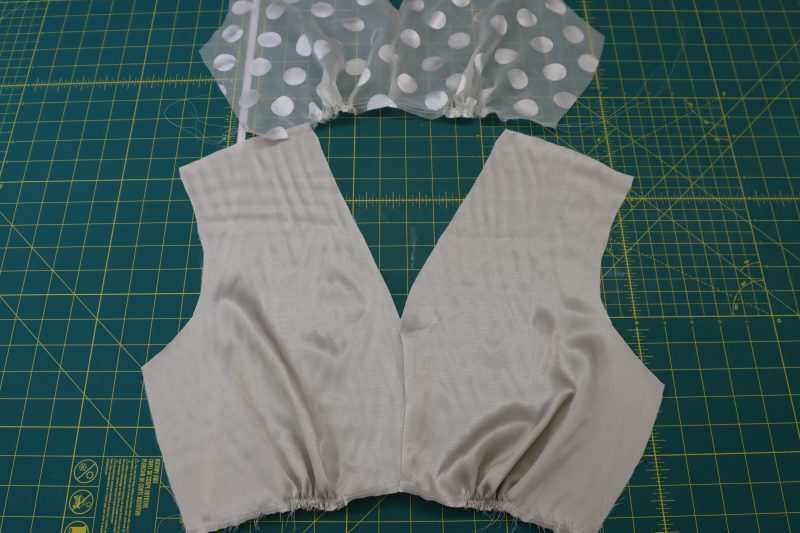
Step 2
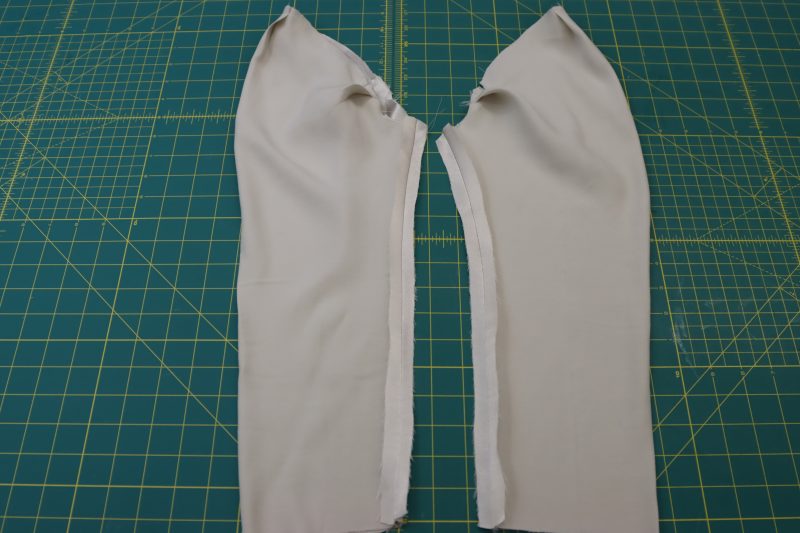
BACK GATHERS
- Using the same technique as the first step, sew two parallel straight stitches on each back piece between the notches on the lower back.
- Repeat all these steps for the main fabric and the lining.
Step 3
SIDE SEAMS
- Place the back dress pieces on top of the front dress piece, right sides together with the side seams and shoulder seams lined up.
- Pin and sew the side seams of the front and back dress pieces together.
- Repeat all these steps for the main fabric and the lining.

Step 4
SHOULDER SEAMS
- Pin and sew the shoulder seams together.
- Repeat for both the main fabric and the lining.

Step 5
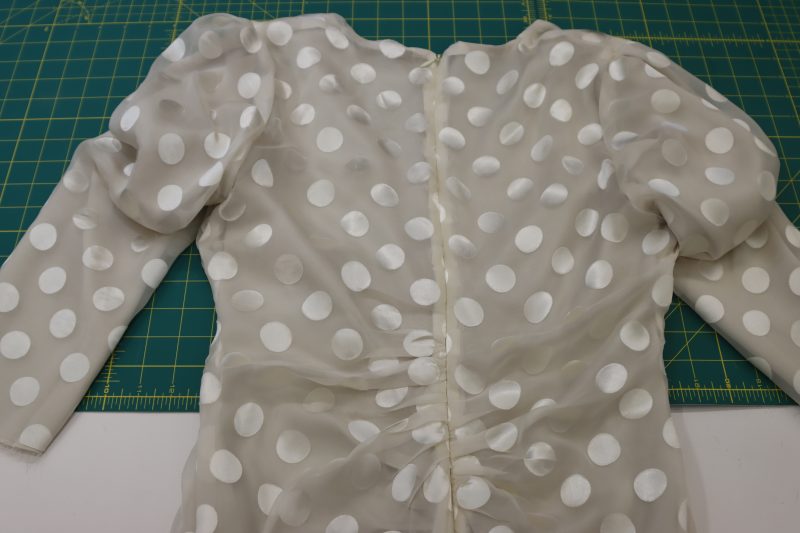
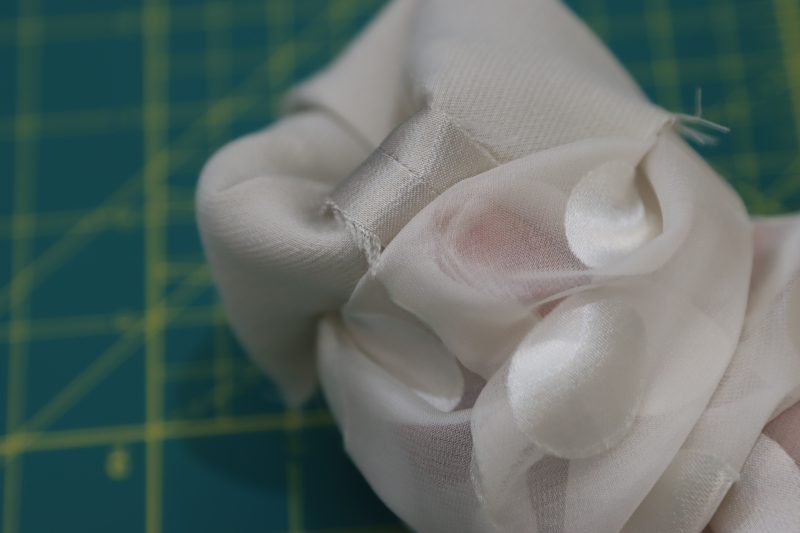
SLEEVE PLEATS
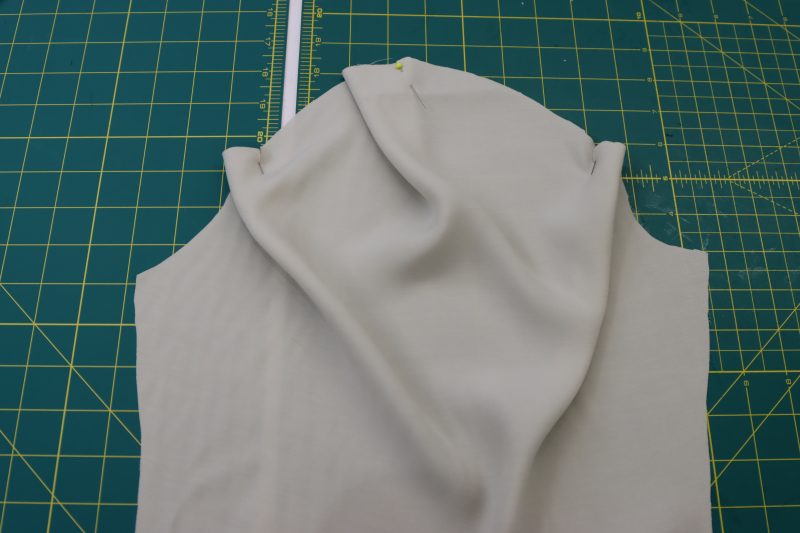
- Fold the sleeve caps right sides together of the sleeves so that each pair of notches is touching each other.
- Place a pin at each fold to hold the notches together.
- Sew a ½ inch seam at each pleat to hold them together.
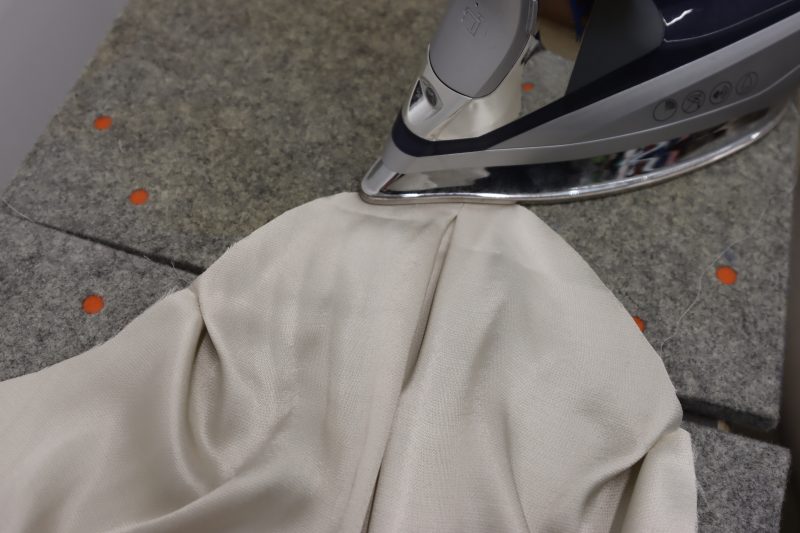
- Iron just the outer ½ inch of the sleeve cap to keep the pleats in place. The center pleat should be an inverted box pleat and the other two pleats should have the bulk of the fabric on the wrong side of the sleeve facing the ends of the sleeve cap.
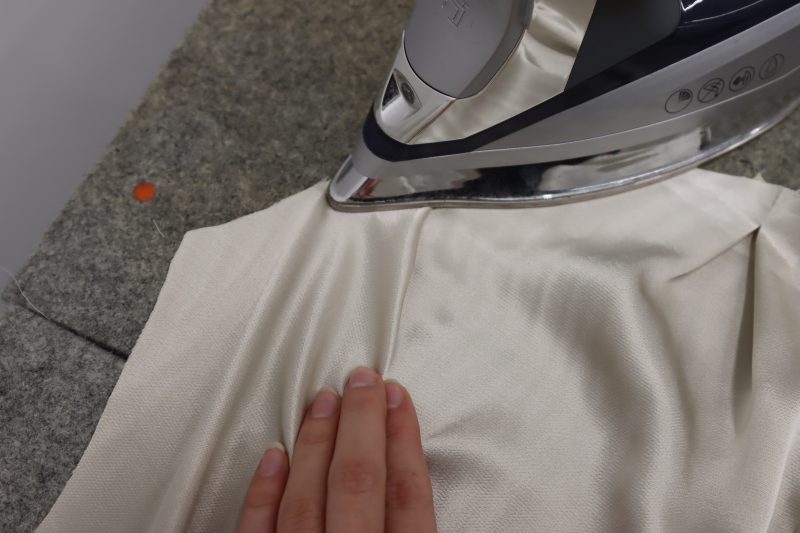
- Sew a stay stitch with ¼ inch seam allowance around the sleeve cap to hold the pleats in place.
- Repeat for all 4 sleeve pieces (2 main fabric and 2 lining).
Step 6
ATTACH SLEEVES
- Fold the sleeves right sides together and sew the side seams shut.
- Flip the sleeve right sides out.
- Place the main fabric sleeves into the armscyes of the main fabric dress and do the same with the lining sleeves.
- Pin and sew the sleeves to the armscyes.
Step 7
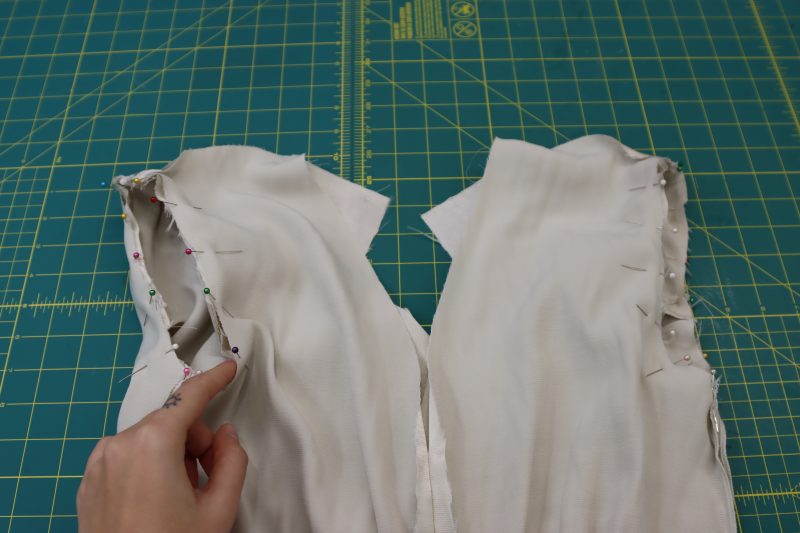
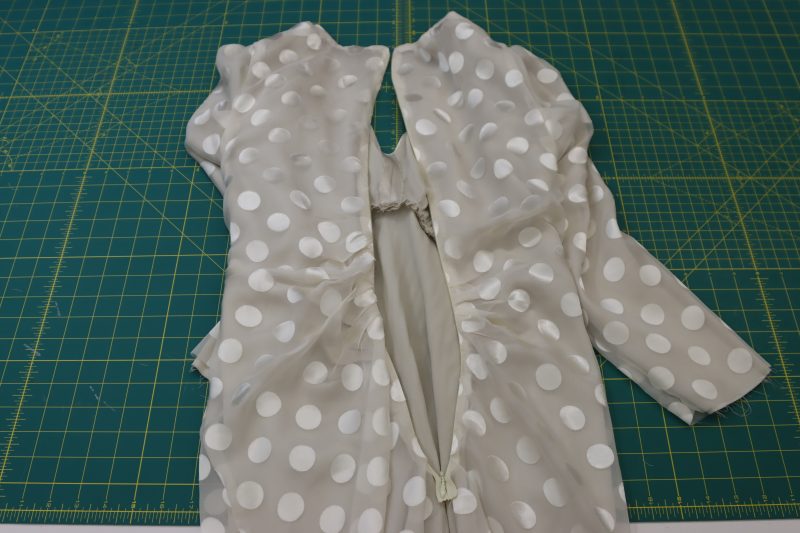
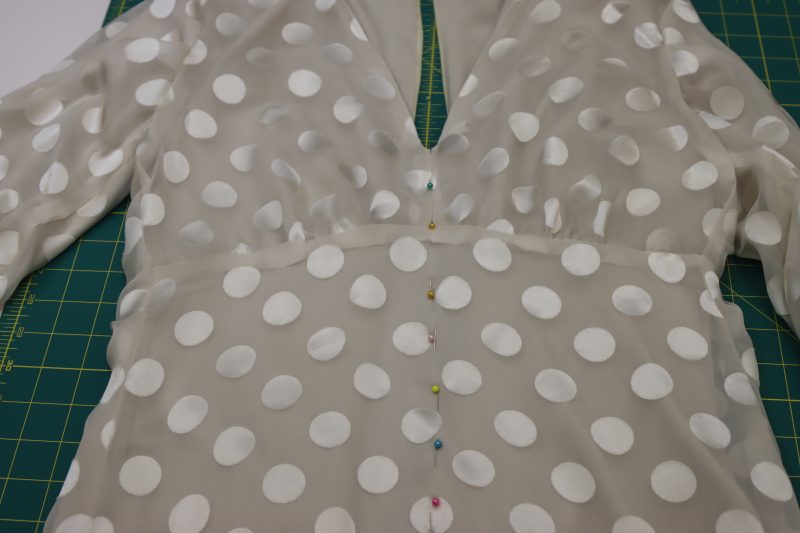
NECKLINE
- Place the RIGHT SIDE of the main fabric (outside fabric with the polkadots) against the WRONG SIDE of the lining fabric (the silky viscose). The reason we’re doing this is so that the pretty shiny side of the viscose lining is facing the outside of the dress instead of touching the skin because we want the viscose to show through.
- Pin around the entire neckline from the center back to the center front on both sides.
- Sew around the entire neckline, making a point at the front center.
- Clip the seam allowance at the front center V shape to make it lay.
- Flip the dress right sides out.
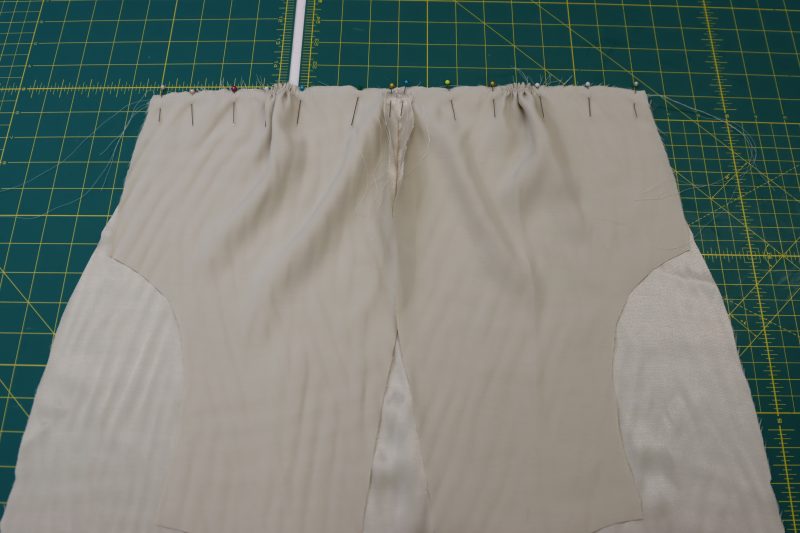
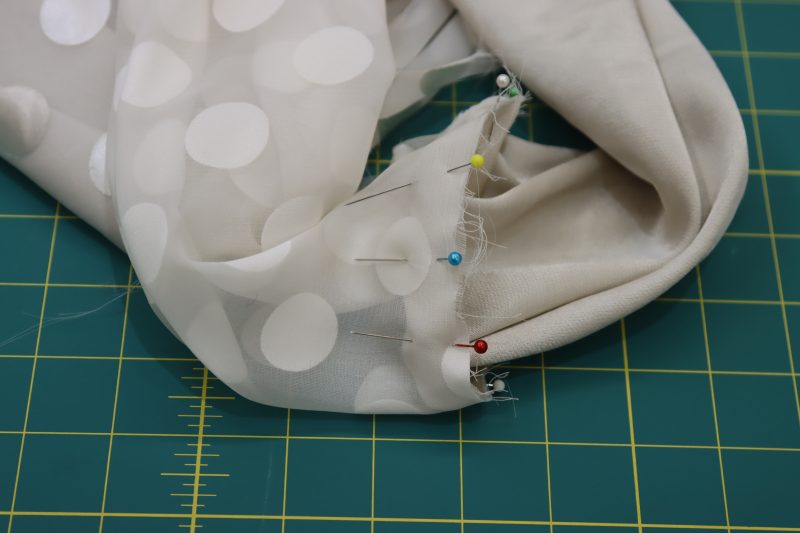
Step 8
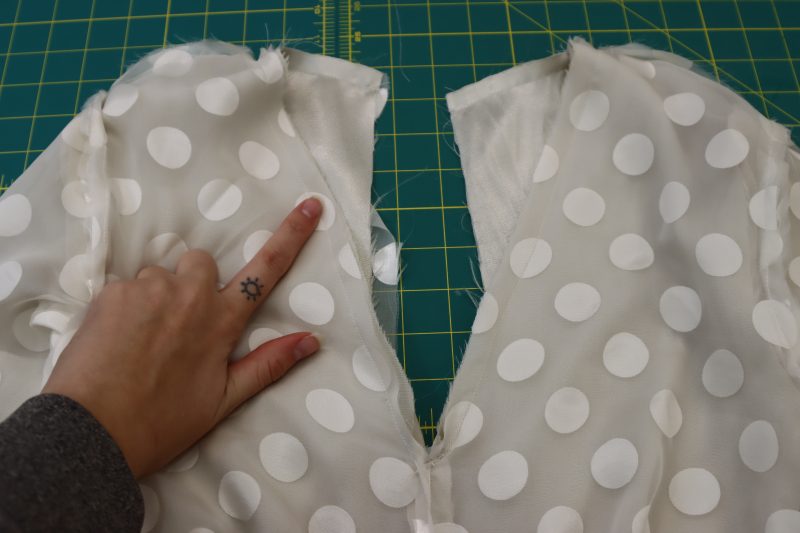
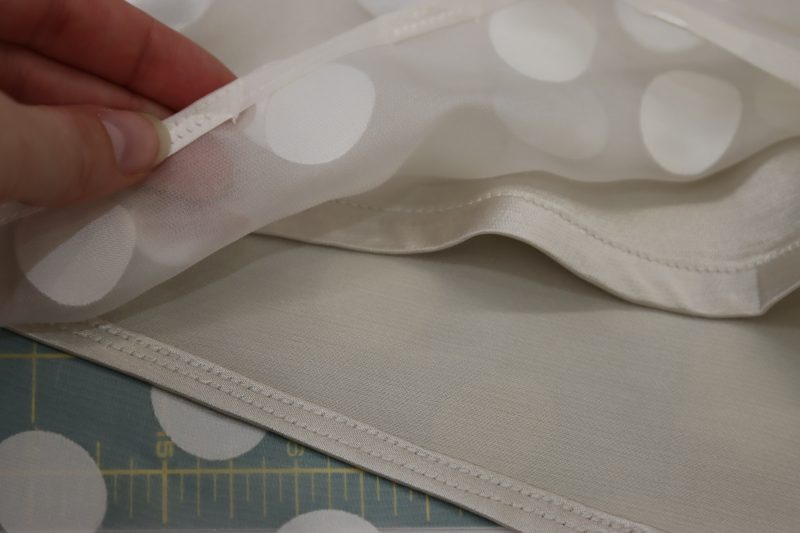
ZIPPER
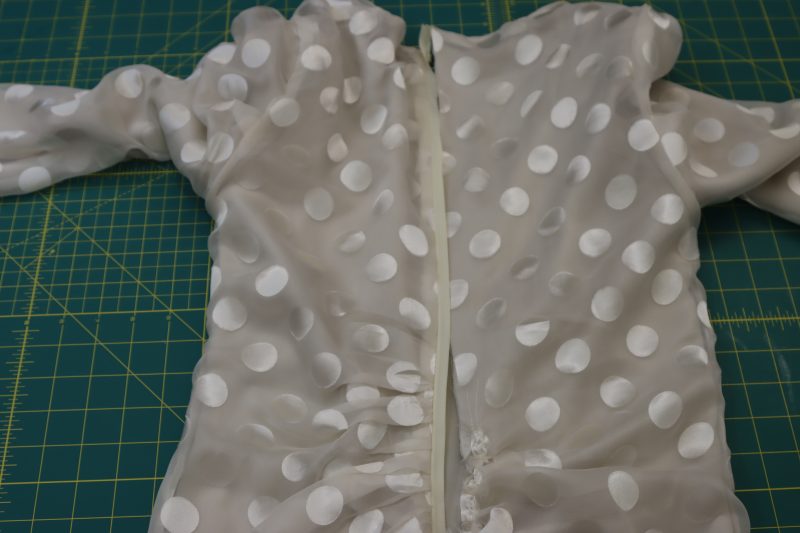
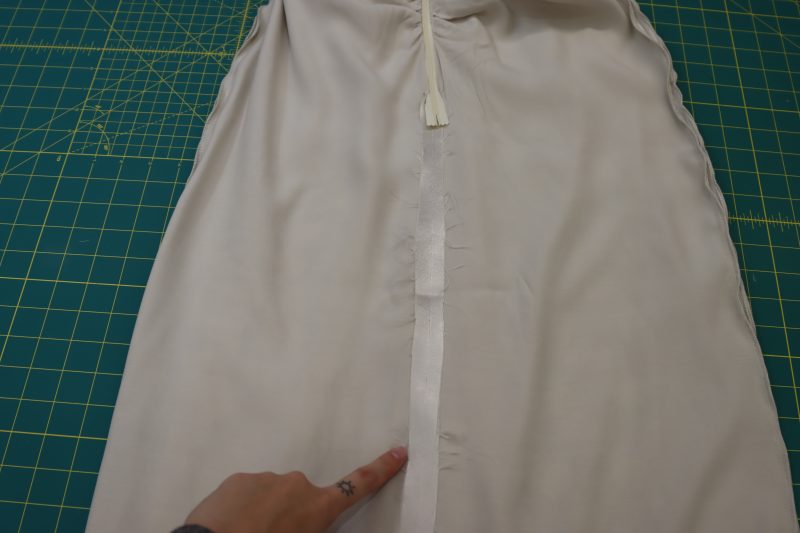
- Gather the fabric at the lower back where the gathering stitches were sewn in step 2.
- Place the invisible zipper face down on the outer polkadot fabric on one side of the center back opening.
- Pin the side of the zipper tape closest to the raw edge of the center back opening and sew it down with an invisible zipper foot attachment on your sewing machine. Be sure ONLY to sew the zipper to the polkadot layer, not the lining.
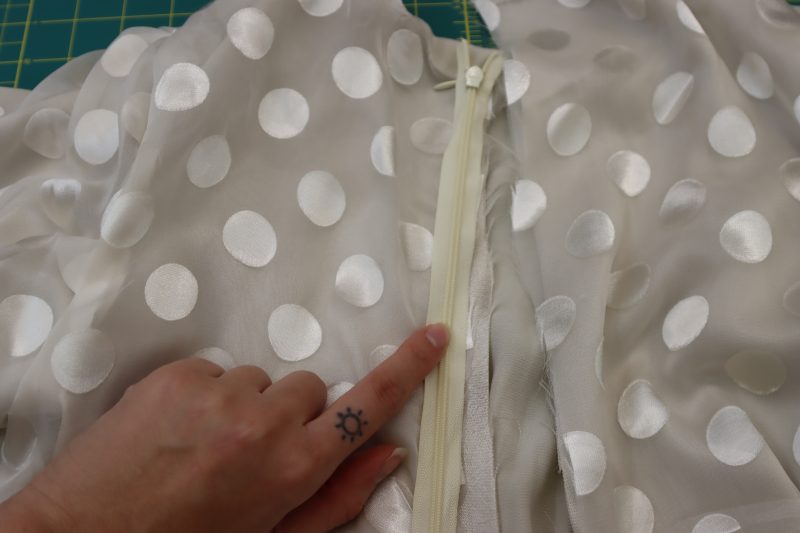
- Flip the dress inside out.
- Pin and sew the opposite side of the zipper to the polkadot layer on the opposite side of the center back opening, right sides together.
- Tuck the extra zipper tape at the top of the zipper in between the lining fabric and the main fabric on both sides of the zipper.
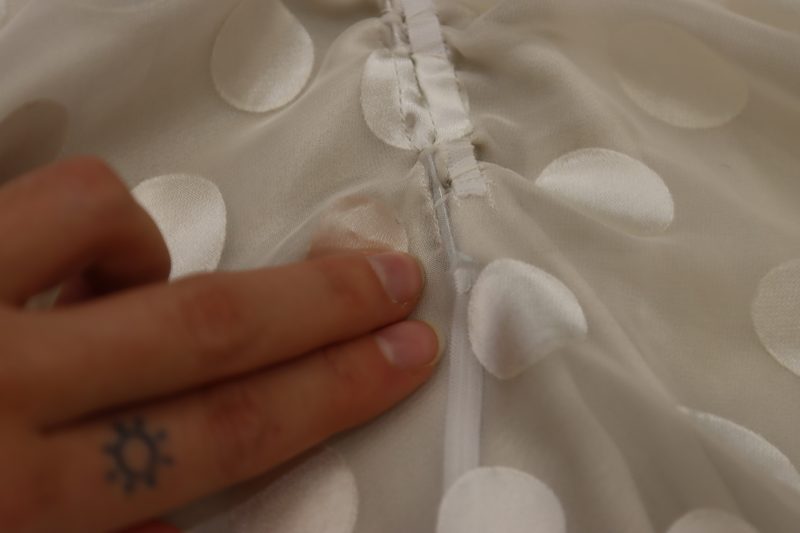
- Flip the dress so that the wrong side of the main fabric and the right side of the lining fabric are both facing out.
- Pin and sew the lining to the zipper tape on its side to tuck the raw edges of the lining at the center back seam into each side of the zipper tape.
- Flip the dress fully right sides out.
- Iron the center back ruching gently so that it lays closer to the skin.

Step 9
CENTER BACK SEAM
- Pin and sew the lining right sides together under the zipper at the center back seam.
- Pin and sew the main fabric right sides together under the zipper at the center back seam.

Step 10
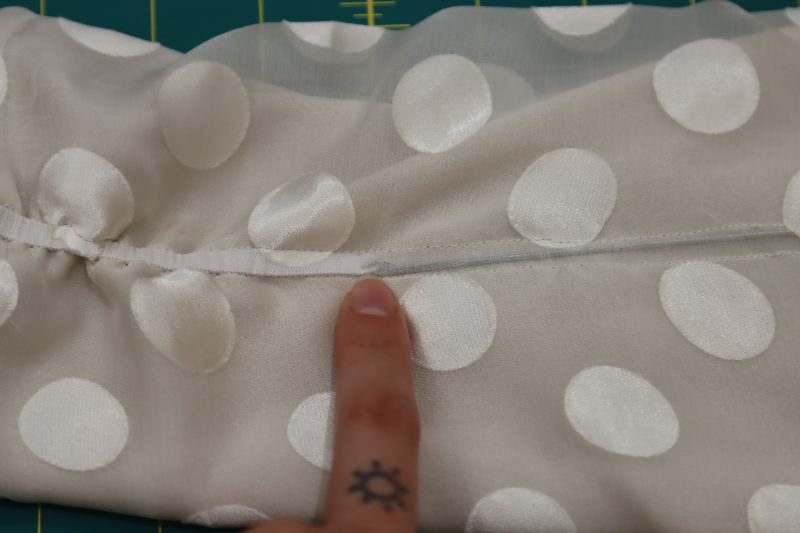
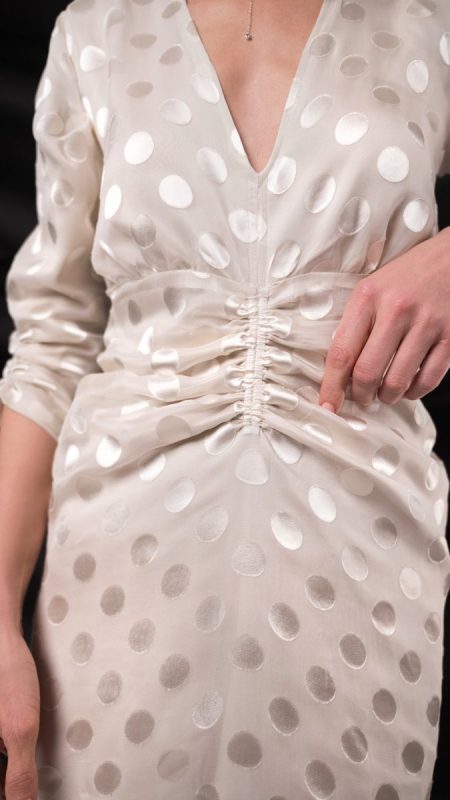
FRONT RUCHING
- Lay the dress perfectly flat with the side and shoulder seams of the main fabric and lining perfectly lined up with each other.
- Place a line of pins directly at the center front of the dress under the neckline.
- Sew three parallel lines front the bottom of the V neckline that are as long as the casing pattern piece, leaving a ½ inch gap centered over the seam that connects the front top to the front skirt. We’re leaving this small gap here because we’re going to insert elastic into these channels, but only in the skirt part under the front top, but we still want the front top to have the same parallel lines..
- Cut two pieces of elastic that are ½ the length of the casing pattern piece.
- Poke the tube turner into the bottom of one of the channels between the main fabric and the lining until it reaches the opening at the top front.
- Stick the end of the elastic at the top of the opening and hook onto it with the tube turner.
- Pull the elastic through the channel until the unhooked end reaches the top of the channel, then sew the end of the elastic down at the top of the channel.
- Sew the other end of the elastic down at the bottom of the channel and remove the tube turner.
- Repeat the exact same steps for the other channel directly next to the one you just put elastic in.
Note: If you’re only using one layer of fabric for this dress, you need to cut out the casing pattern pieces and sew them to the center front of the front skirt piece and sew three parallel lines to make the channels.

Step 11
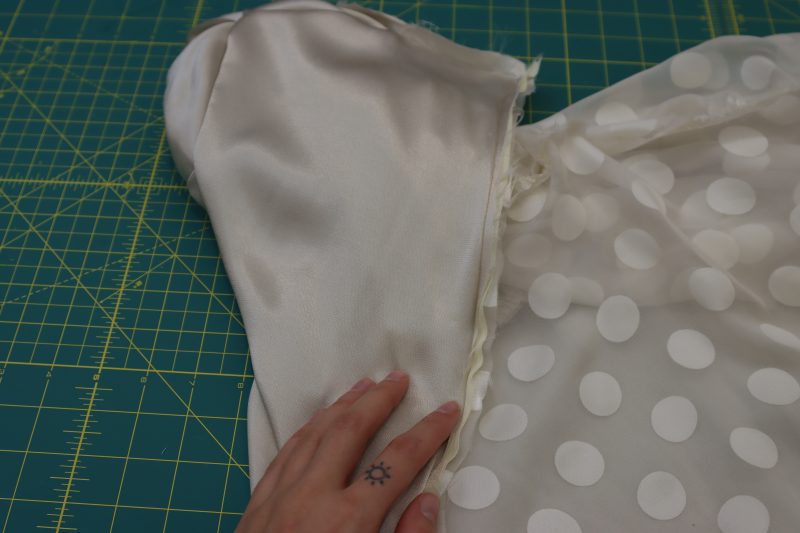
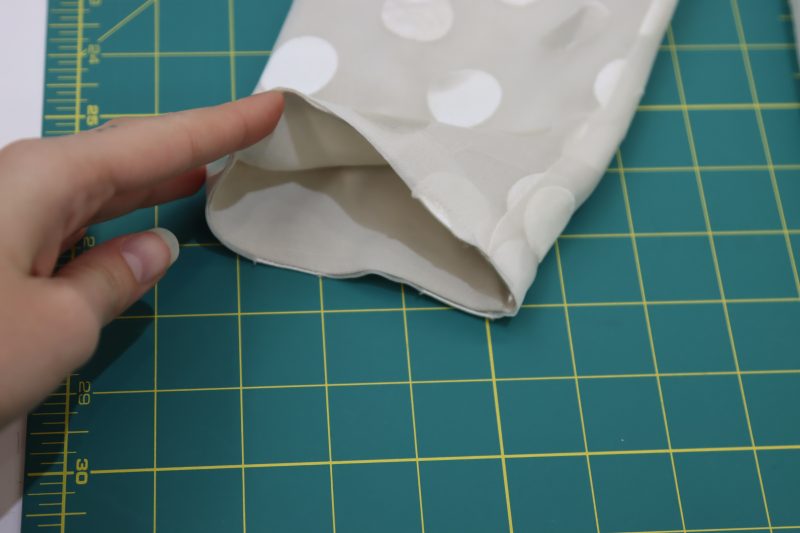
SLEEVE HEM
- Reach up the bottom of the dress between the main fabric and the lining through the sleeves.
- Pinch the raw edges of the sleeves between your fingers so that the right side of the polka dot fabric is touching the wrong side of the lining fabric.
- Pull both layers through the bottom hem of the dress and place a pin where the fabric was pinched.
- Place pins around the entire sleeve opening to keep the raw hems right sides together.
- Sew around the sleeve opening.
- Flip the sleeve back out through the arm hole and iron the opening flat so that the lining doesn’t peak out of the bottom of the sleeve.
Step 12
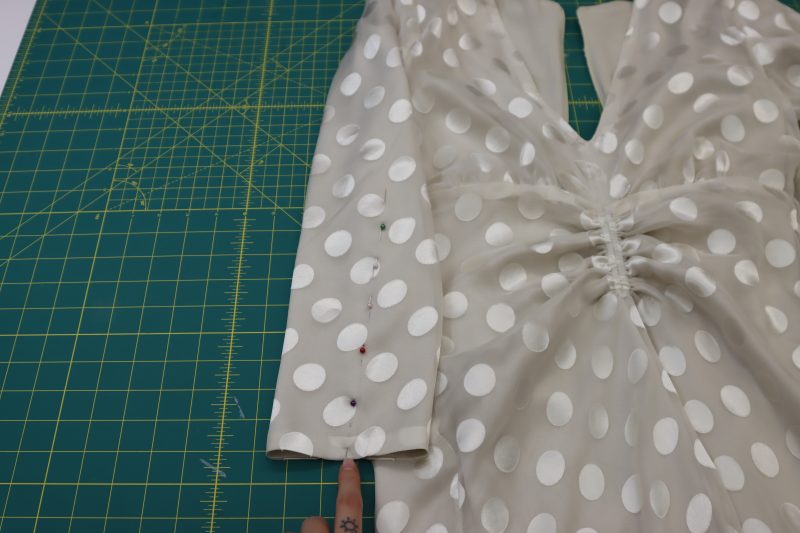
SLEEVE RUCHING
- Using the same technique as in step 10, we’re going to insert elastic into the outsides of the sleeves. Except this time, we’re only making one channel for the elastic instead of two parallel ones.
- After pinning a line down the side of the sleeve that is the length of the sleeve casing pattern piece, sew two parallel straight stitches that stop ½ inch before the end of the sleeve opening.
- Cut your elastic pieces to be ½ the length of the casing pattern piece.
- Feed the tube turner through the bottom hem of the dress between the lining and main fabric and poke it into the channel you just sewed into the sleeve.
- Place the elastic in between the main fabric and lining at the sleeve opening and hook onto it with the tube turner.
- Pull the elastic through the channel and secure it on both ends, as done in step 10.
- Repeat for both sleeves.
Note: If you’re only using one layer of fabric for this dress, you need to cut out the casing pattern piece and sew them to the sides of the sleeves and sew two parallel straight stitches to create the channel.

Step 13
DRESS HEMS
- Iron a fold into the hem of the main fabric so make the dress as short or long as you’d like.
- Sew along that hem with ⅛ inch seam allowance.
- Carefully cut the raw edge of the hem off of the fabric above where you just sewed.
- Fold the hemmed edge again and sew with another ⅛ inch seam allowance. This is one way to get a super clean baby hem.
- Repeat the same steps with the lining fabric, except you will use a ¼ inch seam allowance so that the lining skirt is slightly shorter than the main fabric skirt and it doesn’t stick out the bottom.


Sewing Success: The Finished Riverside Ruched Midi Dress
Share this post with a friend (or two!), download the Riverside Ruched Midi Dress free sewing pattern, and show us which fabrics and colors you choose, using the hashtags #MoodRiversidePattern & #MadeWithMood—and don’t forget to tag us @MoodFabrics, too.


Free Sewing Pattern Inspiration for Your Next Project
With 480+ free sewing patterns and counting, your opportunities for sewing with Mood are endless!
We hope you had as much fun sewing this ruched midi dress pattern as we did! As always, we want to hear from you—share your thoughts and comments below and let us know where you’ll be wearing the Riverside Ruched Midi Dress free sewing pattern!
This is adorable. I am thinking of making it one layer versus the two but I think the front should have been longer so the hem is even all the way around when you shire it.
Would it be possible to move the zipper to the side?
You could, but if you do, I recommend using the same ruching technique on the side seams as you do with the back so that the fabric stays ruched around the zipper.
The download never came. I only received a 15% discount to shop.
Hey Kimberlee, you can download the pattern for free by entering your name and email address into the field under “Download Your Free Sewing Pattern”. Then, check your email inbox (and your spam, just in case) for an email from Mood Sewciety Patterns with the subject line “Your Free Download from Mood Sewciety”. Scroll down to the blue link under the title of the email and click on that. It will bring you to a web browser page where you have to scroll down and find the orange button that says “click here to download your free sewing pattern”. That button will redirect you to the webpage with the PDF of the pattern, which can be printed on 8.5×11 paper on your printer at home. Let me know if you need any additional help accessing the pattern!
I would think an organza sleeve head would give this a lovely 30’s shoulder vibe. Is there a reason you chose not to use one?
That would be so pretty! You should definitely do that if you print this pattern out for yourself!
This is so cute! Love the fabric choice too. I would love to see this on a curvier model to see how it would fit differently and how the ruching would lay.
Hey Kendra, we sincerely appreciate feedback like this. We have initiative planned for the future to further meet the needs of our customers, just like this one. Thank you for your words!
Lovely dress! Would someone check the yardages for the various sizes in the order box for me. For instance, the small size on the page has 3 yards of each fabric, but the order box states 5 yds viscose satin and 3 yards for the dotted cream fabric. Thank-you so much, I love this dress.
Hi Zuzanna, I think this has been fixed. I just checked and it said 3 yards of each for sizes small and medium and 4 yards each for sizes large and extra large.
Thank-you so much! You are always so quick to answer questions.
Should the gathering at center back end at the bottom of the zipper? Thank you for the pattern.
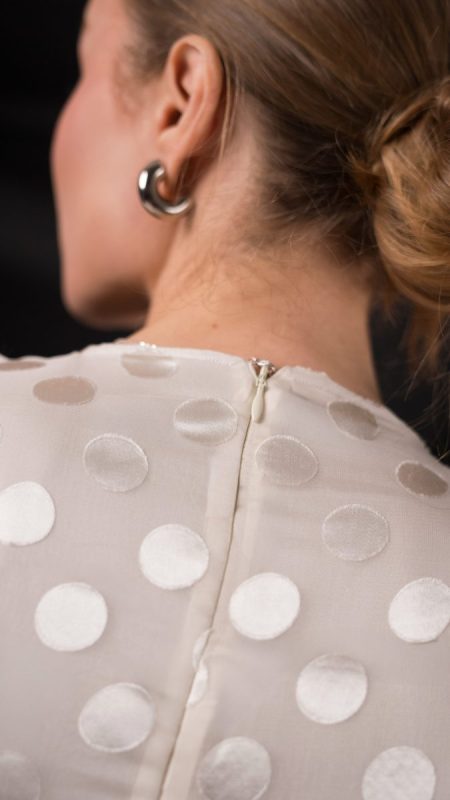
Hi Sharon, when i made it, the gathering landed around the lower back and the zipper went down another 6 inches or so past the ruffle. You can kind of see it in the pictures for step 8.