

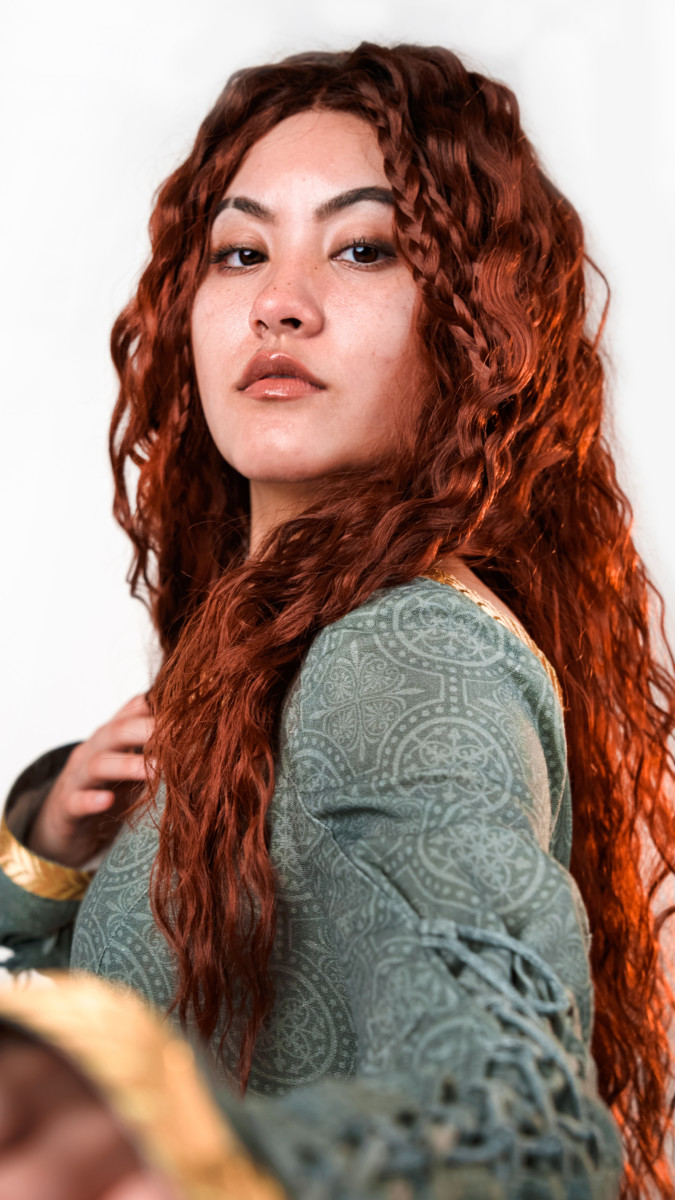
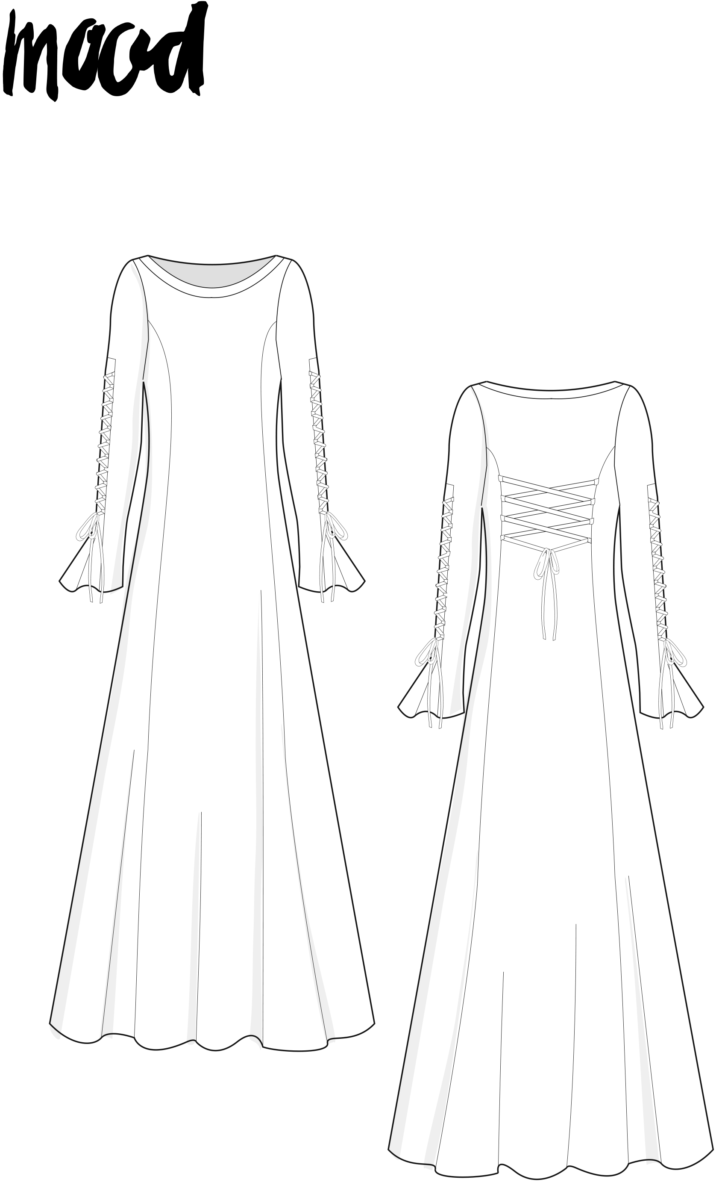
Between House of the Dragon and The Rings of Power, I spend my weekends indulging in my fantasy fix, and more importantly, my fantasy costume fix! Who else gasped when Alicent Hightower did a power-walk in her green dress, or when we saw Galadriel mix chainmail and silks with ease? If, like me, you’re itching to recreate some of these looks for your Halloween costume, then you’ve got to stitch up our latest free sewing pattern, The Luthien Dress! With a classic princess-seamed silhouette, wide boat neck, and lace-up detailing, it is perfect for designing your own looks or recreating some you see on-screen. Join us and let’s journey through the realm of high fantasy together.

Purchase Materials Used Below:
- 7.5-8 yards of Mood Exclusive Gray Gawain’s Glory Linen and Rayon Woven
- 2 yards of Metallic Gold Jacquard Ribbon – 1″
- 1 spool of 116 Smoke 500m Gutermann Sew All Thread
- MDF330 – The Luthien Cosplay Dress Free Sewing Pattern (free download below)
The seam allowance is ½” unless otherwise stated, and the hem allowance is 1”.
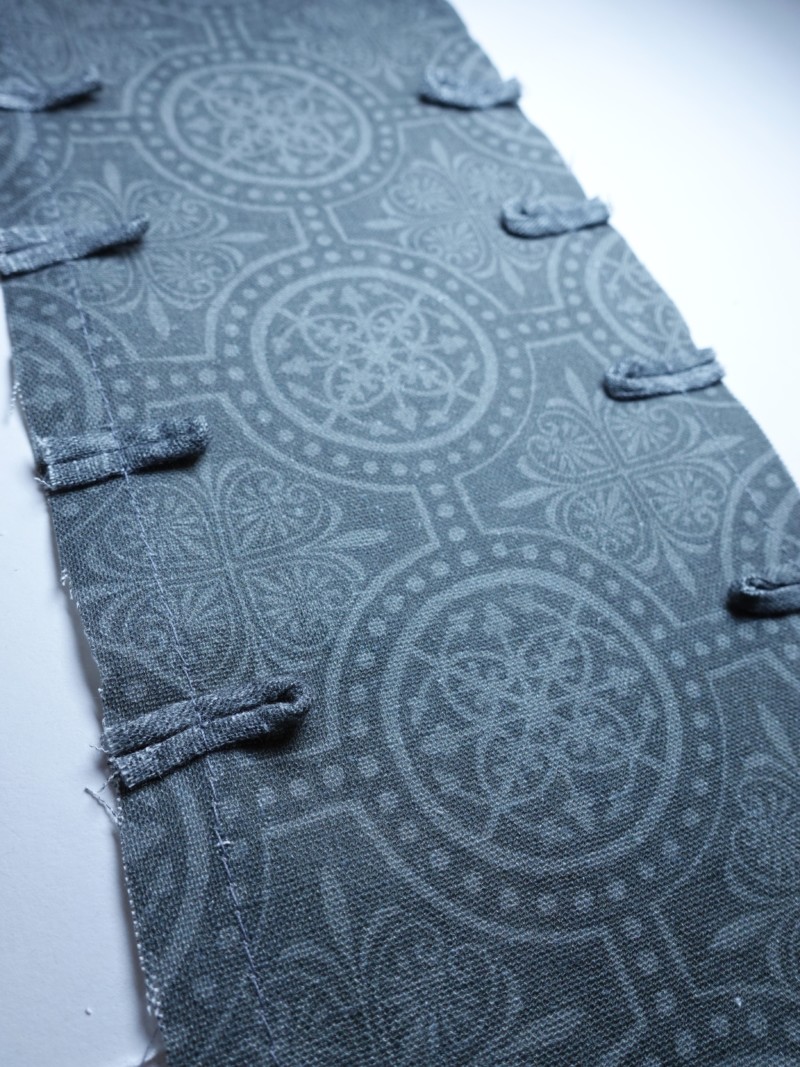
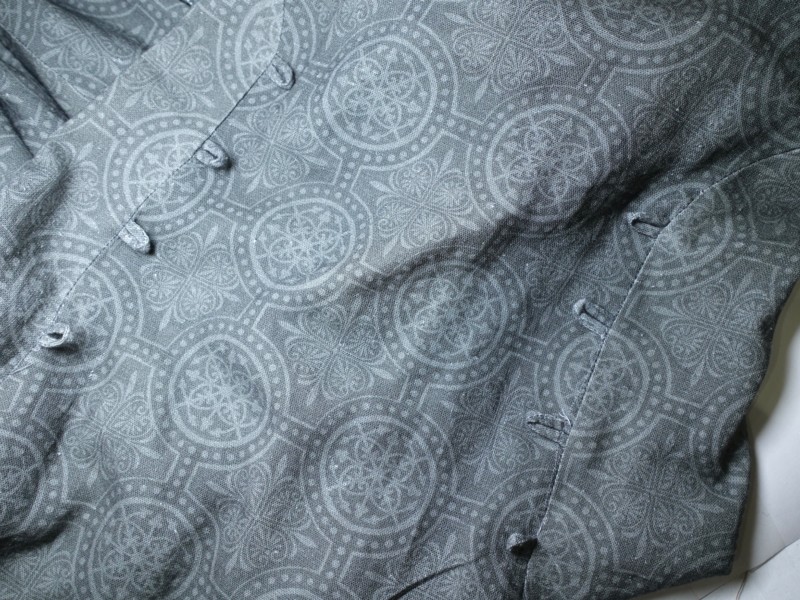
To make the sleeve & waist loops and drawstring, you’ll need to make spaghetti strap cord. A lot of it!
How much cord you will need:
Loops:
For each loop I used 2 ¼” of cord.
I put 16 loops on each sleeve, which equals 36” of cord needed for each sleeve.
18” of cord are needed for the 8 waist loops.
Note: The amount of loops per sleeve and at the waist is up to you.
Drawstring:
For each sleeve I used 80” of cord.
For the back of the dress I used 100” of cord.
Note: Although I made my own cord, I would highly recommend using a premade cord for the drawstrings.
How to sew the sleeves:
Step 1
Pin each loop onto the center sleeve’s loop notches. Try to make this as uniform as possible by lining up the edges as pictured. Sew a basting stitch to secure the loops.
Step 2
Pin and sew the back sleeve to the center sleeve, right sides together, aligning notches.
Step 3
Repeat with the front sleeve, then press open the seams.
Step 4
Sew the back and front sleeves right sides together. Press.

Step 5
Hem the cuff 1”. If you’re adding trim, do so now.
Step 6
Repeat on the other sleeve.
How to sew the dress:
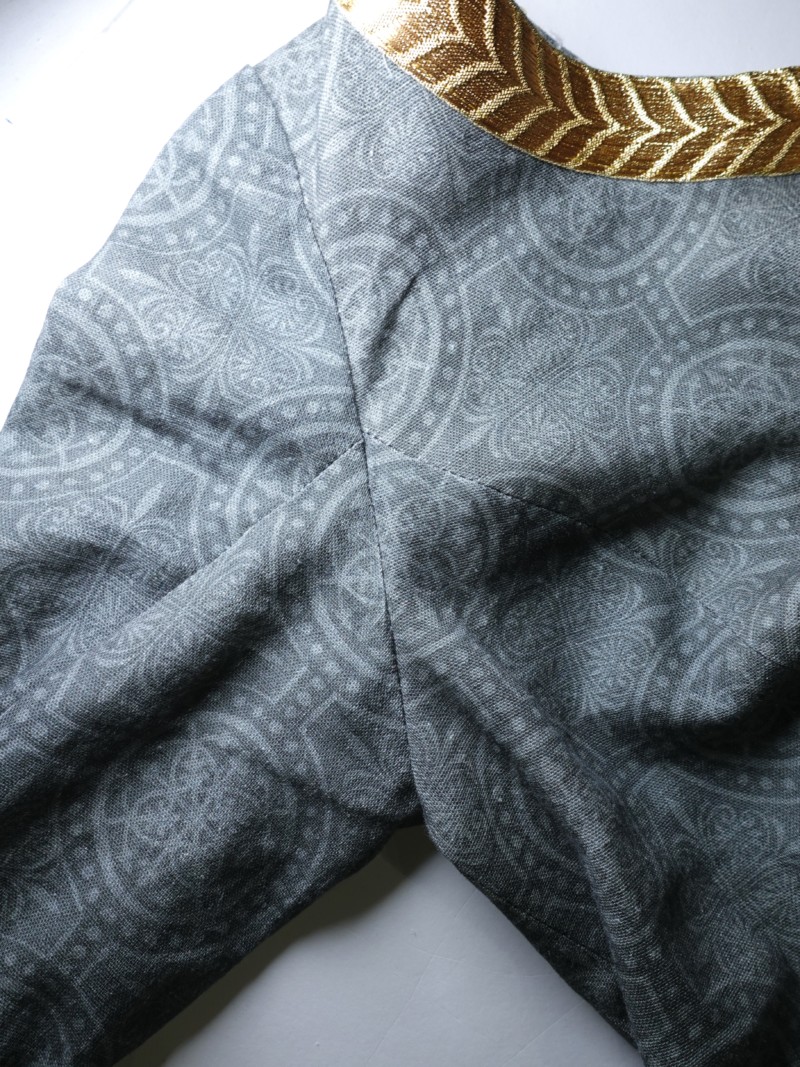
Step 1
Right sides together, sew the side front pieces to the front, matching notches.
Step 2
Sew a side back to a side front, matching notches. Repeat on the other side.
Step 3
As we did with the sleeves, baste the loops onto the back piece, lining up the loops with the notches.
Step 4
Sew the side back pieces to the back, right sides together.
Step 5
Hem the dress 1”.
Step 6
Pin both neck facing pieces right sides together. Sew along the short ends with a ⅜” seam allowance.
Step 7
Hem the bottom of the facing with ⅜” hem.
Step 8
Pin the neck facing to the neckline of the dress, right sides together. Make sure the facing is correctly placed on the dress: front to front, back to back. Sew along the upper edge ⅜”.
Step 9
Turn the neck facing to the inside of the dress, then press.
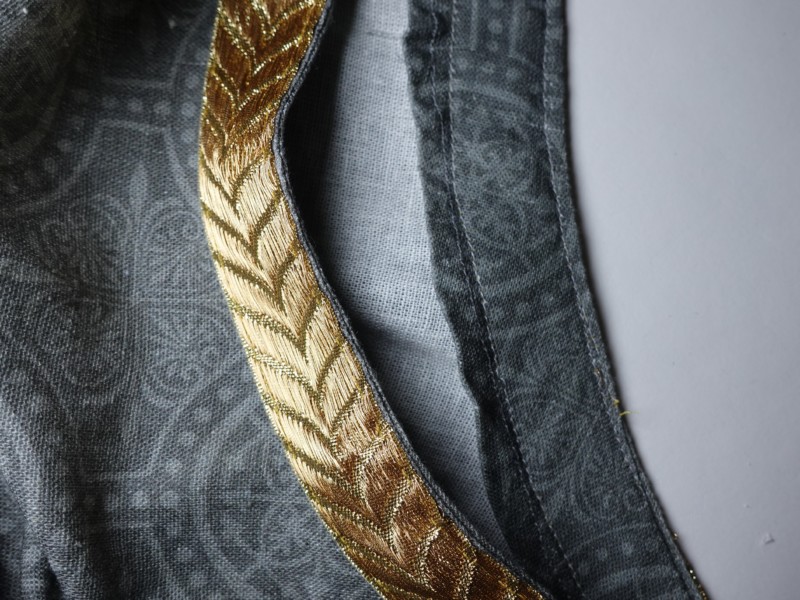
Step 10
If using trim, sew on now.
How to sew on the sleeves:
Step 1
Ease stitch the center sleeve’s shoulder ½” from the raw edge.
Step 2
Pin each sleeve to its corresponding armscye, matching the seams (as pictured above) and notches, and ease the sleeve into the shoulder.
Step 3
Sew, then press.
Elise! good job, this is a nice pattern, but how can we get it?
Hi Sethlyn! You should be able to download the pattern using the widget above the size chart. 😀
Sethlyn, I had to sign in to download the dress.. If you don’t have a Mood account, set one up. The newsletters are good.
What size/material would you recommend for the cord for the loops. I’m planning to use leather cording for the lacing, but since that can’t be sewn I’m looking for a good option for the loops.
Hi Leah, depending on the type of leather cording, you could use it for the loops too. Just practice with a leather needle and scrap fabric first. Otherwise, I suggest using your self fabric to create a spaghetti strap sized cord. Ribbons or folded and sewn bias tape are also options too!
Love this! And simply shortening the hem totally allows it to be a day wear dress!
Love this pattern – especially the sleeve detail. I taught my daughter to do lacing like that when she was first starting to make costumes at age 6 but hadn’t learned zippers or button holes yet
This dress is amazing! Such many ways for interpretation and adjustments ❤️
The pattern I’ve been dreaming of. Hope to see more patterns with this historical style.
Is it possible to not put the draw strings on the sleeves? I’m trying to recreate Galadriel’s green dress from the finale of Rings of Power and it’s super similar in cut to this dress but it doesn’t have the draw strings on the sleeves.
Yes! The sleeves will be quite roomy, so perhaps make a test sleeve first. But I think it would look great 🙂
I never got the email with the pattern download. I tried several times, and I tried setting up an account but I didn’t get a confirmation email for that either. How can I get the pattern?
Hi Amy! We are so sorry the pattern isn’t coming through for you! Just email info@moodfabrics.com and they’ll send it to you. Happy sewing!
After completing this pattern I only really have two complaints, the mobility of the shoulders is a bit unfortunately. Can’t lift my arms without lifting the whole dress and a bit tight at the shoulders/fattier part of the arm. Might just be my build there. Not too sure how I should edit based on that complaint. Also I didn’t do any trim and the neckline that I cut from the pattern didn’t fit right, I ended up using a thin bias tape and it was very lovely. Over all though, I’m probably gonna make another one cuz I like how it looks so much. I might just try to do something different for the sleeve. If anyone has any advice on how to edit the pattern to make a roomier should area I’d be happy to hear. (so I can do it on my second make lol)
Hi Gloria,
I am really no expert on this… But this came into my mind. Maybe it is possible to add an anderarm gusset?! it’s a rectangle that might give you more flexibility, as on these pirat/medieval shirts.
Greetings,
Frodo
I’m hoping to make this for a project at school, how long does this take?
Hi Leila! It took me about 2 full days, but if you omit the trim and use premade cord for the lacing and loops, you’ll save some time!
Love the look of this dress.
is there a way to make it look more like Merida’s riding dress?
Hi Amelia, I suggest making a long sleeved chemise to wear underneath the Luthien Dress. Instead of using the sleeves provided in this pattern, I recommend using sleeves from The Tacca Dress. Cut the sleeve a few inches above the elbow. Remove some of the length from the forearm piece, by the elbow. Sew the forearm and bicep separately, hemming the edges. Sew some ribbon or strips of the self fabric, to attach the sleeve pieces at the elbow and shoulder. I strongly recommend making a muslin of the bodice and a sleeve first! The neckline doesn’t need to be adjusted that much, just cut out a little v-neck!
Oh my goodness thank you for this lovely pattern. And it will fit me without me having to adjust time patten!
it’s lovely, but then all your patterns are lovely. I just wish I could get them in AO. I really hate taping 84 pages together. I NEVER get them taped right! 😉
Hi Jamie, in order to keep our patterns free, we only offer them as US Letter and A4 format. Here is a helpful tip for tiling the pages together (believe me it is a little tricky, even fore me!): The print margins won’t be equidistance from the page edges. As long as you tile the paper together by the print margins not page edges, you should be good!
I think the dress in white will look perfect as Zoot (or Dingo her twin) from the castle Anthrax. I even have a Grail!
Hi Jamie, this dress would look amazing in white! If you post photos, be sure to tag us or use the hashtag #MadewithMood !!
How many yards of dress fabric if I’m using premade cord? 7.5-8 yards just seems like a lot for a dress when most of what I’ve seen is 3-4 yards max for other full length dress patterns
Hello, 3-4 yards should be a good amount.
Hi, how much fabric would I need if I want the dress to not trail on the ground. I’m about 5’4”. I would also use cord for the loops and lacing.
2 yards of fabrics should be enough for this project
Hi,
Would this also work in a velvet fabric? I saw a huge piece advertised on marketplace (2,4m X 3m) and thought this would look amazing…
Hello, this pattern would work well using velvet fabric!
Hello!! Am I dumb, or am I missing the line-key matching the sizes to the line pattern? I imagine I could count from the edge of the pattern the appropriate number but I want to be sure I cut it out right since it’s 75 pages of work
Hello, you can find the size line key on some of the pattern pieces such as page F1 for example.
I am thinking of making this with 4-way stretch jersey knit, do you have any advice for taking the stretcher fabric into account for the sizing?
Hi Auric, You can definitely use fabric with a bit of stretch. My one piece of advice would be the size you cut out should have finished garment measurements that are snug to your body or slightly tight on you since the fabric has some stretch to it. Always make sure to check the finished garment measurements in addition to the body size measurements.
I subscribed to get this pattern and more, but I didn’t get the link, nor can I find the link. Only email I have is the welcome email with 15% off.
Hello, you can try looking in your spam or promotion emails. If you are still unable to receive the download, please send an email to info@moodfabrics.com.
Is the skirt a full circle skirt once it’s all sewn together?
Hi Lauren, I don’t think it makes a full circle around the perimeter, but you are always more than welcome to flare out the bottoms of each pattern piece so that the dress still fits the same in the bust and waist but twirls more on the bottom hem.
Hi, would the lacing work on side instead on the back? What I mean is if I put the loops on the front and back princess seams instead and lace the sides up, would the pattern still work?
Yes I actually love that idea. Instead of attaching the loops for the lace up part of the dress to the center back piece, you’ll want to attach them to the side front and side back seams so that it can be laced up on either side of your waist. But it will literally be the same method as sewing in the loops for the sleeves and the back.
I am so excited that I found this pattern. It is perfect for the Ren Faire costume I am creating. It was honestly really straight forward to use. Thank you for making it. The sizing was pretty easy to use.
Just as a heads up someone on Etsy was trying to sell a copy of the pattern. The images were exactly the same the only difference was they had translated it from English to another language.
That’s absolutely fantastic to hear! We’re so thrilled the pattern is perfect for your Ren Faire costume and that you found it straightforward to use and the sizing easy. Knowing it’s helping bring your creative vision to life makes us incredibly happy! We hope your Ren Faire costume turns out amazing! Happy sewing!
PS. Thank you so much for the heads-up about the Etsy seller. We truly appreciate you bringing this to our attention.
Is seam allowance included
Hi Carter! 1/2 inch seam allowance is always included in our patterns.
I am currently working on this pattern and am fairies that under my arms is going to be super tight. I cut out the size that gave me an extra inch of room around the just so I didn’t think this would be a problem. Anyone have a suggestion on a way to fix it?
Maybe try recutting just the side parts of the top to be a little wider? That way it still fits around the shape of your bust but you have a little more space under the arms.
Love your patterns!
Lovely pattern
So beautiful, absolutely love it. Thank you for sharing it.