

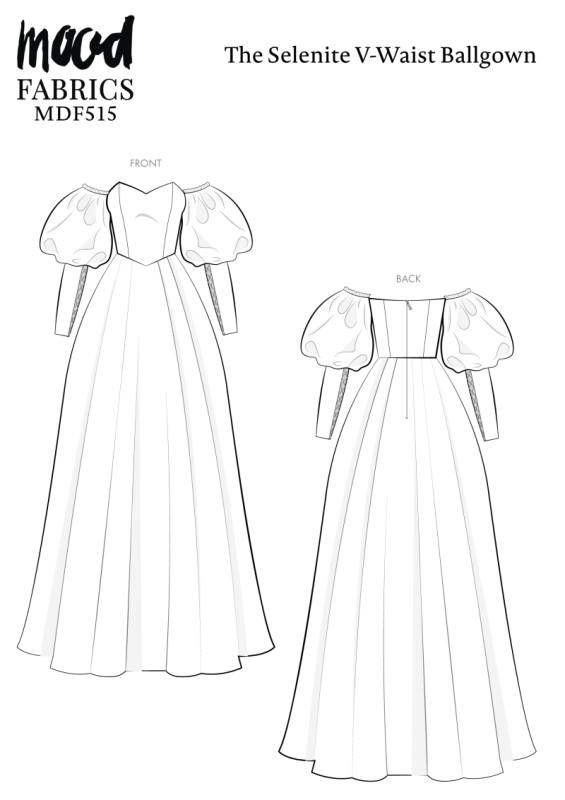
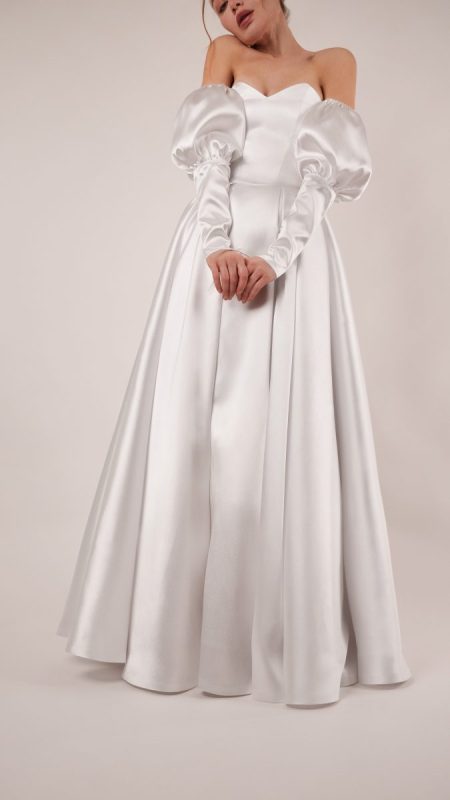
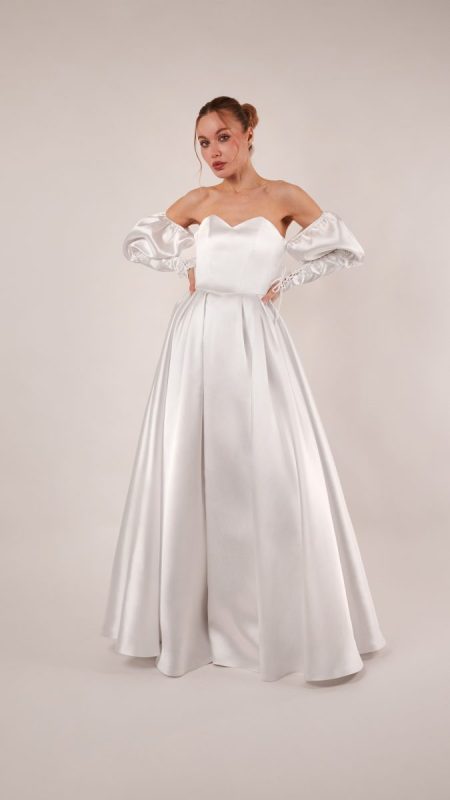
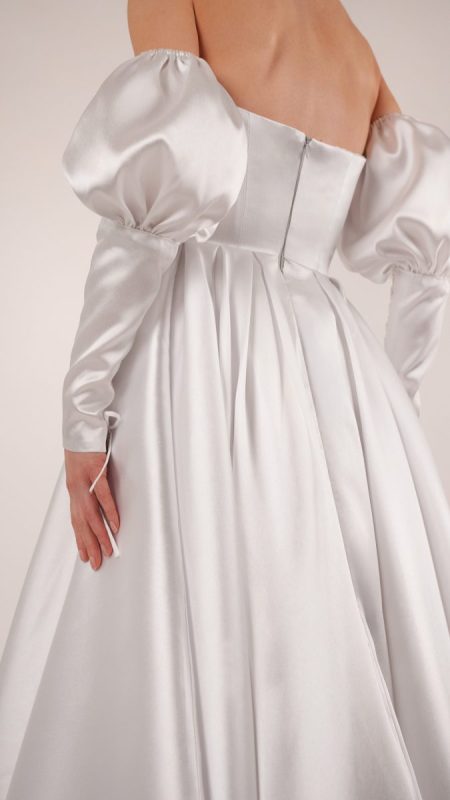
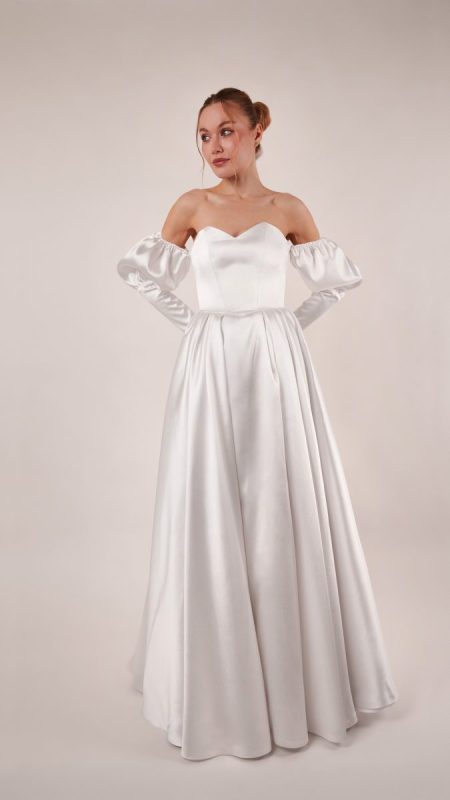
Introducing the Selenite V-Waist Ballgown, a luminous design that captures the essence of modern royalty. Crafted for statement-making moments, this gown transforms pearly white polyester Mikado into a sculptural silhouette with a soft, glossy sheen that instantly evokes bridal elegance. Every detail is designed to command attention, making it the perfect choice for weddings, formal events, or an unforgettable prom look.
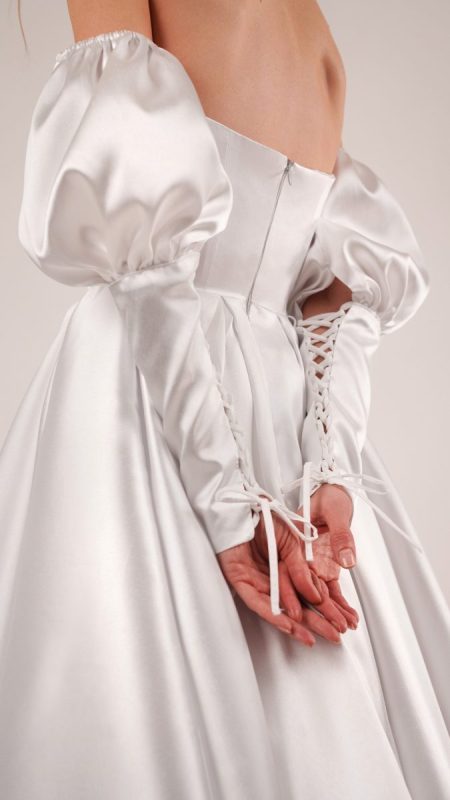
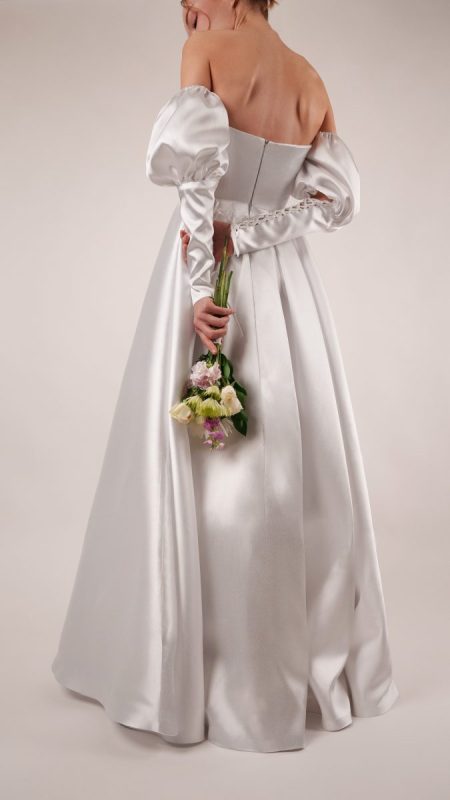
At the heart of the design is a structured, boned bodice that shapes and supports, cinching the waist while highlighting the classic sweetheart neckline and elegant princess seams. The signature V-waist creates a universally flattering line that elongates the body and enhances every curve. Below, dramatic pleats cascade into a voluminous skirt, delivering movement and dimension for that unmistakable ballgown presence.
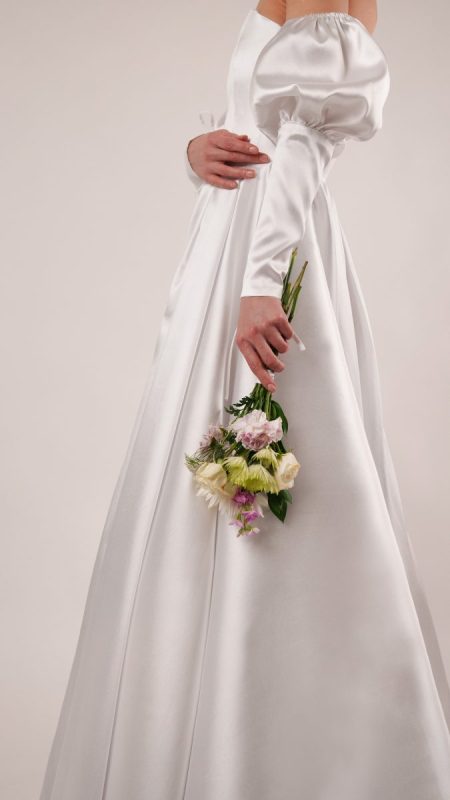
The statement sleeves mirror the grandeur of the skirt, adding balance and romance with their full, sculpted shape. Finished with corset-inspired laced cuffs, they bring a touch of fairytale charm that feels regal and timeless.
To take the volume even further, this pattern also includes instructions for creating a coordinating petticoat to wear underneath the gown. Designed to add structure, lift, and that extra level of drama, the petticoat enhances the fullness of the skirt and helps achieve that true, sweeping ballgown silhouette. Whether you want a subtle boost or full princess-level volume, this added layer lets you customize the final look.
This gown is an absolute show stopper. It’s the kind of gown that enters the room before you do, where people stop mid-conversation just to look. Put yourself in the Selenite V-Waist Ballgown when you’re ready to shamelessly be the center of attention.


Essential Materials & Sizing Guide for the Selenite V-Waist Ballgown
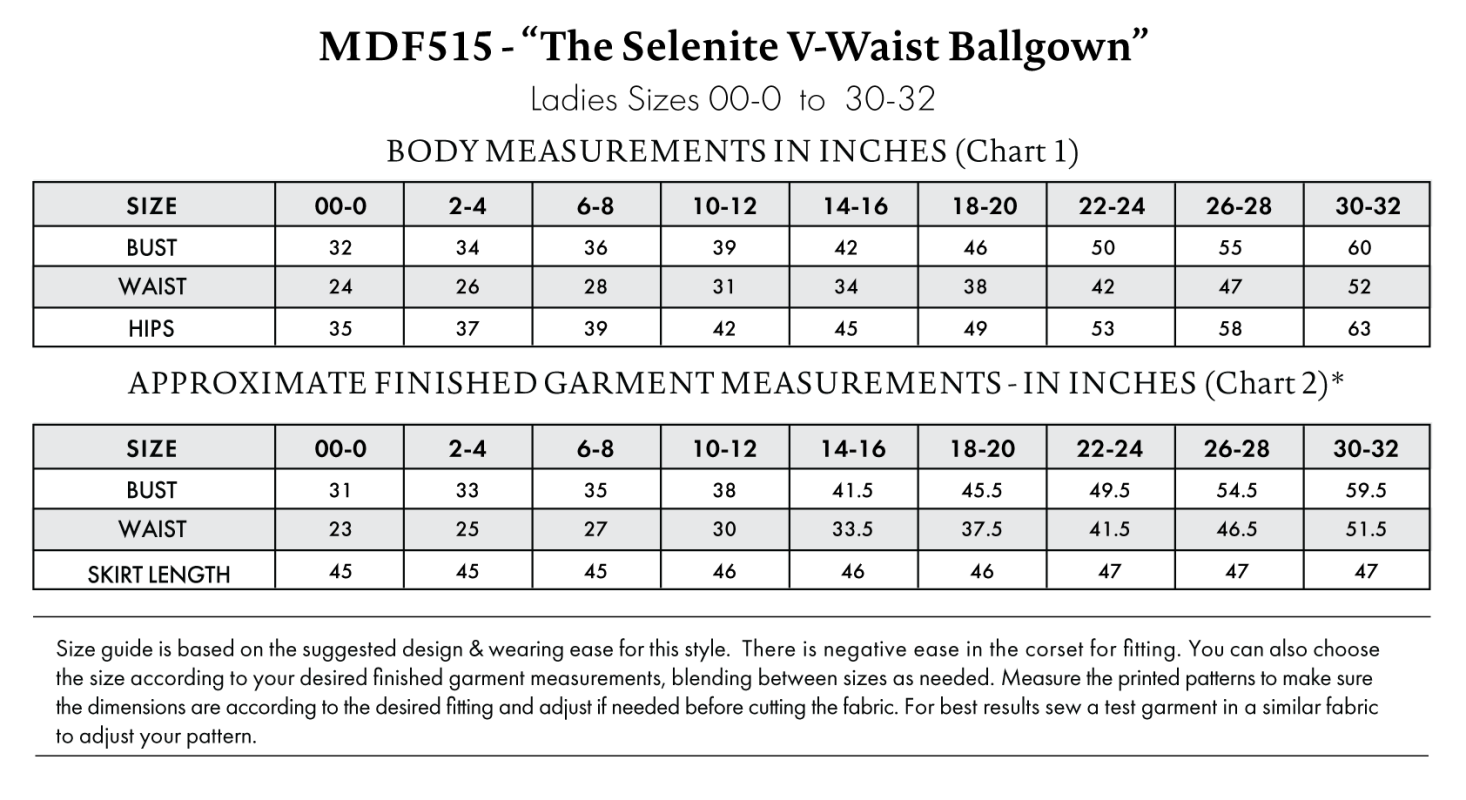
Continue reading for a breakdown of what knowledge and materials you need for creating your very own v-waist ballgown! We’ve got you covered with the recommended materials we used—if you want to follow along exactly—as well as a curated list of alternative fabric type recommendations if you want to customize your own version. The Selenite V-Waist Ballgown free sewing pattern download includes technical drawings for seam and silhouette visibility, plus a size chart to help you find your perfect fit!
Purchase Products Used Below:
Quantities indicated are for sewing a size small* v-waist ballgown. Toggle the ‘SHOP THIS LOOK’ box to find quantity estimates for other sizes.
- 8 yards of Polyester Mikado – White – Nicolette Collection
- 7 yards of Polyester Lining Fabric – White – Margot Collection
- 1 yard of Woven Fusible Cotton Interlining, Single Sided by Helmut Lang – White
- 2 yards of White Rigilene – 12mm/0.5″
- 1 each of Invisible Zipper 24″ by YKK – 316 Light Gray
- 1 yard of White Elastic – 0.25″
- 1 each of Gutermann Sew All Thread 1000m – 20 White
- MDF515 – Selenite V-Waist Ballgown Sewing Pattern (Free download below!)
Additional Products Used:
- 8 yards of Cotton Voile – White – Mood Exclusive Farley Collection – for the petticoat.
- Loop Turner
- Stitch Witchery
- Tailor’s Chalk
Alternative Fabric Type Recommendations:
The Selenite V-Waist Ballgown sewing pattern is best suited for medium weight fashion fabrics. Explore other fabric types or colors from our featured collections for you v-waist ballgown with the links below.
Fabric Collections Used in this Post:
Download Your Free Sewing Pattern
Submit your name and email in the form below to receive the download link for the Selenite V-Waist Ballgown free sewing pattern directly in your inbox. Mood Sewciety Patterns will send your free download link via email with the subject line: ‘Your Free Download from Mood Sewciety – The Selenite V-Waist Ballgown’ (in PDF format for A4 and letter-size printing).
© MoodFabrics.com / MoodSewciety.com – Mass production, resale, or distribution of this pattern in any form is strictly prohibited.
Find Your Perfect Fit
The Selenite V-Waist Ballgown Sizing Guide is based on the suggested design & wearing ease for this style. You can also choose the size according to your desired finished garment measurements, blending between sizes as needed. Measure the printed patterns to make sure the dimensions are according to the desired fitting and adjust if needed before cutting the fabric. For best results, sew a test garment in a similar fabric to adjust your pattern.
Note: Always read all the instructions before cutting the fabric!
How to Sew The Selenite V-Waist Ballgown
The instructions provided below are designed to guide you through sewing the Selenite V-Waist Ballgown from start to finish.

3 Tips for Sewing with Mikado
⇒ Use a sharp new needle to prevent thread pulls in your fabric.
⇒ After pressing your seams open with an iron, use something heavy like a tailor’s clapper or a textbook to flatten the seams and secure your pressing.
⇒ Do not omit the lining because the raw edges of the Mikado can be a little bit itchy.
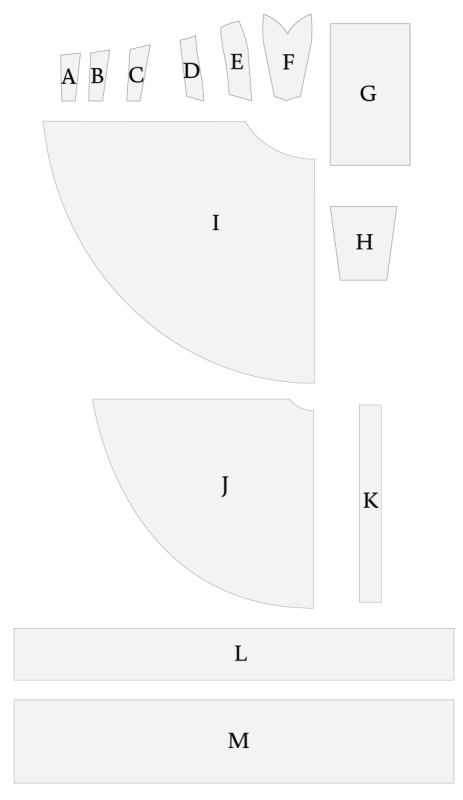
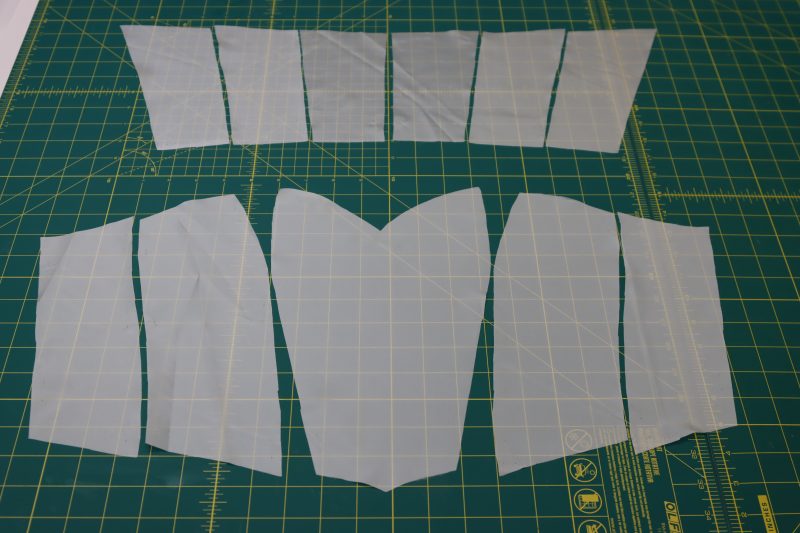
Pattern Pieces & Fabric Cuts Needed
(A) CORSET BACK CENTER
Fabric – Cut 2 Mirrored
Lining – Cut 2 Mirrored
(B) CORSET BACK MIDDLE
Fabric – Cut 2 Mirrored
Lining – Cut 2 Mirrored
(C) CORSET BACK SIDE
Fabric – Cut 2 Mirrored
Lining – Cut 2 Mirrored
(D) CORSET FRONT SIDE
Fabric – Cut 2 Mirrored
Lining – Cut 2 Mirrored
(E) CORSET FRONT MIDDLE
Fabric – Cut 2 Mirrored
Lining – Cut 2 Mirrored
(F) CORSET FRONT CENTER
Fabric – Cut 1
Lining – Cut 1
(G) SLEEVES
Fabric – Cut 2
(H) CUFFS
Fabric – Cut 2
Lining – Cut 2
(I) SKIRT
FRONT: Fabric – Cut 1 On Fold
BACK: Fabric – Cut 2 Mirrored
(J) SKIRT LINING – PETTICOAT*
FRONT: Lining – Cut 1 On Fold
BACK: Lining – Cut 2 Mirrored
(K) PETTICOAT WAISTBAND
Fabric – Cut 1
(L) PETTICOAT UPPER RUFFLE
Fabric – Cut 1
(M) PETTICOAT BOTTOM RUFFLE
Fabric – Cut 1
Pattern piece J can be used to create both the lining and the petticoat. Cut 2 on the fold for each. The petticoat can be made using lining fabric or any fabric of your choice.
Sew with a 1/2″ seam allowance for all seams unless otherwise specified.
HOW TO SEW THE PETTICOAT
Step 1
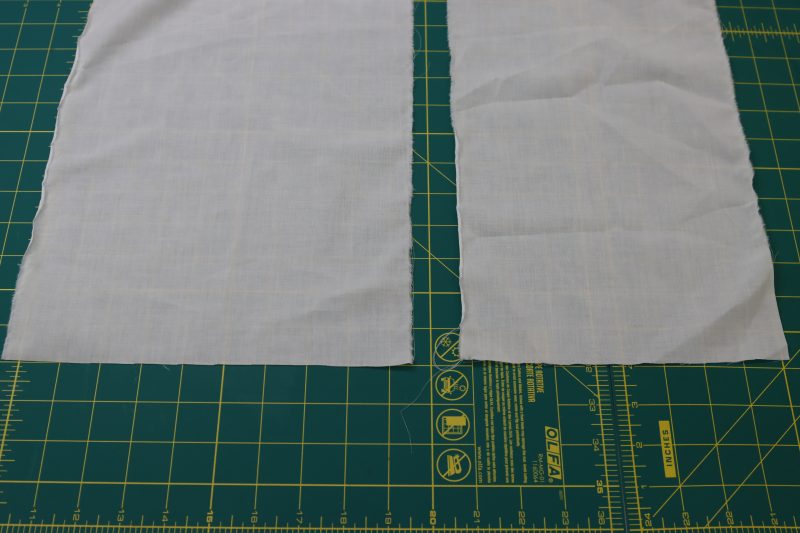
CUT SKIRT
- Please note: there are no separate pattern pieces for the petticoat, but instructions for cutting out and assembling all the pieces can be found below.
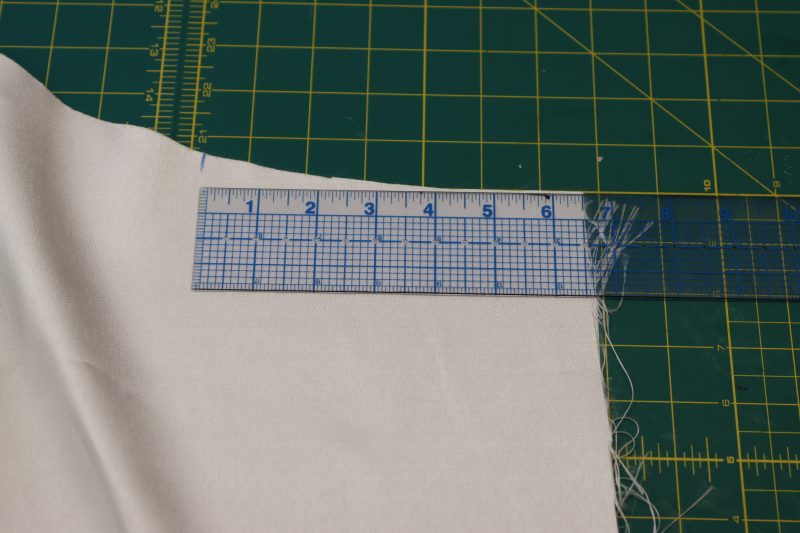
- Using the same pattern piece as the lining skirt, cut out one skirt piece on fold out of the cotton voile, or whichever fabric you choose for your petticoat.
- The petticoat is only a half circle skirt, not a full circle, so you will need to adjust the waistline of the petticoat to fit around your entire waist, not just half of it. To do this, just cut the waistline of the skirt to your own waist measurement.
Step 2
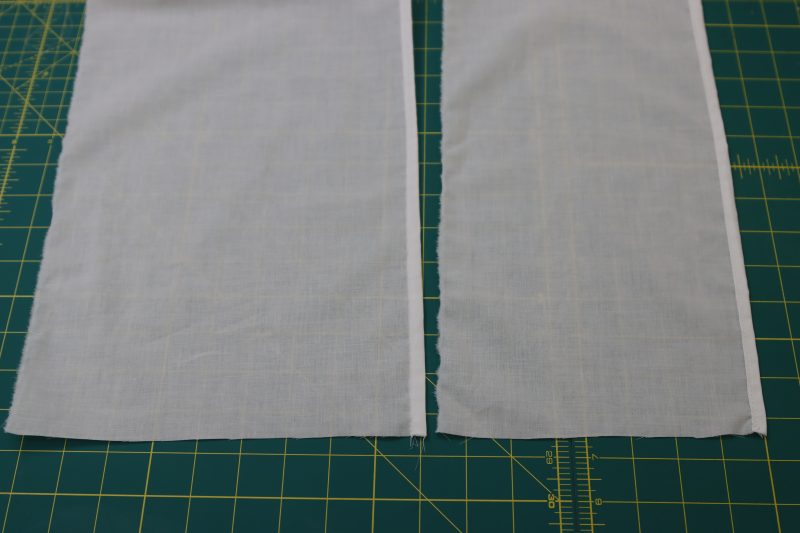
HEM RUFFLES
- Cut two strips of the cotton voile that are10 inches wide and 8 inches wide respectively. The length of the ruffles should be the entire length of your yardage of fabric (in this case, it was around 6 yards long, because I started out with 8 yards of cotton voile before I cut out the skirt).
- Sew a ¼ inch double rolled hem on one of the long sides of both strips of fabric.
- Press the hem flat.
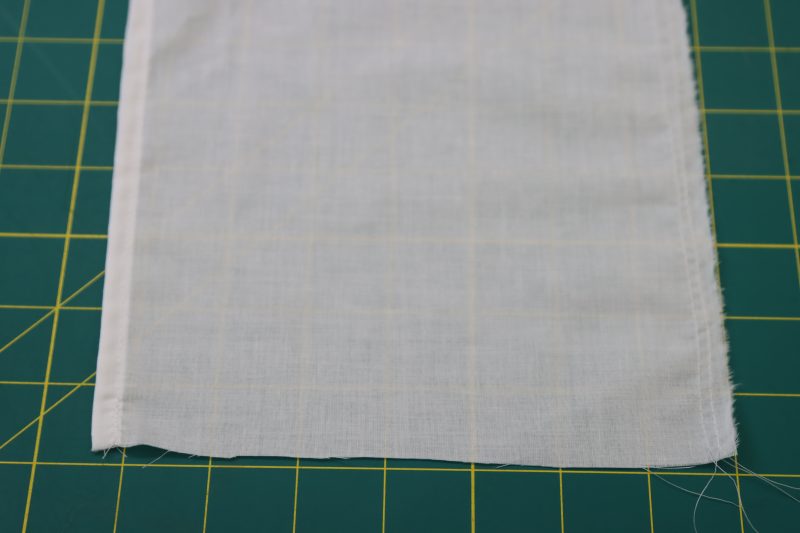
Step 3
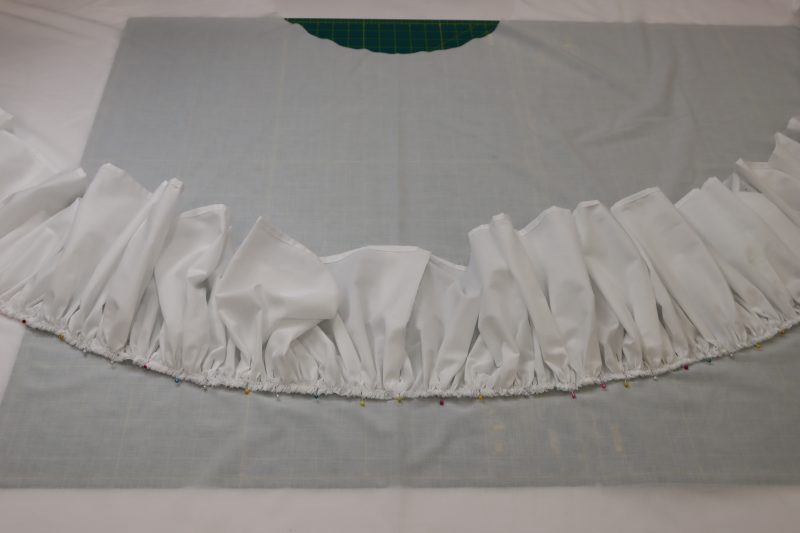
GATHER RUFFLES
- Sew two parallel straight stitches with a stitch length of 4 millimeters along the long raw edges of both of the ruffles.
- Pull on the top threads to gather the ruffles.
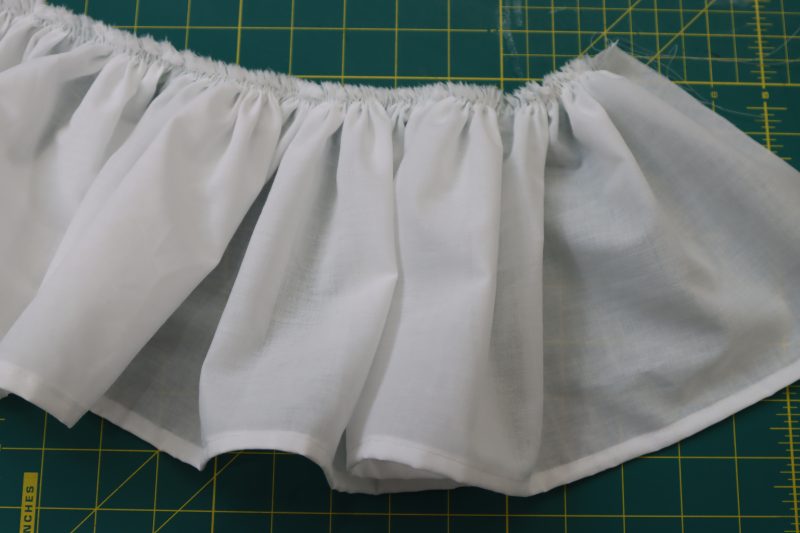
Step 4
ATTACH RUFFLES
- Gather the 10 inch wide ruffle until it is roughly the same length as the diameter of the half circle skirt.
- Find the center front of the circle skirt and the center point of the gathered ruffle.
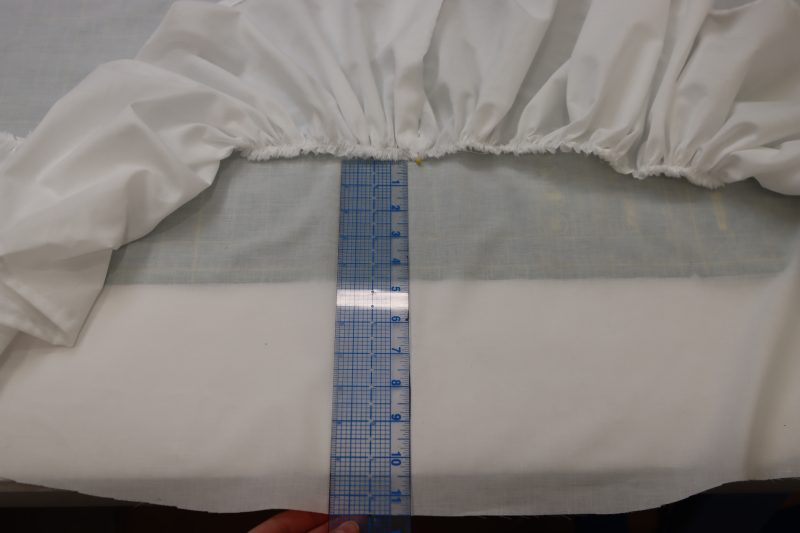
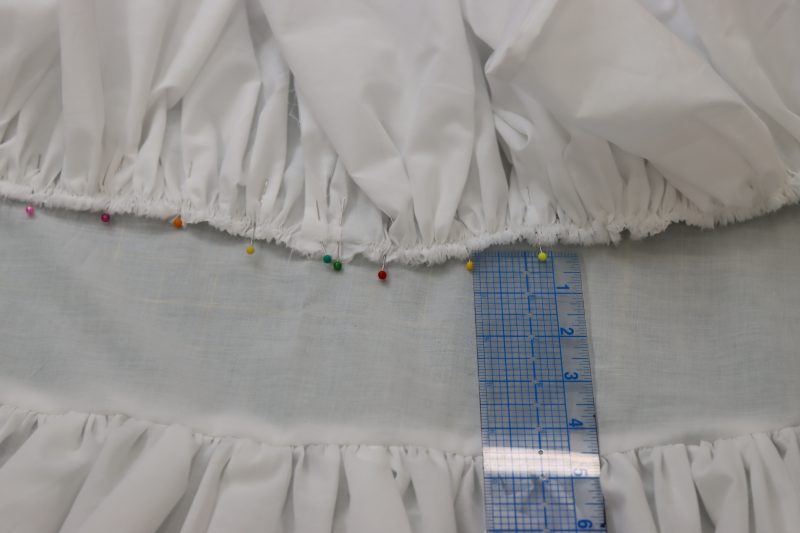
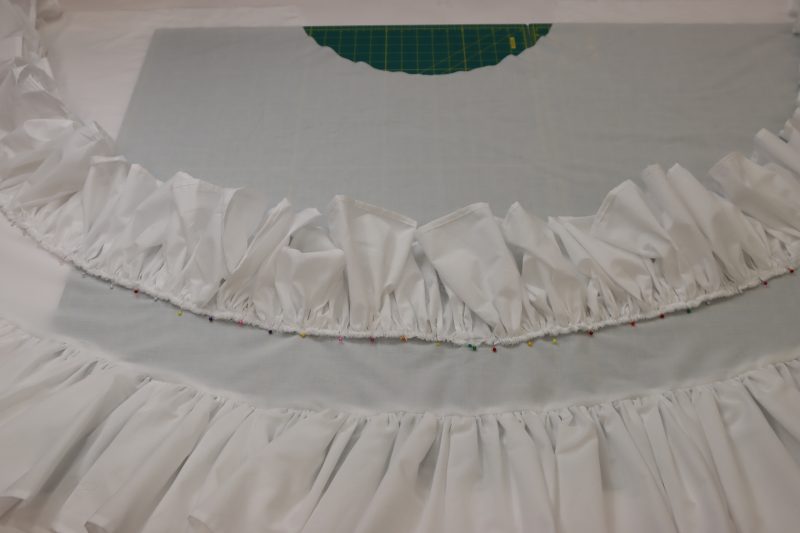
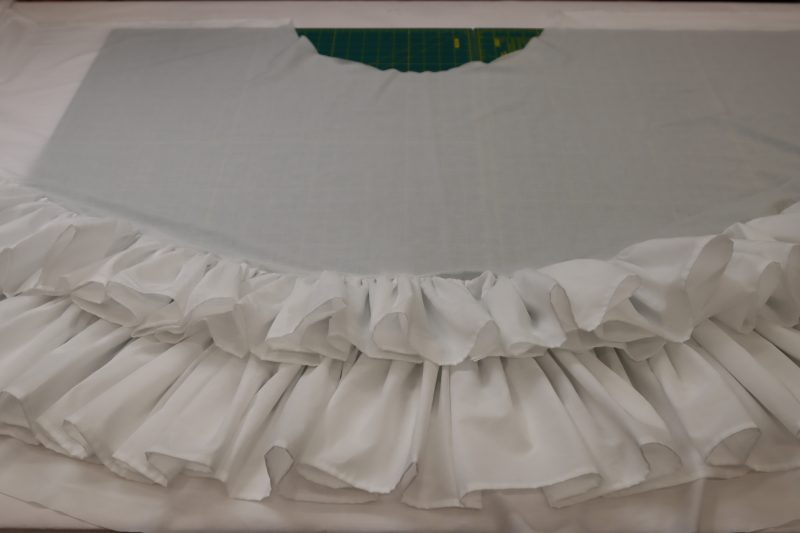
- Measure 11.5 inches from the bottom hem of the skirt and begin pinning the ruffle to the skirt at the center point, right sides together.
- Pin the ruffle right sides together around the entire diameter of the skirt, making sure to maintain the same 11.5 inch distance from the raw hem.
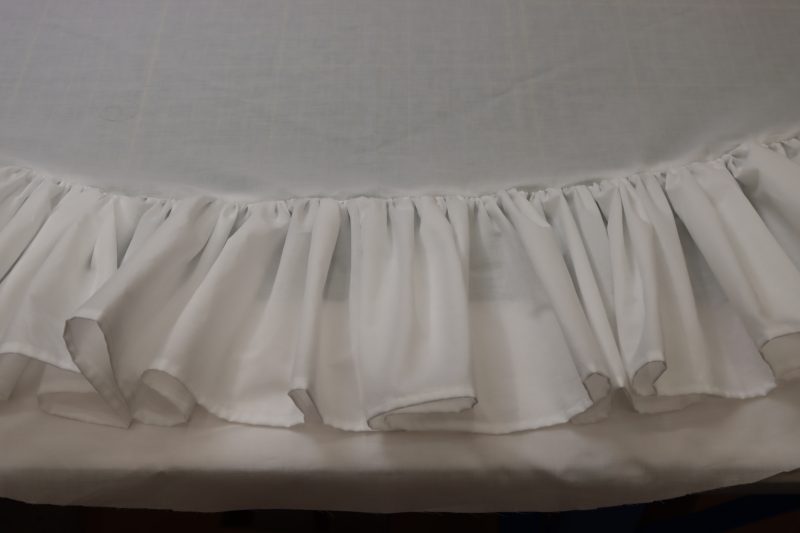
- Sew over the ruffle, attaching it to the skirt, making sure to sew far enough away from the raw hem of the ruffle that the gathering stitches are hidden in the seam allowance.
- Repeat the previous method of attaching the bottom ruffle for attaching the top ruffle 4.5 inches above the bottom ruffle.
Step 5
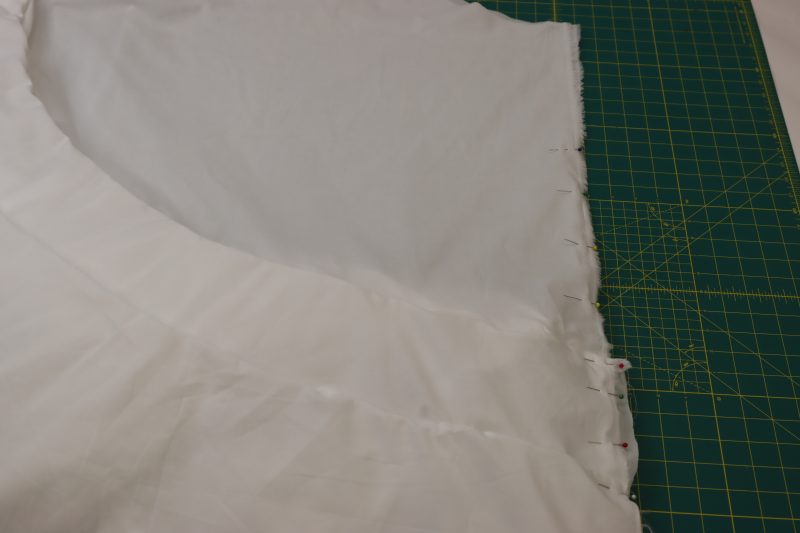
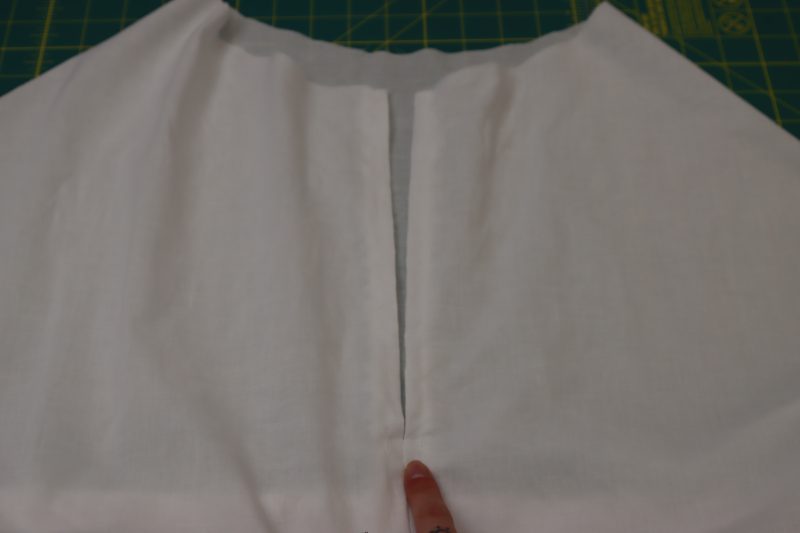
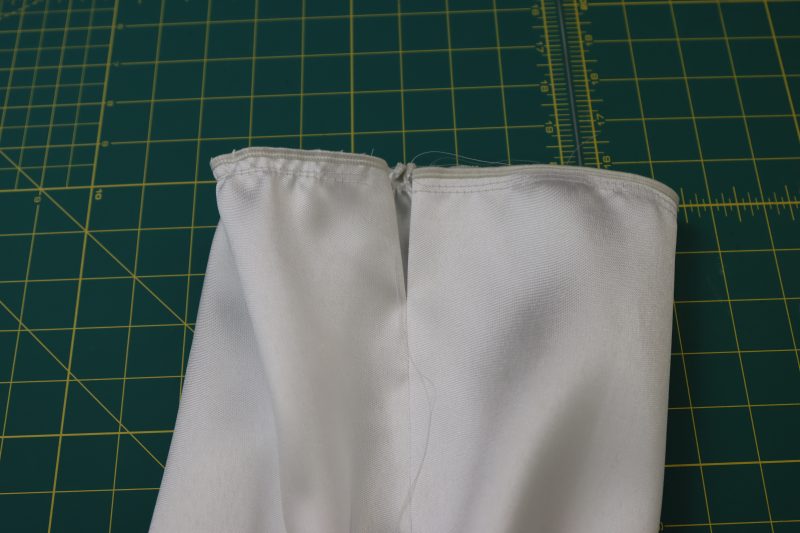
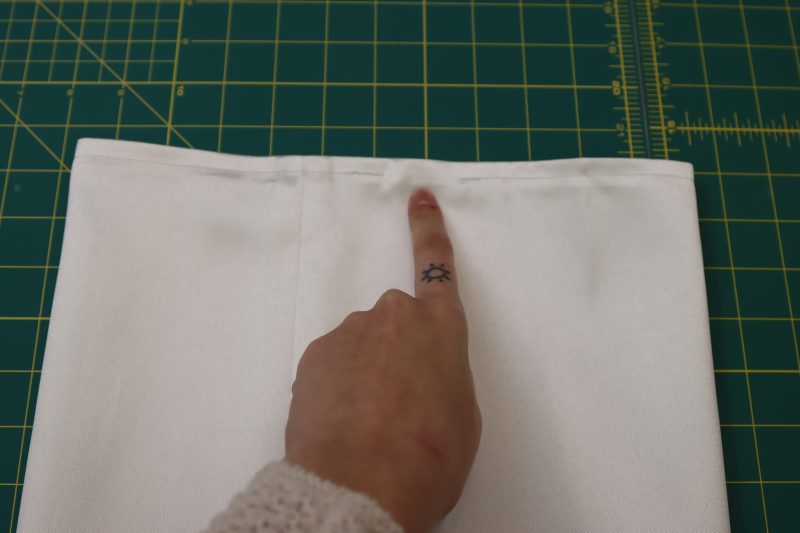
CENTER BACK SEAM
- Fold the skirt right sides together so that the center back edges are lined up.
- Pin and sew the center back seam of the skirt, except for an 8 inch gap at the top of the seam by the waist.
- Press the center back seam open and flat.
- Topstitch the opening at the top of the center back seam.
Step 6
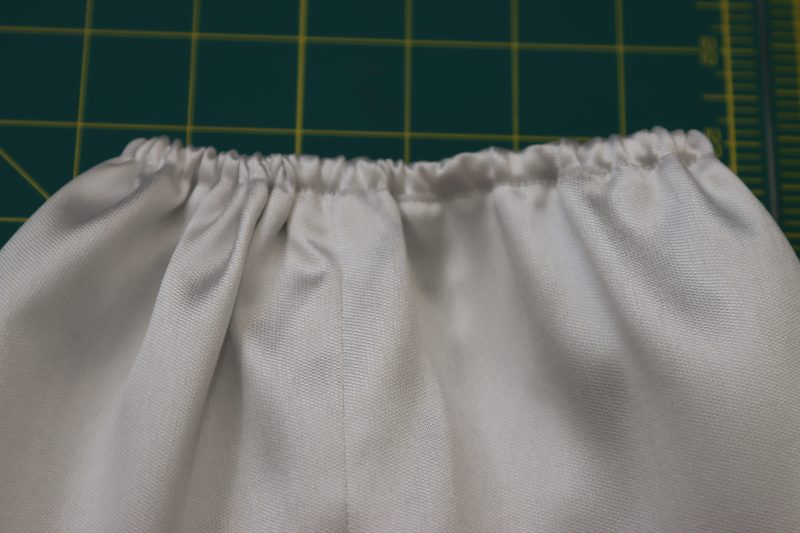
MAKE WAISTBAND
- Cut a strip of the cotton voile that is 4 inches wide and at least twice your waist measurement.
- Fold both long edges of the strip in toward the center of the strip and press the fold.
- Fold the strip in half once more to hide the raw edges.
Step 7
ATTACH WAISTBAND
- Sandwich the waistline of the skirt in between the folded waistband.
- Pin the waistline of the skirt into the waistband.
- Topstitch the bottom edge of the waistband of the petticoat.
Step 8
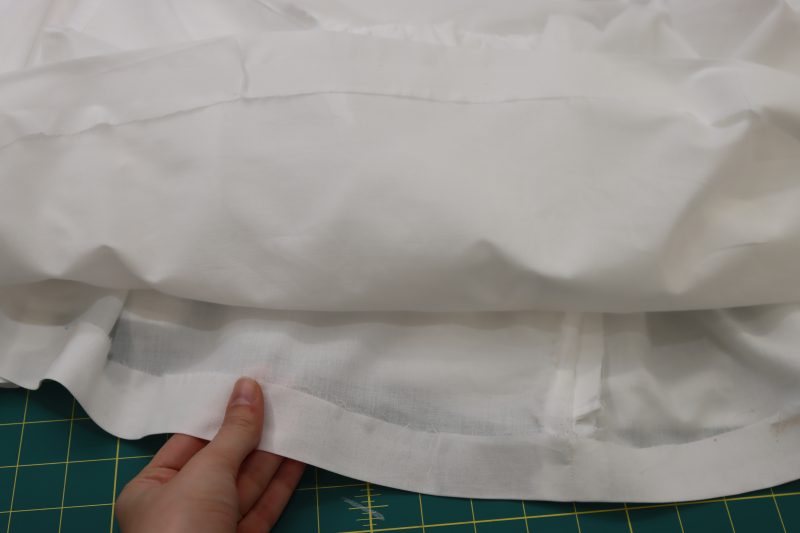
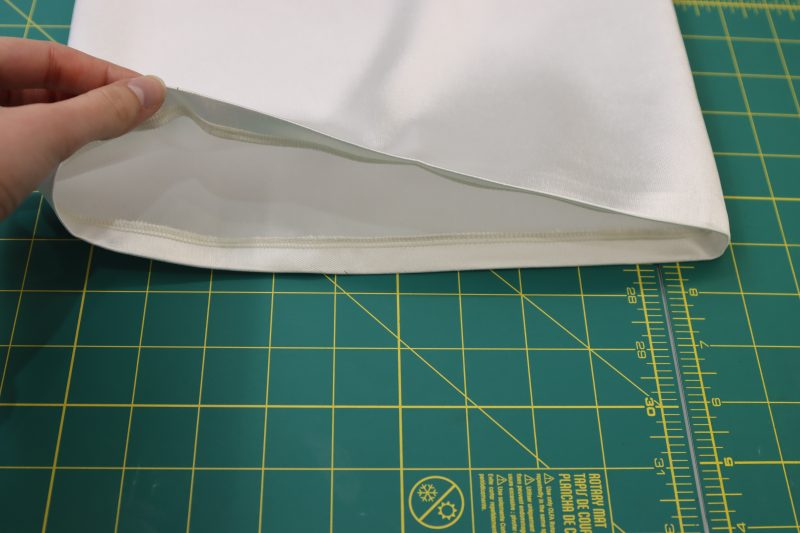
HEM PETTICOAT
- Press a 1.5 inch fold into the bottom hem of the petticoat.
- Press hem tape into the fold to make a blind hem on the petticoat.


HOW TO SEW THE SELENITE BALLGOWN
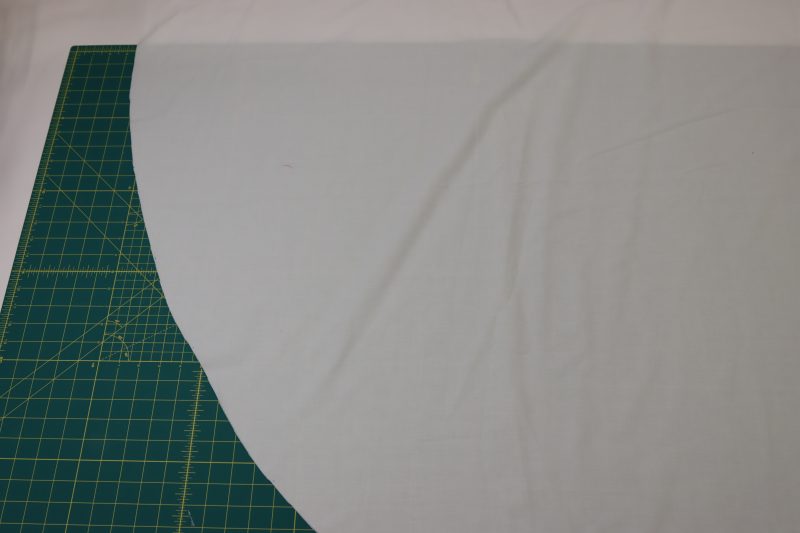
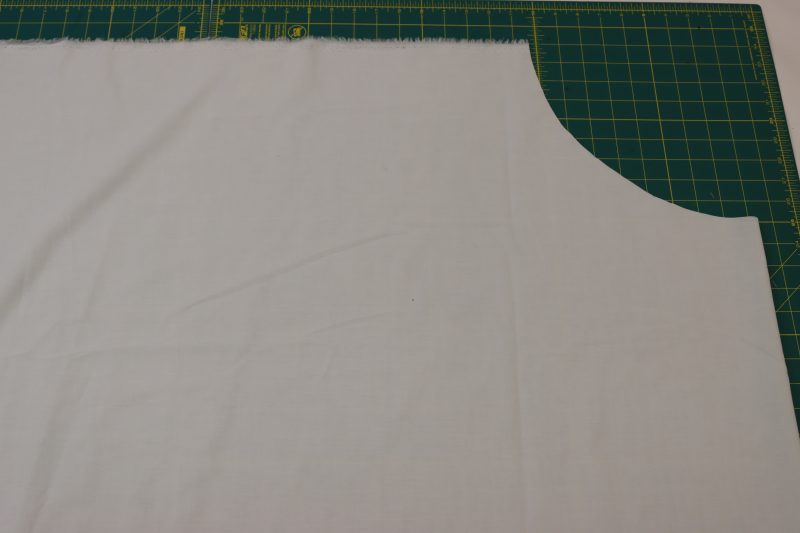
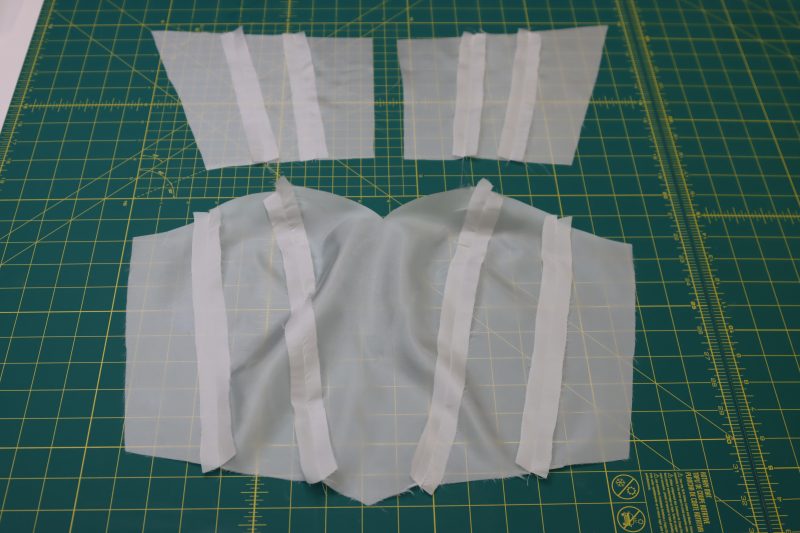
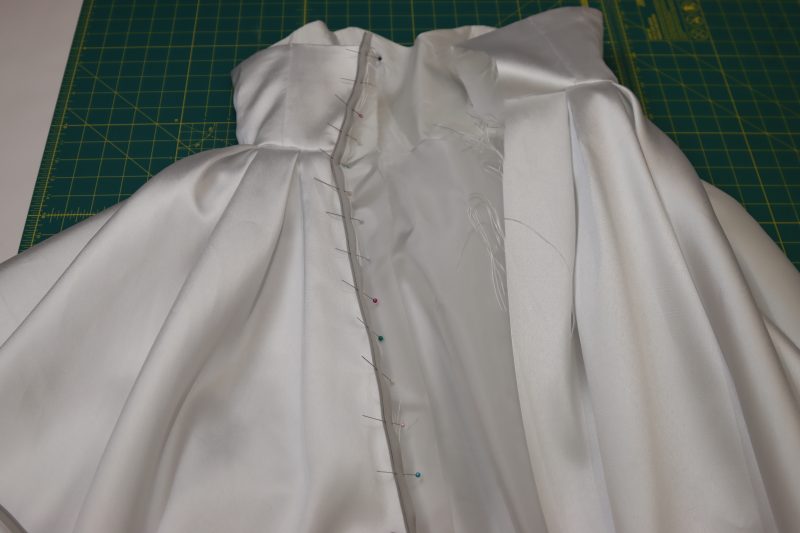
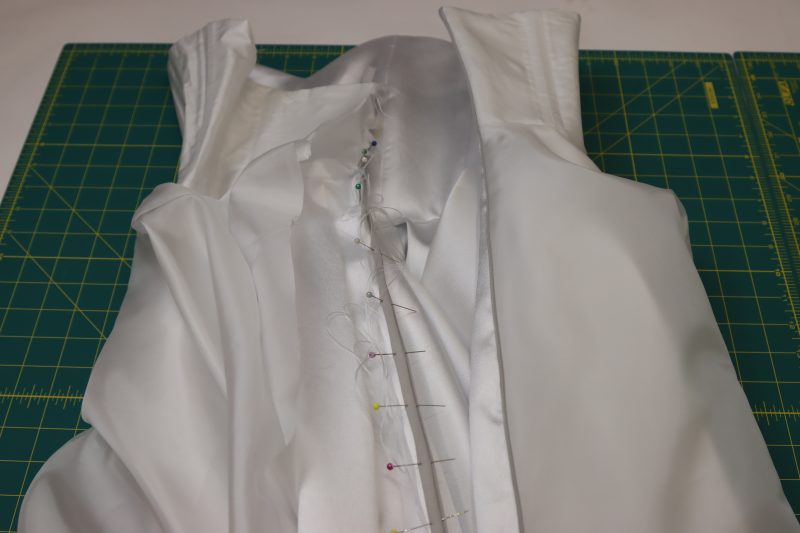
Step 9
BODICE LINING
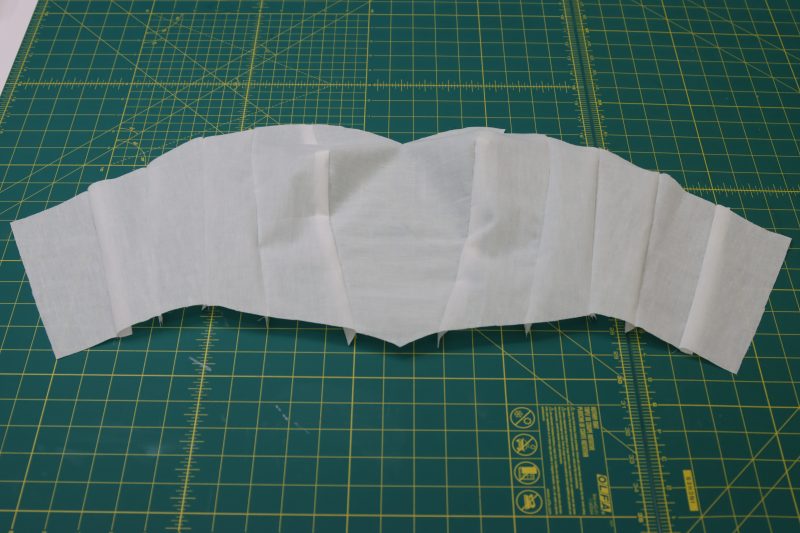
- Layout all the bodice lining pieces as shown in the photo below.
- Pin and sew the bodice lining pieces right sides together.
- Press all the seams open and flat.

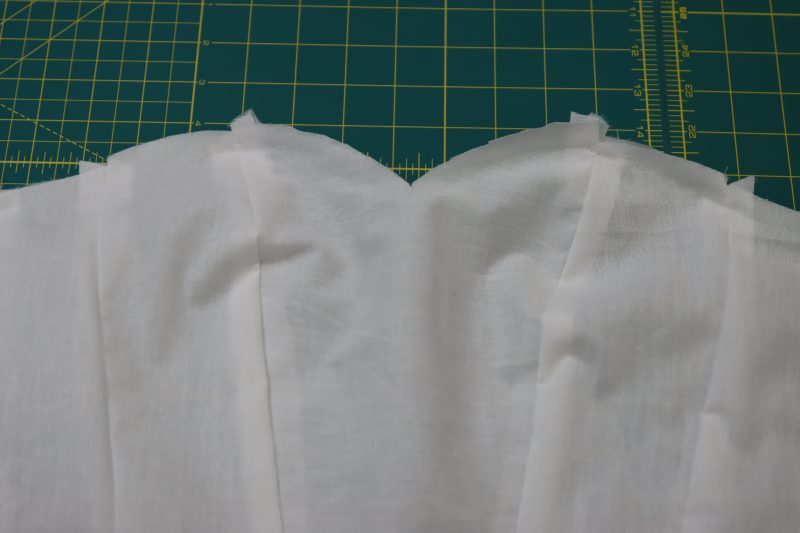
Step 10
BODICE INTERFACING
- Follow the same steps from step 9 for assembling a bodice out of fusible interfacing EXCEPT DO NOT PRESS THE SEAMS. It’s fusible interfacing and will stick to your iron or to your ironing board. Do not iron the seams yet.
- Lay the interfacing bodice wrong sides together on top of the lining bodice, making sure to hold the seam allowance open with your fingers while you line up the necklines.
- Pin and sew the necklines of the interfacing and the lining bodices together.
- NOW you can very very carefully open up each seam on the interfacing bodice, lay each one open and flat on top of its corresponding seam on the lining bodice, and finally press and fuse the interfacing to the lining.
- Since the seam allowances for the interfacing bodice are now open and flat, there will be a gap between the lining and the interfacing at each seam. We’re going to insert boning there in the next step.
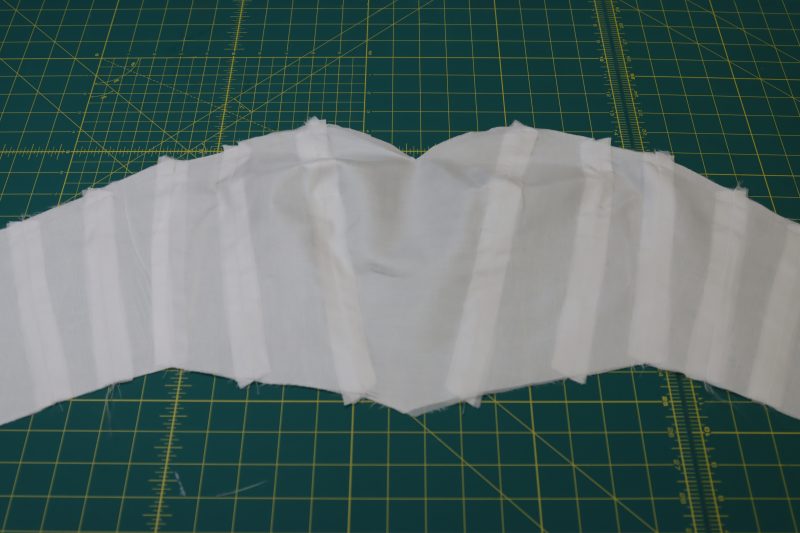
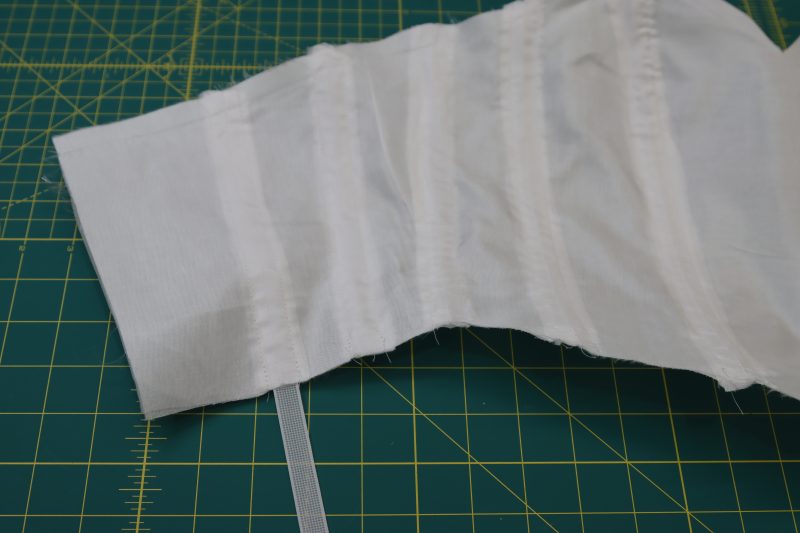
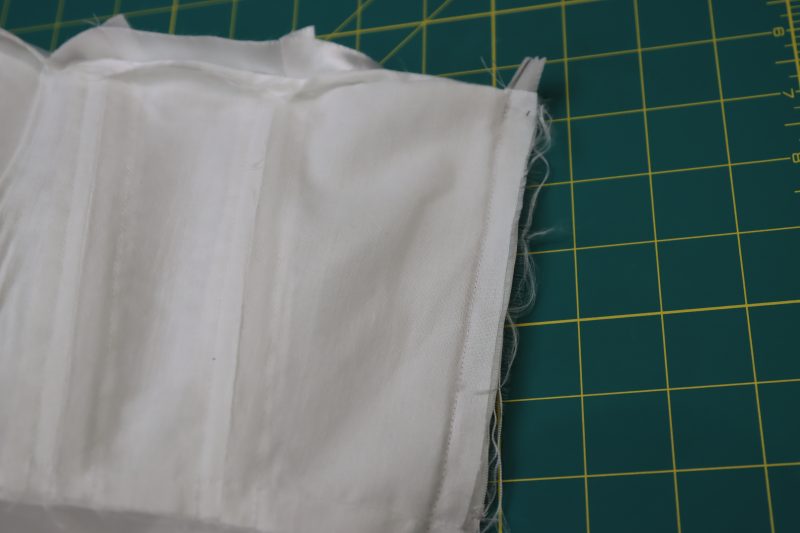
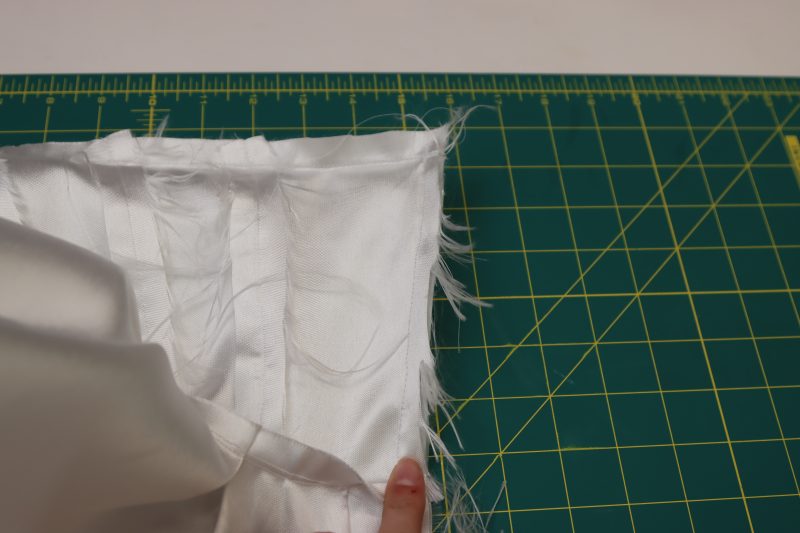
Step 11
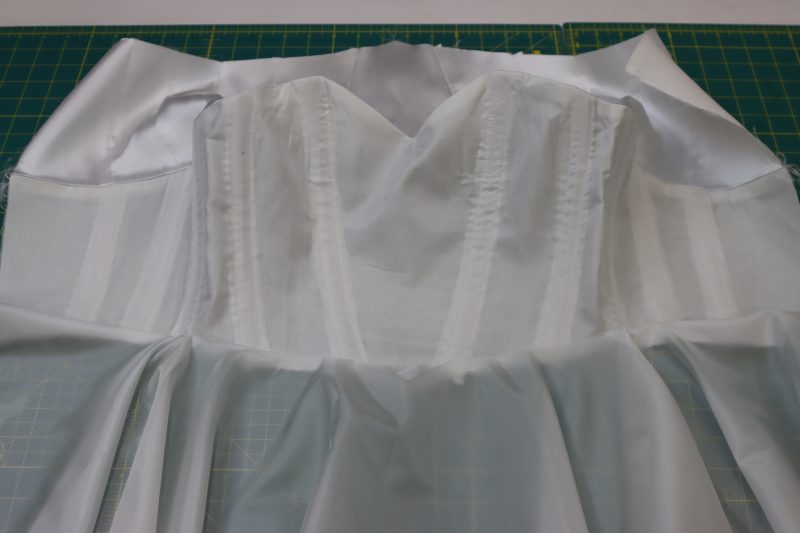
BONING CHANNELS
- Now that the interfacing bodice and lining bodice are fused together everywhere except for the seams, sew a straight stitch ¼ inch away from both sides of every single seam on the bodice.
- Insert the rigilene boning into the channels and cut them ½ inch shorter than the actual length of the channel.
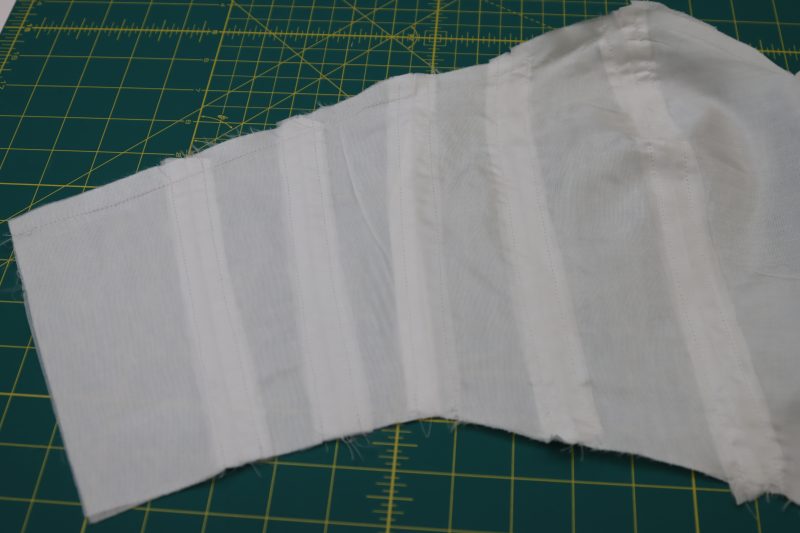
Step 12
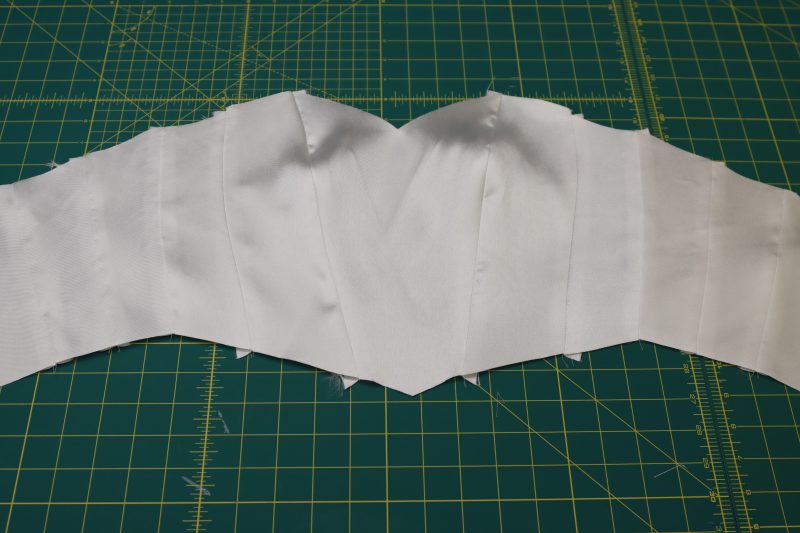
BODICE SHELL
- Construct the bodice shell the same way the lining was constructed, pressing all the seams open and flat.
Step 13
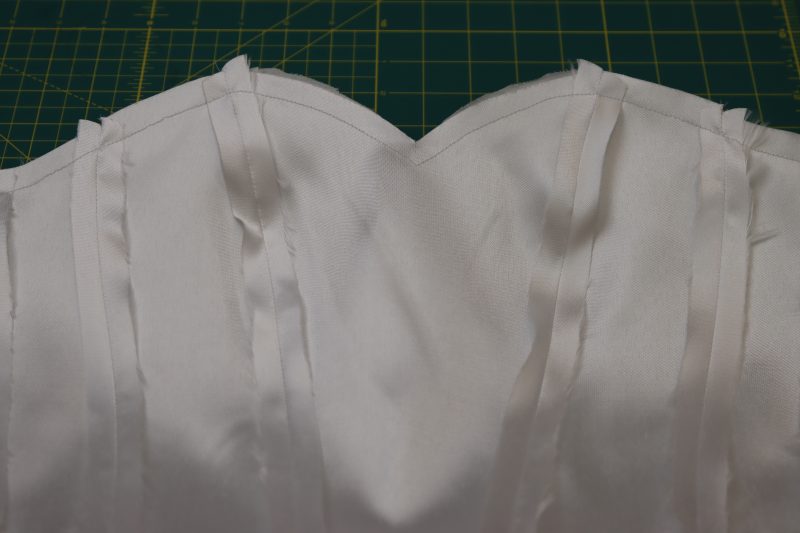
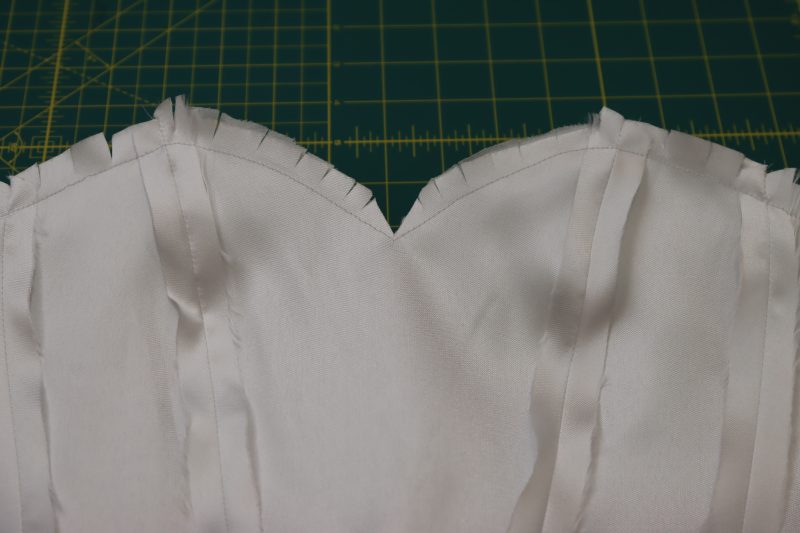
ATTACH SHELL TO LINING
- Place the main fabric bodice and the lining/interfacing bodice with the right side of the main fabric and the right side of the lining touching each other.
- Pin and sew the neckline of the lining bodice and the main fabric bodice together.
- Clip the seam allowance of the neckline to let it lay flat when you flip it right sides out.
- Flip the bodice right sides out.
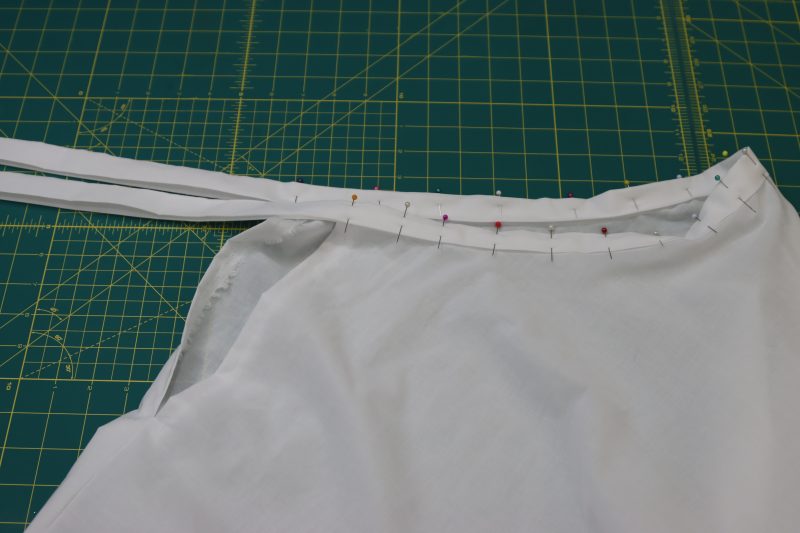
Step 14
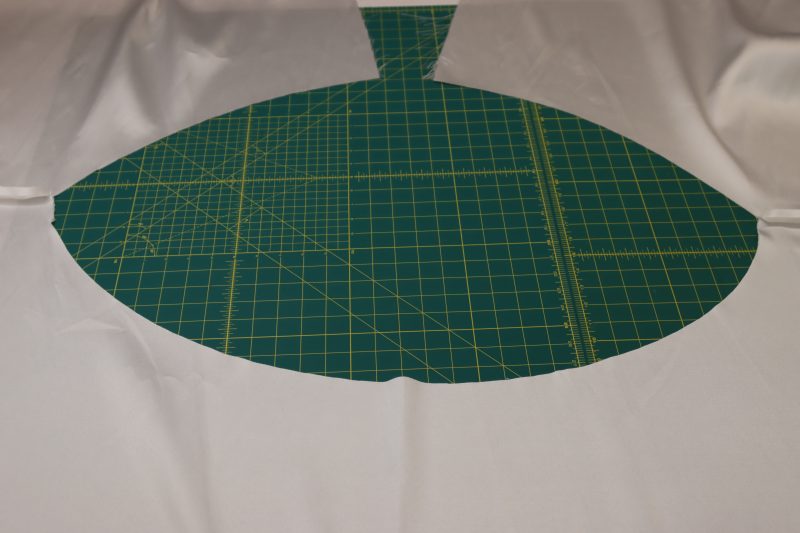
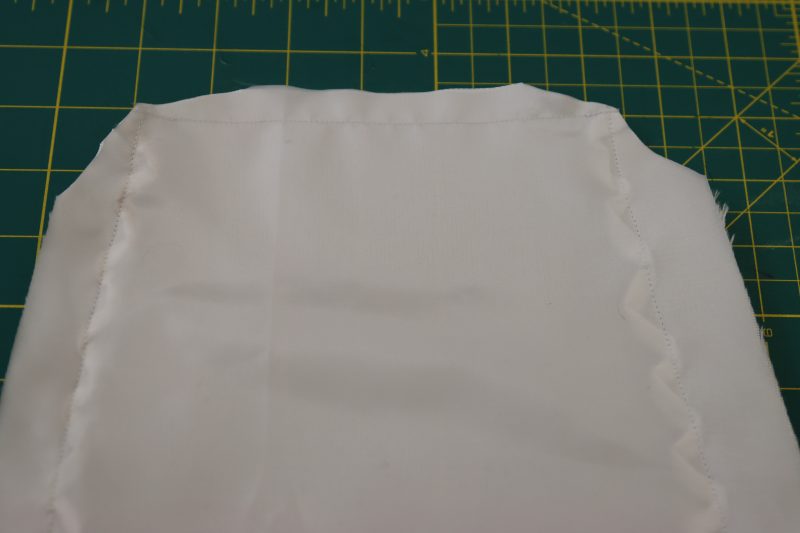
LINING SKIRT
- Lay the back lining skirt pieces right sides together on top of the front lining piece.
- Pin and sew the side seams of the lining skirt together.
- Press the side seams open and flat.
Step 15
ATTACH LINING
- Place the lining skirt right sides together with the waistline of the lining layer of the bodice.
- Pin and sew the lining skirt ONLY to the waistline of the lining bodice. Do not sew it to both layers of the bodice.
Step 16
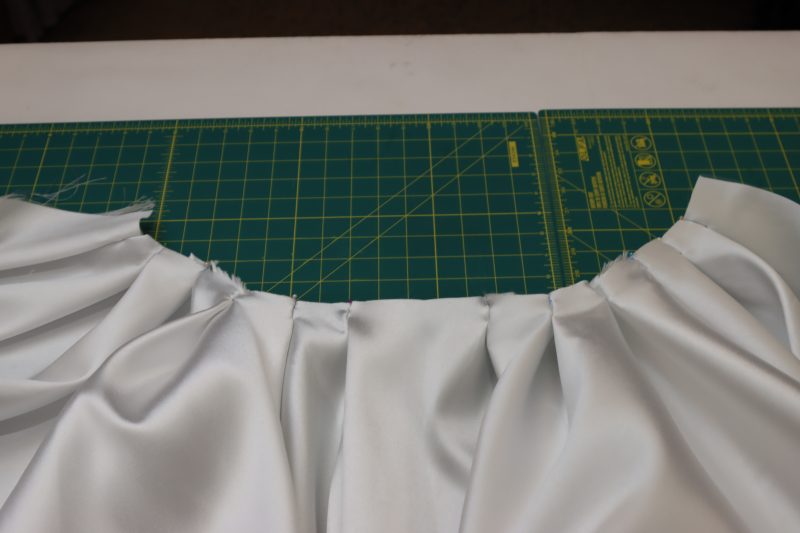
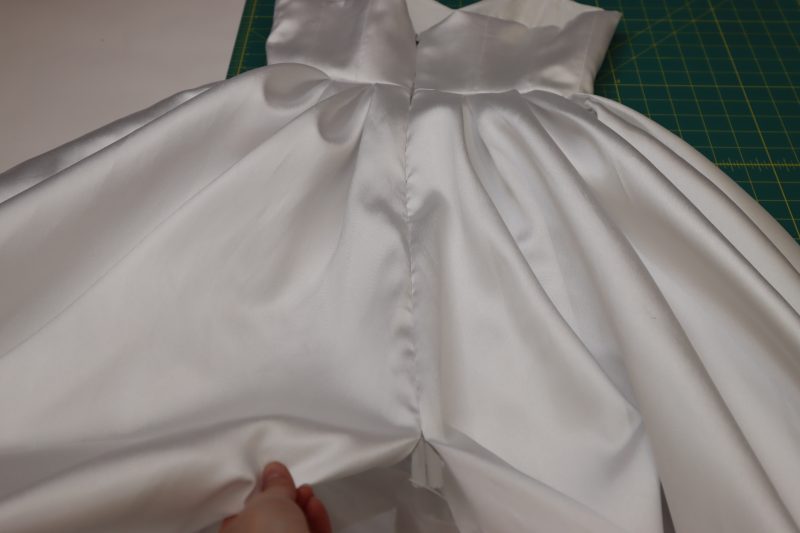
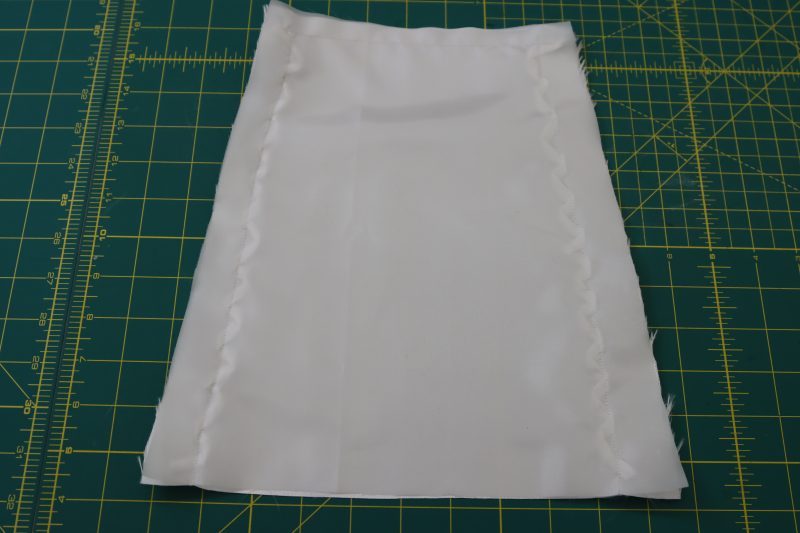
PLEATED SKIRT
- Sew the side seams of the outer fabric skirt the same way as the lining skirt side seams.
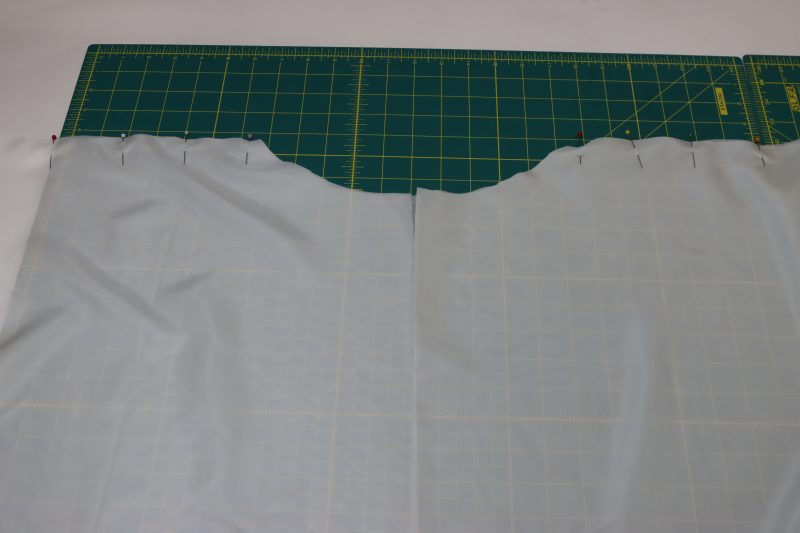
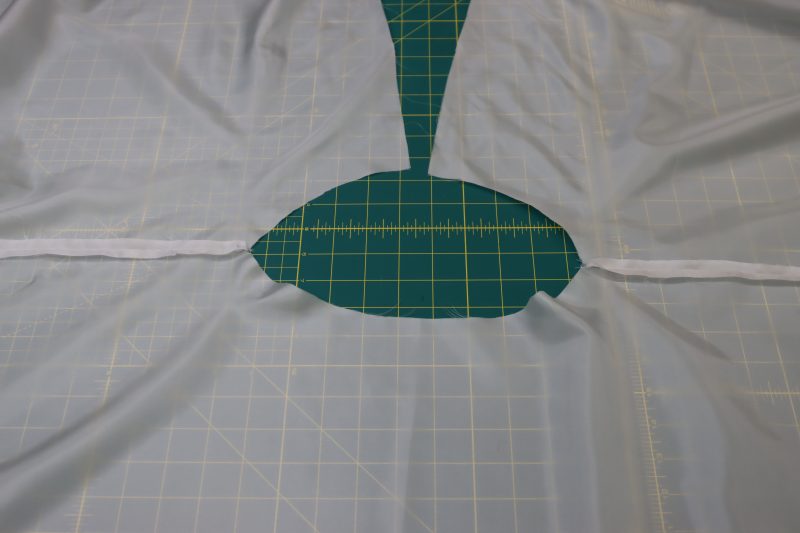
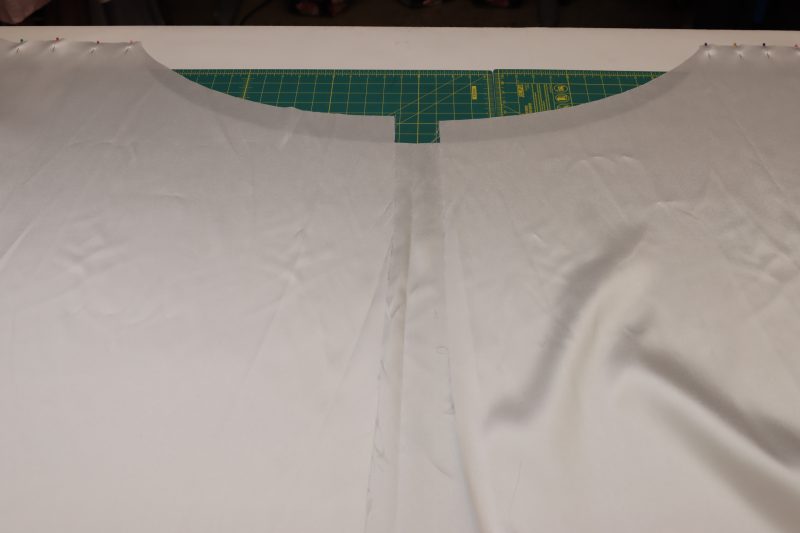
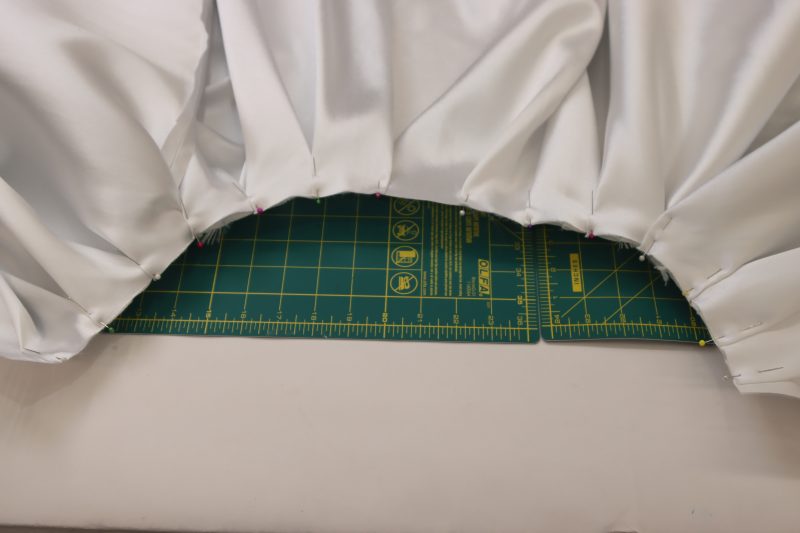
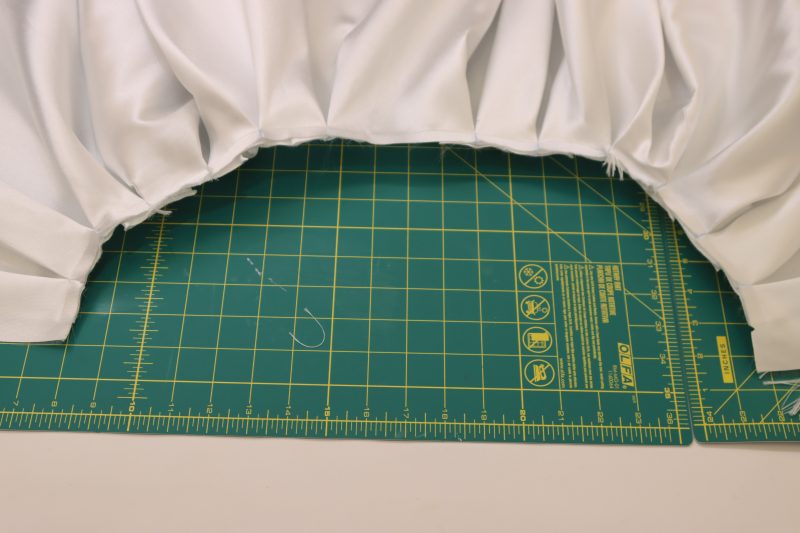
- This part requires a little bit of math so buckle up: Fold the outer skirt in half at the center front.
- We will be making 12 total pleats on the skirt, 6 on each side with a gap at the center front of the dress where there are no pleats.
- Mark 6 evenly spaced chalk marks at the waistline of the skirt to mark the center of each dart. Those 6 marks should be mirrored on the opposite side of the waistline.
- Measure the total length of the waistline of the outer skirt.
- Measure the length of the bottom of the bodice. We will be pleating the outer skirt until it is the same length as the hem of the bodice.
- Now we have to figure out the amount of fabric that needs to be folded into each pleat. To do that, here is the equation you need to use: Depth of Pleat = (Original Width of Skirt Waistline – Desired Width of Skirt Waistline)/12 pleats
- With my particular measurements entered, the equation becomes: Depth of Pleat = (78 inches – 28 inches)/12 = 4.17 inches. This means that you need to fold 4.17 inches into each pleat, or 2.09 inches on either side of each chalk mark at the waistline. Fold box pleats into the waistline of the skirt with each chalk line at the center of the fold of the pleat. Make sure that the amount of fabric folded into the pleat is the result of the equation above.
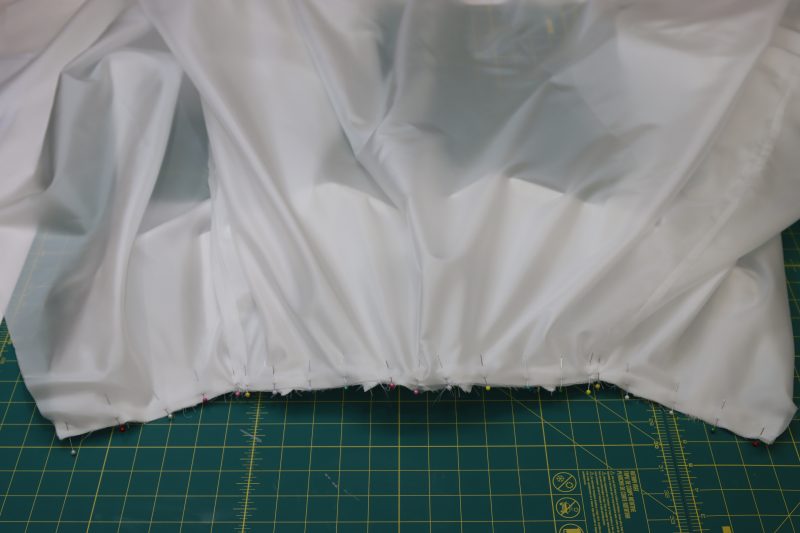
- Pin and sew the box pleats.
- Press the box pleats flat with an iron so that the chalk marks are now lined up perfectly with the seams of the pleats.
- Pin the box pleats flat.
- Sew a stay stitch over the box pleats with ¼ inch seam allowance.

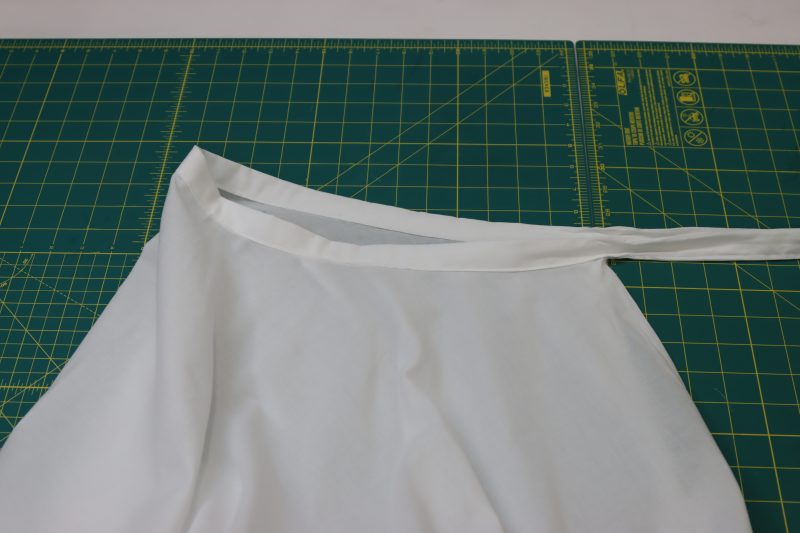
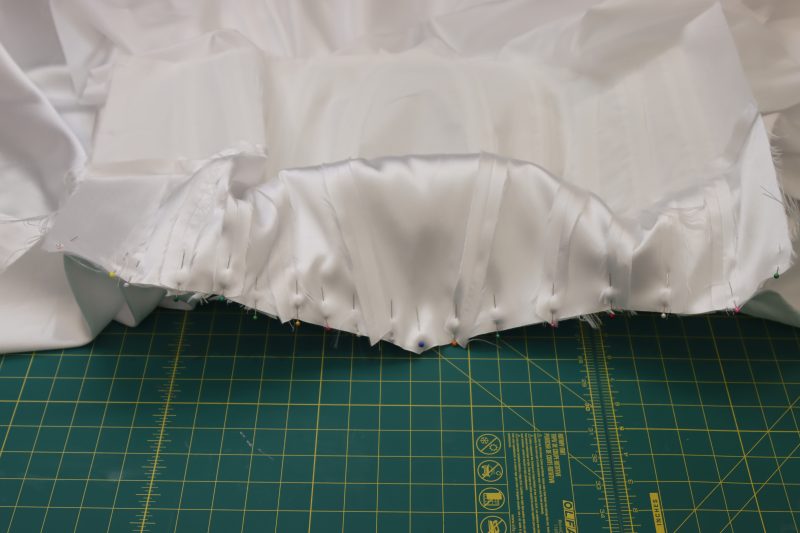
Step 17
ATTACH PLEATED SKIRT
-
- Pin the pleated outer skirt to the waistline of the outer bodice layer. DO NOT pin and sew the skirt to the lining layer of the bodice.
- Sew the pleated skirt to the outer bodice.
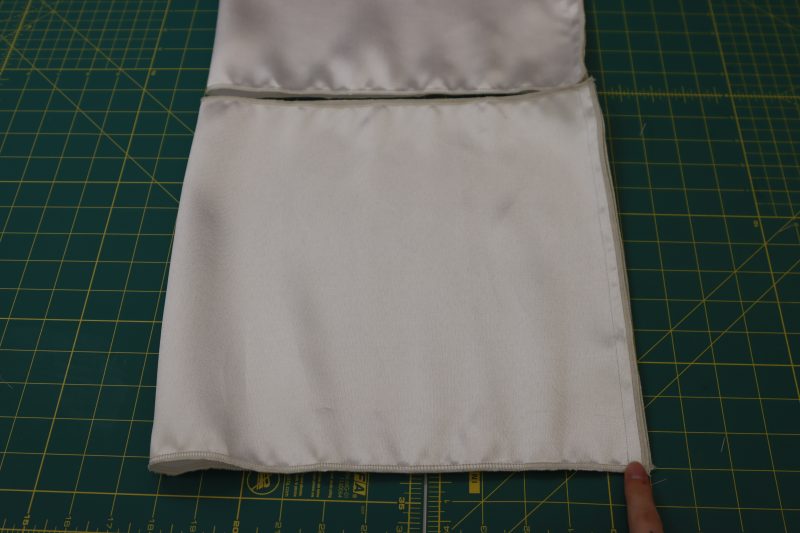
Step 18
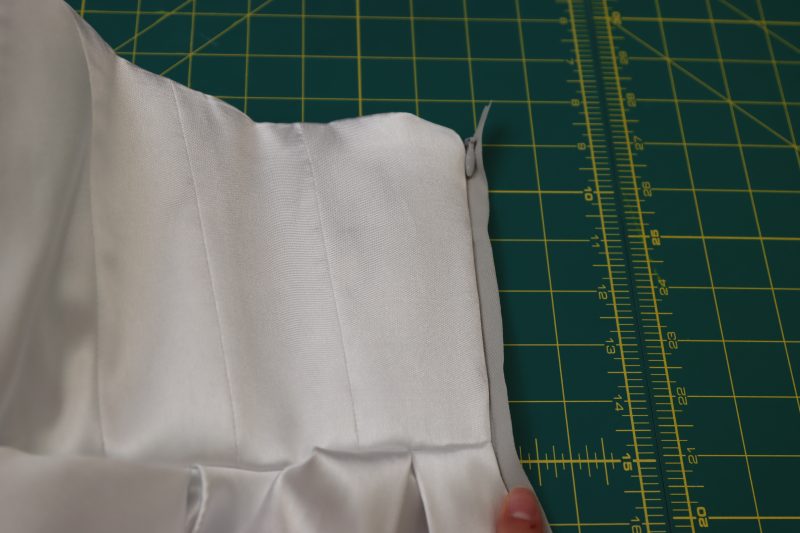
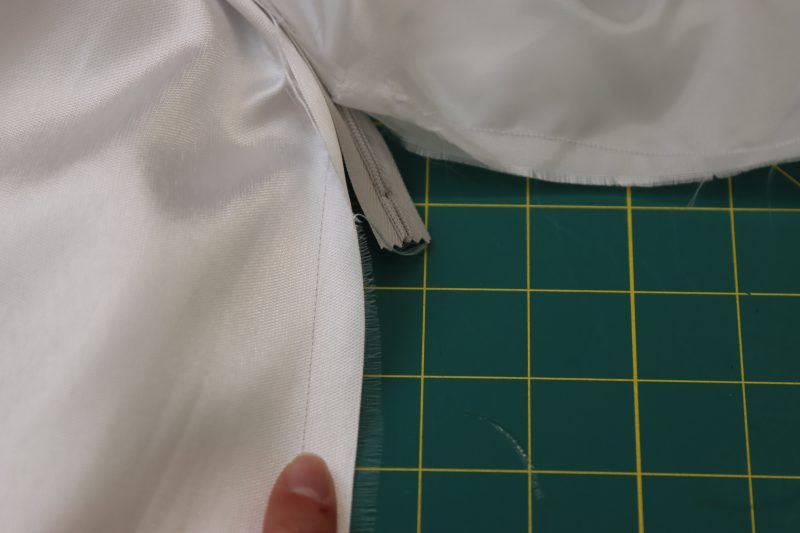
ZIPPER
-
- Place the zipper right sides together with the wearer’s left side of the center back of the gown. Only Pin it to the outer layer of the dress.
- Flip the lining layer of the dress out and lay it right sides together over the zipper tape you just pinned.
- Replace the pins so that both layers of the dress are sandwiching the zipper.
- Sew that side of the zipper tape.
- Flip the dress right sides out.
- Repeat the previous method of sandwiching and sewing the zipper but on the opposite side of the center back of the dress.
Step 19
CENTER BACK SEAM
-
- Press the center back seam along the zipper open and flat.
- Pin and sew the center back seams under the zipper to finish closing the seam. Sew the lining and the shell seams separately.
Step 20
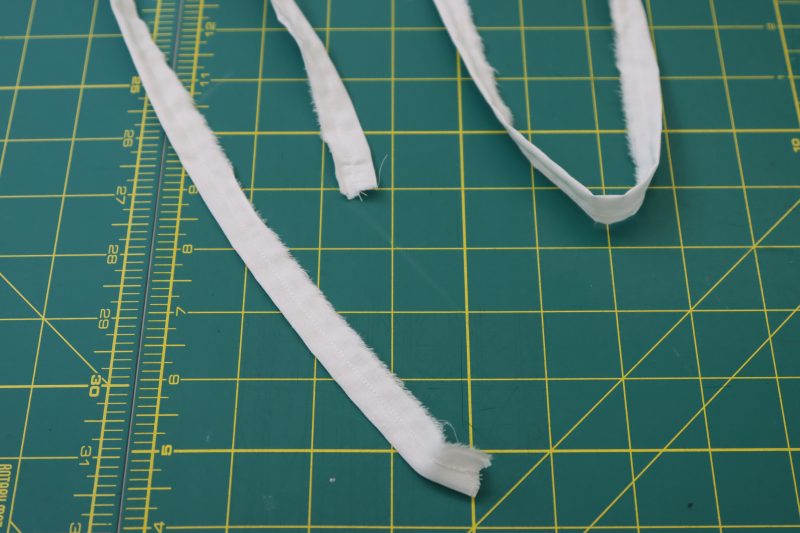
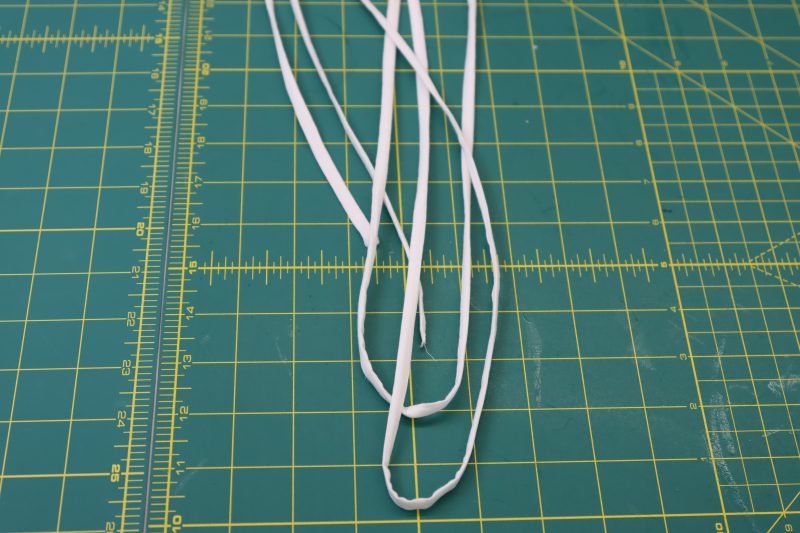
LACING
-
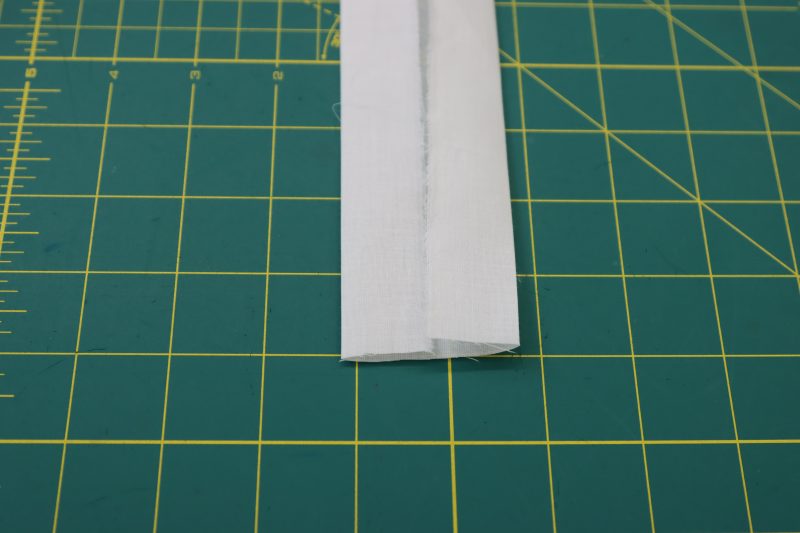
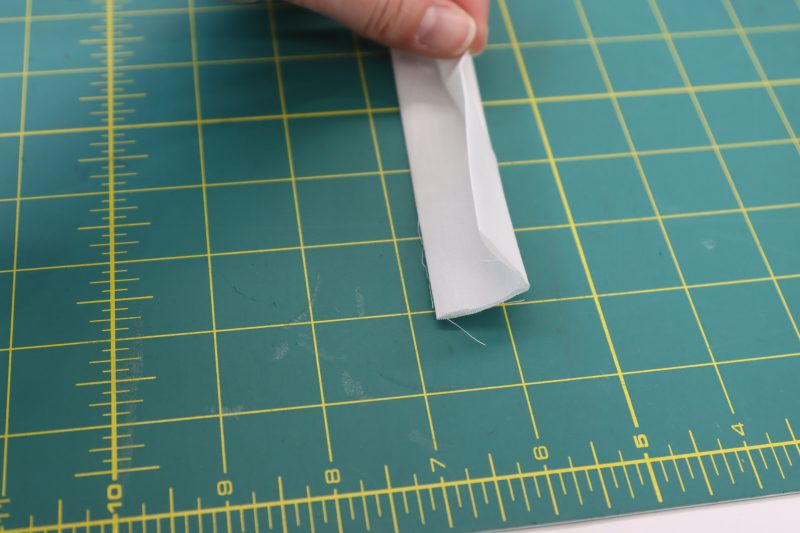
- Cut 2 strips of fabric that are 1 inch wide and at least 60 inches long (I used some leftover voile, but you can use any fabric. This part is for making the laces and the corset loops on the sleeve cuffs).
- Fold the strips right sides together and sew down the length of the strips with ¼ inch seam allowance.
- Flip the strips right sides out with a loop turner to bring the seam allowances inside of the tube.
- For one of the strips, cut it into 4 equal pieces. For the other strip, cut it in half.

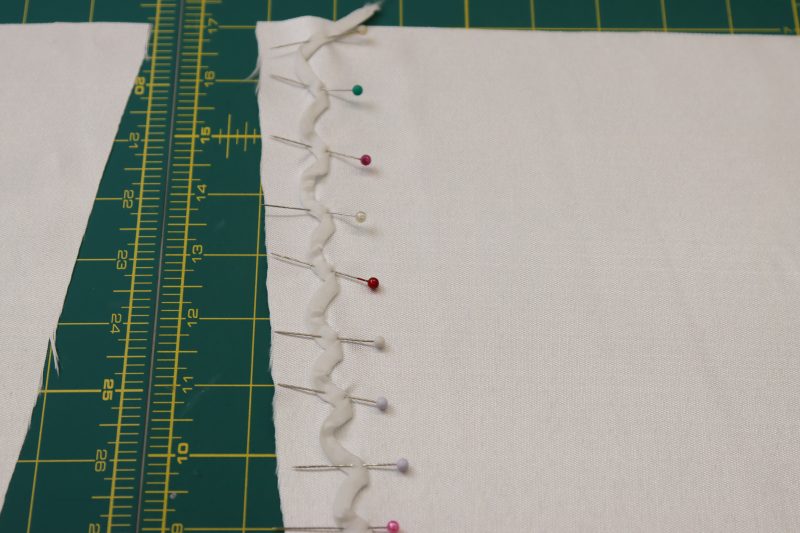
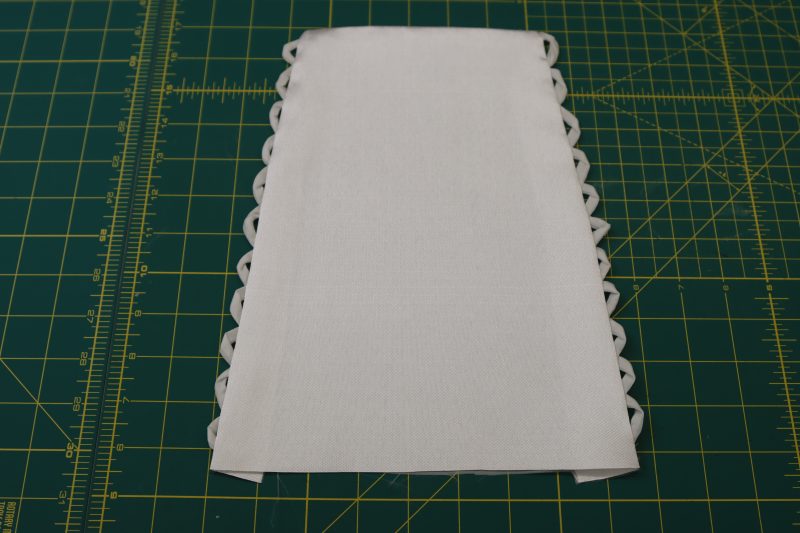
Step 21
SLEEVE CUFFS
-
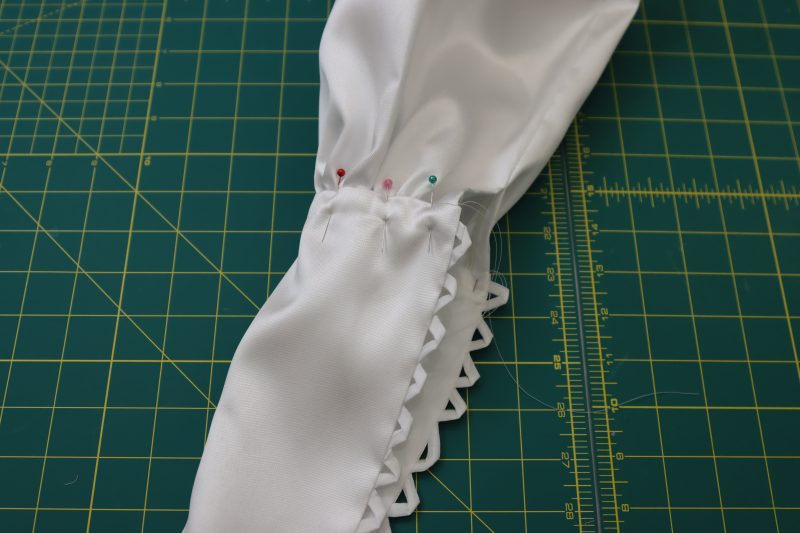
- Pin one of the 4 shorter strips in a zigzag pattern to the right side of one of the long edges of the cuff pieces. I pinned the strip down this way to make loops that can be used to lace up the cuffs (I really just eyeballed this part. I ended up with 11 loops in total, but you can make more or fewer if that’s your desired look).
- Sew a straight stitch down the center of the zigzag.
- Repeat the mirrored side of the same cuff piece.
- Place the other cuff piece without the loops on top of the one with the loops and pin them together.
- Sew around the two sides of the cuffs AND the bottom of the cuff (the shorts of the two ends of the trapezoid where your wrist will come out of the sleeve).
- Clip the corners of the cuff, flip it right sides out, and press the seams.
- Repeat for the other sleeve cuff so that you have two matching ones.

Step 22
SLEEVES
-
- Fold the sleeve pieces in half right sides together.
- Pin and sew the sleeve inseams except for a 4 inch gap at the bottom of the sleeve opening.
- Press the sleeve inseams open and flat.
- Topstitch the 4 inch gap so that the seam allowance is secured to the inside of the sleeve.
- Sew two parallel gathering stitches at the bottom of the sleeve by the gap.
Step 23
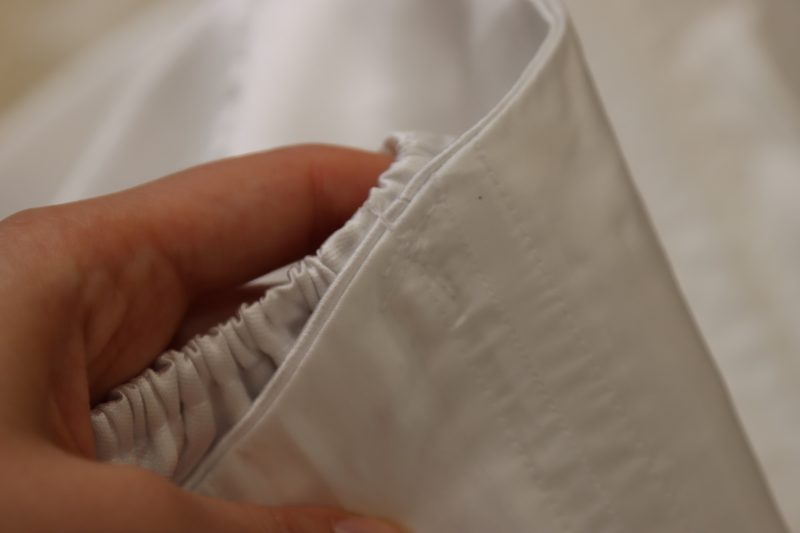
SLEEVE ELASTIC
-
- Press a ½ inch fold into the top edge of the sleeve.
- Stitch around the folded edge of the sleeve with a ⅜ inch seam allowance, being sure not to go completely around the top of the sleeve so that there is a gap for inserting elastic.
- Cut 2 pieces of elastic that fit snugly around your upper arm.
- Use a safety pin to insert the elastic into the casing at the top edge of the sleeve.
- Once you feed the elastic all the way through the sleeve, pin and sew the elastic into a closed loop.
- Topstitch the rest of the casing shut.

Step 24
ATTACH SLEEVES
-
- Gather the bottom edge of the sleeve until it is the same width as the opening of the cuff.
- Press a ½ inch fold the raw edges of the cuff and tuck them into the inside of the cuff.
- Sandwich the gathered bottom of the sleeve into the cuff.
- Pin and sew the gathered sleeve into the cuff.
- Pin and sew the inseam at the top of the sleeve to the side seam of the bodice at the neckline.
- Now would also be a good time to lace up the sleeves with the two strips of fabric that are 30 inches long that you made in step 20. It’s much easier to lace the sleeves up when you’re not wearing the dress yet.
Step 25
HEM SKIRT
-
- Press a 1 inch fold into the hem of the outer skirt.
- Press fusible hem tape into the fold so that the hem is invisible.
- Sew a double folded ½ inch hem into the lining skirt.

Sewing Success: The Completed Selenite V-Waist Ballgown
Share this post with a friend (or two!), download the Selenite V-Waist Ballgown free sewing pattern, and show us which fabrics and colors you choose, using the hashtags #MoodSelenitePattern & #MadeWithMood—and don’t forget to tag us @MoodFabrics, too.


Free Sewing Pattern Inspiration for Your Next Project
With 500+ free sewing patterns and counting, your opportunities for sewing with Mood are endless!
We hope you had as much fun sewing this v-waist ballgown pattern as we did! As always, we want to hear from you—share your thoughts and comments below and let us know where you’ll be wearing the Selenite V-Waist Ballgown free sewing pattern!
Can’t get enough sewing with Mood? Browse your next make with our latest free sewing patterns.
Bridal Sewing? Our Cassis Tiered Sleeve Blouse and Lunette Cocktail Dress free sewing patterns make for the perfect bridal event dressing combo! Imagine bridal shower attire, wear the Lunette cocktail dress on its own for your bachelorette party or pack both for your honeymoon! Need a dress for a day wedding or nighttime affair? Don’t miss out on sewing our beginner-friendly Estoril Collared A-Line Dress.
Hi!
This is a beautiful pattern. However, I couldn’t find any mention of the interfacing in the materials needed section, nor in the shop this look pop-up. What kind of interfacing would you recommend?
Hey Petra, thank you for pointing this out! I just edited the materials list at the beginning of the post with the interlining that I used.
Could the skirt be made shorter? How do I go about doing that without ruining the original design?
Hey Bridgette, since the skirt is just a circle skirt, you can shorten the skirt by just cutting out a circle with a smaller diameter.
Would love to make this for my girl for a party comming up. She would love it in blue
Is there any suggestions to alternative sleeves? She don’t like sleeves this far off the shoulder.
Hey Nanna! Check out the sleeves for the Venice V-Waist Dress. It is a similar style dress with a corseted bodice and sleeves that just hang off the shoulders, but the sleeves are a little more secure.
Thank you so much for this pattern! I made it for my daughter’s prom dress using dusty pink satin for the skirt and a pink sequined fabric for the bodice. It was lovely! While I loved the sleeves in the original pattern, she had a different vision, so I just made the straight part longer and kept off the wider part of the sleeve. I used a pink tulle for a see-through effect. Thank you!!
I could totally see this dress being used to create a “Sarah” cosplay from the Labryinth movie during the dream ballroom scene.