

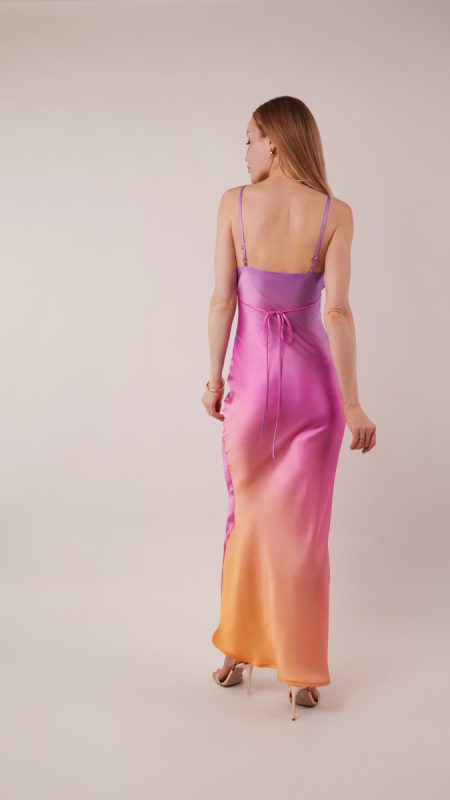
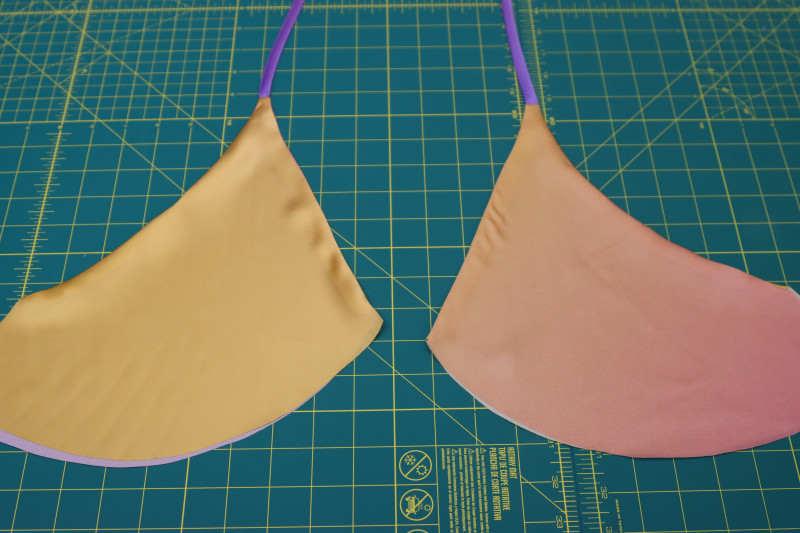
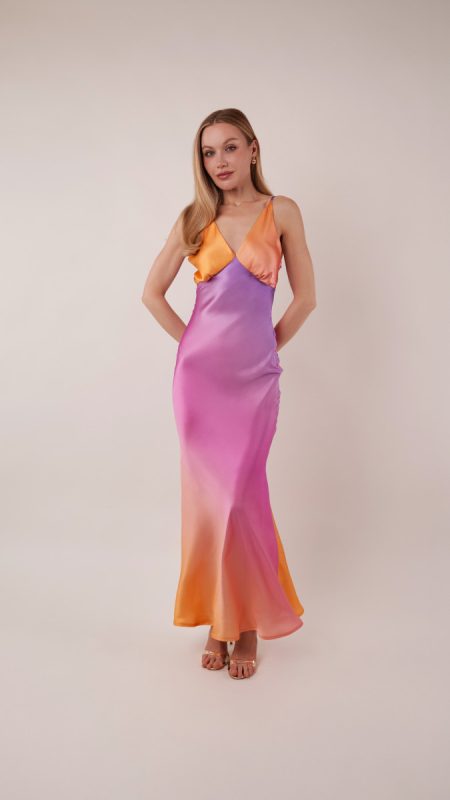
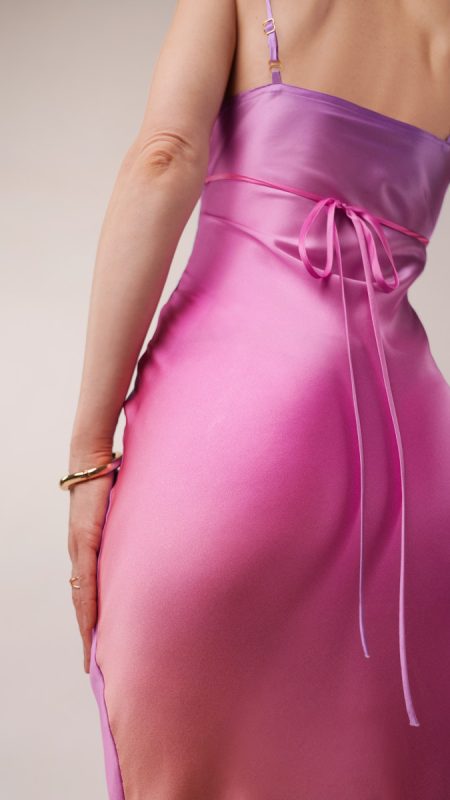
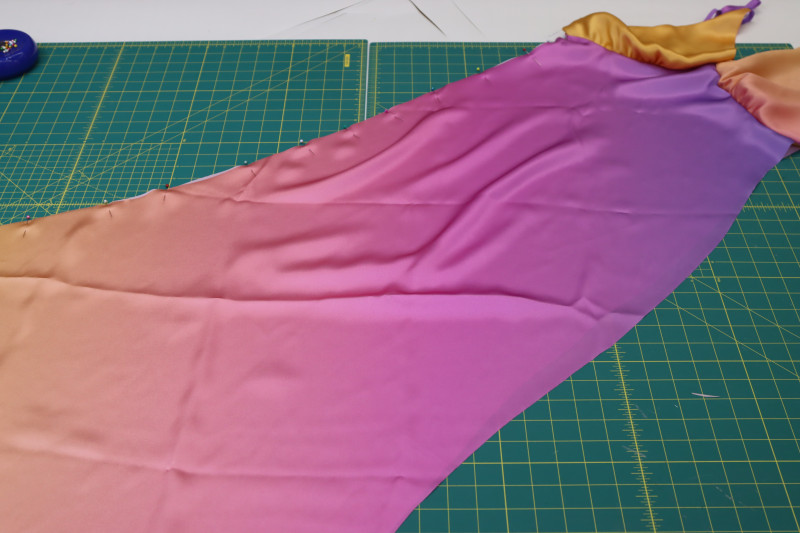
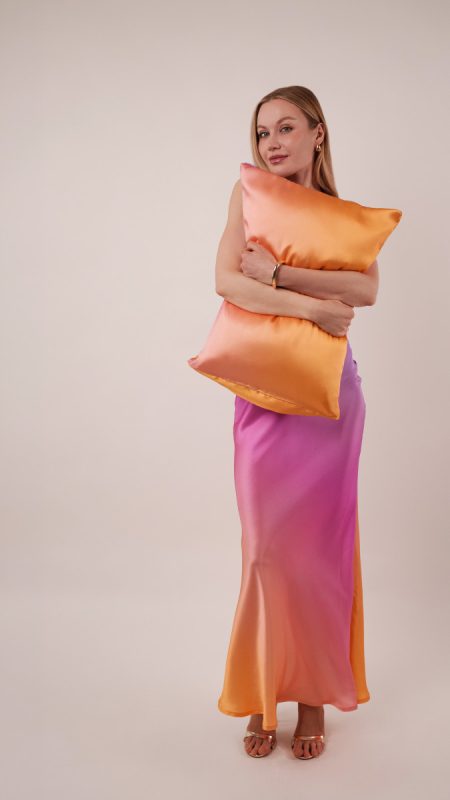
The Alexandrite Sunset Silk Charmeuse Slip Dress was designed to glow like a summer sunset and move like liquid. Crafted from a breathtaking ombré silk charmeuse print in dreamy shades of pinky peach, golden yellow, and soft lavender, this bias-cut gown drapes over the body with an elegance that feels almost unreal. The fabric skims your curves so effortlessly, it looks as though it was painted directly onto the skin, hugging in all the right places without ever feeling restrictive.
With adjustable straps and a customizable waist tie, this sultry slip dress lets you create the perfect fit for your body and your mood while still maintaining that breezy silhouette. The result is pure glamour with an easy, relaxed feel.
This is the kind of dress that was made for vacation nights and golden hour walks by the water. Just add delicate jewelry, a pair of strappy heels, and an icy fruity cocktail in hand, and you’re ready to become the main character of your summer getaway.


Essential Materials & Sizing Guide for the Alexandrite Sunset Silk Charmeuse Slip Dress
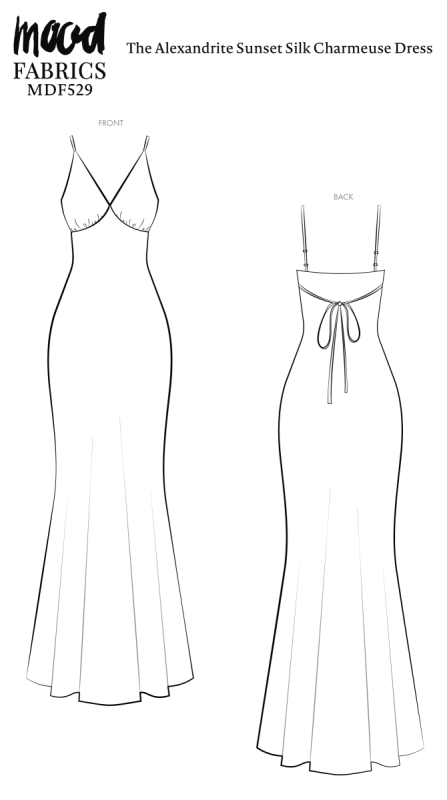
Continue reading for a breakdown of what knowledge and materials you need for creating your very own dress! We’ve got you covered with the recommended materials we used—if you want to follow along exactly—as well as a curated list of alternative fabric type recommendations if you want to customize your own version. The Alexandrite Sunset Silk Charmeuse Dress free sewing pattern download includes technical drawings for seam and dress visibility, plus a size chart to help you find your perfect fit!
Purchase Products Used Below:
Quantities indicated are for sewing a size small slip dress. Toggle the ‘SHOP THIS LOOK’ box to find quantity estimates for other sizes.
- 3.5 yards of Silk Charmeuse Print 16MM, Made in Italy – Light Peach, Pink and Lavender Ombre
- 1 each of Gutermann Sew All Thread 250m – 913 Pink
- 1 each of Gold Metal Slider for 3/8″ Strap – Set of 4
- MDF529 – Alexandrite Sunset Silk Charmeuse Slip Dress Sewing Pattern (Free download below!)
Additional Products Used:
*Quick Tip! The ‘SHOP THIS LOOK’ box defaults to full-yard quantities. To order an exact half-yard quantity for any fabric, simply use the decrease quantity button (-) to subtract by the half yard. Then click “ADD TO CART” to add all materials to your cart. (Our system can only display full-yard quantities initially.)
Alternative Fabric Type Recommendations:
The Alexandrite Sunset Silk Charmeuse Slip Dress sewing pattern is best suited for light or featherweight fashion fabrics. Explore other fabric types or colors from our featured collections for your dress with the links below.
Download Your Free Sewing Pattern
Submit your name and email in the form below to receive the download link for the Alexandrite Sunset Silk Charmeuse Slip Dress free sewing pattern directly in your inbox. Mood Sewciety Patterns will send your free download link via email with the subject line: ‘Your Free Download from Mood Sewciety – The Alexandrite Sunset Silk Charmeuse Slip Dress’ (in PDF format for A4 and letter-size printing).
© MoodFabrics.com / MoodSewciety.com – Mass production, resale, or distribution of this pattern in any form is strictly prohibited.
Find Your Perfect Fit
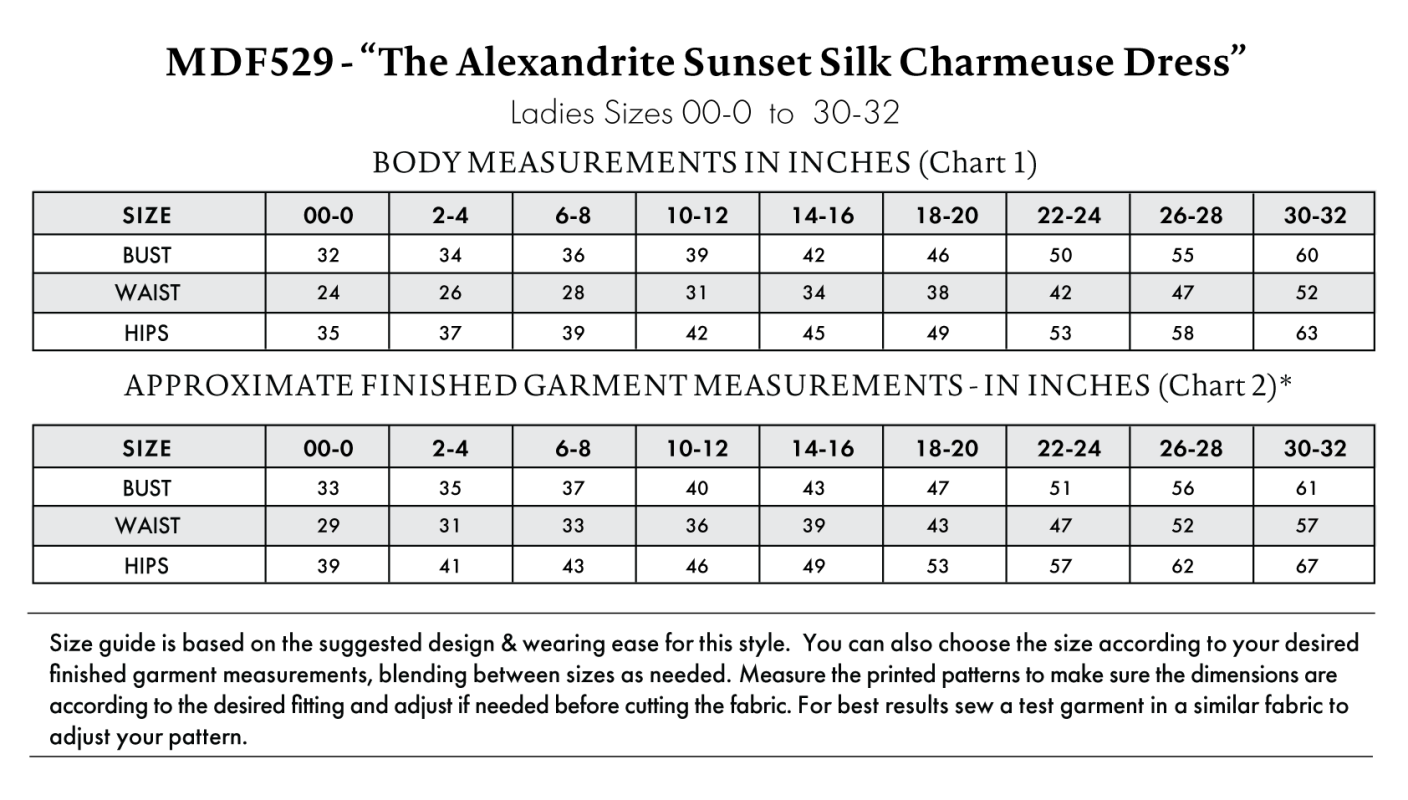
The Alexandrite Sunset Silk Charmeuse Slip Dress Sizing Guide is based on the suggested design & wearing ease for this style. You can also choose the size according to your desired finished garment measurements, blending between sizes as needed. Measure the printed patterns to make sure the dimensions are according to the desired fitting and adjust if needed before cutting the fabric. For best results, sew a test garment in a similar fabric to adjust your pattern.
Note: Always read all the instructions before cutting the fabric!
How to Sew The Alexandrite Sunset Silk Charmeuse Slip Dress
The instructions provided below are designed to guide you through sewing the Alexandrite Sunset Silk Charmeuse Slip Dress from start to finish.


4 Tips for Sewing with Silk Charmeuse
⇒ Use a super skinny, super sharp microtex needle on your machine for this whole project to prevent thread pulls and rats nests in your sewing machine.
⇒ When cutting out your pattern, I recommend pinning the pattern pieces directly to the fabric with more pins than you think you need to. This will ensure that the fabric doesn’t warp and shift while you’re cutting it.
⇒ Lower the heat on your iron and use a piece of muslin between the iron and the silk. Silk doesn’t melt like synthetic fibers, but it can still burn.
⇒ This one is kind of important: before hemming your dress (after step 8), hang your dress on a mannequin or hanger to let the bias weigh itself down. After letting it sit for 24 hours, trim the hem again so that it is perfectly flat, then you can sew it.


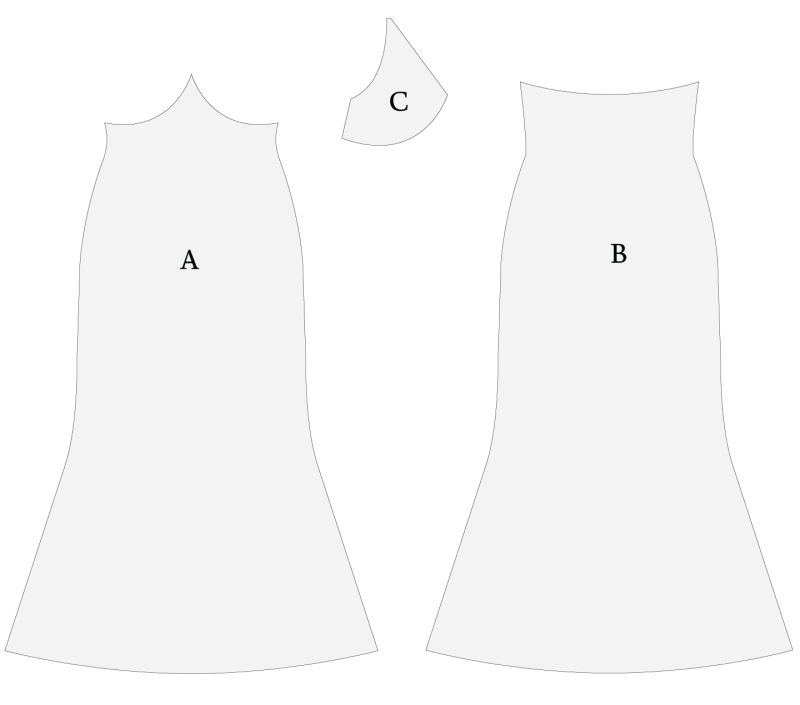
Pattern Pieces & Fabric Cuts Needed
- (A) FRONT
- Fabric – Cut 1
- (B) BACK
- Fabric – Cut 1
- (C) CUPS
- Fabric – Cut 2 Mirrored Sets

Sew with a 1/2″ seam allowance for all seams unless otherwise specified.
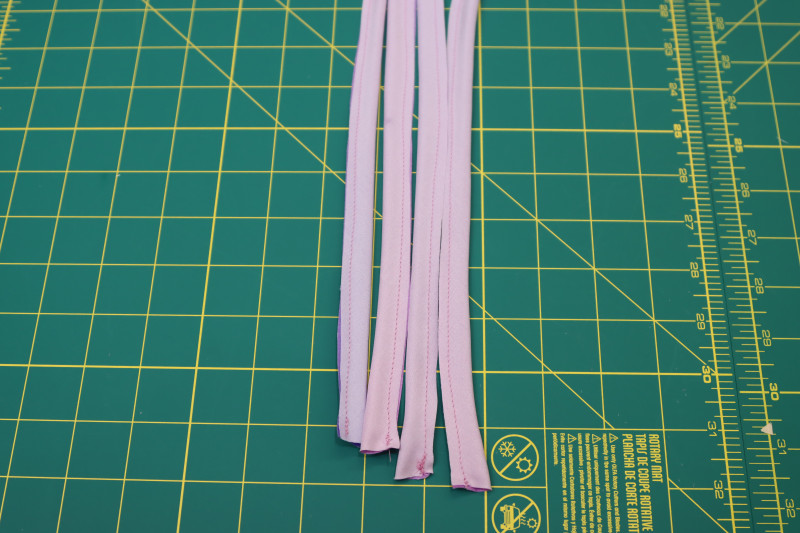
Step 1
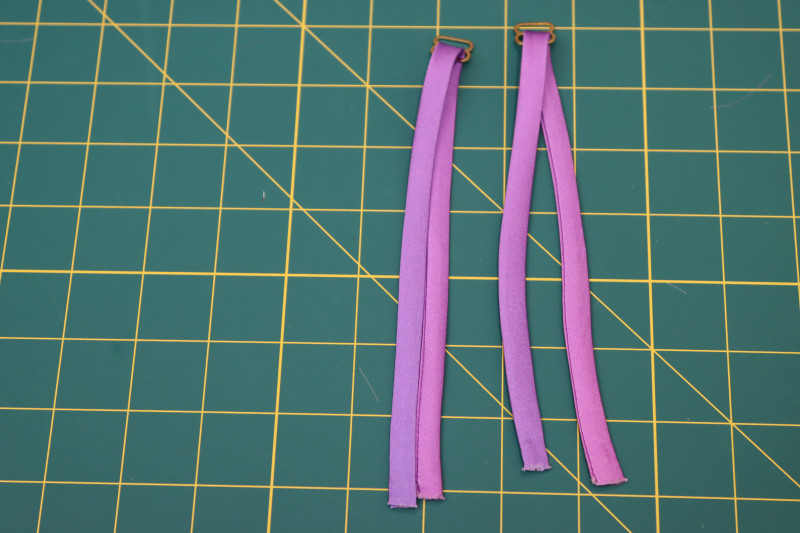
STRAPS & WAIST TIES
- Fold the straps in half long ways right sides together.
- Sew the length of the straps with ⅛ inch seam allowance.
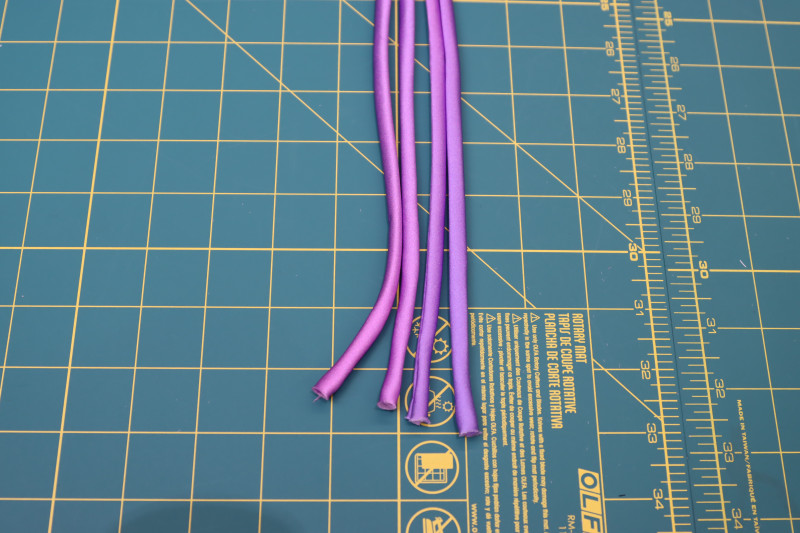
- Flip the straps right sides out with a loop turner.
- Press the straps flat with an iron.
- When you’re done sewing the 4 shoulder straps, cut 2 straps that are both twice as long as the shoulder straps and repeat the above process to make the waist ties.
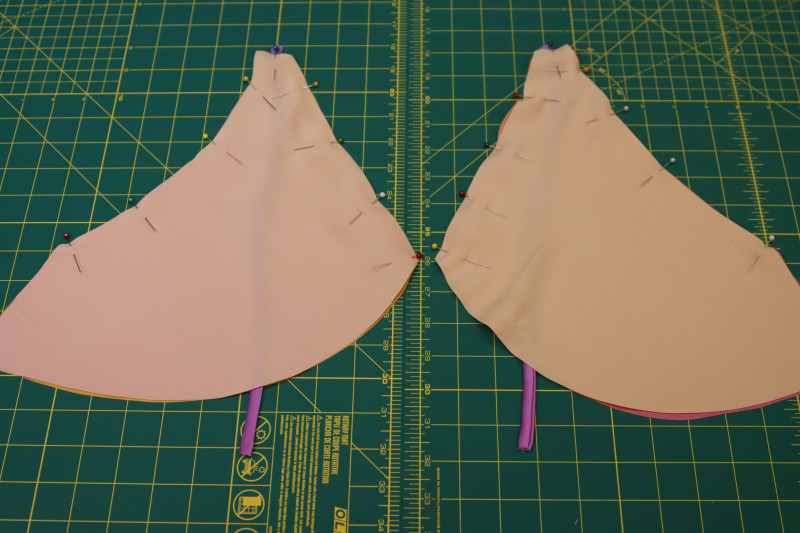
Step 2
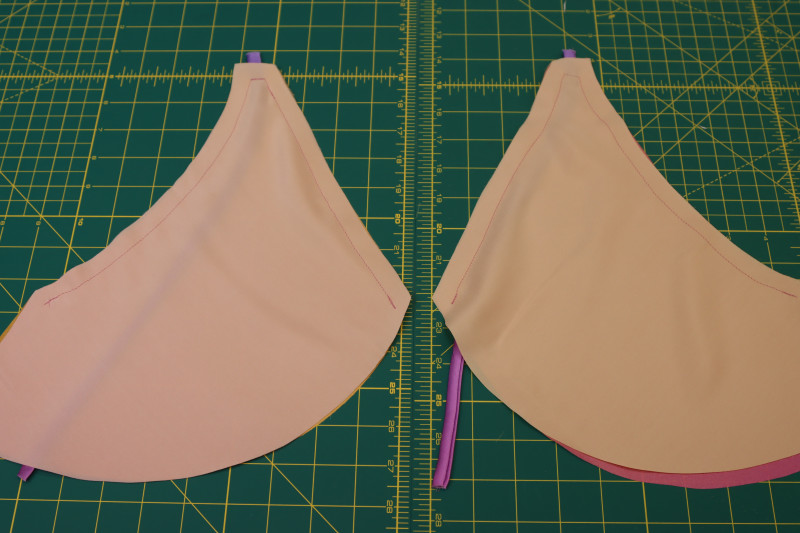
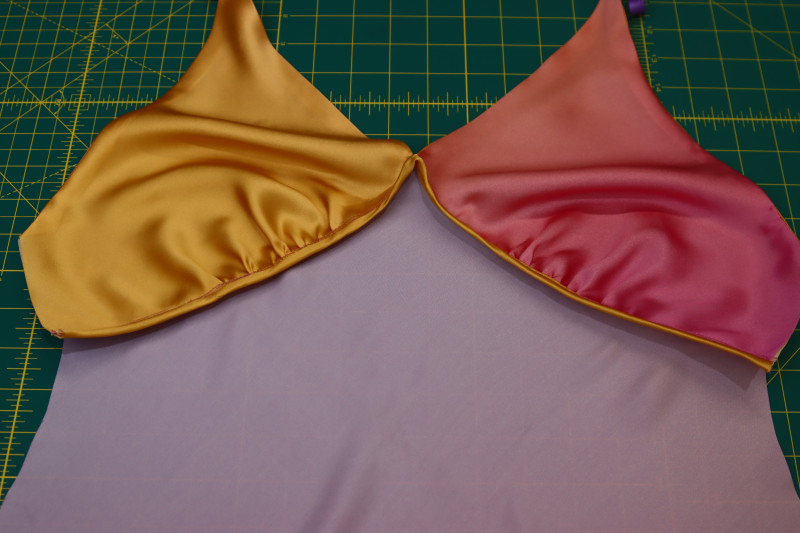
BRA CUPS
- Place the bra cups in two piles where the cups are facing right sides together.
- Sandwich a shoulder strap between each set of bra cups as shown in the below photo.
- Pin the top edges of the bra cups.
- Sew along the pins.
- Clip the top corner of the bra cups where the strap sticks out.
- Flip the bra cups right sides out and press the seams.
Step 3
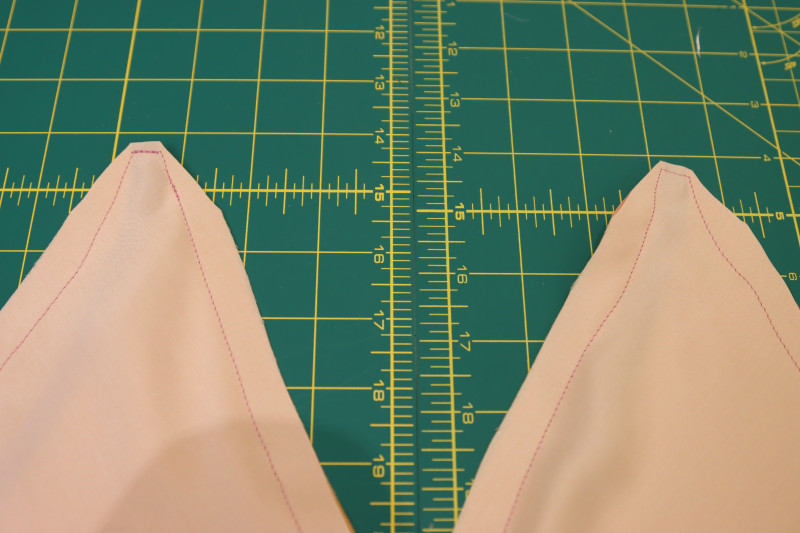
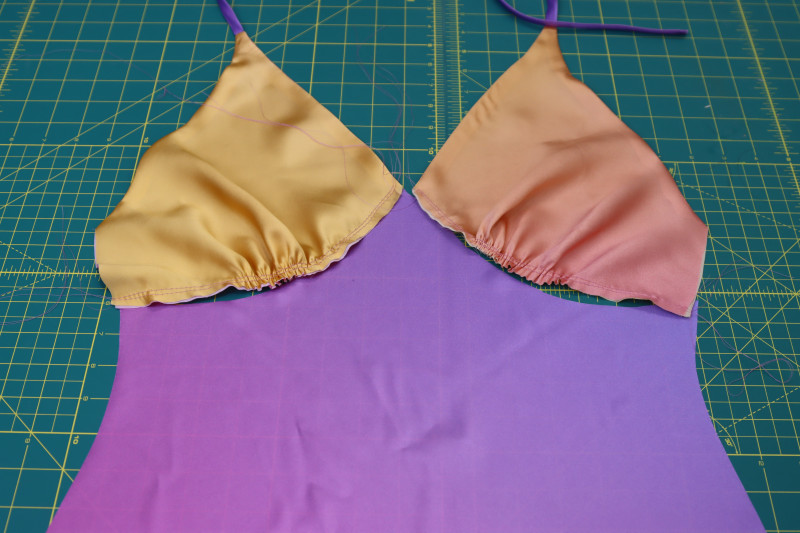
GATHER CUPS
- Sew two gathering stitches along the bottom edge of each bra cup.
- Pull on the top threads of the gathering stitches to gather the cups until they are roughly the same length as the curves in the top of the skirt front.

Step 4
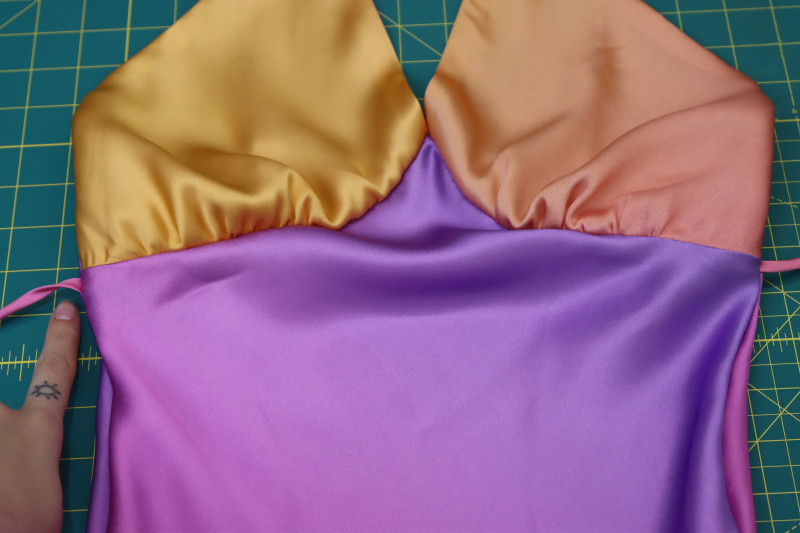
ATTACH CUPS
- Pin the bra cups ONE AT A TIME to the curved edge at the top of the skirt front, making sure the edges of the bra cup are lined up with the corners of the skirt front.
- Sew one bra cup on.
- Pin and sew the other bra cup on.
Step 5
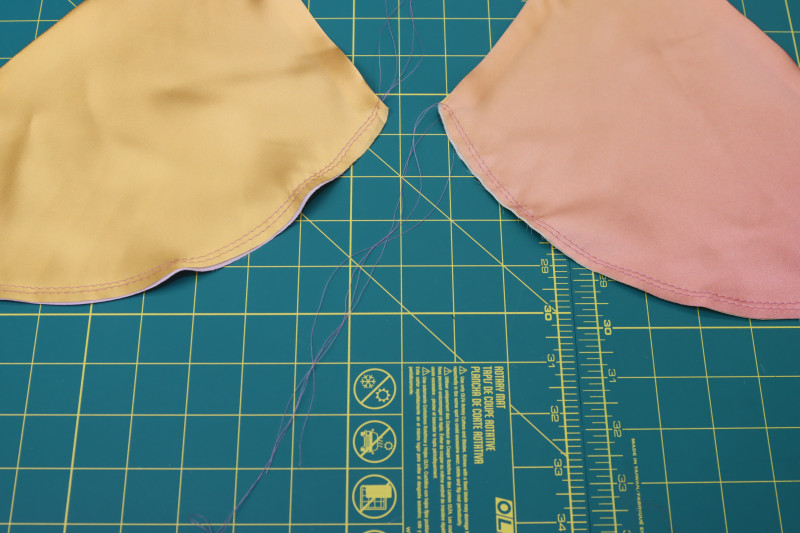
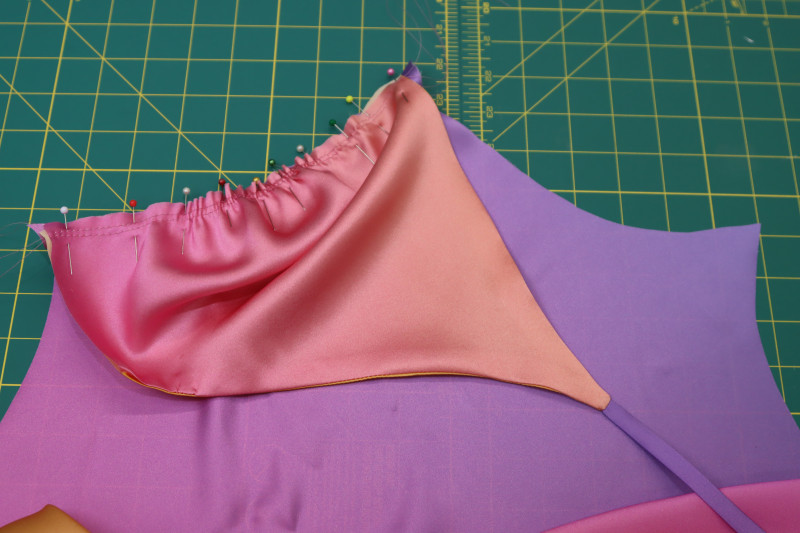
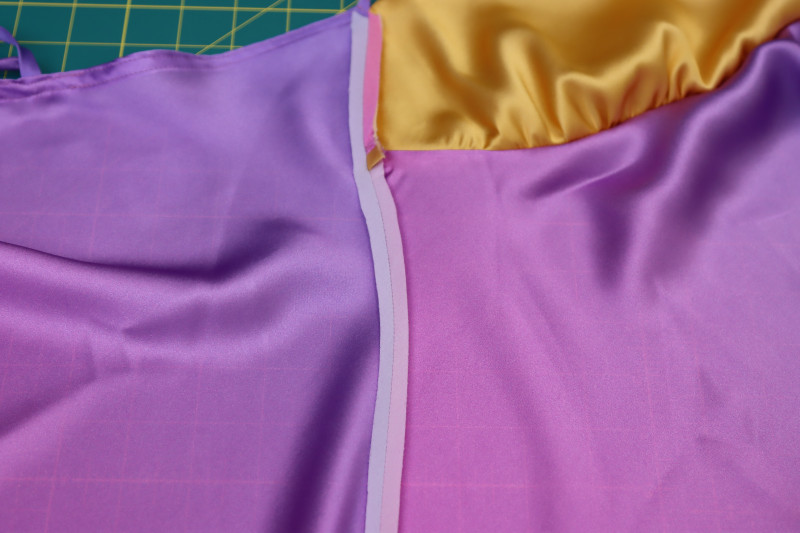
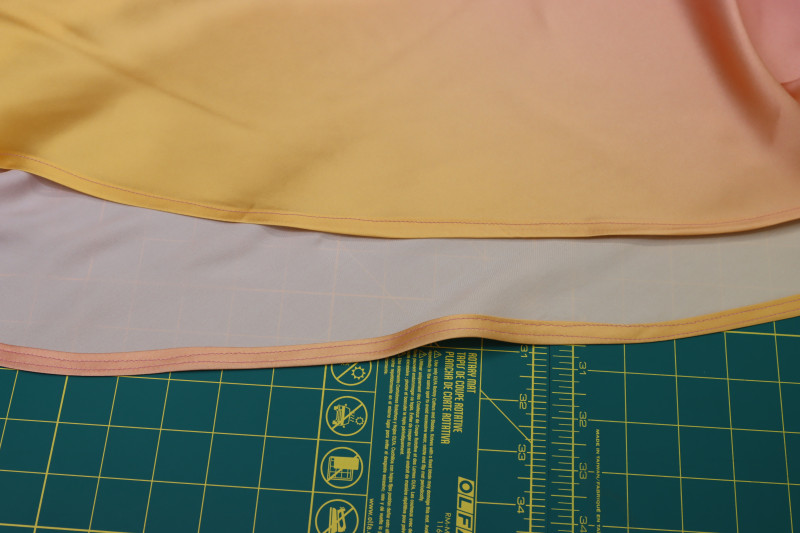
BIAS BINDING
- Cut a strip of bias tape that is 1.5 inches wide and as long as the bust seam.
- Sew the bias tape right sides together with the seam allowance of the bust seam.
- Trim the seam allowance down to ¼ inch.
- Wrap the bias tape around the seam allowance, fold it over itself, and pin it in place.
- Topstitch the folded edge of the bias tape to the seam allowance.

Step 6
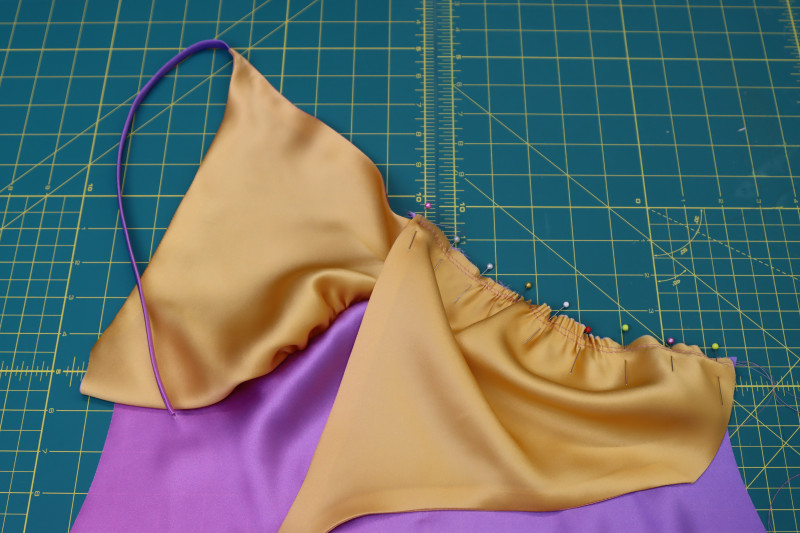
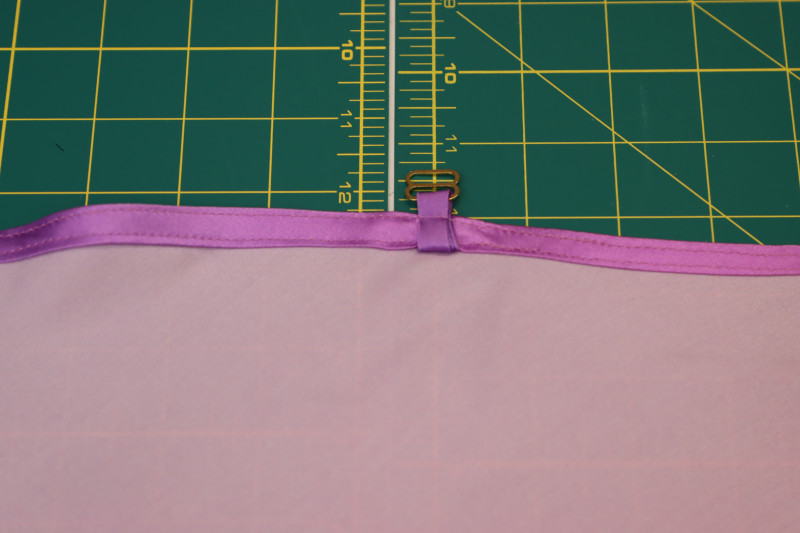
BACK STRAPS
- Insert the other set of shoulder straps into the bottom loop of the strap adjusters.
- Press a double folded ¼ inch hem into the top neckline of the back skirt.
- Insert the back straps into the fold (you’re allowed to trim the back straps like I did so that they don’t stick out as long from the back neckline).
- Make two parallel top stitches over the fold on the back neckline of the dress, securing the back straps in place and hemming the neckline.


Step 7
SIDE SEAMS
- Place the front and back of the dress WRONG SIDES TOGETHER.
- Pin and sew the side seams of the dress with a ¼ inch seam allowance.
- Press the side seams open and flat.
- Fold the dress right sides together at the side seams.
- Before sewing the french seams, insert the waist ties directly under the bust.
- Sew the side seams right sides together with ¼ inch seam allowance to create french seams on the sides of the dress and secure the waist ties.
Step 8
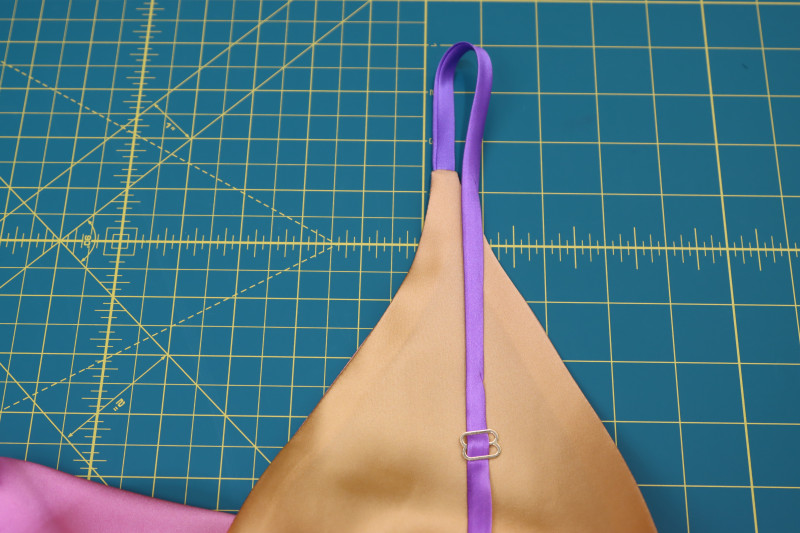
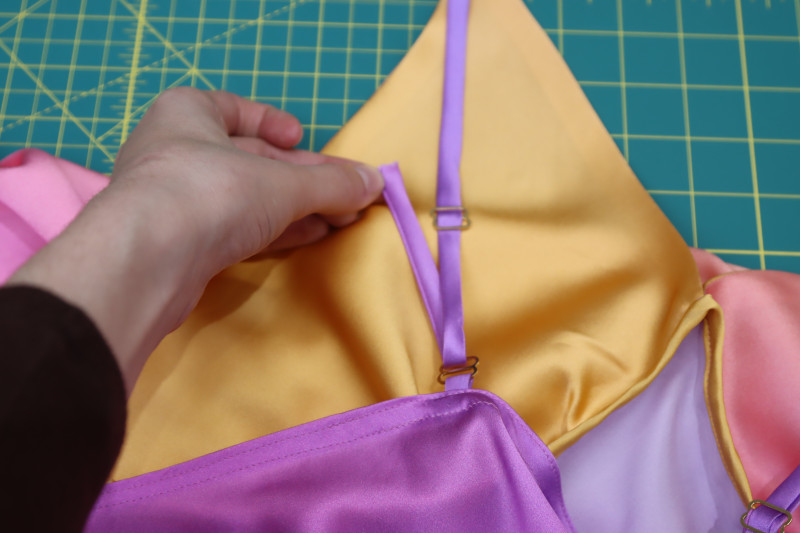
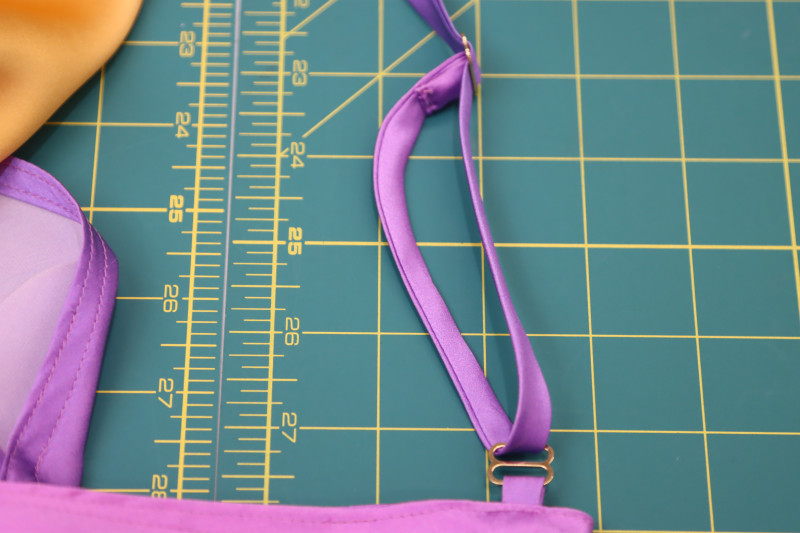
STRAP ADJUSTERS
- Insert the front shoulder straps through the other set of strap adjusters but putting it into one loop and out of the other, as shown in the photo below.
- Insert the front strap through the top loop of the back strap adjuster from front to back.
- Insert the front strap back through the top strap adjuster the same way you inserted it in step 8.1.
- Sew the raw edge of the front strap to itself under the top strap adjuster.

Step 9
HEM
- Before hemming the dress, let it hang for 24 hours to let the bias adjust. Trim the hem so that it is parallel with the floor, then hem.
- Sew a double folded ¼ inch hem into the bottom of the dress.
- Press the hem.


Sewing Success: The Finished Alexandrite Sunset Silk Charmeuse Slip Dress
Share this post with a friend (or two!), download the Alexandrite Sunset Silk Charmeuse Dress free sewing pattern, and show us which fabrics and colors you choose, using the hashtags #MoodAlexandritePattern & #MadeWithMood—and don’t forget to tag us @MoodFabrics, too.


Free Sewing Pattern Inspiration for Your Next Project
With 525+ free sewing patterns and counting, your opportunities for sewing with Mood are endless!
We hope you had as much fun sewing this slip dress pattern as we did! As always, we want to hear from you—share your thoughts and comments below and let us know where you’ll be wearing the Alexandrite Sunset Silk Charmeuse Slip Dress free sewing pattern!
Can’t get enough sewing with Mood? Browse your next make with our latest free sewing patterns.
this dress is special both the style and the chosen materian and also very feminine, timelessly beautiful still simple
The pattern is missing page A4
Hi Keri,
Yes, it is a blank page that is not needed to assemble the pattern. You can check the diagram on page 1 of your PDF.
What are the dimensions for the straps? How wide and long?
I cut mine to be 1 inch wide, then folded them in half long ways and sewed with a 1/8 inch seam allowance so that the width of the strap once its turned right sides out is 3/8 inches. for the length, I cut all 4 of the straps to be 10 inches long, but you will end up trimming the ones that are sewn to the back of the dress. I hope this helps!