

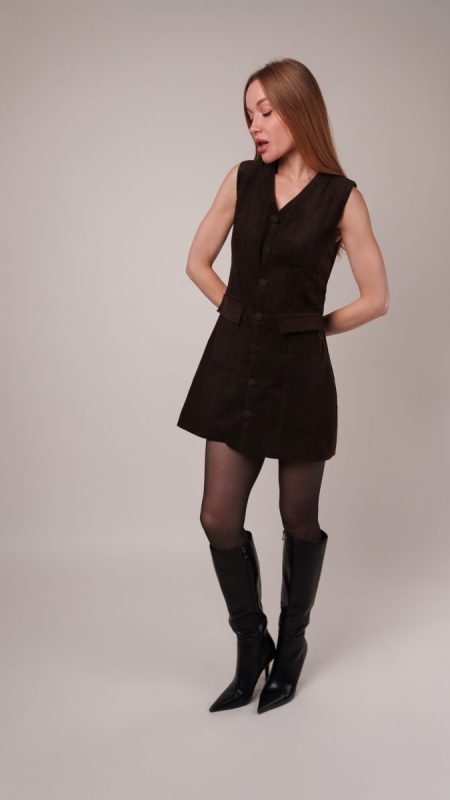
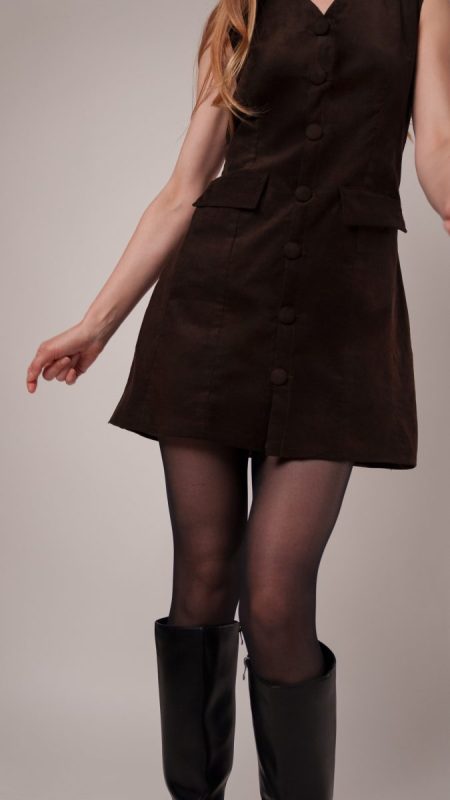
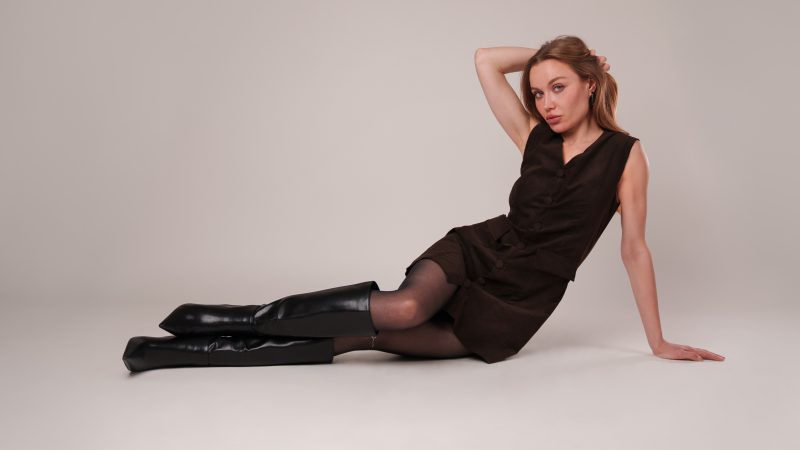
The Fawn Mini Dress captures a classic 1960s silhouette with modern flair. Made from featherwale cotton corduroy, it has a soft texture that gently catches the light and gives a subtle nod to vintage style. Front darts shape the waist just enough to flatter without feeling restricted, while the shorter hemline keeps the look playful and confident.
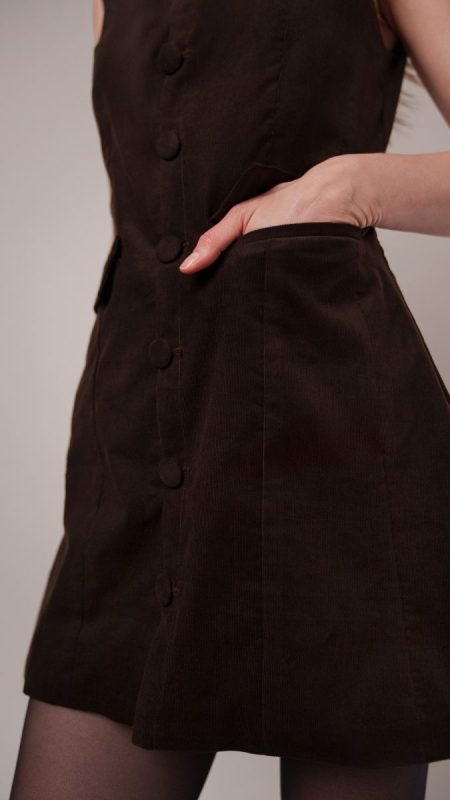
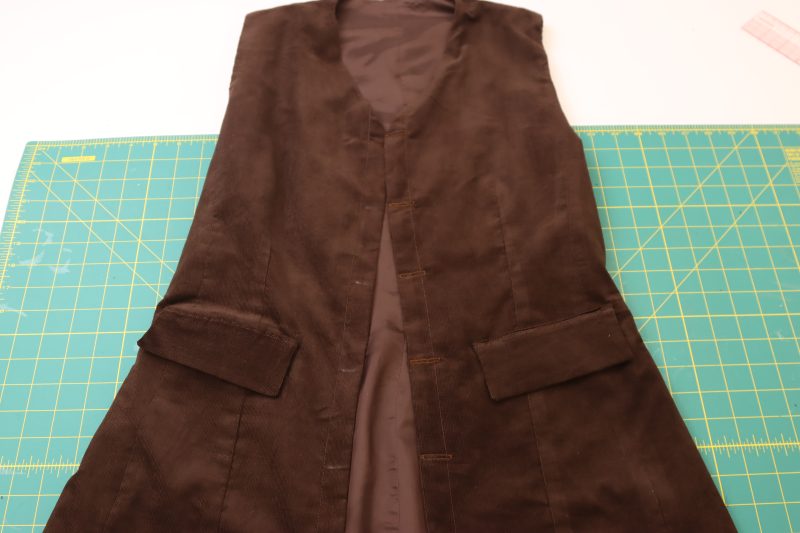
The dress opens fully along the front with fabric covered buttons made from the same corduroy, offering perfectly polished functionality. It slips on easily, no zippers required, and can even be worn open as a long vest for a layered look. Deep, practical pockets are a given in a world filled with faux ones.
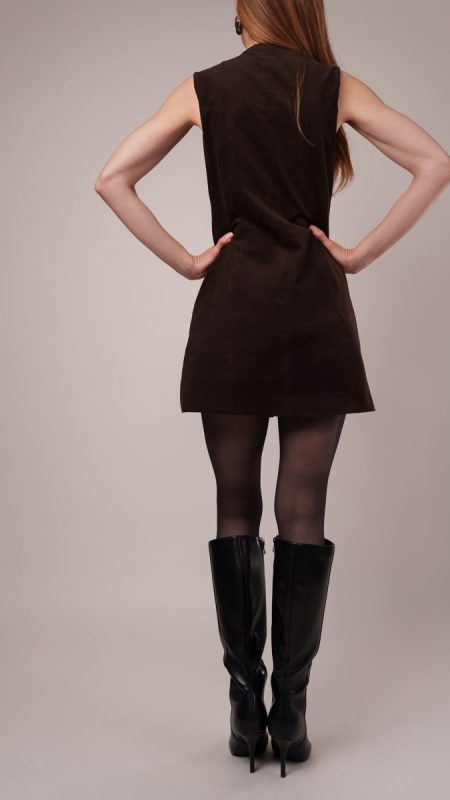
Worn here with tights and knee high boots, the Fawn Mini Dress proves how simple pieces can still make a strong impression. Style it alone for a sleek, minimal look or layer it over a blouse or turtleneck for a touch of retro charm. However you wear it, this piece delivers an effortless kind of sophistication that feels just right for fall.

Essential Materials & Sizing Guide for the Fawn Mini Dress
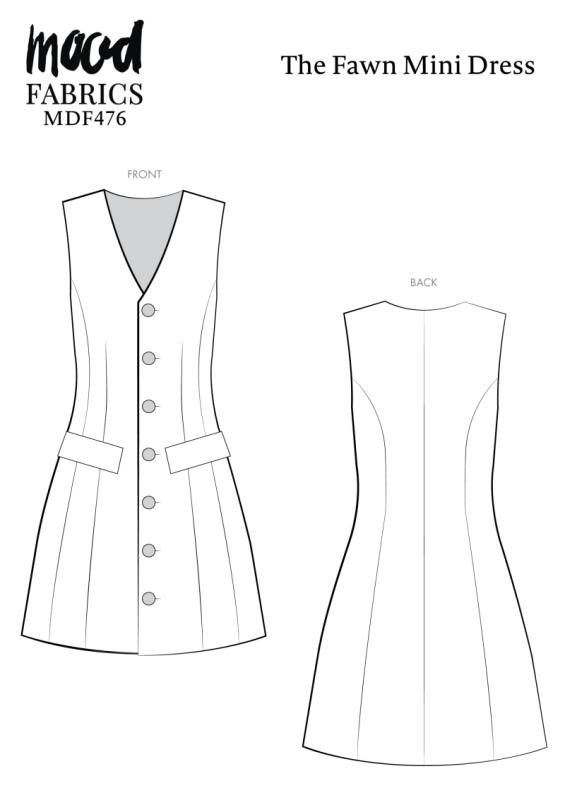
Continue reading for a breakdown of what knowledge and materials you need for creating your very own mini dress! We’ve got you covered with the recommended materials we used—if you want to follow along exactly—as well as a curated list of alternative fabric type recommendations if you want to customize your own version. The Fawn Mini Dress free sewing pattern download includes technical drawings for seam and silhouette visibility, plus a size chart to help you find your perfect fit!
Purchase Products Used Below:
-
- 2 yards of Featherwale Cotton Corduroy – Charley Brown – Dawn Collection
- 2 yards of Bemberg Lining – Chocolate Brown – Lucidum Collection
- 3 each of Dritz Half Ball Covered Buttons Size 36-7/8″ – 3ct
- 1 each of Gutermann Sew All Thread 500m – 594 Walnut
- MDF475 – Fawn Mini Dress Sewing Pattern (Free download below!)
Quantities indicated are for sewing a size small mini dress. Toggle the ‘SHOP THIS LOOK’ box to find quantity estimates for other sizes.
Alternative Fabric Type Recommendations:
Download Your Free Sewing Pattern
Submit your name and email in the form below to receive the download link for the Fawn Mini Dress free sewing pattern directly in your inbox. Mood Sewciety Patterns will send your free download link via email with the subject line: ‘Your Free Download from Mood Sewciety – The Fawn Mini Dress’ (in PDF format for A4 and letter-size printing).
© MoodFabrics.com / MoodSewciety.com – Mass production, resale, or distribution of this pattern in any form is strictly prohibited.
Find Your Perfect Fit
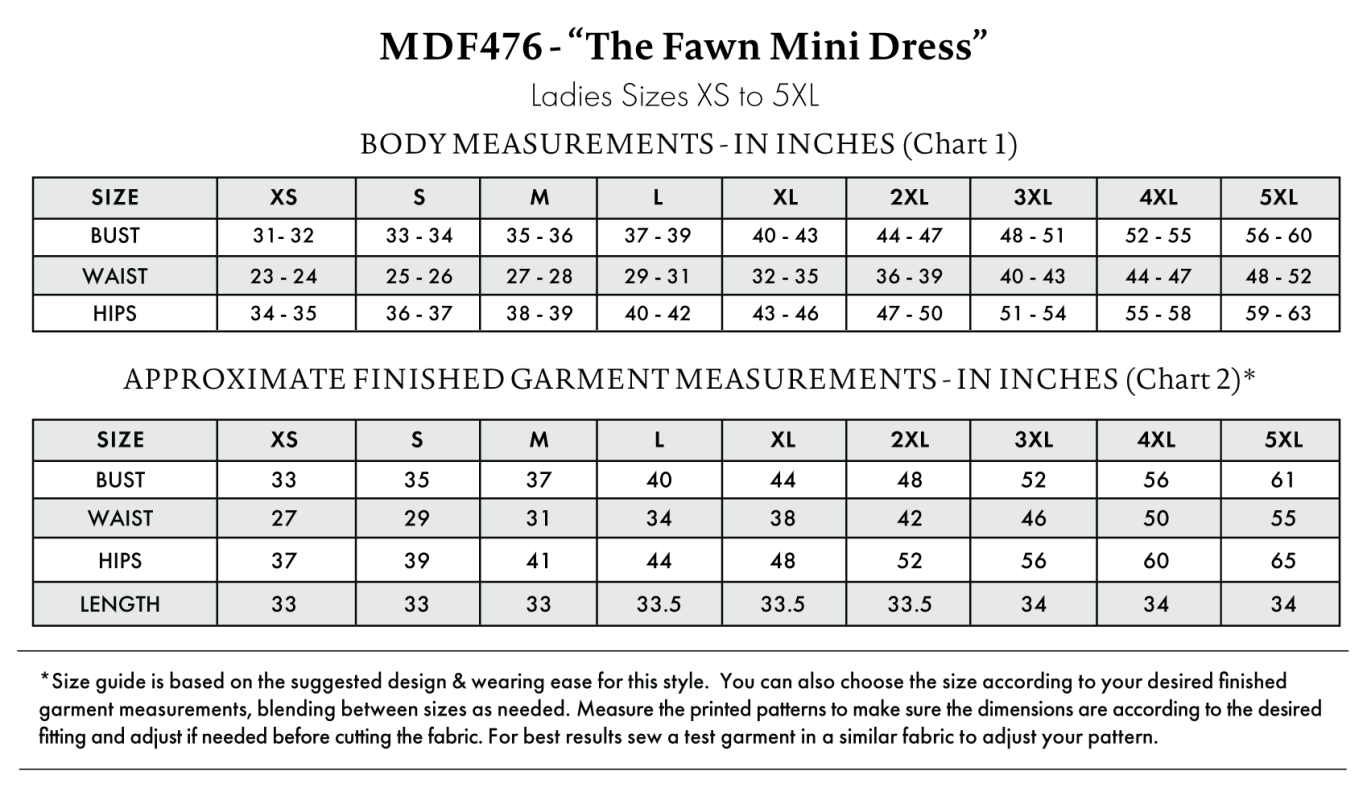
The Fawn Mini Dress Sizing Guide is based on the suggested design & wearing ease for this style. You can also choose the size according to your desired finished garment measurements, blending between sizes as needed. Measure the printed patterns to make sure the dimensions are according to the desired fitting and adjust if needed before cutting the fabric. For best results, sew a test garment in a similar fabric to adjust your pattern.
Note: Always read all the instructions before cutting the fabric!
How to Sew The Fawn Mini Dress
The instructions provided below are designed to guide you through sewing the Fawn Mini Dress from start to finish.

2 Tips for Sewing with Corduroy
⇒ Make sure as you’re cutting your fabric that the wales (stripes) in the corduroy are all facing the same direction.
⇒ If you plan on making this mini dress without a lining, make sure you serge or zigzag the raw edges of the dress because corduroy does fray a lot.


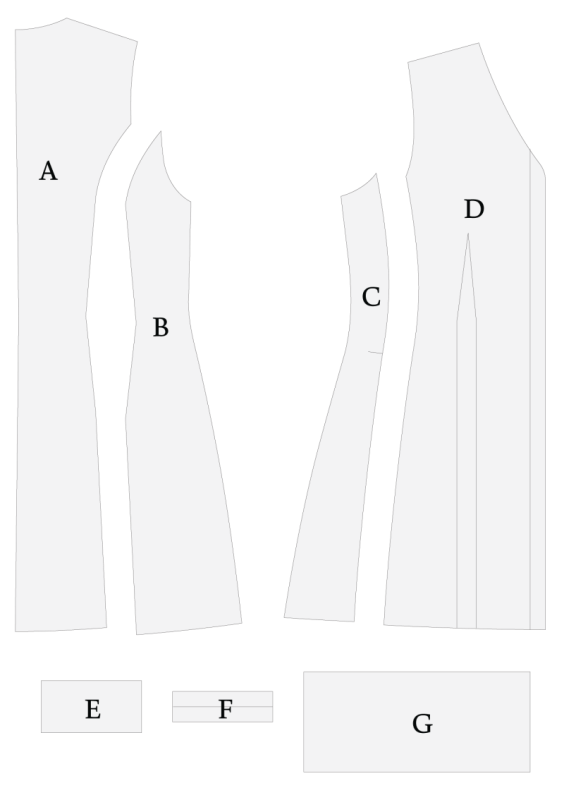
Pattern Pieces & Fabric Cuts Needed
- (A) BACK CENTER
- FABRIC – CUT 2 MIRRORED
- LINING – CUT 2 MIRRORED
- (B) BACK SIDE
- FABRIC – CUT 2 MIRRORED
- LINING – CUT 2 MIRRORED
- (C) FRONT SIDE
- FABRIC – CUT 2 MIRRORED
- LINING – CUT 2 MIRRORED
- (D) FRONT CENTER
- FABRIC – CUT 2 MIRRORED
- LINING – CUT 2 MIRRORED
- (E) POCKET FLAP
- FABRIC – CUT 4
- (F) POCKET WELT
- FABRIC – CUT 4
- (G) POCKET BAG
- LINING – CUT 2
Sew with a 1/2″ seam allowance for all seams unless otherwise specified.
Step 1
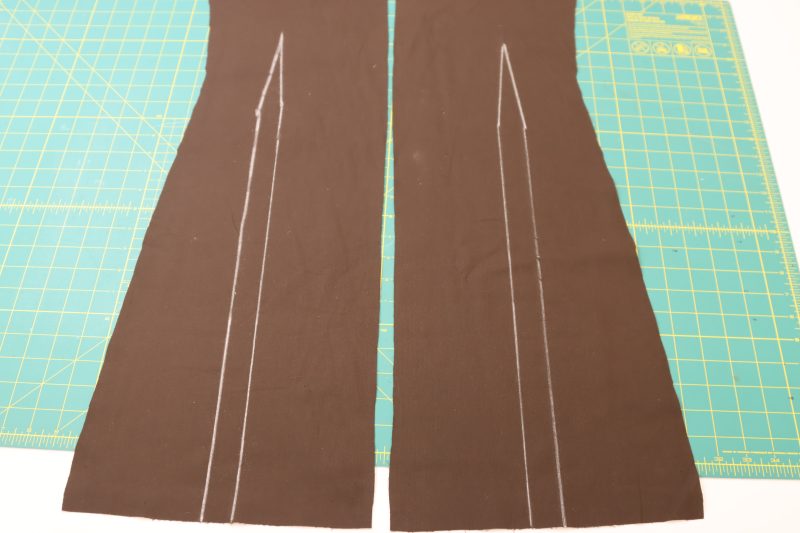
DARTS
- Mark the darts on the wrong side of the front center pieces of the dress using tailor’s chalk.
- Fold the fronts of the dress right sides together with the fold centered along the dart.
- Pin and sew the dart in place.
- Open the fold and iron the dart toward the side seams.
- Repeat these steps for both the main fabric dress and the lining dress.
Step 2
FRONT SEAMS
- Place the side front pieces right sides together with the sides of the center front pieces.
- Pin the curved edge of the side front pieces to the curved edge of the center front pieces.
- Sew the center front pieces to the side front pieces and iron the seam open and flat.
- Repeat these steps for both the lining and main fabric dress pieces.
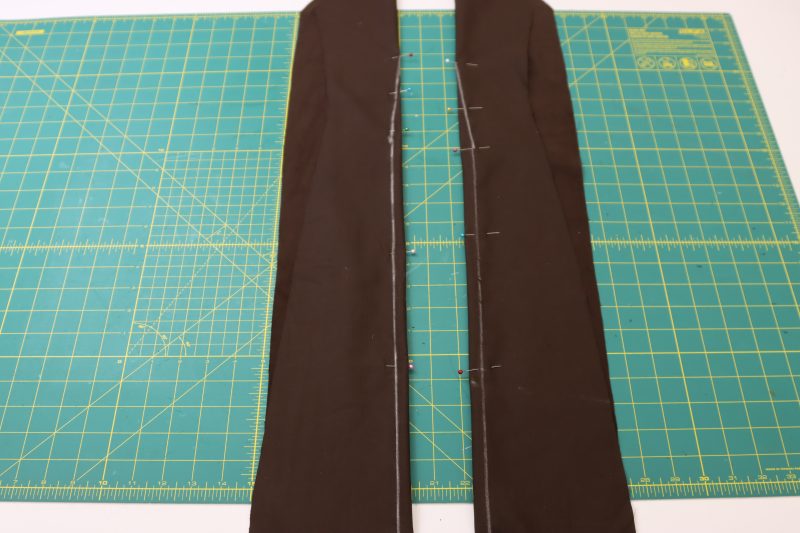
Step 3
BACK SEAMS
- Place the center back pieces right sides together.
- Pin and sew the center back seam.
- Open the center back seam and press it flat.
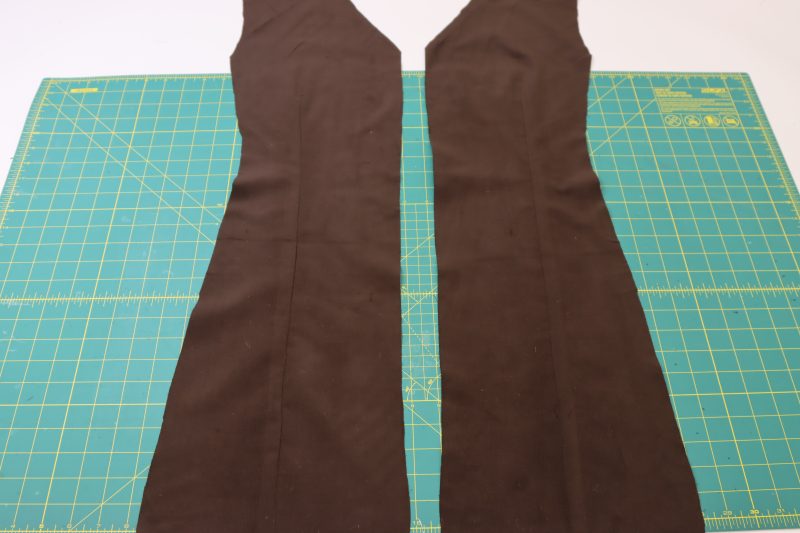
- Place the side back pieces right sides together with the sides of the center back piece.
- Pin and sew the curved edges of the side back pieces to the sides of the center back piece.
- Open the side back seam and press it open and flat.
- Repeat these steps for both the lining and main fabric dress pieces.
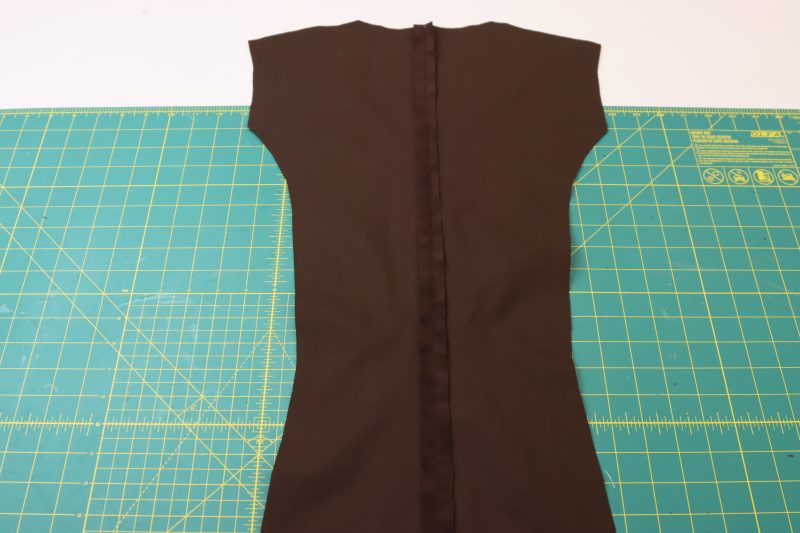
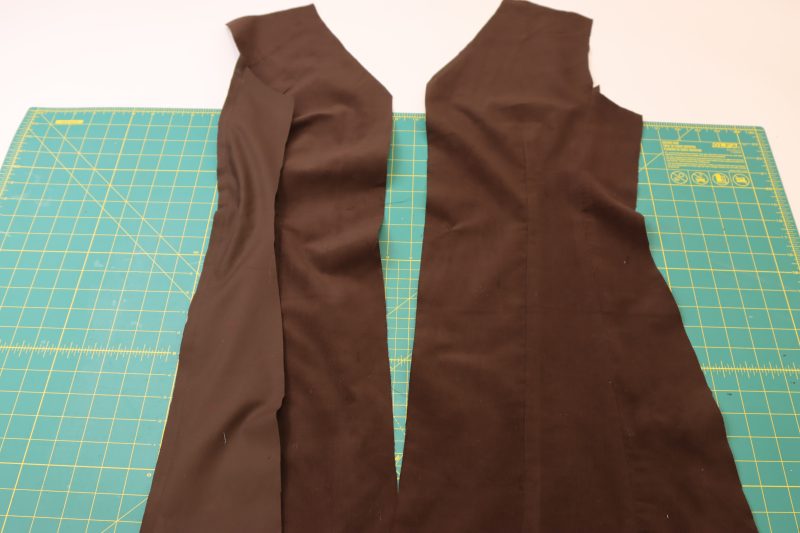
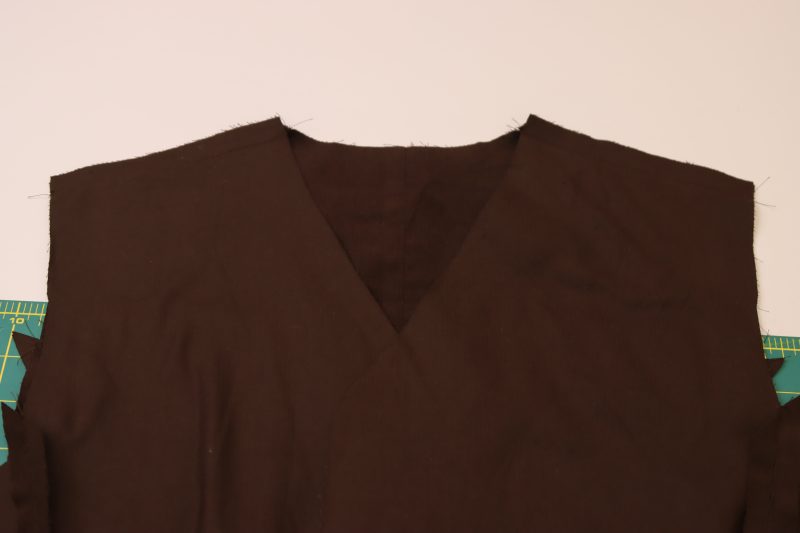
Step 4
SHOULDER SEAMS
- Place the front dress pieces on top of the back dress piece, right sides together, with the shoulder seams lined up.
- Pin and sew the front and back pieces together at the shoulder seams.
- Repeat for both the lining and main fabric dress.
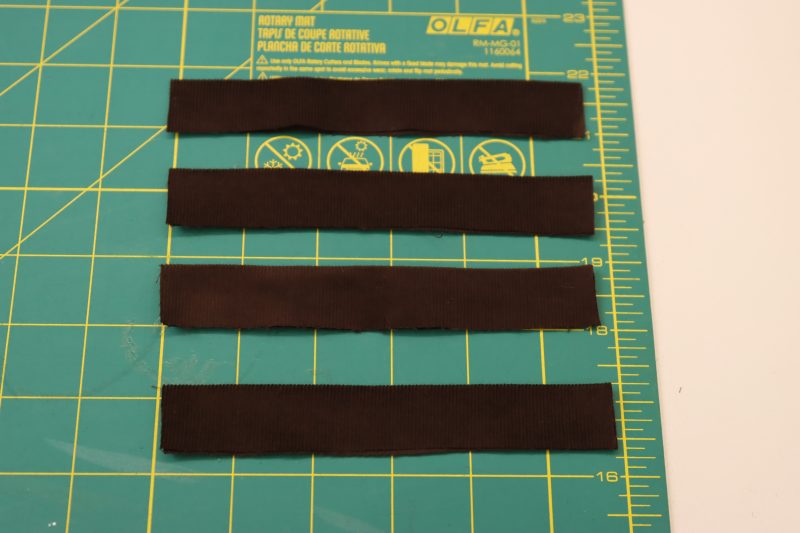
Step 5
WELT POCKETS
- Fold the pocket welts in half long ways, wrong sides together.
- Iron the fold in the pocket welts.
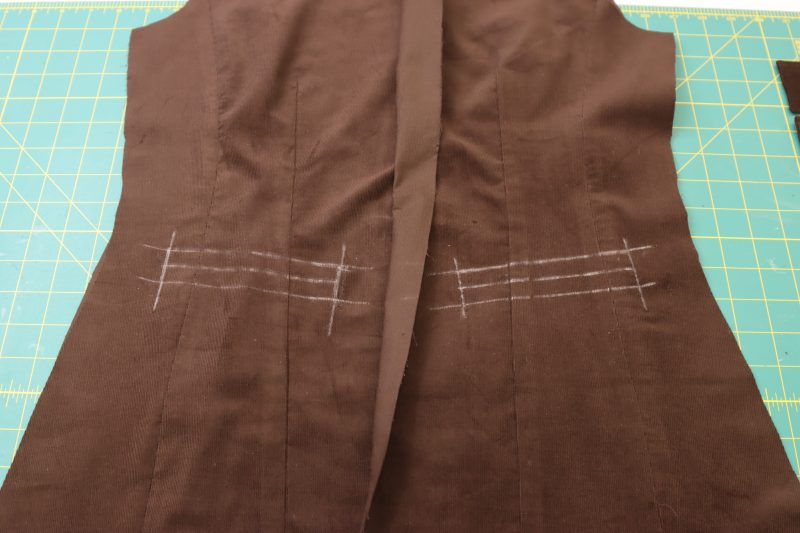
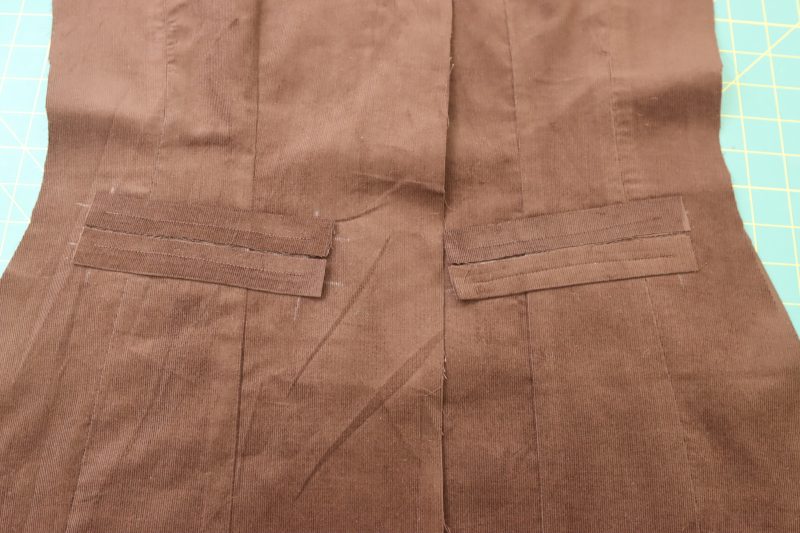
- Mark the location of the welt pockets using tailor’s chalk on only the front dress pieces of the main fabric.
- Place the pocket welts along the top and bottom lines of the chalk markings so that the raw edges of the pocket welts are meeting in the middle of the chalk marking.
- Pin and sew the pocket welts directly on the top and bottom chalk lines.
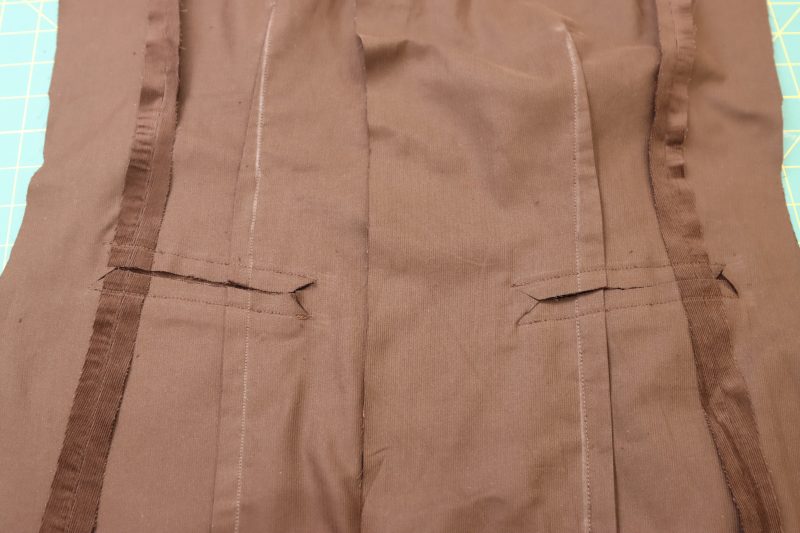
- Cut a hole through the main fabric that goes directly in between the two seams you just sewed, being sure to make the hole square by cutting triangles at the end of the cut, as shown in the photo below.
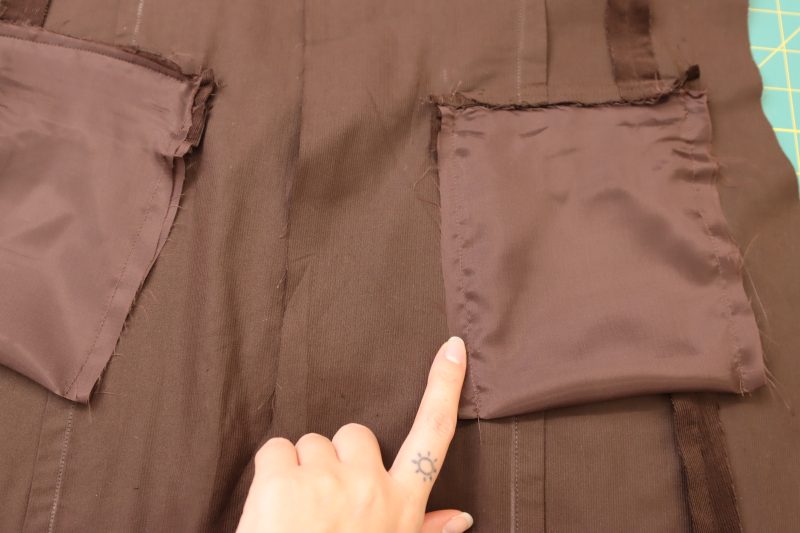
Step 6
POCKET LINING
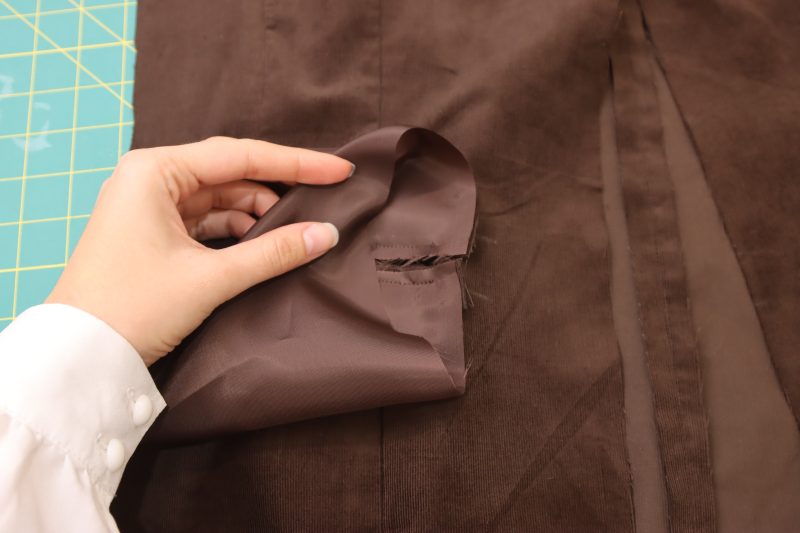
- Pin and sew one of the short sides of the pocket lining to the top pocket welt, directly on top of the seam you just sewed.
- Pin and sew the other short side of the pocket lining to the bottom pocket welt, directly on top of the bottom seam.
- Flip all the pocket pieces toward the inside of the fabric and iron everything into place.
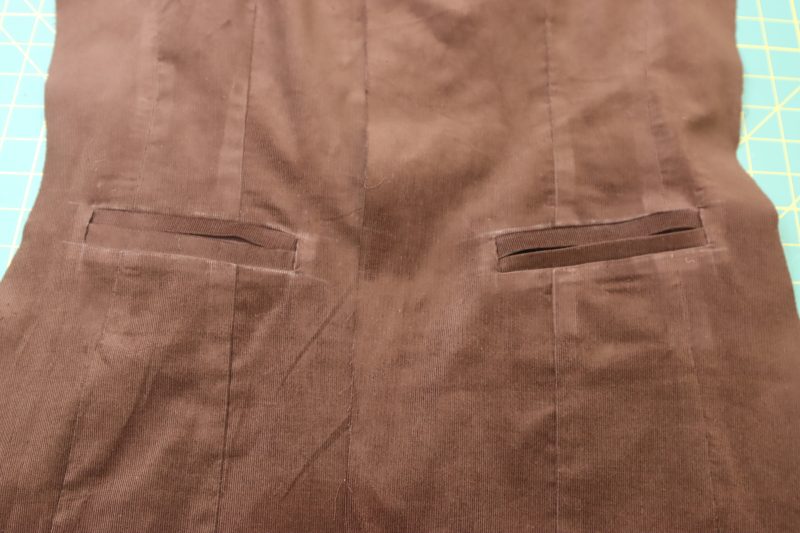
- Sew the sides of the pocket bags closed.
- Sew the sides of the welt opening closed by catching both the top and bottom welt and the side of the pocket slit opening (the triangle part) in the seam. Repeat on both sides of the pocket opening and on both the left and right pockets.

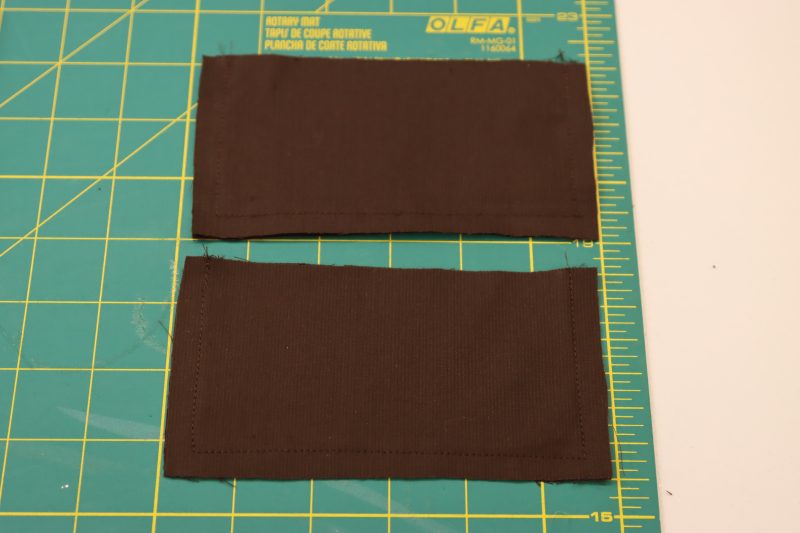
Step 7
POCKET FLAPS
- Place the pocket flaps in two stacks, with each stack having two pocket flap pieces facing right sides together.
- Pin and sew around one of the long sides and both short sides of each pocket flap.
- Clip the corners of the pocket flaps so that they can be poked out when inverted.
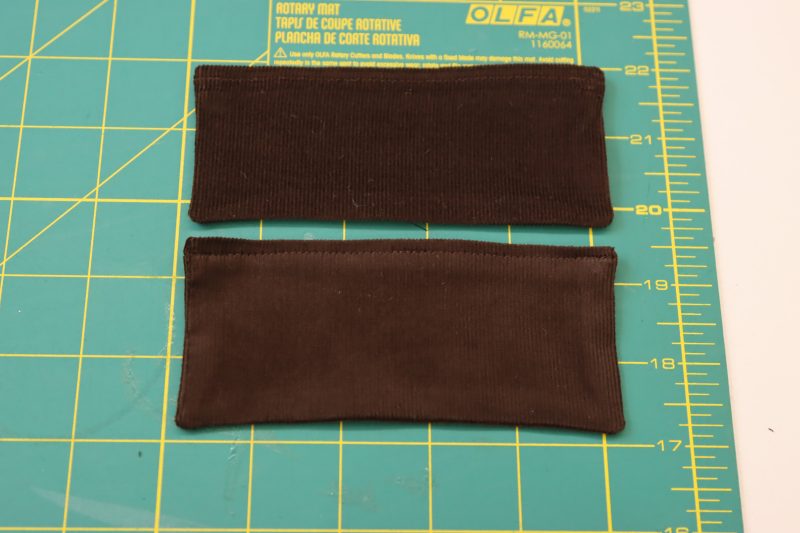
- Flip the pocket flaps right sides out and fold the open edge of the pocket flap into the wrong side of the flap with a ½ inch fold.
- Topstitch the open folded edge of the pocket flap to close off all the raw edges.
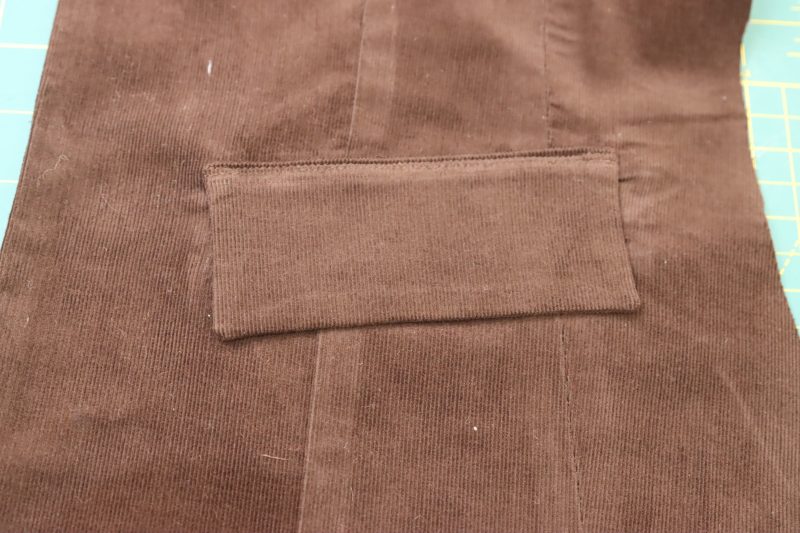
- Pin and sew the pocket flap directly above the welt pockets on both sides of the front of the dress.
Step 8
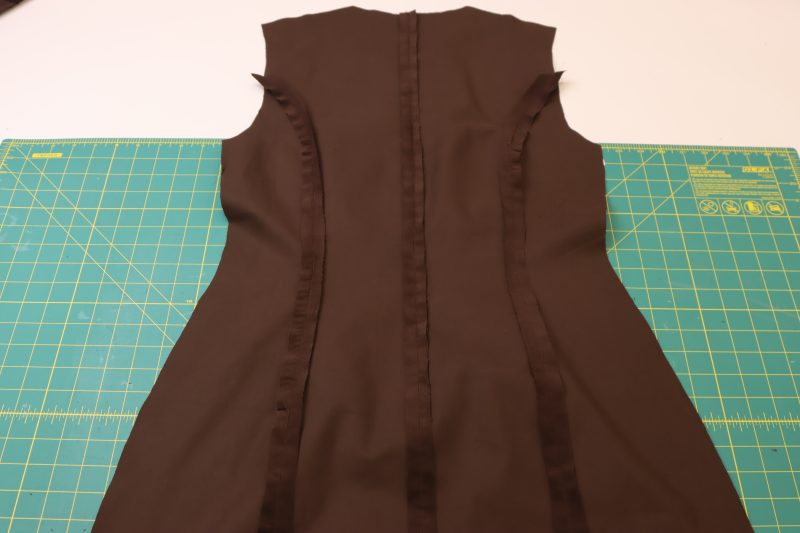
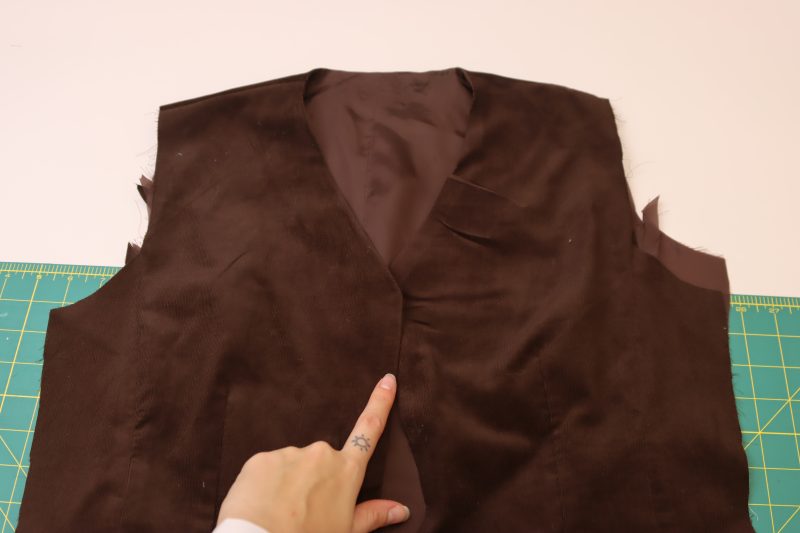
FRONT OPENING
- Place the lining dress inside of the main fabric dress, right sides together.
- Pin around the entire front opening of the dress from the bottom hem, all the way around the neckline, back to the other side of the front opening.
- Sew the front opening.
- Flip the dress right sides out and iron the front opening so that the lining is not peeking out from the main fabric.
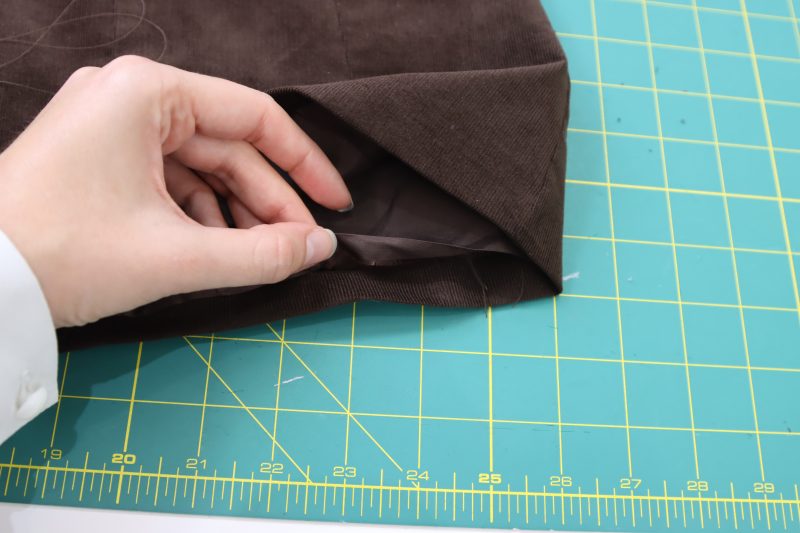
Step 9
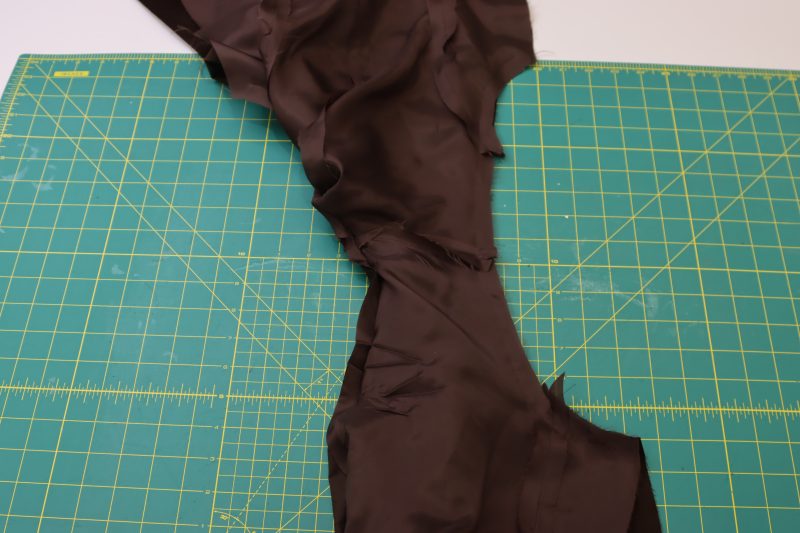
ARMSCYES
- Lay the dress completely flat so that the entire lining of the dress is face down.
- Grab the armscyes of the lining and main fabric on the left side of the dress and separate them from each other.
- Open the armscyes from each other and wrap them around the opposite side of the dress until they meet again.
- Pin the armscyes right sides together and sew the curve.
- Pull the rest of the dress that is now tucked inside the armscye out and lay it flat again.
- Repeat these steps for the opposite armscye so that both arm openings are closed and raw edges are finished.
Step 10
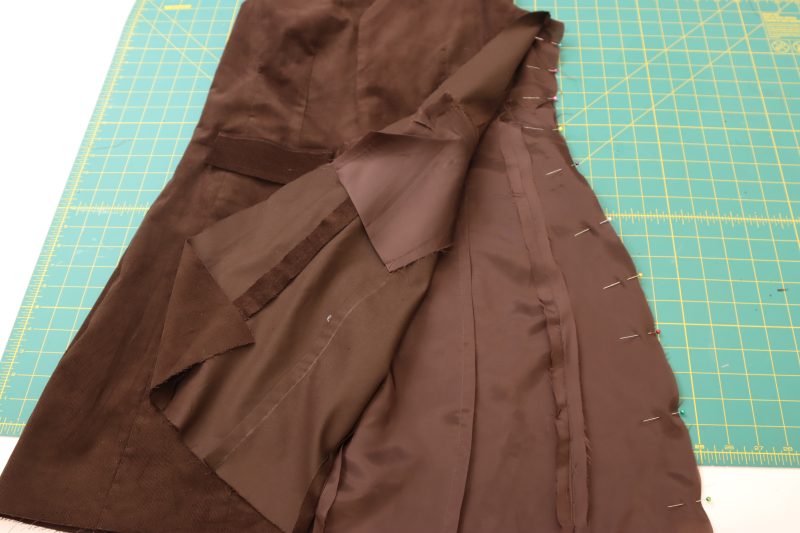
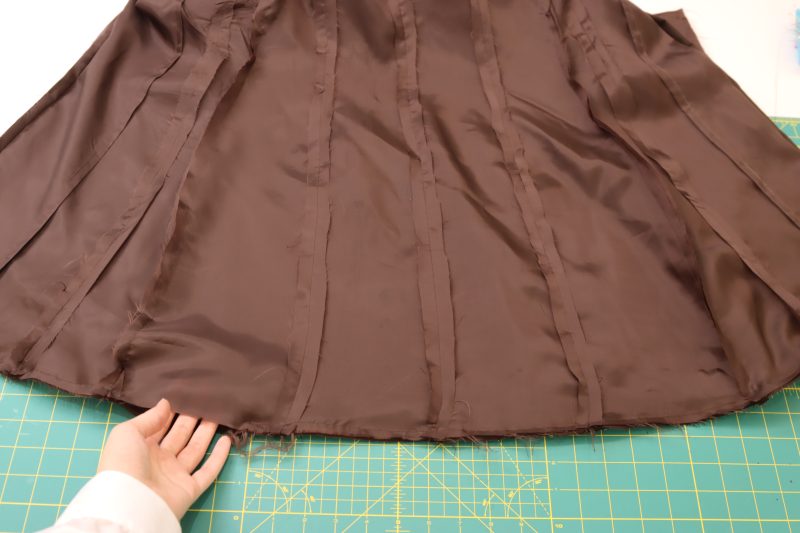
SIDE SEAMS
- Lay the dress so that it is folded in half at the shoulder seams.
- Lift the main fabric out of the way to expose the lining dress.
- Pin and sew the side seams of the lining dress together, right sides together, until you get to the armpit.
- Flip the dress inside out so that the right side of the lining is on the outside of the dress and the right side of the main fabric is on the inside of the dress.
- Lift the closed lining out of the way to expose the raw side seams of the main fabric.
- Pin and sew the side seams of the main fabric together until you get to the armpit. Connect this seam with the seam connecting the lining side seam.
Step 11
BOTTOM HEM
- Flip the dress inside out through the bottom hem so that the wrong sides of both the lining and the main fabric are facing the outside of the dress.
- Pin and sew the bottom hem of the dress, lining up all the seam together and leaving a 6 inch hole through which you can flip the dress right sides out.
- Flip the dress right sides out through the hole.
- Iron the bottom hem so that the lining is not peeking out past the main fabric.
- Hand stitch the 6 inch hole shut with a ladder stitch.
Step 12
BUTTON PLACKET
- Sew a vertical line from the neckline to the hem on both sides of the front opening of the dress according to the location of the button placket lines on the front pattern piece.

Step 13
BUTTONHOLES
- Mark 7 button holes evenly spaced down one side of the front opening of the dress using tailor’s chalk.
- Use the button hole foot attachment on your sewing machine to make buttonholes on all the chalk marks.
- Open each button hole using a seam ripper, being sure not to rip through the tacks on the sides of the button holes.
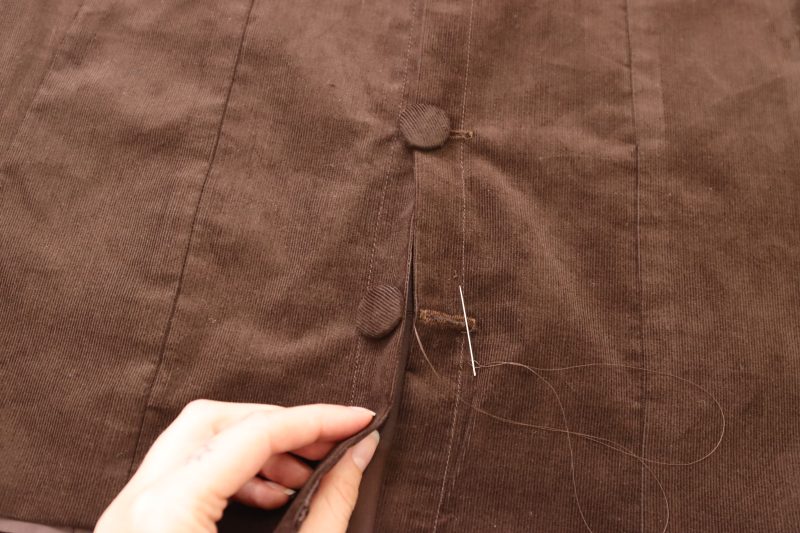
Step 14
FABRIC BUTTONS
- Using the covered buttons kit and following its instructions, cover 7 buttons with the same fabric as the outer layer of the dress.
- Lay the side of the dress opening with the button holes on top of the side without the button holes and line up the button plackets.
- Use tailor’s chalk to draw chalk marks inside of all the button holes so that the chalk transfers to the other side of the dress opening directly under the button holes. This will ensure that the buttons are lined up perfectly with the button holes.
- Sew the fabric covered buttons directly onto the chalk marks.
Sewing Success: The Finished Fawn Mini Dress
Share this post with a friend (or two!), download the Fawn Mini Dress free sewing pattern, and show us which fabrics and colors you choose, using the hashtags #MoodFawnPattern & #MadeWithMood—and don’t forget to tag us @MoodFabrics, too.


Free Sewing Pattern Inspiration for Your Next Project
With 470+ free sewing patterns and counting, your opportunities for sewing with Mood are endless!
We hope you had as much fun sewing this mini dress pattern as we did! As always, we want to hear from you—share your thoughts and comments below and let us know where you’ll be wearing the Fawn Mini Dress free sewing pattern!
Beautiful
Hello, I have not been getting the links for the free patterns even though I’m already signed up for your newsletters.
You can download the pattern for free by entering your name and email address into the field under “Download Your Free Sewing Pattern”. Then, check your email inbox (and your spam, just in case) for an email from Mood Sewciety Patterns with the subject line “Your Free Download from Mood Sewciety”. Scroll down to the blue link under the title of the email and click on that. It will bring you to a web browser page where you have to scroll down and find the orange button that says “click here to download your free sewing pattern”. That button will redirect you to the webpage with the PDF of the pattern, which can be printed on 8.5×11 paper on your printer at home. Let me know if you need any additional help accessing the pattern!
How could I add sleeves? Is there a pattern I could use?
We have lots of dress patterns with sleeves. I recommend taking the sleeve pattern piece from another pattern and adding it to this one. If the sleeve cap is too big for the armscye on the fawn dress, you may have to alter it a bit or gather the sleeve to make it fit. Let me know if you end up trying it!
¡Manos a la obra! ¡Estoy entusiasmada!, lo haré en denim gracias por el patrón! ❤️
I am in love with this dress! Question though, if I need to lengthen it, where’s the best place to do that? Thanks!
Just extend the length from the bottom hem of the dress so that it’s wide enough at the bottom to fit around hips and legs. Thanks for asking!
Have not tapped for pattern, yet I am delighted to see shift style with double darts & button down.! It will be a uniform in many shades of corduroy, denim, etc. Thank you for locating this designer.
Thanks for this pattern . I will make it longer for me. I love it in corduroy.
Lovely, I have some cord just waiting for this. Also if anyone has seen Mood’s flannel twill, its amazing to work with and would look great using this pattern.
“Love how you styled this mini dress—so chic and fun!”
Beautiful dress!!
The instruction as use to cut a lining but the instructions dont mention it. Could you please advise?
The pattern pieces are labeled with how much lining and main fabric pieces to cut out of each pattern piece. The instructions note that whatever is done for the main fabric in the first 4 steps should also be repeated for the lining fabric.
What is the recommended yardage for 3X and 2X? In both the main fabric and lining? Thanks in advance.
I recommend 4-5 yards of each!
I just assembled the PDF puzzle (it’s a 4×6 grid of trimmed US Letter and the 3XL fits into a but under 1.25 yards (measured with a shop tape measure). Doubling it since you need two of everything give you 2.5 yards if you don’t care about matching the horizonal lines of plaids or other patterns. “Three to be safe” agrees with the “Shop this look” tool in the sidebar for sizes up to US 30.
As a cross check a 4×6 grid of untrimmed US letter is 44 inches in length so two of everything has to fit into 88 inches (call it 2.5 yards, round up to 3).
Love this detailed reply, thank you!
I have a gorgeous vintage fabric that would be perfect, but it has a bit of stretch… apart from using a stretch lining are there any other adjustments I should make?
When picking out your size, use the finished garment measurements instead of the body measurements so that you know how tight or loose fitting the final garment will fit.
Hi ! Quick question. Instead of the bemberg lining could I use Polyester Lining Fabric – Bridal Pink – Margot Collection? I am working with tweed fabric as my outer layer btw.
Absolutely! You can use pretty much any kind of lining fabric.
What changes would you make if you were making this with a thinner fabric? Im thinking of using a lightweight cotton in my stash…I would think in that case the lining is a must, and probably want some interfacing around the placket and bust…
I would recommend pretty much all the things you mentioned if using a thinner cotton for the outside. You might even want to use a little bit of interfacing at the front opening to support the button placket.
Me gusta mucho el vestido,me encantaría poder hacerlo. Gracias
I love this pattern. Do you think it would work in a velvet fabric?
Totally, that would be so cute and retro looking!
Hi! I’m almost through making this but opted out of the lining and now I’m unsure how to finish the neckline and armseyes. Do you have any suggestions?
I would do a rolled hem the best you can, or you can always make a facing to go inside the neckline.
Hi there,
Love your patterns as I’ve done a few projects. Is there any way to isolate certain sizes? Like a layered PDF? I know that you can print all the sizes and then trace the lines that are your size once assembled however, sometimes the lines blend and it’s really challenging to trace them accurately. I also do not like wasting paper for sizes I don’t need. If not, could mood please consider this feedback going forward and make patterns in layered PDFs with each of the sizes?
Thank you!
Unfortunately we don’t have the pattern available in a layered PDF as of right now, but it might be available as a paid option in the future. Thank you for this valuable feedback!
Hi, I am 5 feet tall. I was wondering if I have to adjust where the wasitline is on the dress pattern? If yes, by around how much?
Hi Sara! If you’re going to shorten it, I would take fabric from just above the markings for the welt pockets. Additionally, you’ll probably want to shorten the hem.
Hello, the pattern is beautiful, thank you so much!!! I’m about to make it, and I’ve just noticed that there is only one marking for the pocket placement — is that normal? How do I know where to position them and their measurements on the dress? Thank you so much!!
Lucie
Hi Lucie! Yes the pocket marking is intentional. Before assembling the front pieces of the dress, you can use chalk to mark the position of the welt pocket on the side front piece. Then, assemble the front of the dress, and the chalk marking can be used for the welt pocket once that side front seam is sewn. You only need one pocket marking because that marks one of the sides of the pocket, and the rest just lines up next to it. I hope this helps!
Hello Marisa,
Thank you for this great pattern! I have almost finished sewing it and I would like to ask what do you mean in Step 10 when saying “Connect this seam with the seam connecting the lining side seam.” Maybe, when done with all seams of lining and fabric, sew them together (outside of the initial sewing line?)? . Should I do it all way down from armpit to hem? or just a few spots so that the lining doesn’t move uncontrollably?
Hey Elena, all this step is showing is to sew the lining right sides together at the side seams and then moving the lining out of the way to sew the main fabric right sides together at the side seam, which requires turning the dress inside out with the wrong sides of both the lining and the main fabric facing out. I hope this clarifies that step!
Yes, it does! Thank you so much for the quick reply. I gave almost finished sewing now. This is my first pattern sewing ever, so thank you for everything!
When you’re finished, we would love to see how it turned out! Tag us on social media with the hashtag #MadeWithMood so we can see it and share your success!
Great dress pattern, thank you! My fitting muslin sewed up beautifully is quite flattering. I used size Large and the only modification for my body was to reduce the width at the outer shoulder. Nice work by the designer. Thank you for not having crazy large amounts of ease the way the Big 4 pattern companies are known to have. I am off to buy fabric.
I saw your comment that A0 versions might be available in the future, possibly for sale; A0 is something I’d definitely consider paying for.
Good Morning,
Making this for my 20 something daughter. She’s quite short-waisted. Do you have a recommendation for where to take out an inch between the shoulder and the waist?
Thank You
If you want to shorten it, I recommend taking up a small amount from the hem AND take a small amount from above the marking for the welt pocket (since that is the smallest part of the waist).
Pattern is great. Can you please add the total of material for each size, I find it hard to determine this.
Thanks
Hey Debra! You can use the “Shop This Look” widget to determine how much fabric is needed for each size. For example, sizes small and medium require 2 yards of both lining and main fabric, while sizes large and extra large require 3 yards of each.
I do not see the markings for the welt pocket on the pattern. Any guidance on how to position it?
They are on Piece C, the front side.
Hello, On the front and back side pieces there is a line on the pattern – maybe a dart? However, there is nothing in the instructions that addresses that line. Thoughts? Doralee
Hey there Doralee! There are no darts on the back of the dress, only princess seams. The front of the dress has both princess seams and a long dart. The front darts are sewn in step 1 of the tutorial. I hope this clears up your question!
Thank you for answering so quickly. What are the horizontal lines on all 4 pattern pieces? 🙂
Excellent question Doralee! Those are notches. You cut just 1/2 inch notch at all those lines and then when you’re sewing Front Center to Front Side, you line up the notches on both pieces to make sure that they’re sewn evenly and matched up on the curve. Same with the back pieces.
Marissa, That makes sense. Thank you for being so patient. I have completed a muslin and am waiting for a fitting from my daughter. Pockets were a little bit hard to get neat but I think everything else went well. I’ll post a picture on Instagram when I’m done. Doralee
Hello. I made this dress for my mother-in-law….she is regularly medium size. I made the dress and it was beautiful. However, the dress did not fit my mother-in-law it was too small. I respected the seam allowance of 1/2 inch. I don’t know where i made the mistake. Can someone explain or give hints? Do I have to take in consideration the 1st or 2nd chart from the pattern?
Thank you!!
Javier from Puerto Rico
Hi Javier! When deciding what size to make, I will compare my measurements to the second chart because that one has the finished garment measurements. The dress is made with a bit of ease, but if you want more or less ease, you can size up or down to make the dress more loose fitting or skin tight.
I’ve tried to download this dress several times now, and I don’t get an email with the download link.
Hey Klaudia, I’m sending you the link right now. Check your email when you see this.
Love this pattern! Would love to sew this someday. Would poplin be okay? Wanted more over sized look but kind of new to fabric in general. Thanks!
Poplin might be a little thin for this dress but if you do a lining I bet a poplin print would be cute!
Love this store..
Half of this patterns instructions didn’t make sense and made me waste half of all I got for my birthday which was fabric. Can’t be certain but this felt like an AI pattern and I feel really disappointed that mood a “world known fabric store” can’t be bothered to dish out for better patterns. I will not download another pattern from here again.
Hi Georgie! I’m so sorry to hear that the pattern was difficult to follow. We’ve gotten mostly really positive feedback on this pattern and the tutorial, but we still appreciate constructive criticism like this. That being said, we have never and will never use AI to make our patterns. I personally make these patterns and tutorials along with the Mood Sewciety Team. Could you let us know a little bit more about which steps were unclear?
I try to make this dress in bigger size, and it did not turn out right. It’s something with the size en bust that gets to big and had to make a new adjustment so it looked good.
Hi Mia
We work with standard sizes, which sometimes don’t fit all body types perfectly, and depending on the garment design, adjustments may be needed for custom measurements. Thank you for sharing your experience!
Wish it came with instructions on how to sew without a lining (beginner)
Hey Anna, you are more than welcome to sew this without a lining! If you do, the only difference in how the dress is constructed it that all the seams need to be finished with a rolled hem. This means the arm holes, the neckline, the hem, and the center front button placket.
Hey! Thank you for your response. How do I make the markings on the main fabric for the welts?
Hi Anna! Usually I will cut into the welt marking so that there is a slit in the paper. Then I’ll place that paper on the fabric pattern piece and trace over the slit with tailor’s chalk so that the welt marking is exactly where the paper pattern says.
Is there a video tutorial available for this project?
Not yet, but thank you for this feedback. This was a really popular pattern, so we’ll definitely consider making a video tutorial for it.
Im planning to use a wool plaid, would you suggest interfacing? if so where would be best?
Hey Georgie! I don’t think interfacing is necessary for a wool shell, I would just pick a lining. Maybe bemberg or a cotton lining.
Love the dress!