
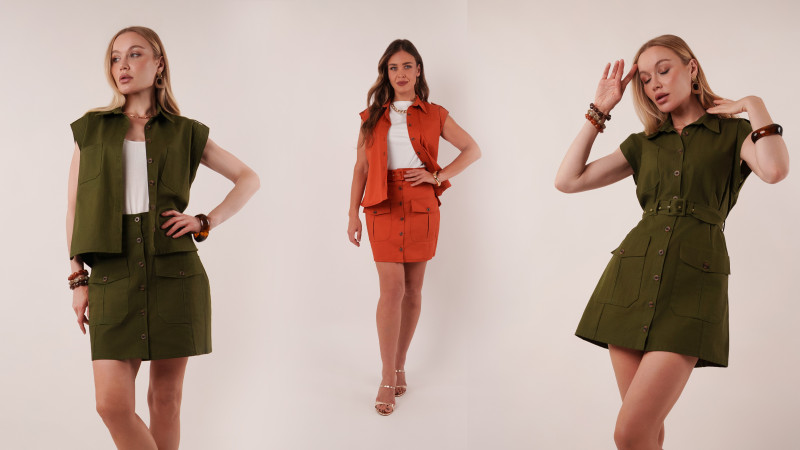
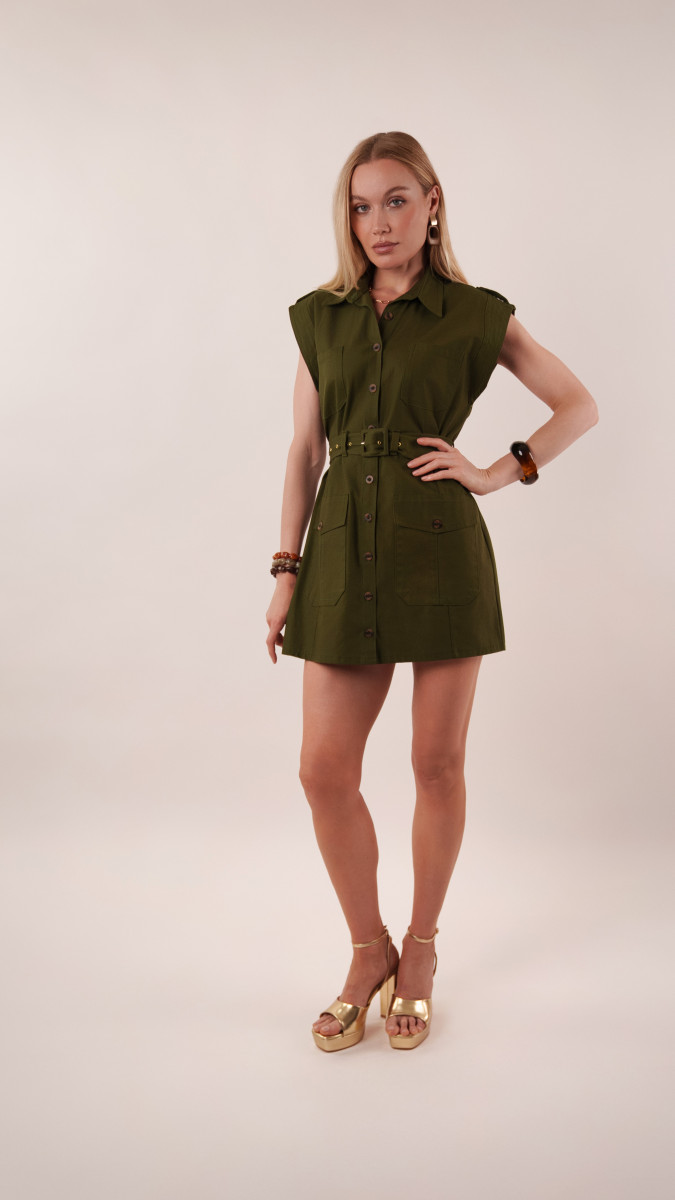
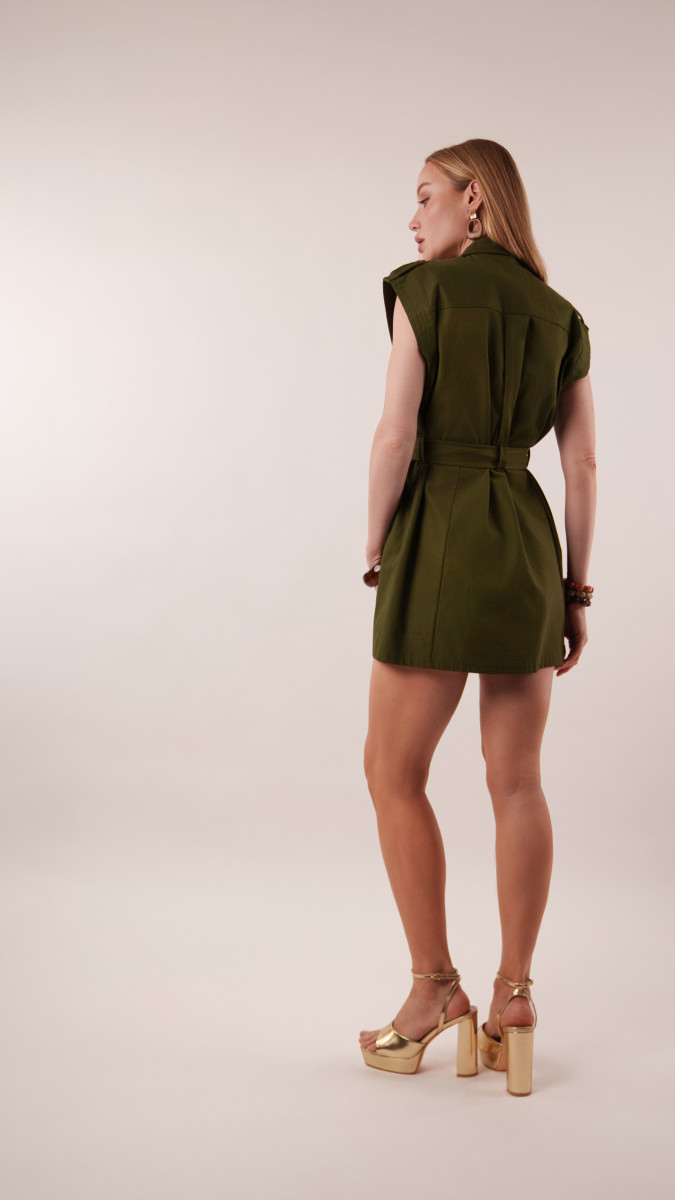
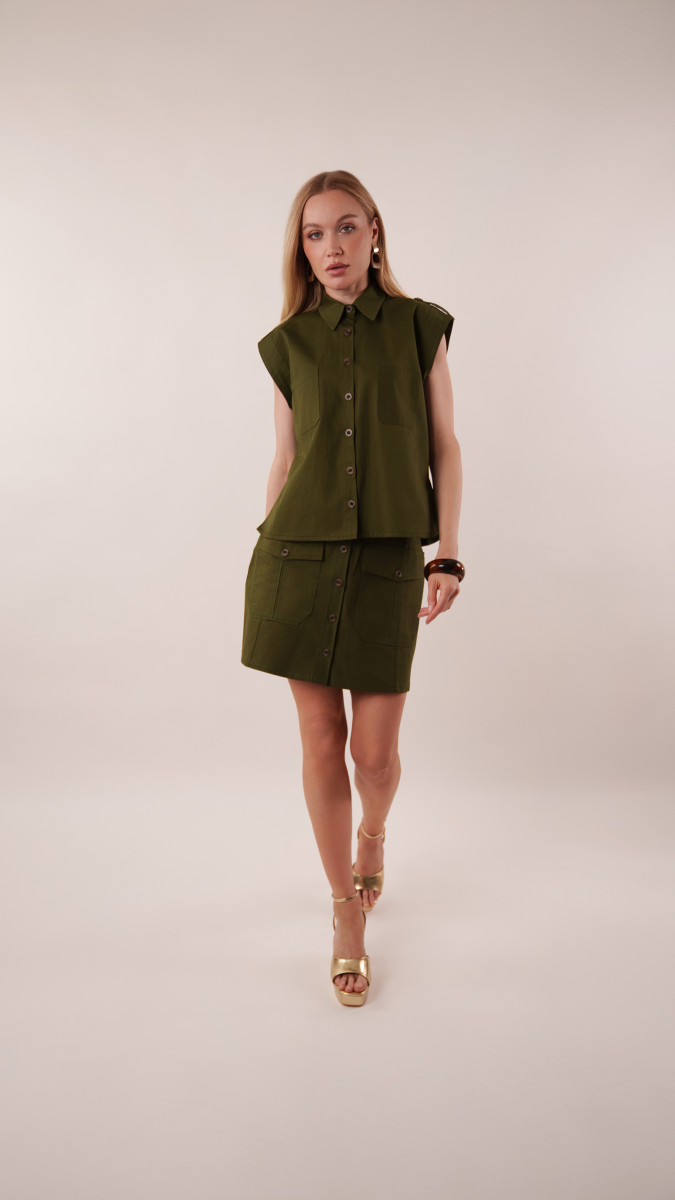
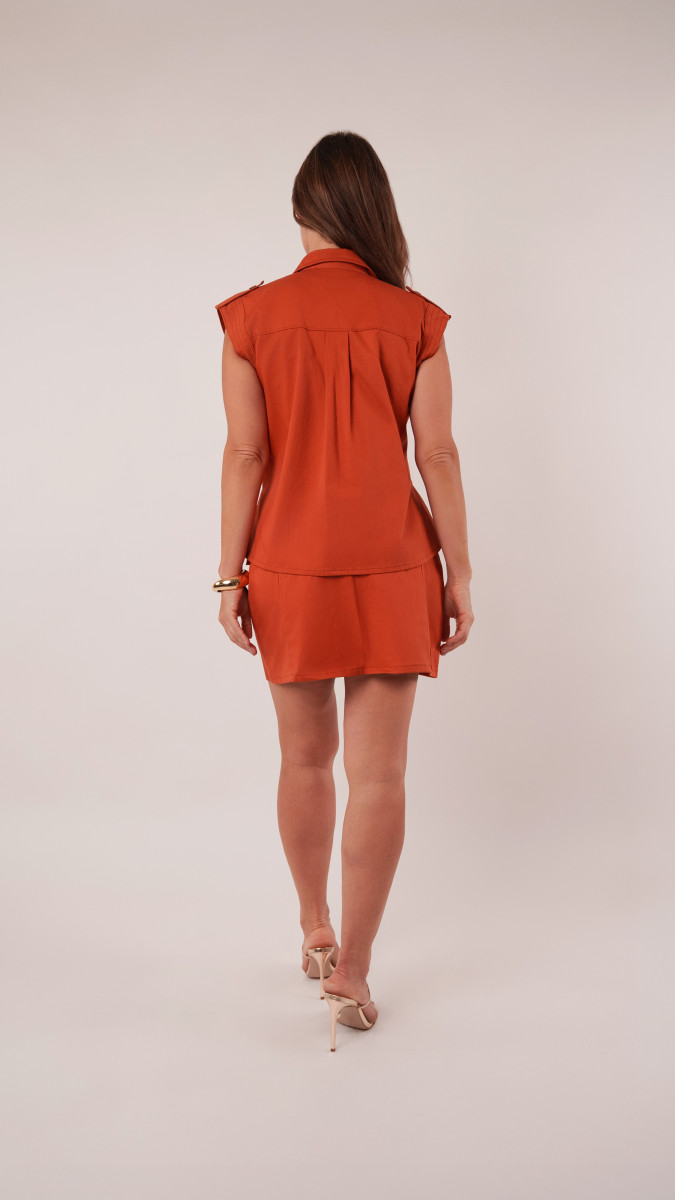
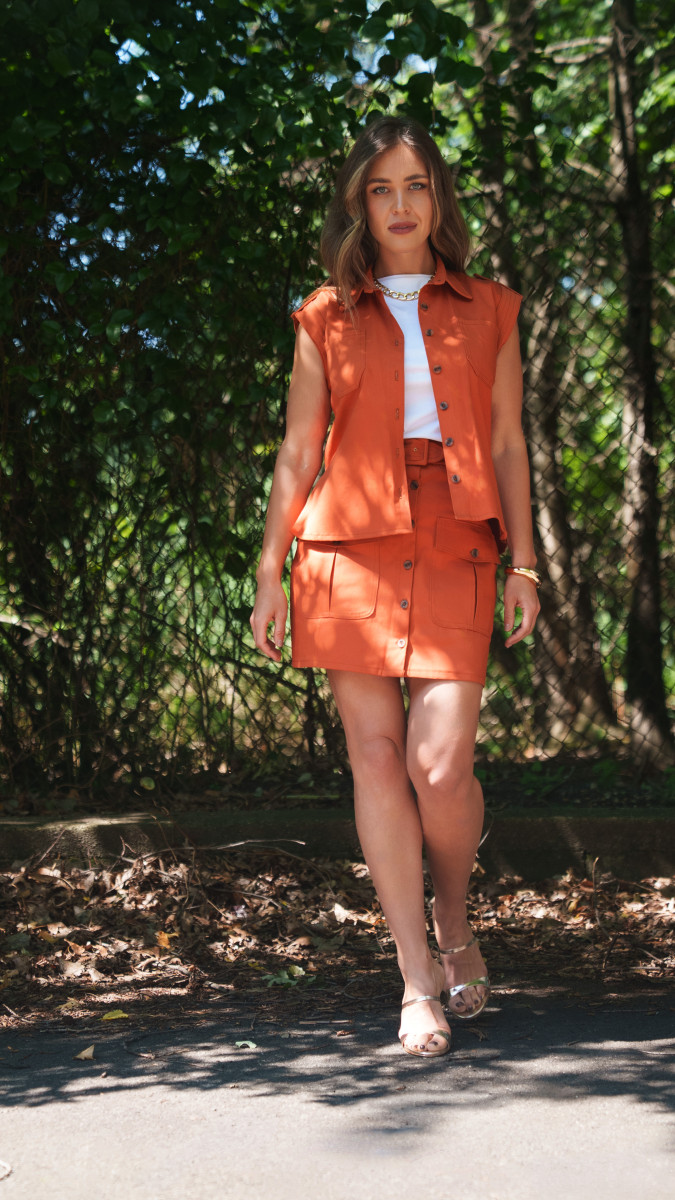
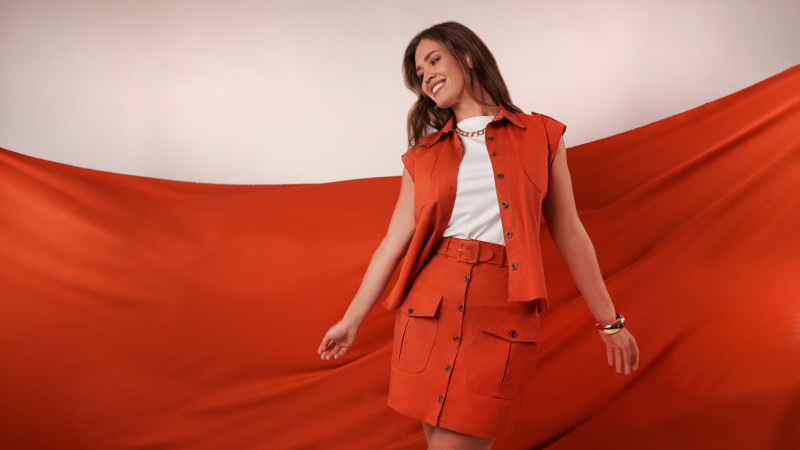
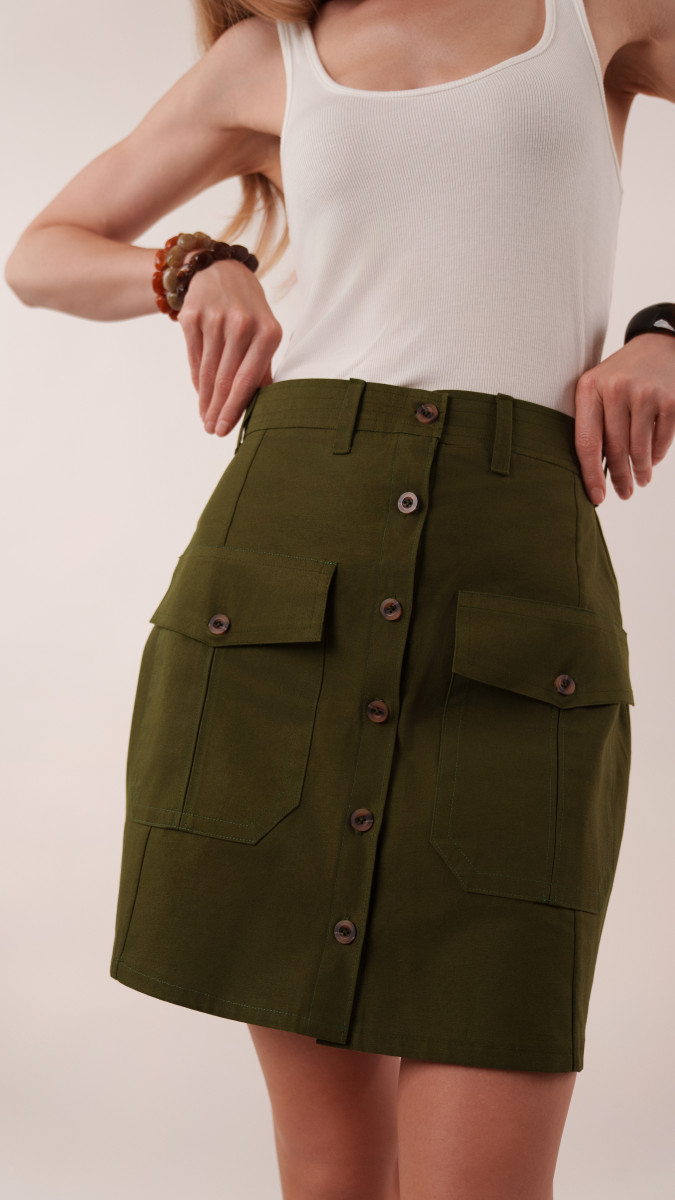
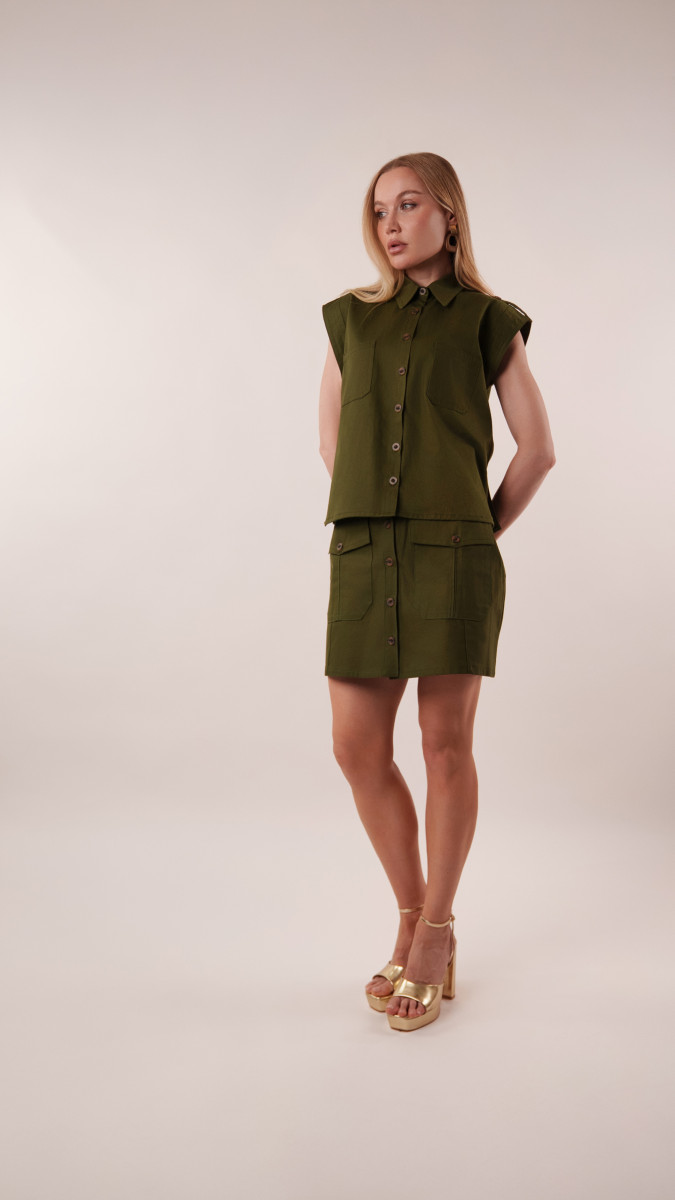
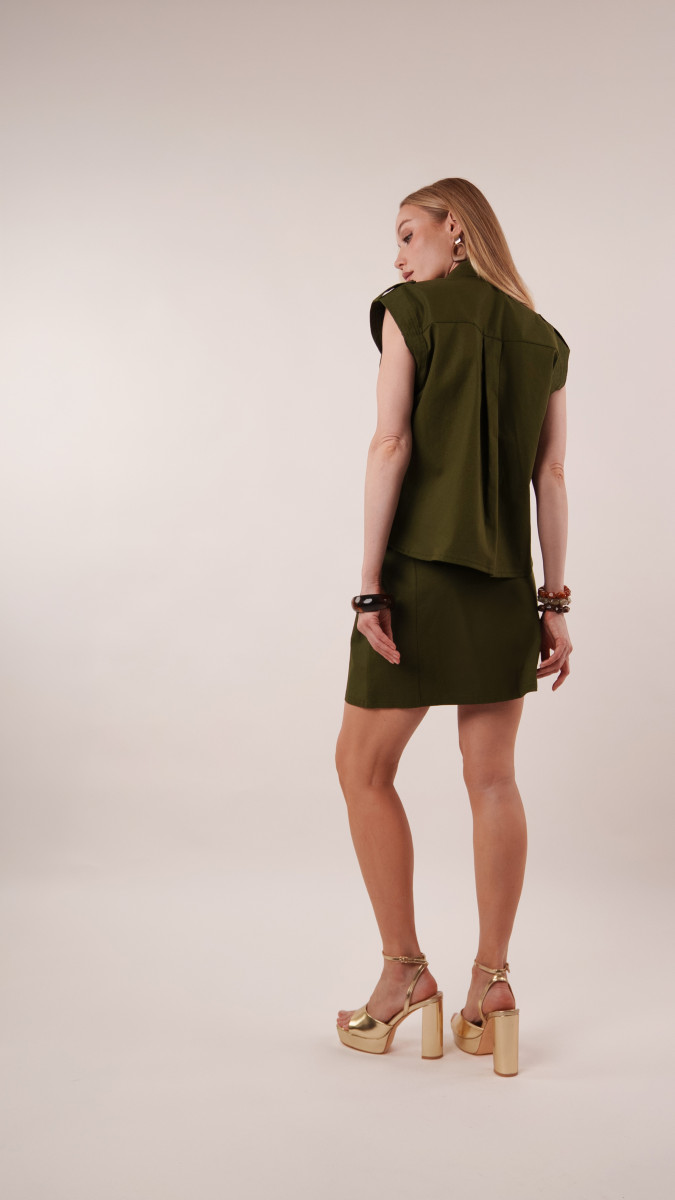
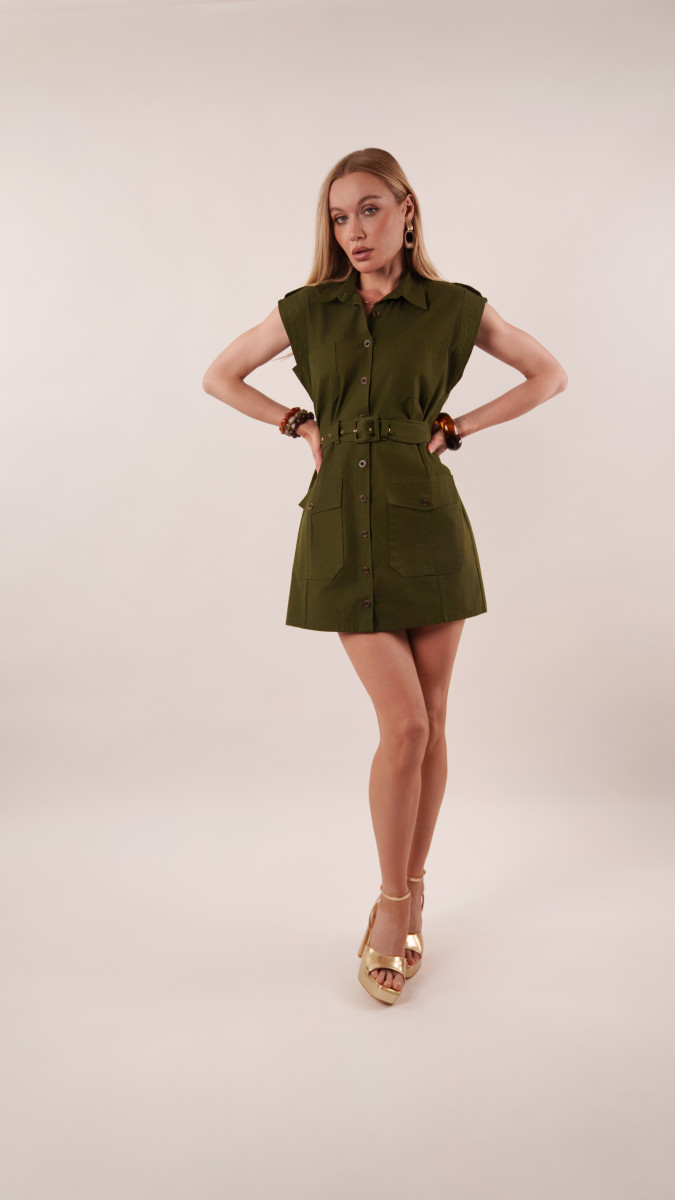
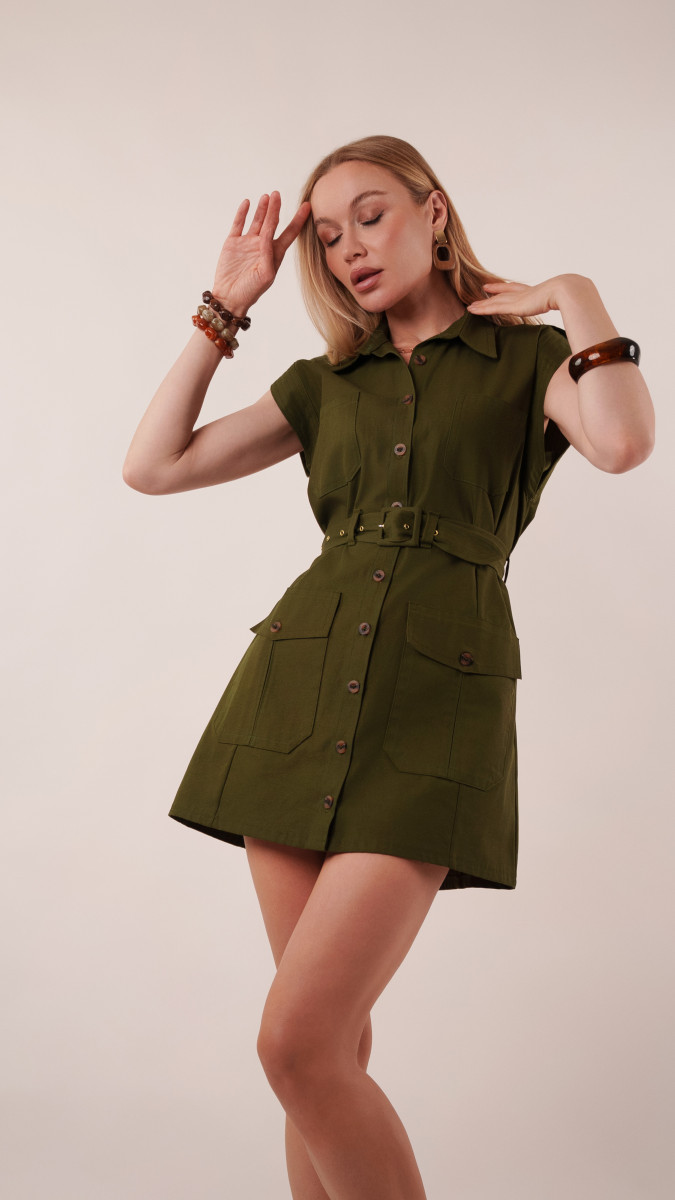
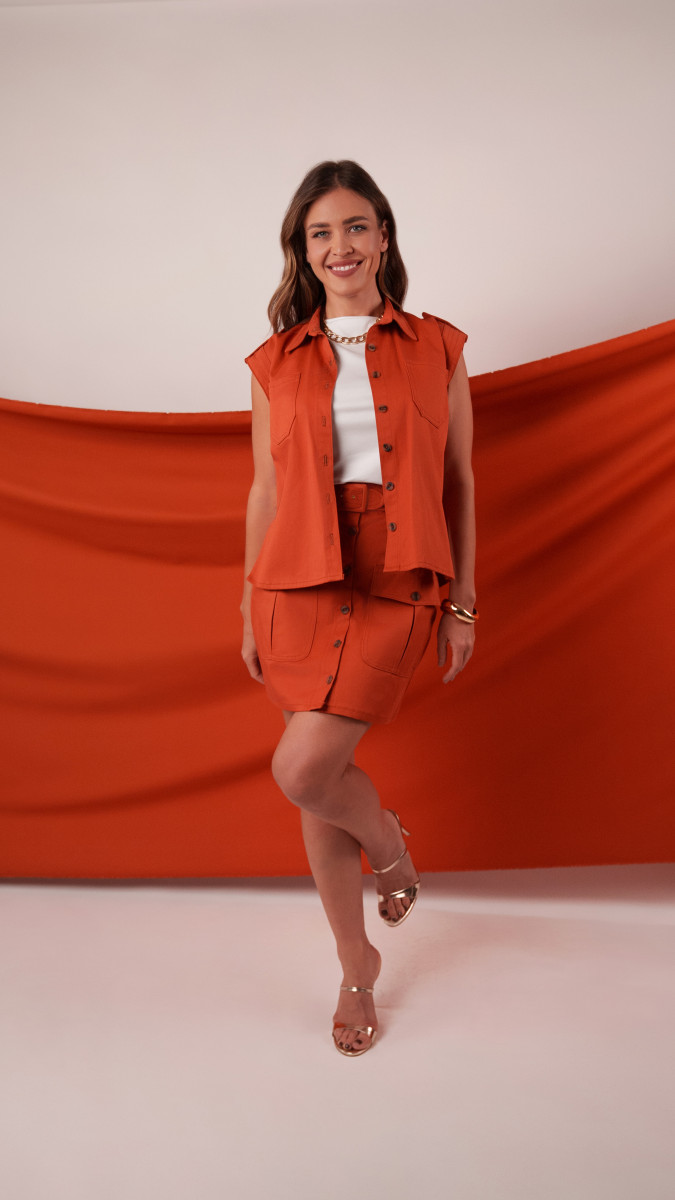
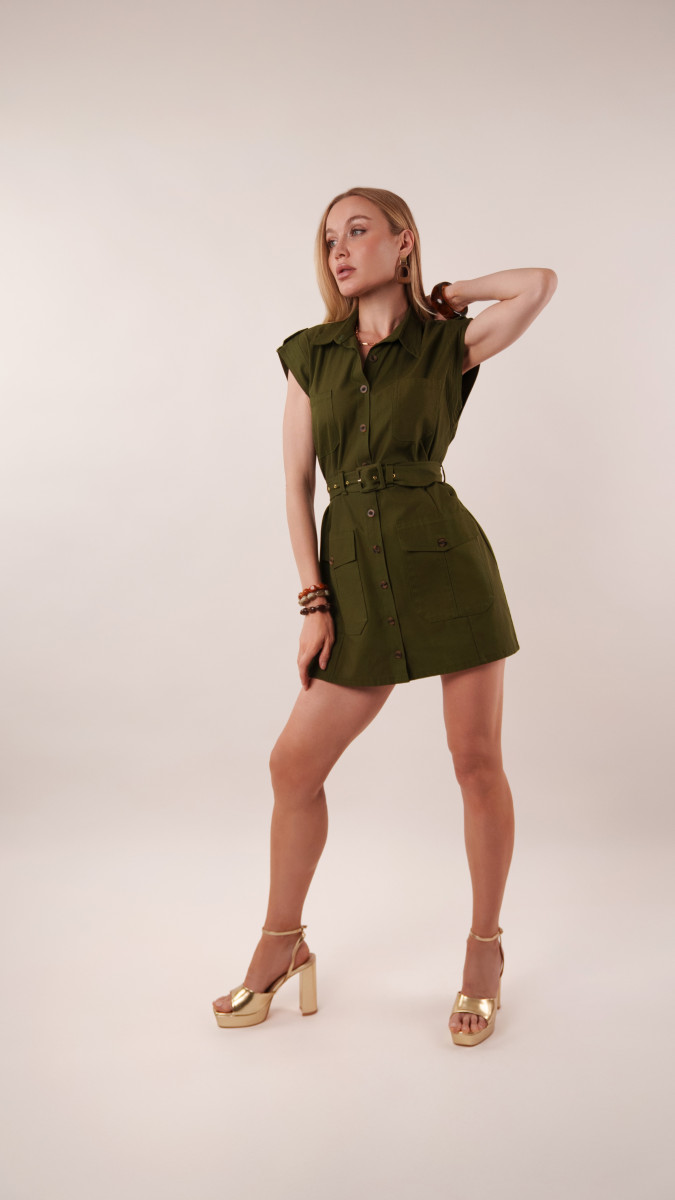
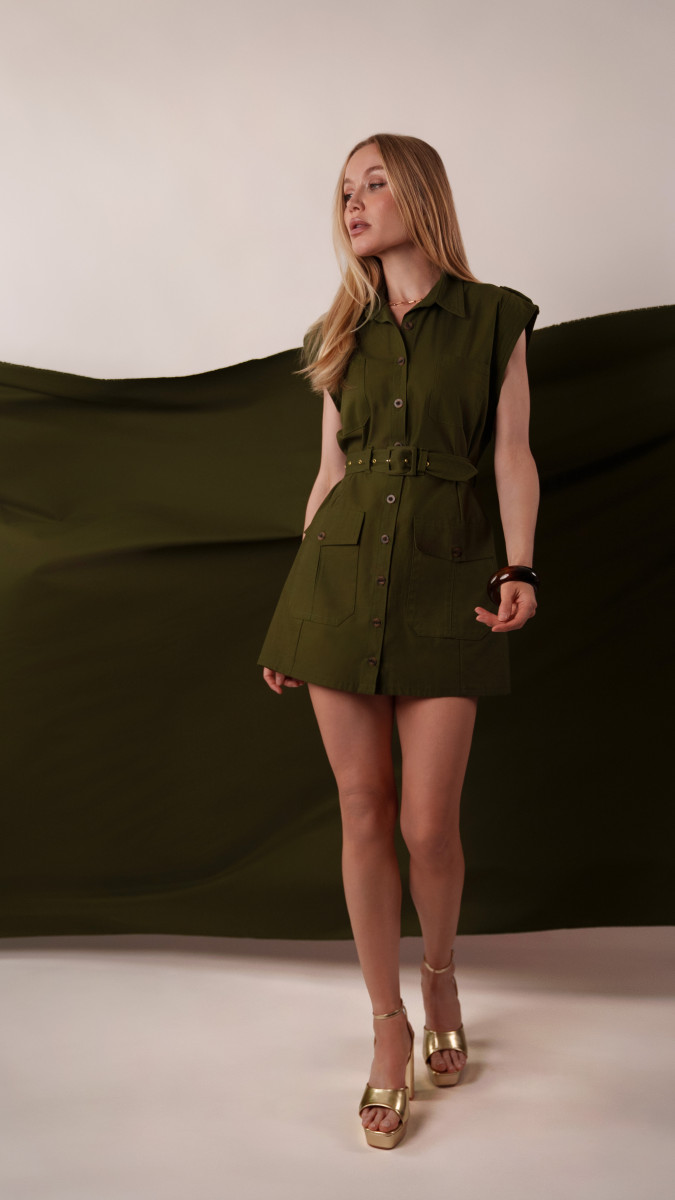
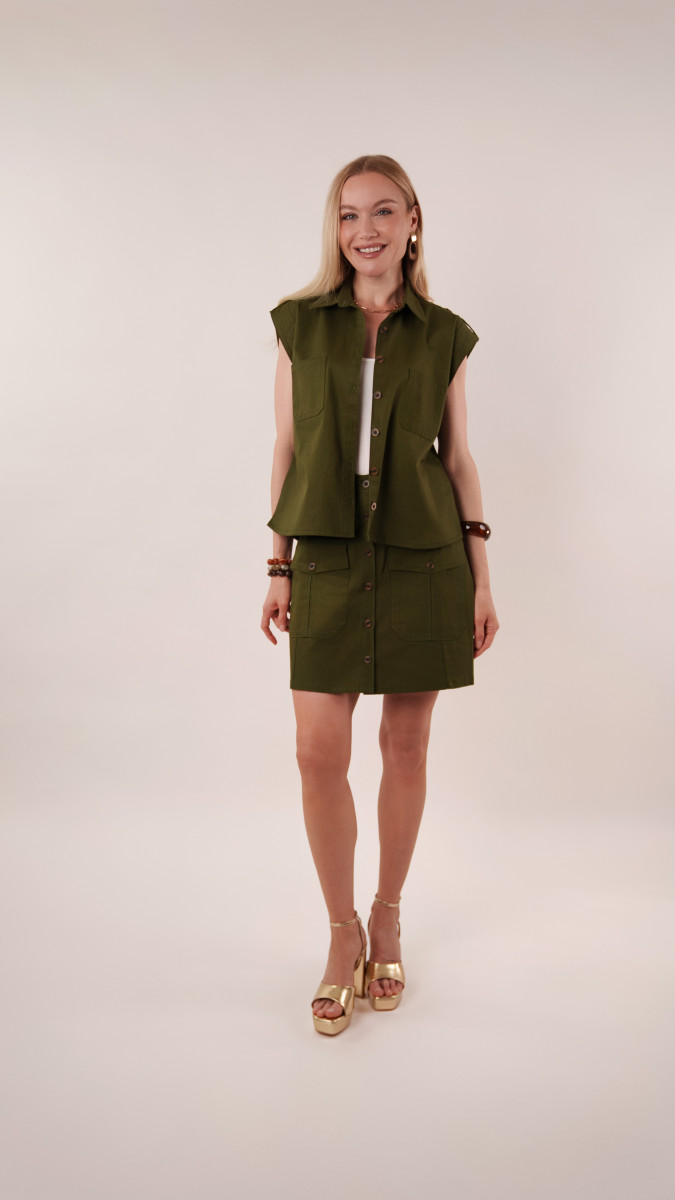
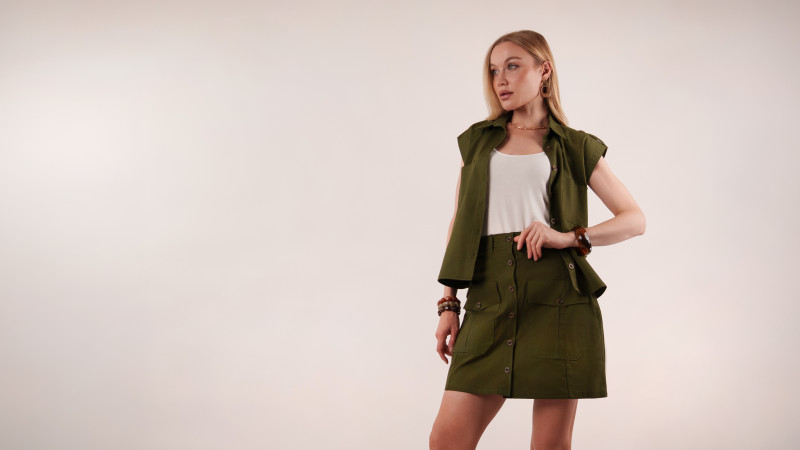
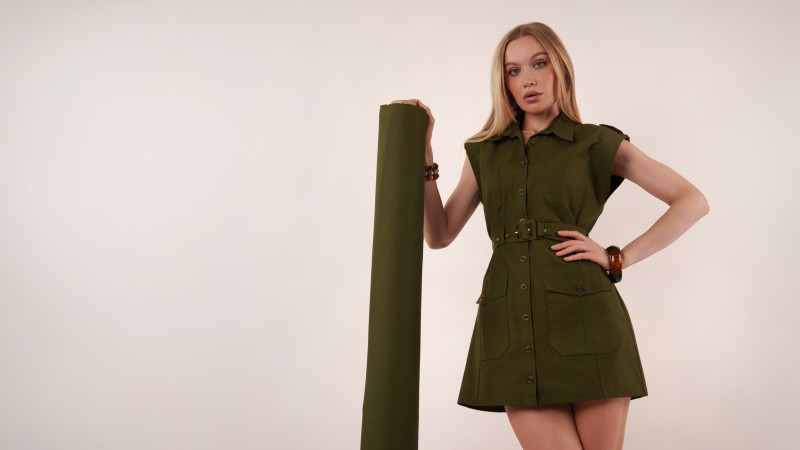
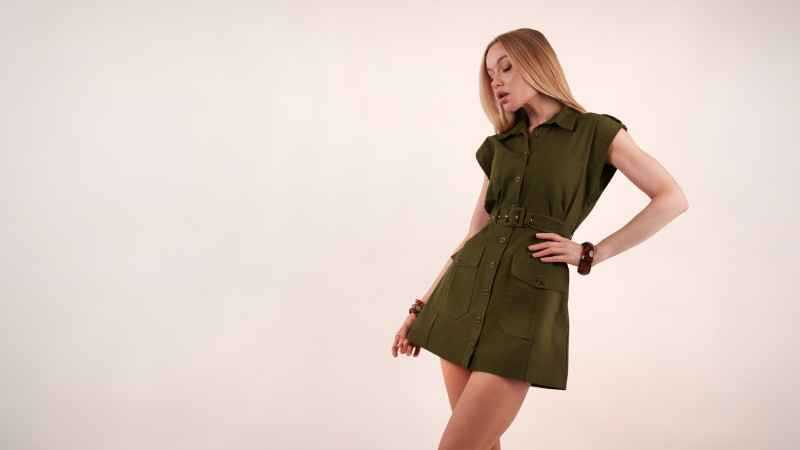
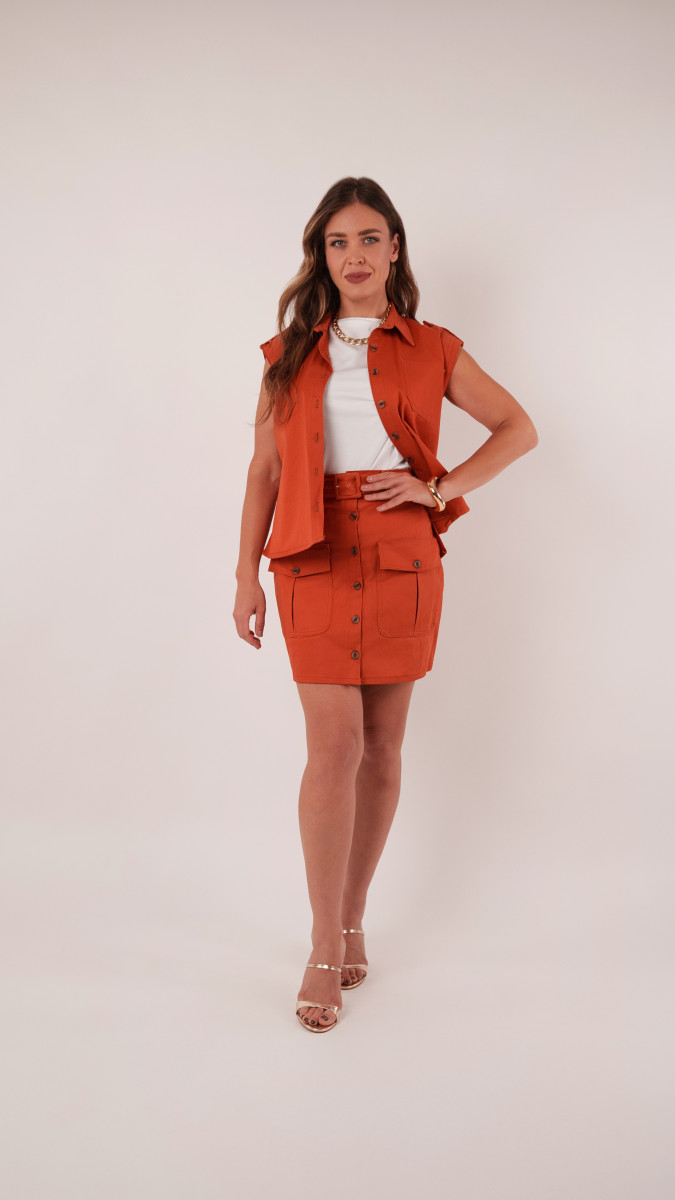
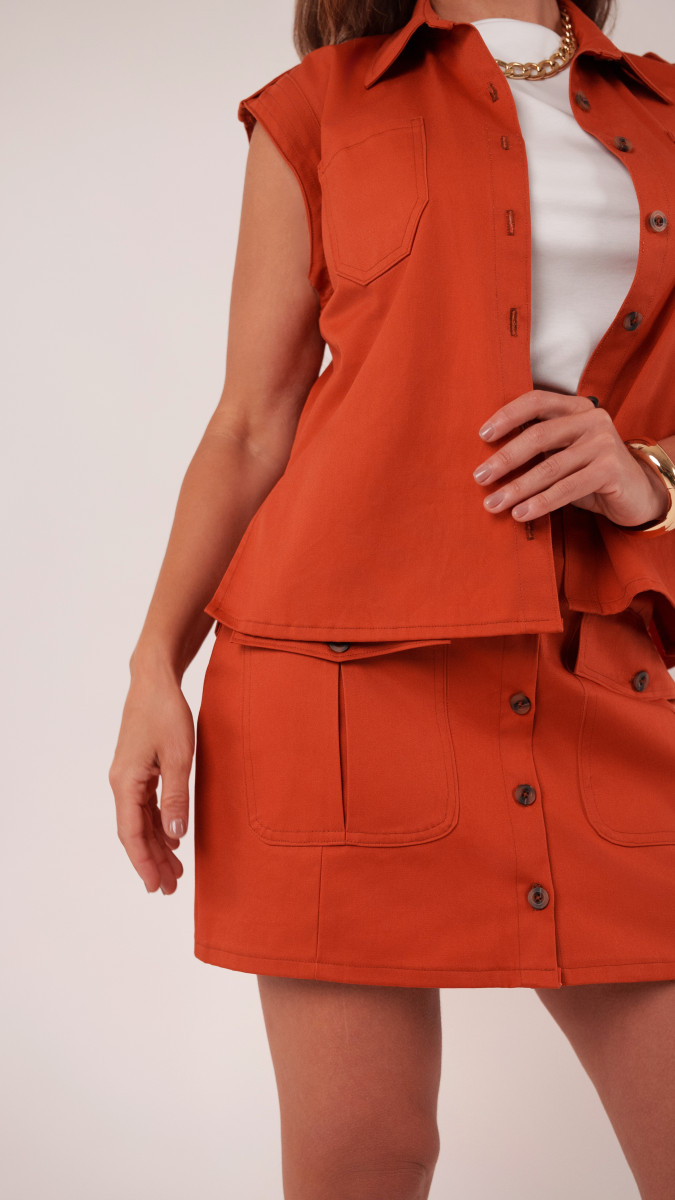
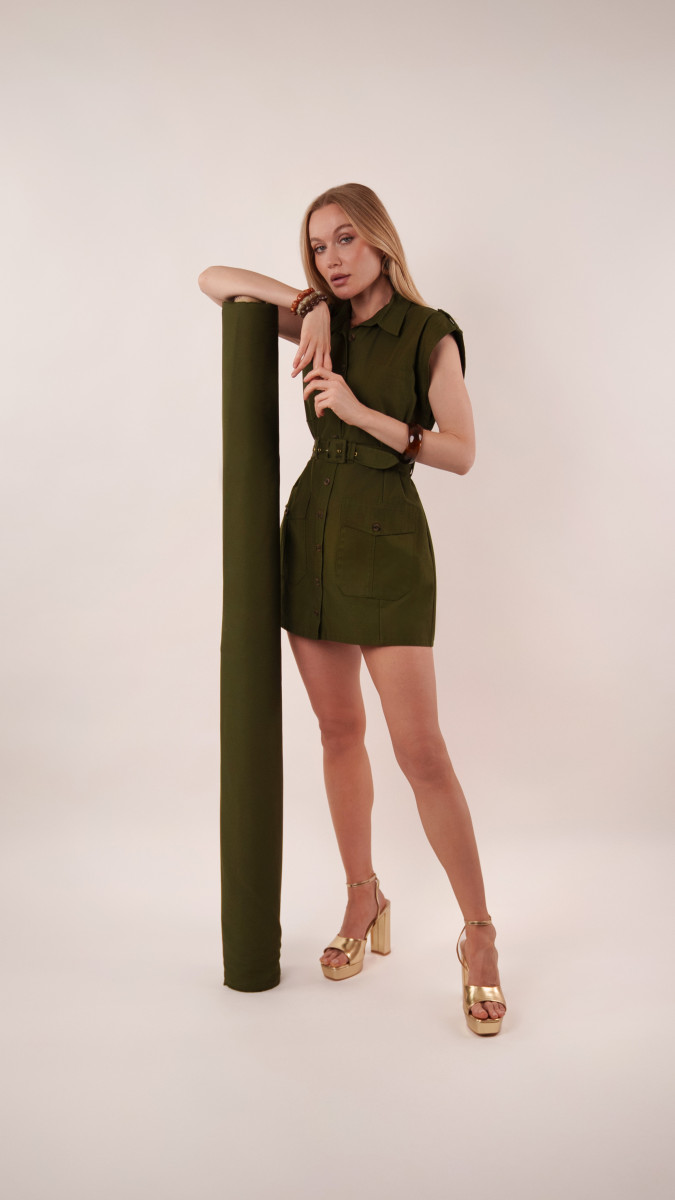
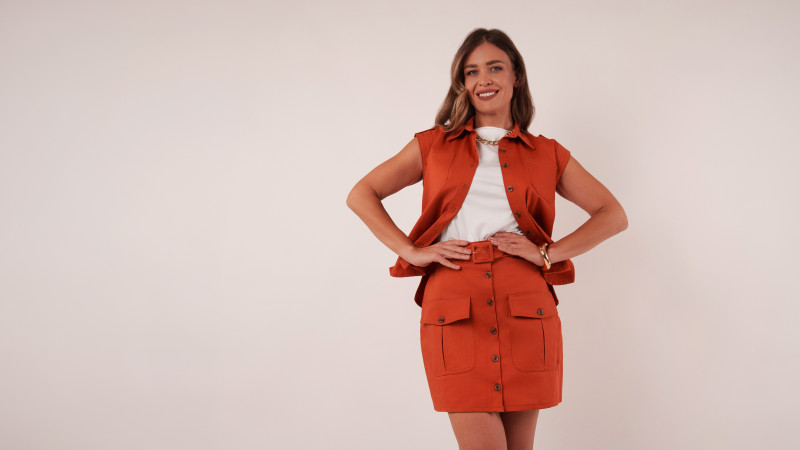
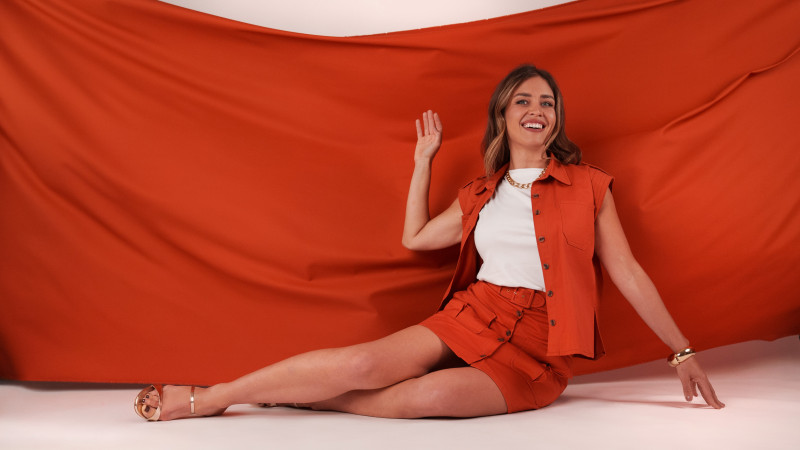
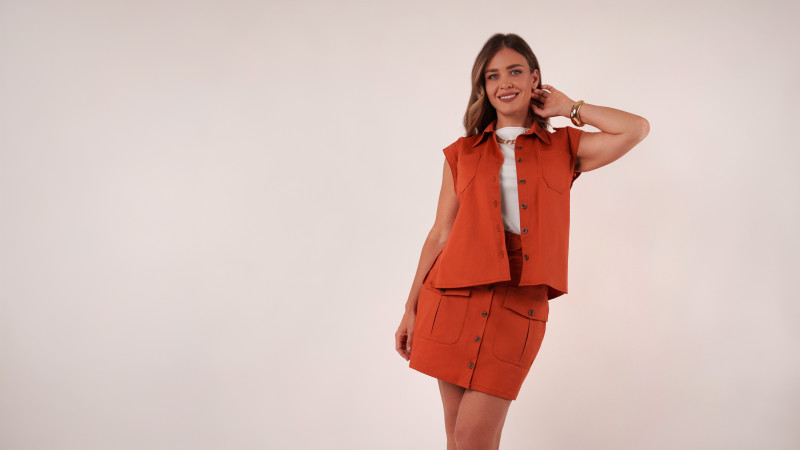
Three patterns. One download. Meet the Kalla Ensemble, a versatile wardrobe staple that proves you do not need a complicated pattern to create polished, elevated garments. This pattern includes three coordinating pieces: a structured utility top, a pocketed mini skirt, and a chic shirt dress. Whether you sew one piece or all three, you’ll quickly realize they all share the same beginner-friendly construction techniques. Once you’ve mastered one garment, you’ll have the confidence to sew the rest.
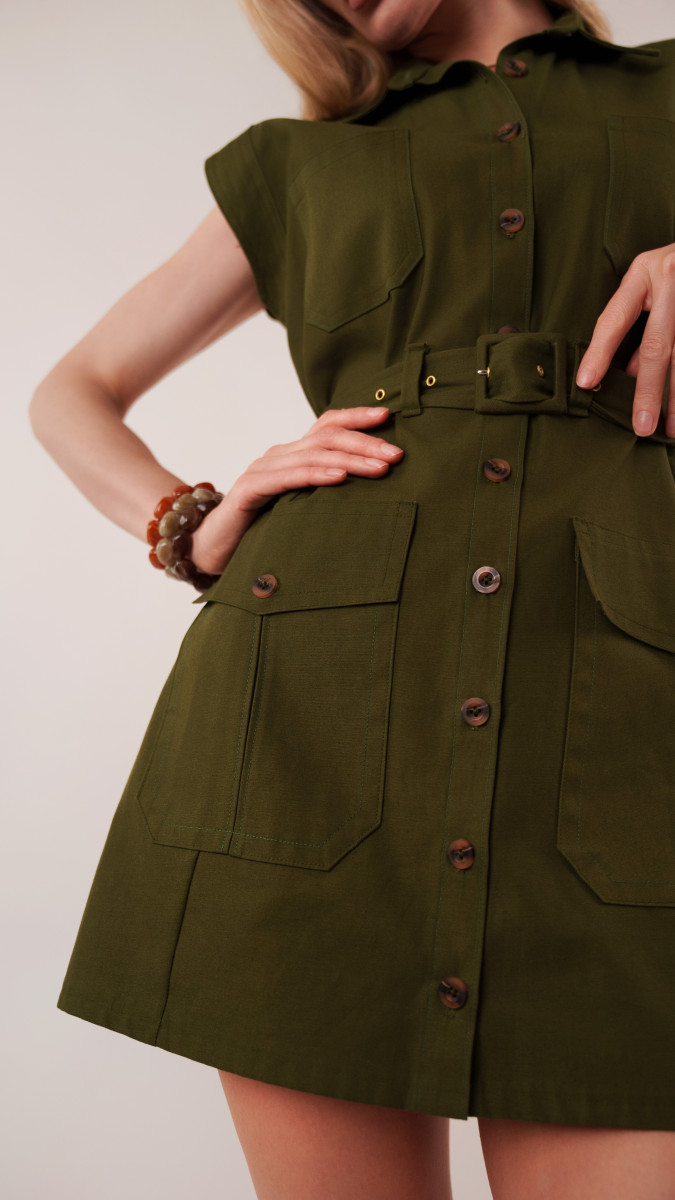
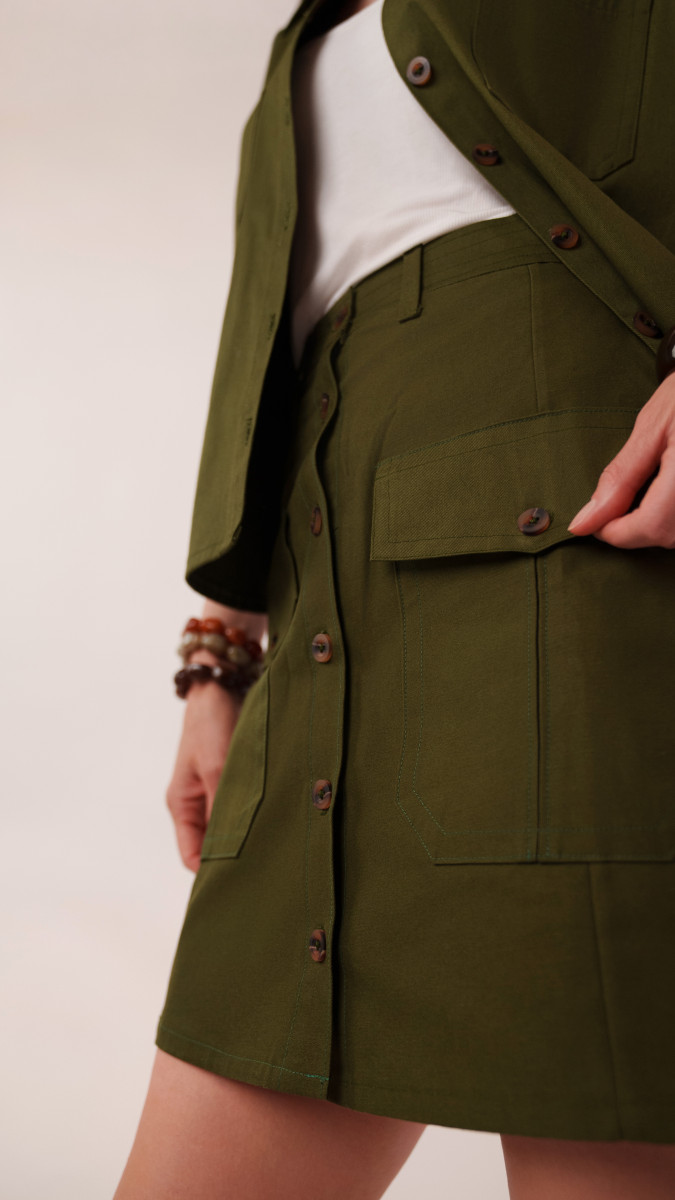
Made from our Organic Cotton Twill in a rich olive green, the Kalla Ensemble strikes the perfect balance between comfort and structure. The fabric is soft enough to wear directly against your skin while providing the body needed to achieve those crisp utility-inspired lines. It is one of our favorite fabrics to sew with, and for good reason. It presses beautifully, topstitches cleanly, and is forgiving enough for sewists looking to build their skills.
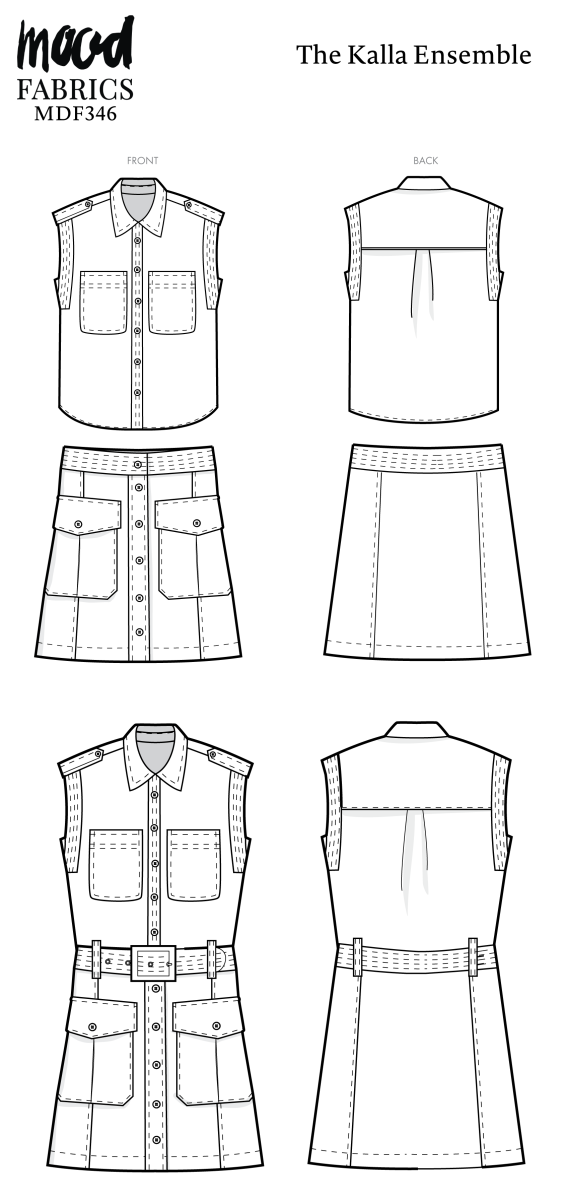
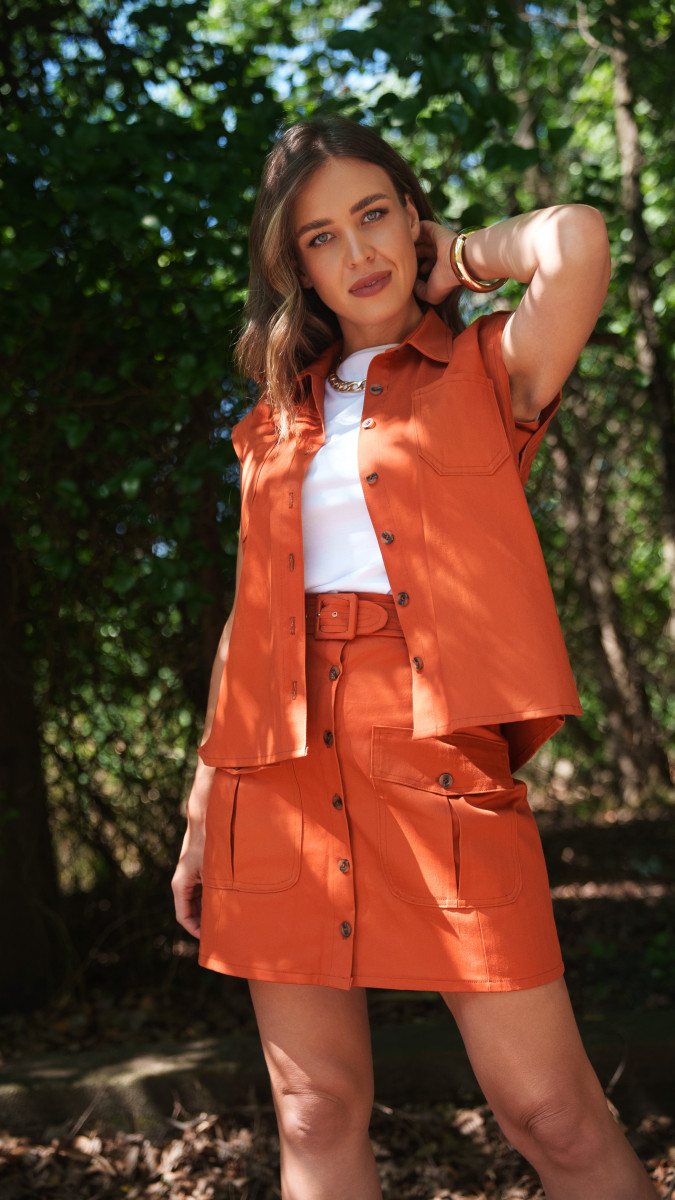
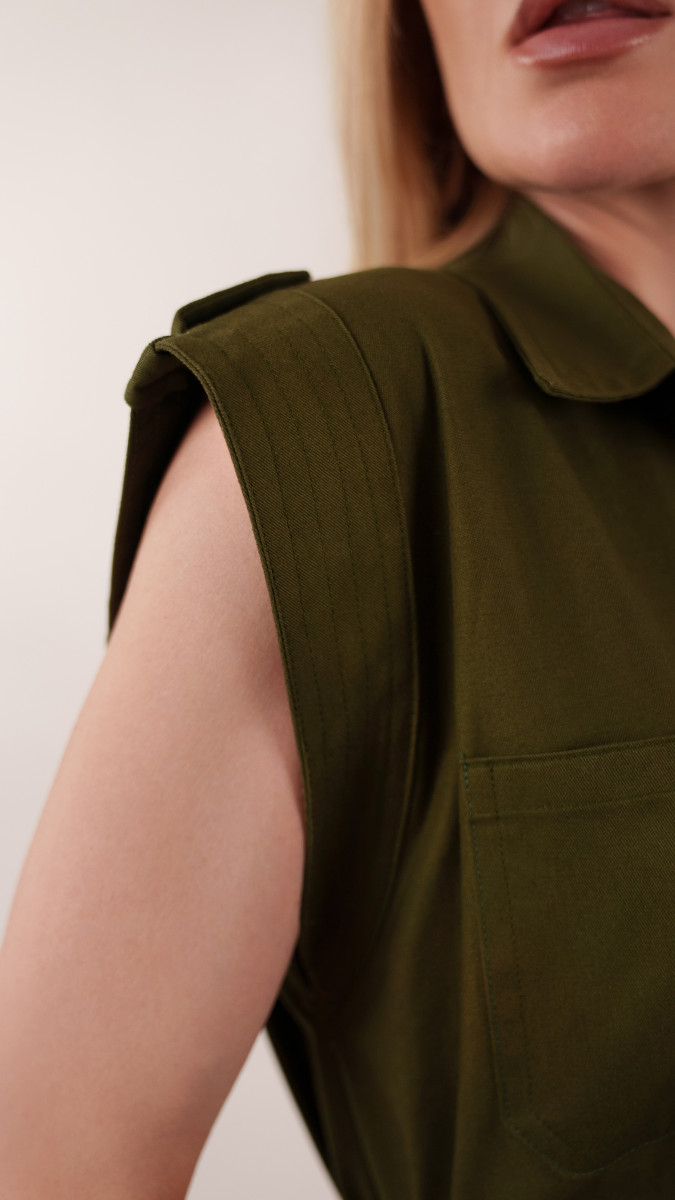
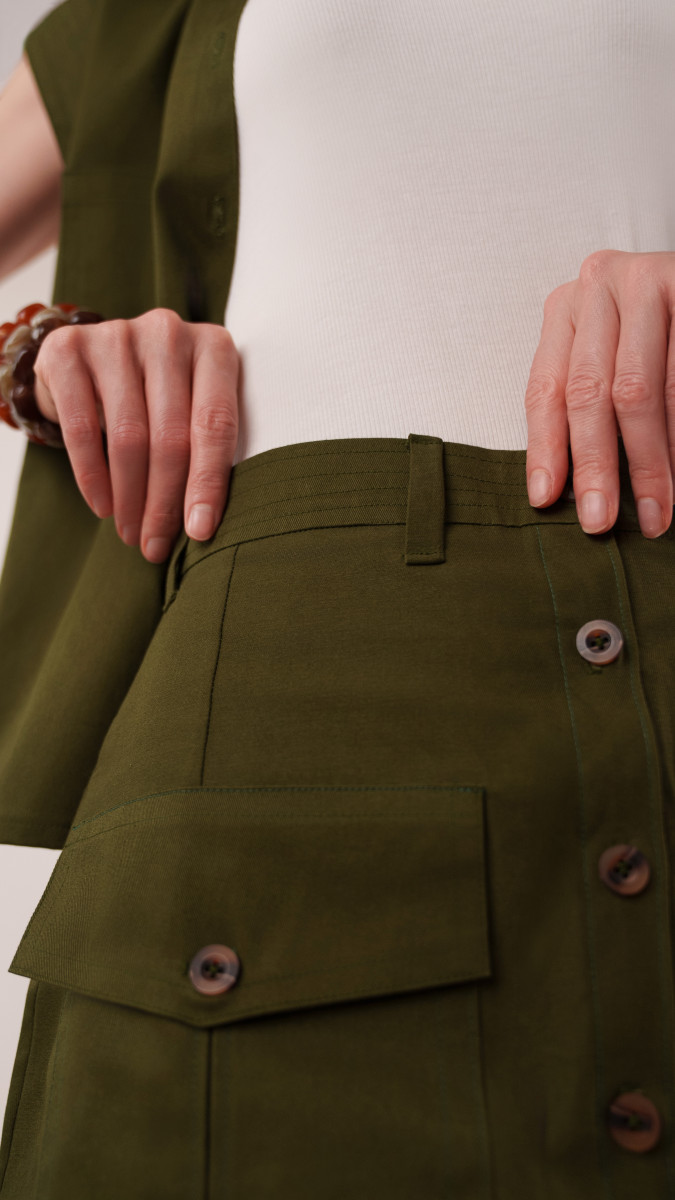
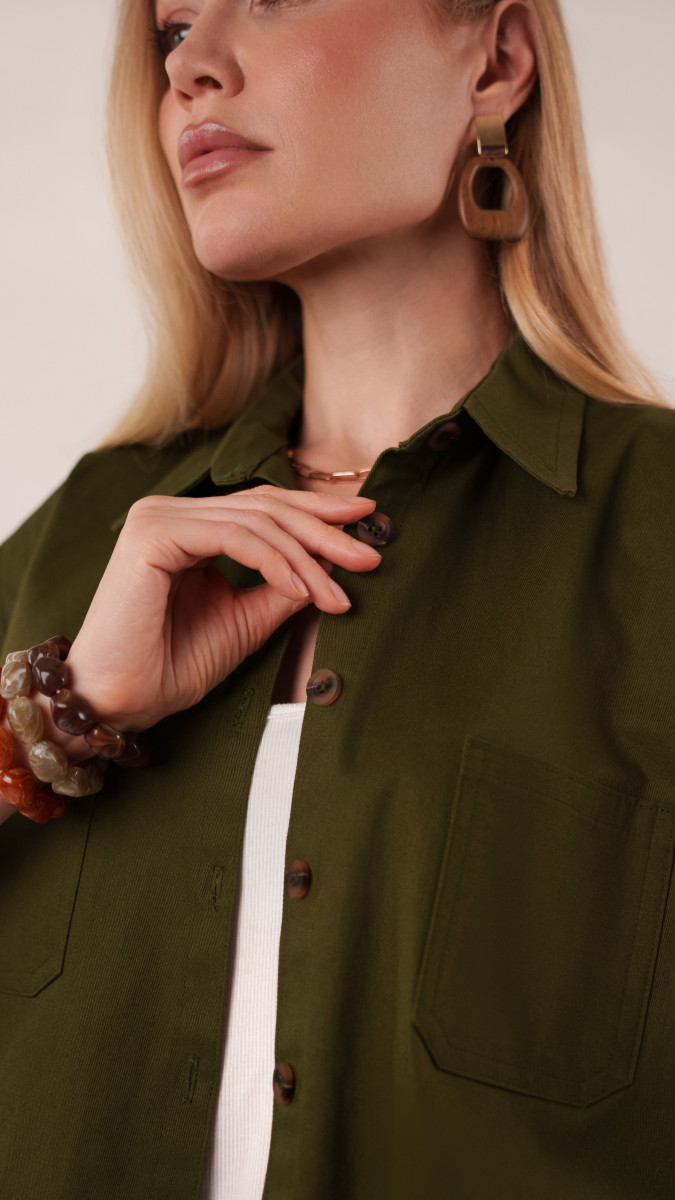
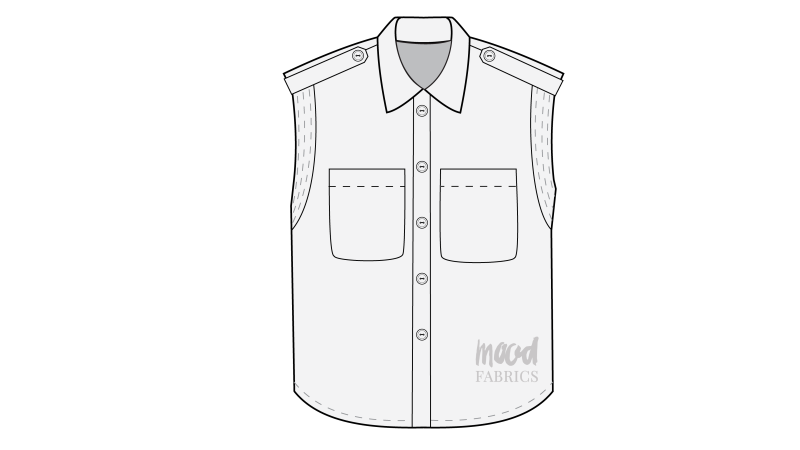
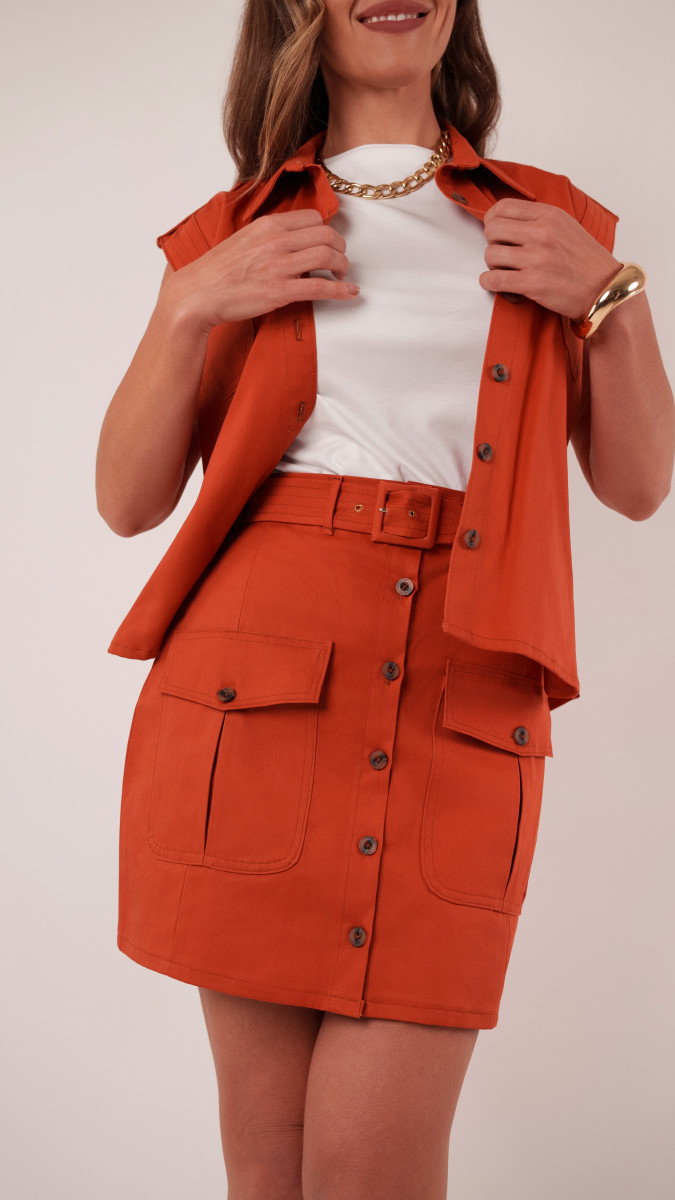
The charm of the Kalla Ensemble is all in the details. Oversized utility pockets pair with classic patch pockets for an elevated cargo-inspired look, while rows of decorative topstitching highlight every seam. Coordinating buttons and a matching belt finish each garment with a polished, ready-to-wear appearance that looks far more advanced to sew than it actually is.
Although it’s made for warm-weather dressing, the Kalla Ensemble easily transitions into cooler seasons. Wear the top with jeans, style the skirt with tights and boots, or layer the relaxed shirt dress over a fitted turtleneck when autumn rolls around. With three interchangeable pieces that can be mixed, matched, and worn separately, this is the kind of ensemble you’ll be wearing for years to come.
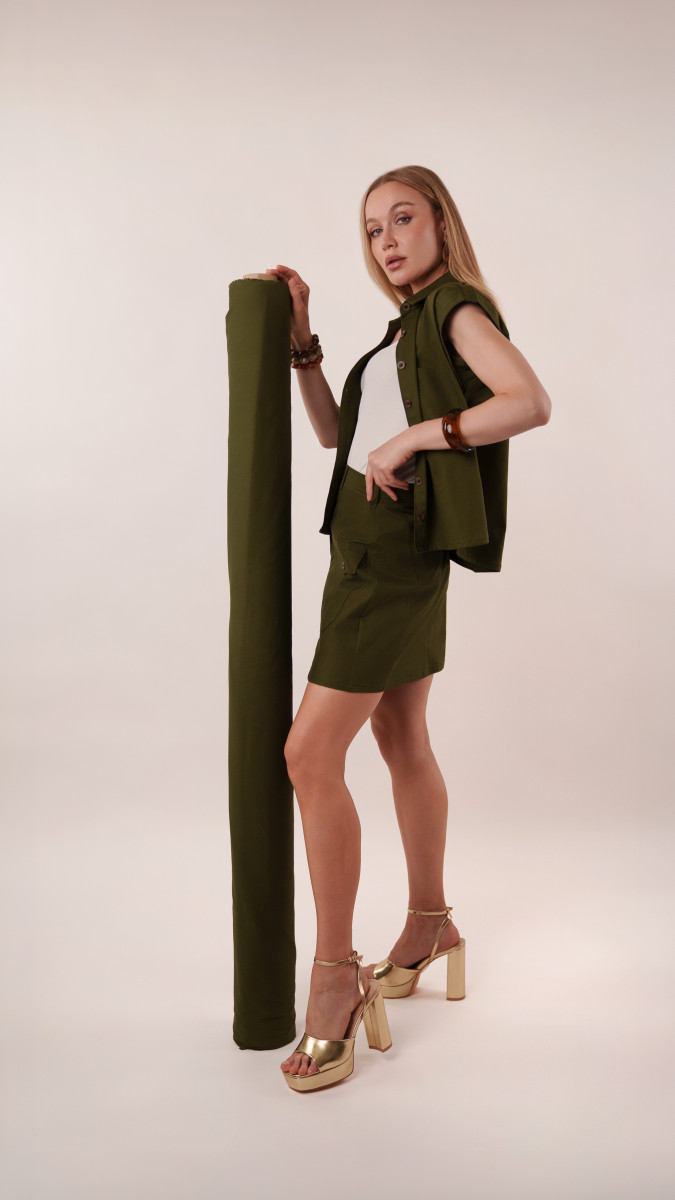
Essential Materials & Sizing Guide for the Kalla Ensemble
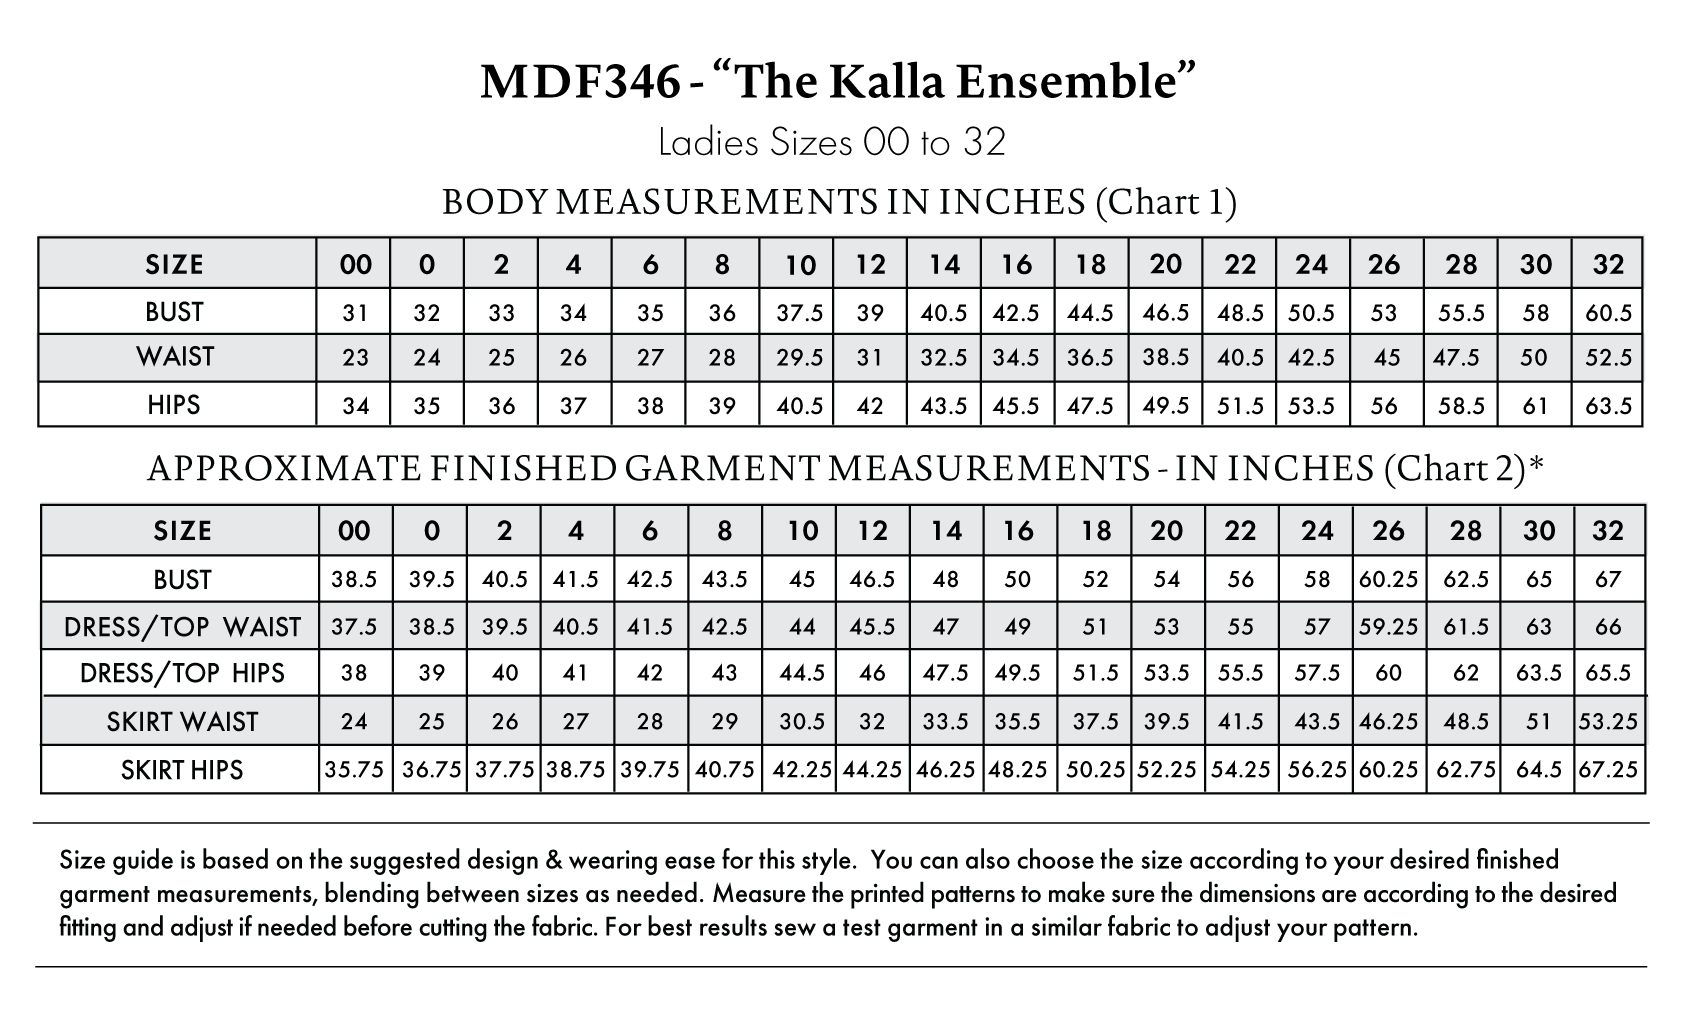
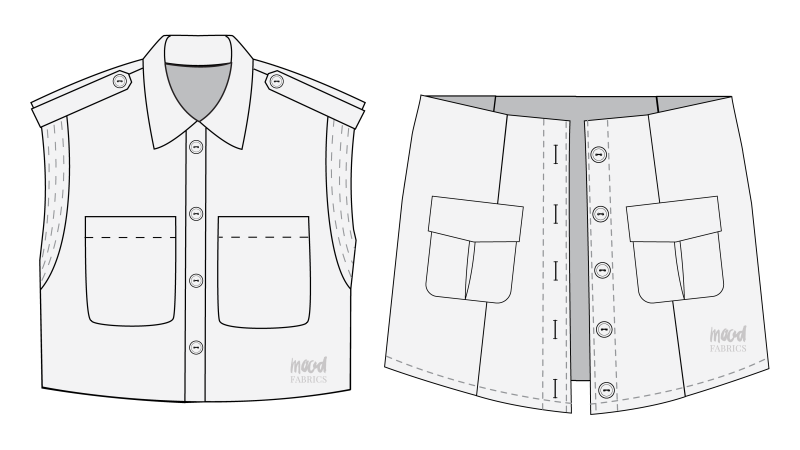
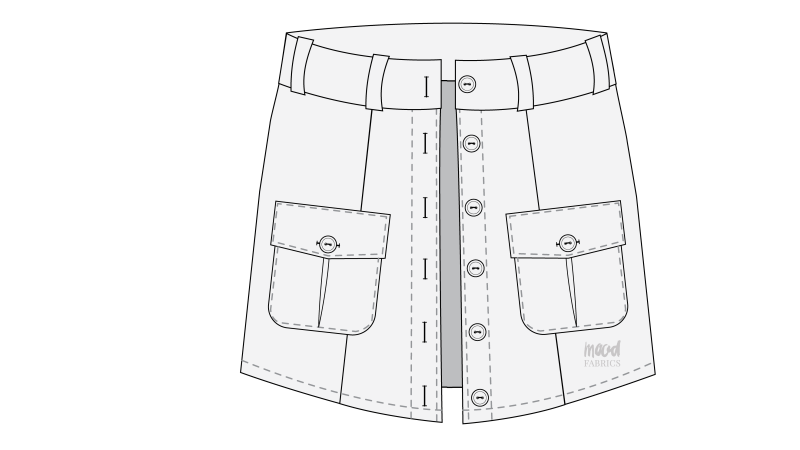
Continue reading for a breakdown of what knowledge and materials you need for creating your very own ensemble! We’ve got you covered with the recommended materials we used—if you want to follow along exactly—as well as a curated list of alternative fabric type recommendations if you want to customize your own version. The Kalla Ensemble free sewing pattern download includes technical drawings for seam and ensemble visibility, plus a size chart to help you find your perfect fit!
Purchase Products Used Below:
Quantities indicated are for sewing a size small ensemble. Toggle the ‘SHOP THIS LOOK’ box to find quantity estimates for other sizes.
- 2.5 yards of Organic Cotton Twill – Olive – Stratton Collection
- 1 each of Maxant Rectangular Buckle Cover Kit – 1.5″
- 28 each of Tortoise Plastic Button – 28L/18mm
- 1 each of Dritz Brass Eyelets Size 5/32″ – 100ct
- 3 each of Gutermann Sew All Thread 100m – 782 Black Olive
- MDF346 – Kalla Ensemble Sewing Pattern (Free download below!)
Additional Materials Used
Alternative Fabric Type Recommendations:
The Kalla Ensemble sewing pattern is best suited for medium or heavy weight fashion fabrics. Explore other fabric types or colors from our featured collections for your ensemble with the links below.
Fabric Collections Used in this Post:
Download Your Free Sewing Pattern
Submit your name and email in the form below to receive the download link for the Kalla Ensemble free sewing pattern directly in your inbox. Mood Sewciety Patterns will send your free download link via email with the subject line: ‘Your Free Download from Mood Sewciety – The Kalla Ensemble’ (in PDF format for A4 and letter-size printing).
© MoodFabrics.com / MoodSewciety.com – Mass production, resale, or distribution of this pattern in any form is strictly prohibited.
Find Your Perfect Fit
The Kalla Ensemble Sizing Guide is based on the suggested design & wearing ease for this style. You can also choose the size according to your desired finished garment measurements, blending between sizes as needed. Measure the printed patterns to make sure the dimensions are according to the desired fitting and adjust if needed before cutting the fabric. For best results, sew a test garment in a similar fabric to adjust your pattern.
Note: Always read all the instructions before cutting the fabric!
How to Sew The Kalla Ensemble
The instructions provided below are designed to guide you through sewing the Kalla Ensemble from start to finish.
3 Tips for Sewing The Kalla Ensemble with Cotton Twill
⇒ Make sure you launder your fabric before cutting out the pattern. Otherwise, the garment will shrink after you’re done sewing it and it won’t fit you anymore.
⇒ Finish the raw edges of this garment with a serger or zigzag stitch along the edge.
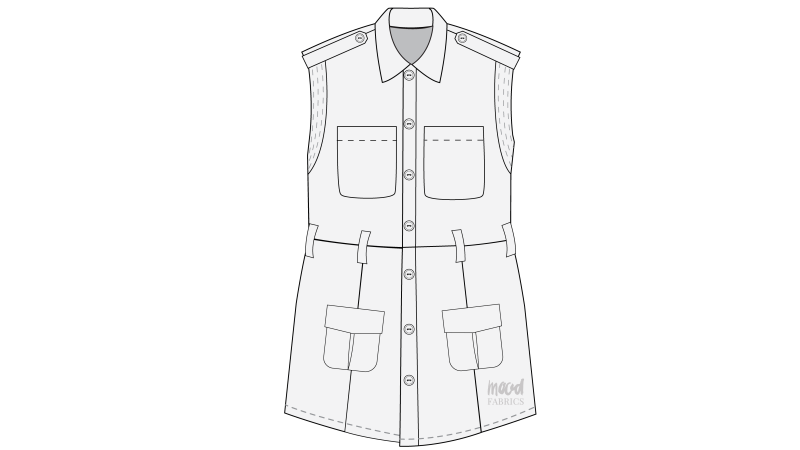
⇒ The instructions for the dress and the top are practically identical. The only difference is that the top is cut longer and is separate from the skirt while the dress is cut shorter and attaches to the skirt at the waist, omitting the waistband. Make sure to read the steps carefully based on which version of the ensemble you’re making.
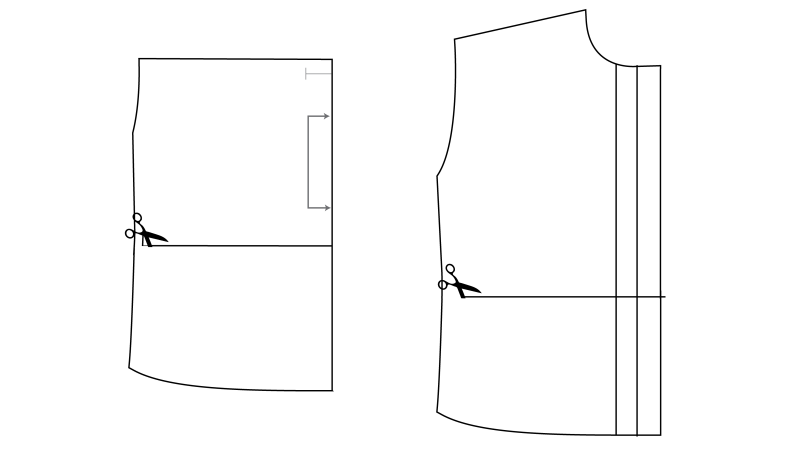
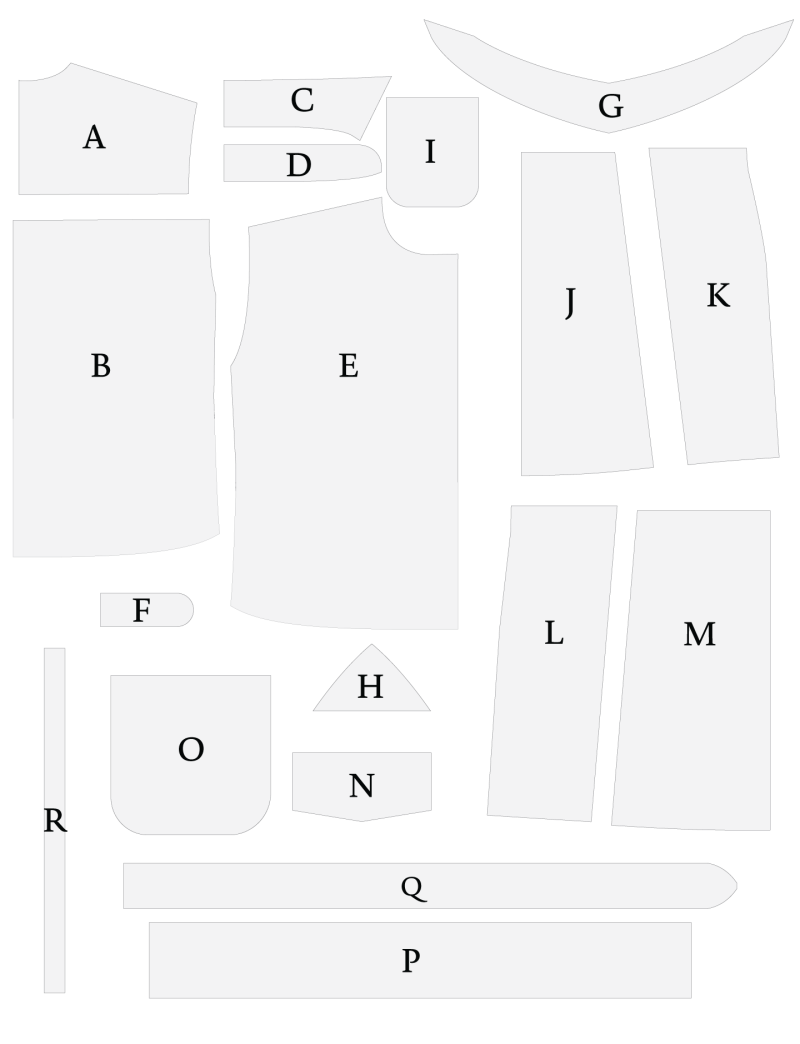
Pattern Pieces & Fabric Cuts Needed
(A) BACK YOKE
- Fabric – Cut 1 on Fold
(B) BACK TOP
- Fabric – Cut 1 on Fold
(C) COLLAR
- Fabric – Cut 2 on Fold
(D) COLLAR BAND
- Fabric – Cut 2 on Fold
(E) TOP FRONT
- Fabric – Cut 2 Mirrored
(F) SHOULDER TABS
- Fabric – Cut 4
(G) ARMHOLE OUTER FACING
- Fabric – Cut 2 Mirrored
(H) MODESTY PANEL
- Fabric – Cut 2
(I) TOP FRONT POCKET
- Fabric – Cut 2
(J) SKIRT BACK ENTER
- Fabric – Cut 2 on Fold
(K) SKIRT BACK SIDE
- Fabric – Cut 2 Mirrored
(L) SKIRT FRONT SIDE
- Fabric – Cut 2 Mirrored
(M) SKIRT FRONT CENTER
- Fabric – Cut 2 Mirrored
(N) SKIRT FRONT POCKET FLAP
- Fabric – Cut 2
(O) SKIRT FRONT POCKETS
- Fabric – Cut 2
(P) SKIRT WAISTBAND
- Fabric – Cut 1
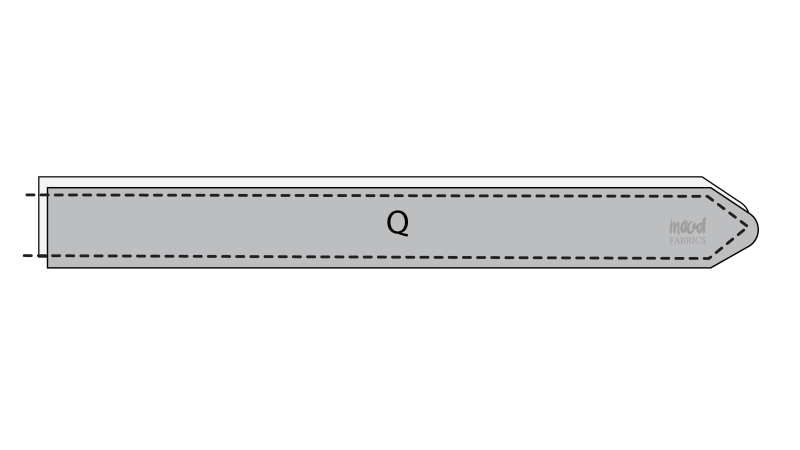
(Q) BELT
- Fabric – Cut 2
(R) BELT LOOPS
- Fabric – Cut 1
Sew with a 1/2″ seam allowance for all seams unless otherwise specified.
Step 1
TOP BACK
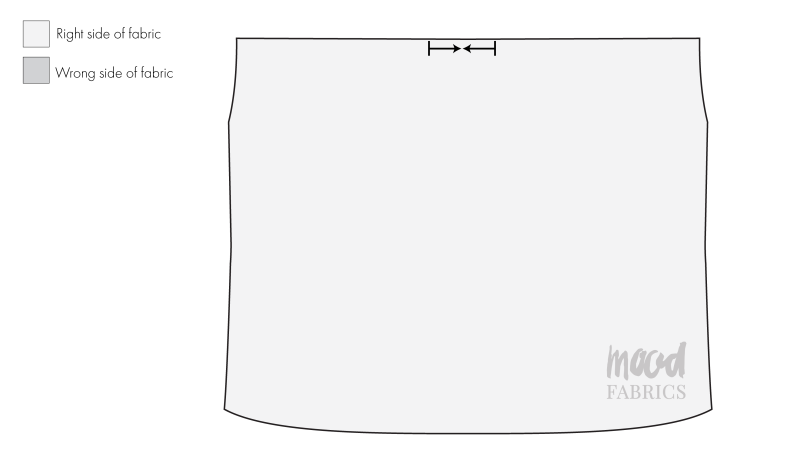
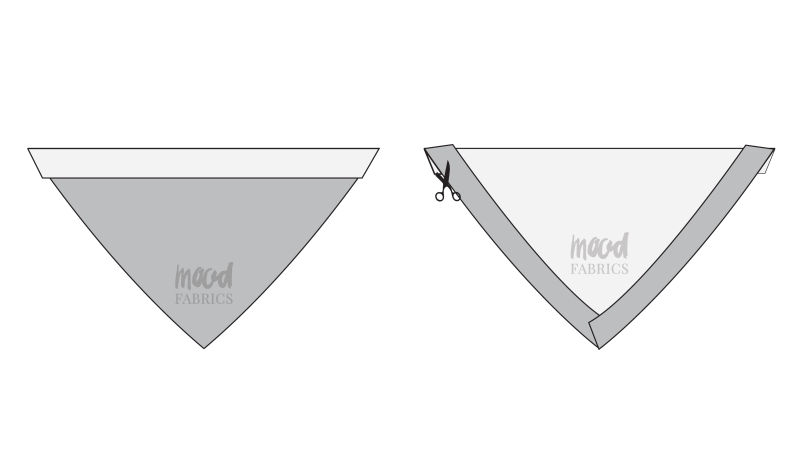
- Locate the notches on the back top upper edge.
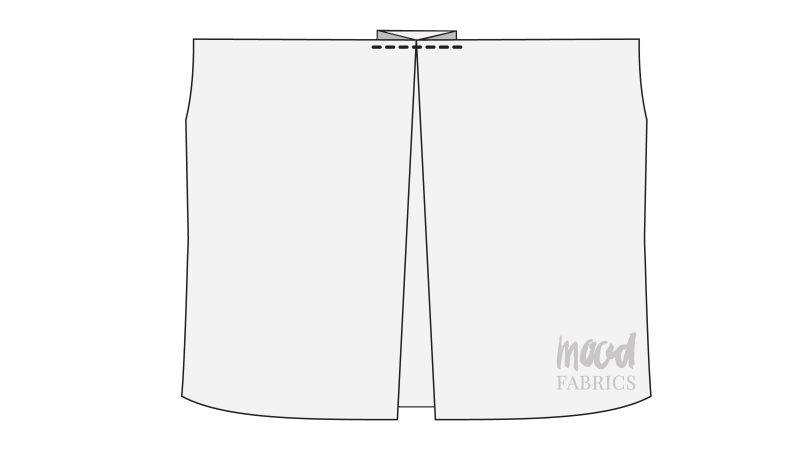
- Bring the notches together and pin them in place before pressing into a box pleat with an iron.
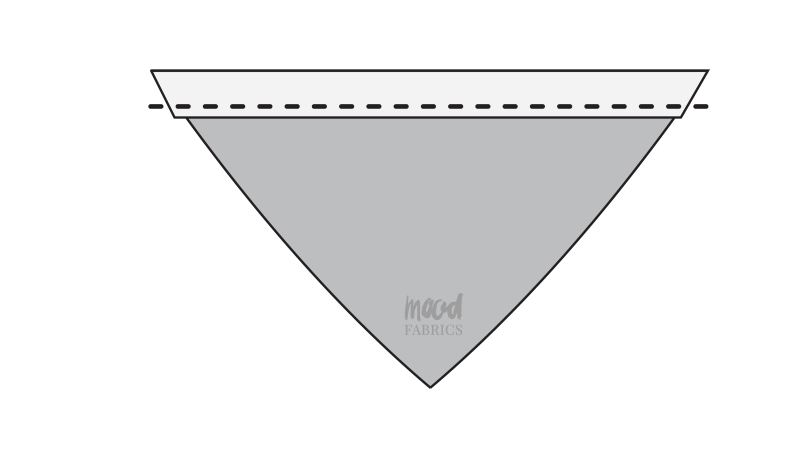
- Secure the pleat by sewing a basting stitch with a ¼ inch seam allowance so that the stitch doesn’t show after the next step.
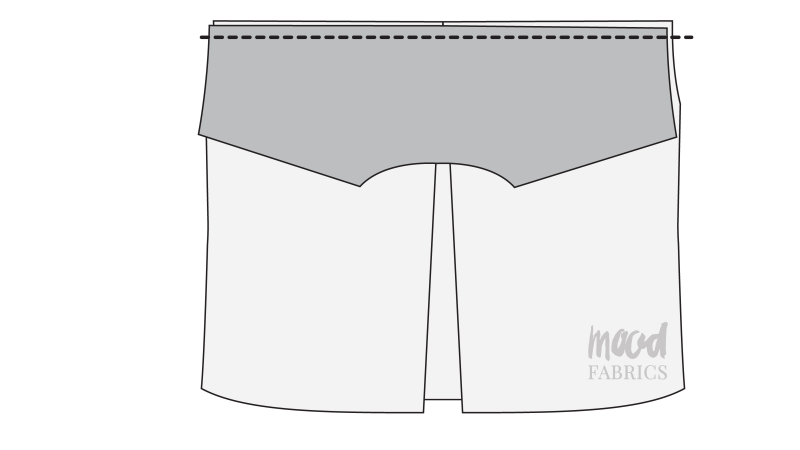
- Place the back yoke right sides together with the back top upper edge on top of the pleat.
- Sew the yoke and the back top together.
- Press the yoke seam open and flat.
Step 2
BUTTON PLACKET
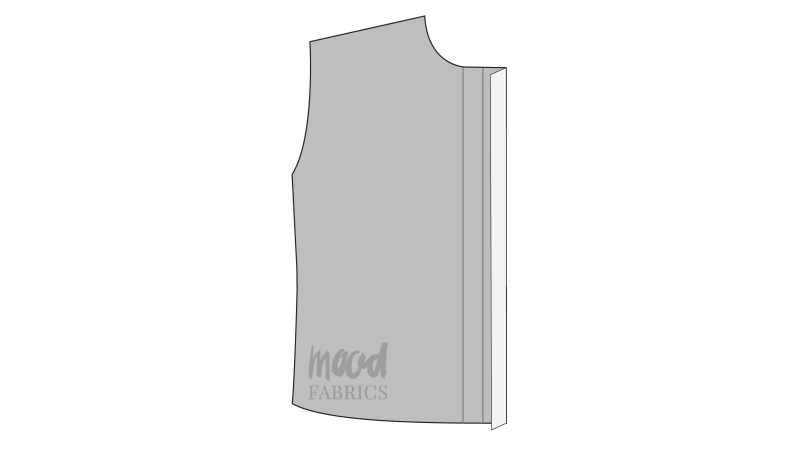
- Locate the notches on the front top that indicate the fold locations for the button placket.
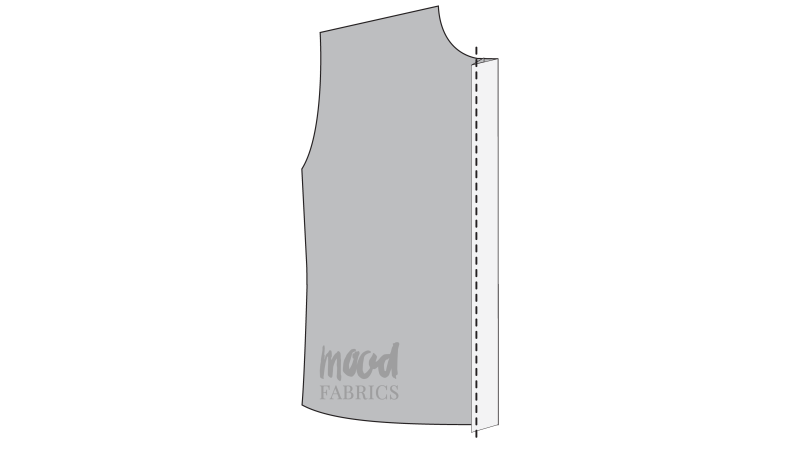
- Press a ½ inch fold into the center front opening of the top with the fabric folded toward the wrong side of the garment. This is the seam allowance for your button placket.
- Press a 1 inch fold into the center front opening of the top with the fabric folded toward the wrong side of the garment. This is the back of the button placket.
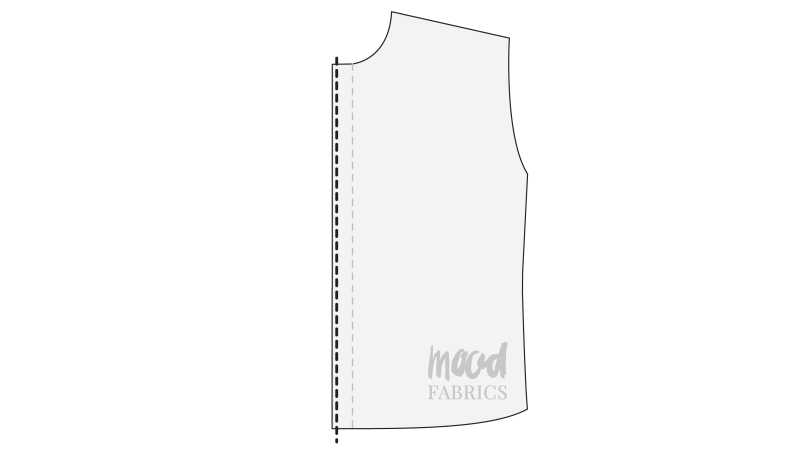
- Sew a straight stitch from the neckline to the hem of the top over the seam allowance of the button placket. I sewed this with a ⅞ inch seam allowance front the center front of the top.
- Repeat these steps for both sides of the center front opening of the top.
Step 3
SHOULDER SEAMS
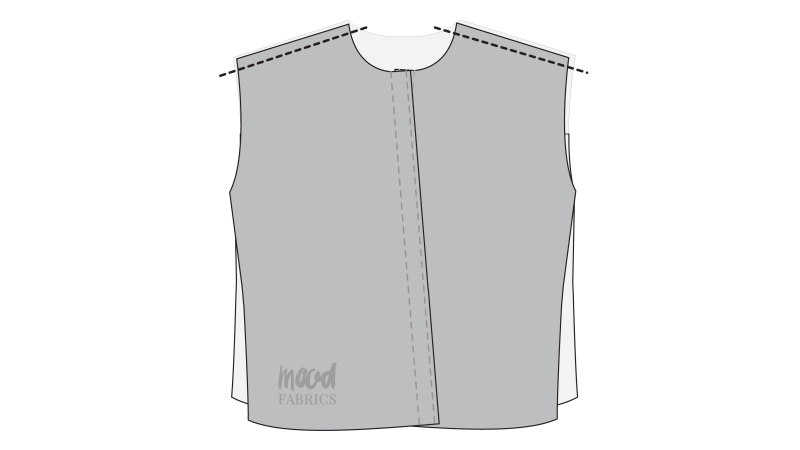
- Place the front top pieces right sides together on top of the back top piece with the shoulders lined up.
- Pin and sew the front top pieces to the back top piece at the shoulder seams.
- Press the shoulder seams open and flat.
Step 4
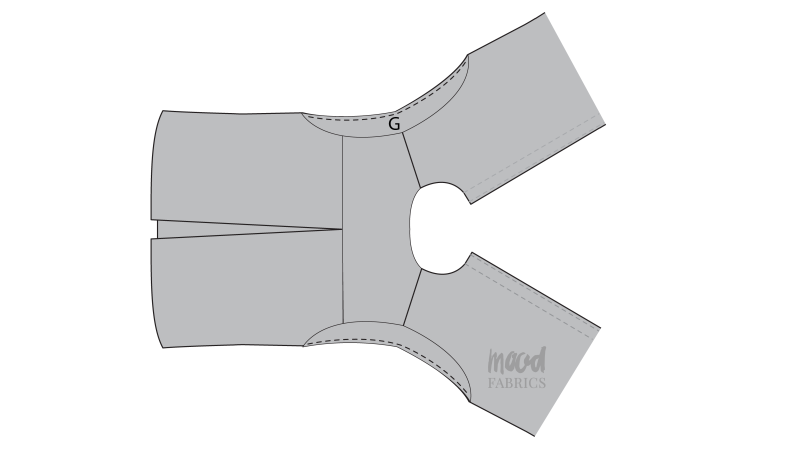
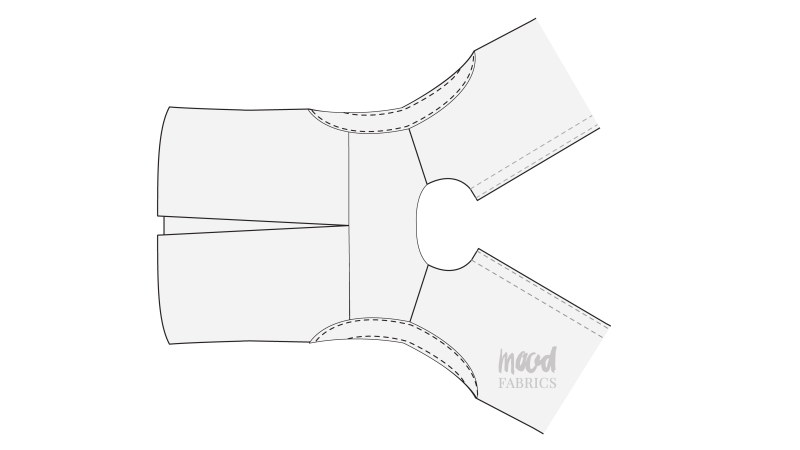
ARMSCYE OUTER FACINGS
- Layout the top unfolded at the shoulders so that both the back and front of the top are wrong sides up.
- Place the RIGHT SIDE of the facings onto the WRONG SIDE of the armscyes of the top.
- Pin and sew the facings to the armscyes.
- Press the seams open and flat.
- Fold the armscye facings toward the RIGHT SIDE of the armscyes, so that the wrong side of the facings are now laying on top of the right side of the top.
- Press a ½ inch fold into the raw edge of the armscye facings to hide it in the wrong side of the facing.
- Pin the folded edge of the armscye facing flat against the right side of the armscye.
- Sew along the folded edge of the facing with a tiny (⅛ inch) seam allowance to attach it to the top.
Step 5
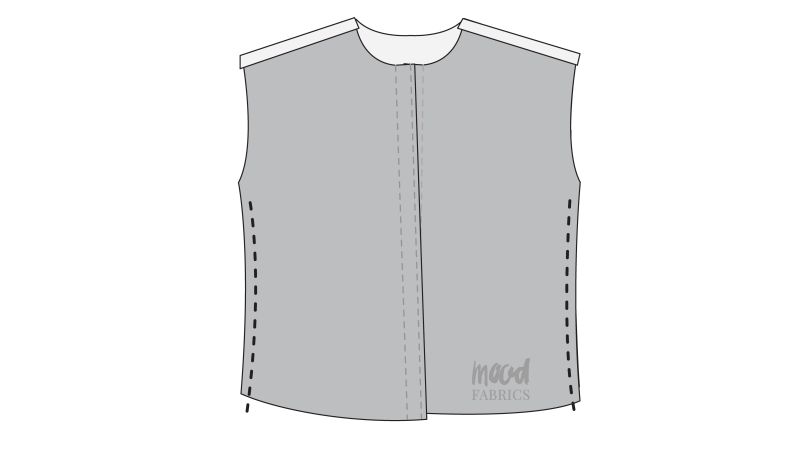
SIDE SEAMS
- Note: If you’re making the top, you want to leave an unsewn section at the bottom of the side seams for the slit. If you’re making the dress, you can sew all the way to the bottom hem at the side seams.
- Fold the top right sides together with the fold at the shoulder seams.
- Line up the side seams of the top.
- If you plan on using the modest panels under the arms, pin and sew the side seams of the top right sides together, but only up to the BOTTOM of the armscye facings. Do not sew the armscye facings right sides together.
- If you DON’T plan on using the modest panels under the arms, pin and sew the side seams of the top right sides together including through the armscye facings right sides together.
- Press the side seams open and flat.
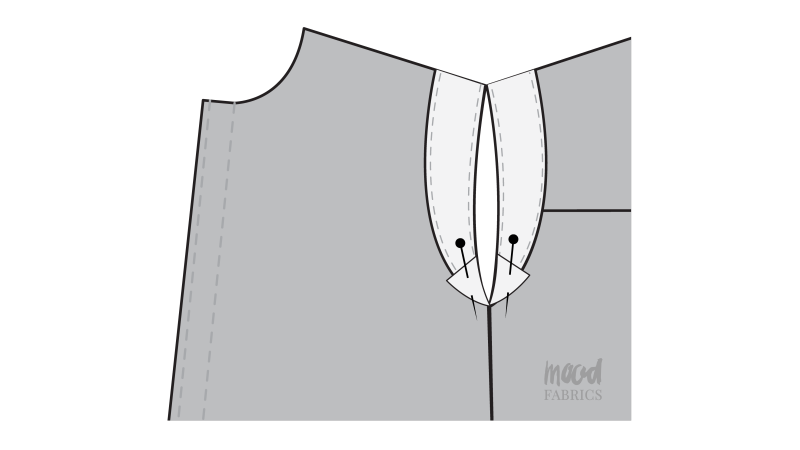
- Fold the raw edges of the bottom of the armscye facings toward the inside of the garment.
- Pin the raw edges of the armscye facings to the inside of the top.
Step 6
ARMSCYE TOPSTITCHING
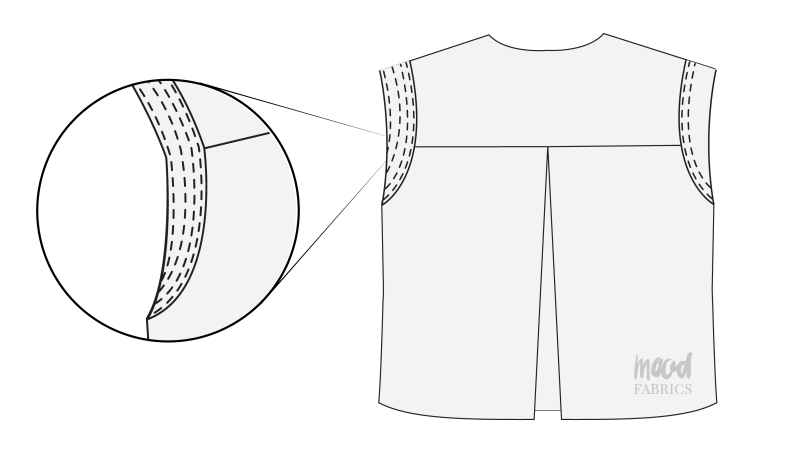
- Sew parallel lines of topstitching with ¼ inch spacing starting from the first topstitch on the armscye facings. When you’re done, there should be 6 in total (5, plus the one you sewed in step 4).
Step 7
MODESTY PANNEL
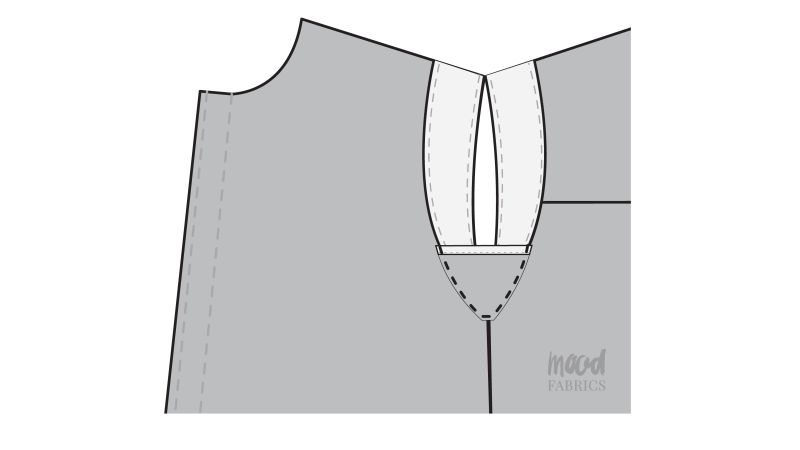
- Press a double rolled ¼ inch fold into the top edge of the modesty panels toward the wrong side of the fabric.
- Press a single rolled ¼ inch fold into the bottom sides of the modesty panels toward the RIGHT side of the fabric.
- Topstitch the double rolled hem at the top of the modesty panels.
- Place the right side of the modesty panel on the wrong side of the bottom of the armscye.
- Pin and sew the modesty panels to the bottom of the armscye by sewing directly over the topstitch you sewed in step 4 from the outside of the top.
Step 8
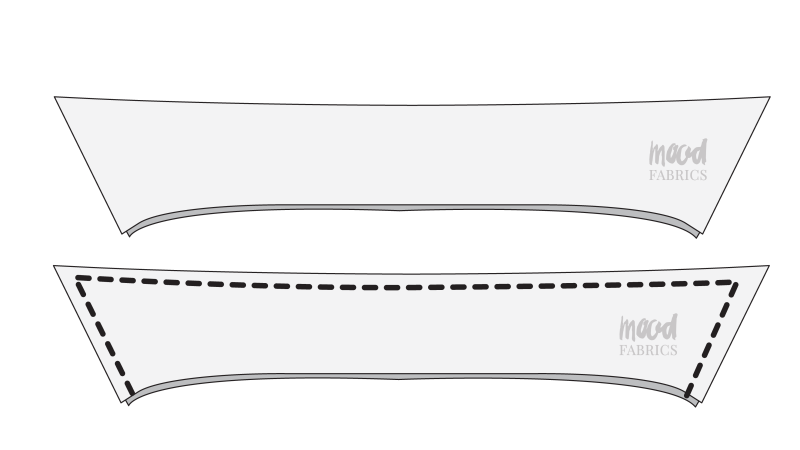
COLLAR
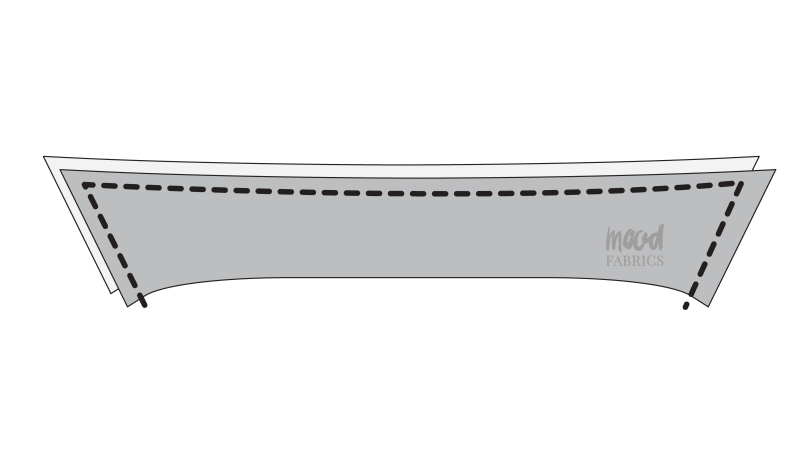
- Place the collar pieces right sides together.
- Pin and sew the collar pieces together at the top and sides. Leave the bottom open.
- Clip the corners of the collar and flip it right sides out.
- Press the corners and seams of the collar.
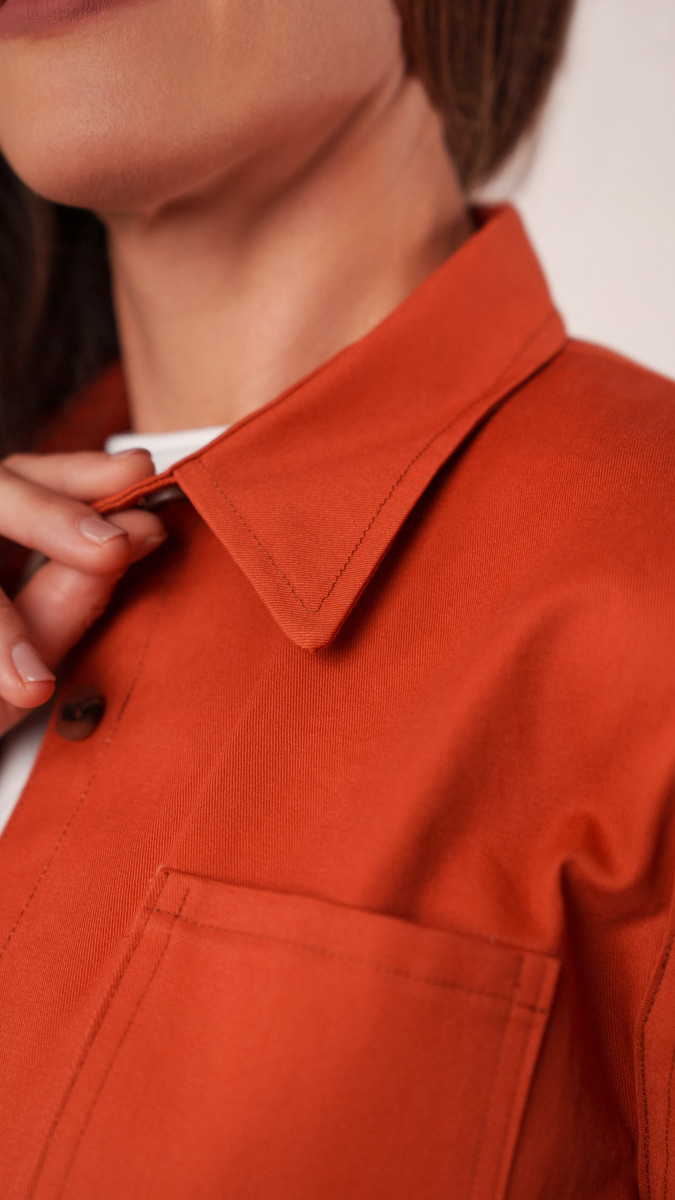
- Topstitch around the collar with a ½ inch seam allowance.
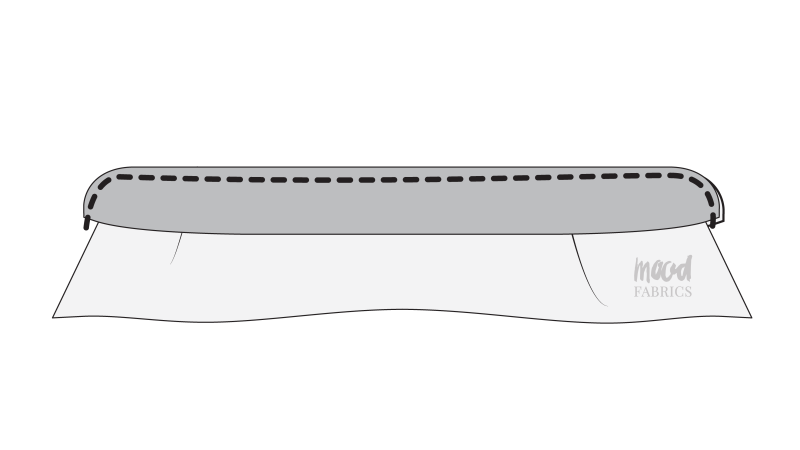
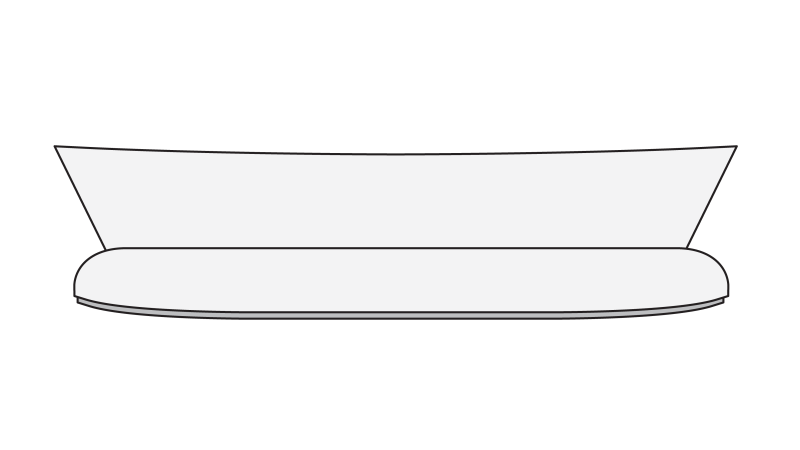
- Sandwich the raw edge of the collar in between the two collar stand pieces with the collar stand pieces facing right sides together.
- Pin and sew around the top edge of the collar stands, including the curves.
- Clip around the curves of the collar stand.
- Flip the collar stand right sides out and press the seams.
Step 9
ATTACH COLLAR
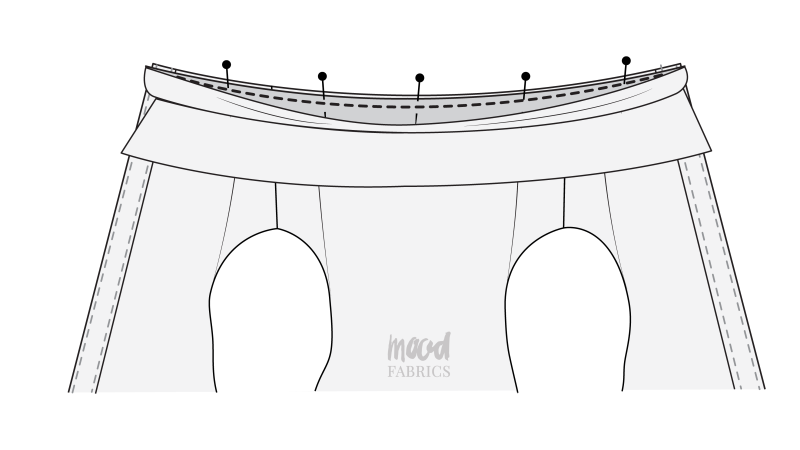
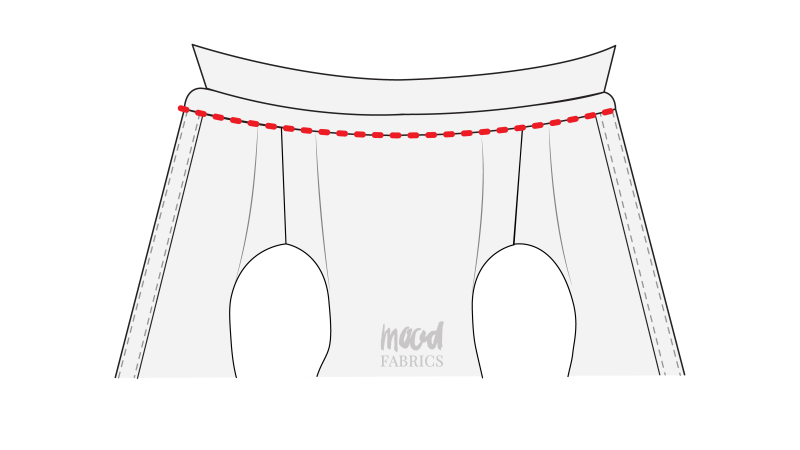
- Pin one of the raw edges of the collar stand to the raw edge of the neckline.
- Sew the collar stand to the neckline.
- Press the seam allowance of that side UP into the collar stand.
- Press a ½ inch fold into the raw edge of the other side of the collar stand.
- Pin the folded edge of the collar stand directly on top of the neckline seam you just sewed.
- Topstitch a stitch in the ditch between the collar stand and the neckline to attach the inner collar stand to the top invisibly.
Step 10
FRONT POCKETS
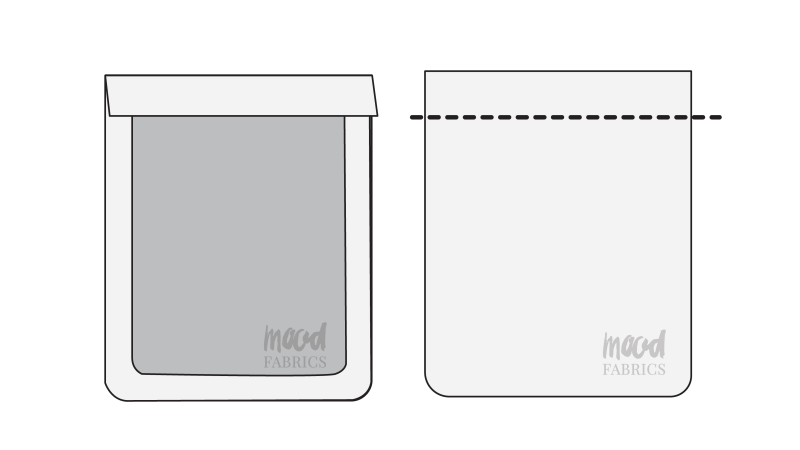
- Press a ½ inch fold into the bottoms and sides of the pockets so that the raw edge is hidden.
- Press a 1 inch fold into the top of the pockets.
- Topstitch over the top of the pocket to secure the fold at the opening of the pocket.
- Place the wrong sides of the pockets onto the right side of the front top pieces.
- Topstitch around the sides and bottoms of both of the pockets.
Step 11
SHOULDER STRAPS
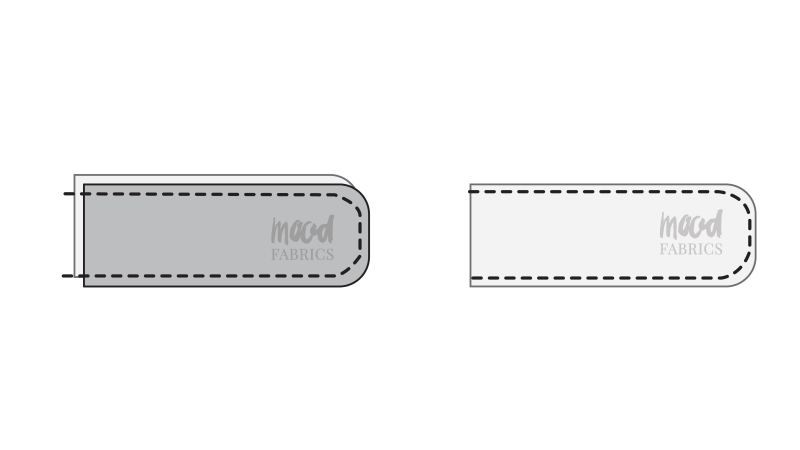
- Place the shoulder strap pieces right sides together.
- Pin and sew around the long sides and rounded edge of the shoulder straps.
- Clip the rounded edges of the shoulder straps and flip them right sides out.
- Press the seams flat and topstitch around the perimeter of the shoulder straps.
- Topstitch around the edges of the shoulder straps.
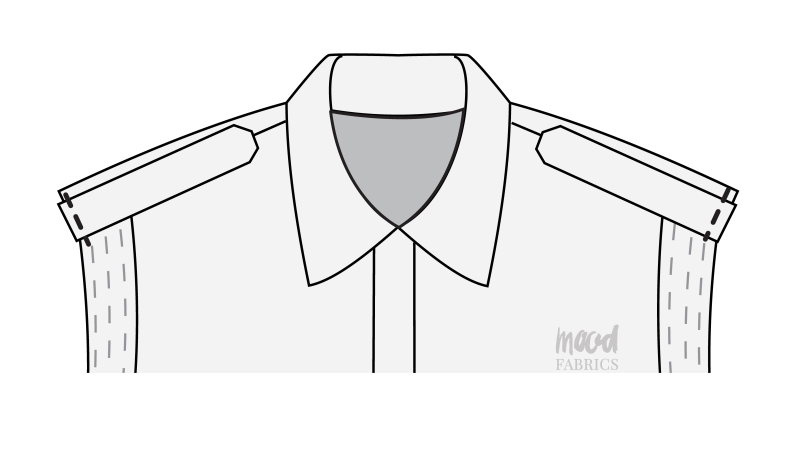
- Pin the raw edge of the shoulder strap to the inside of the shoulder seam on both sides of the top.
- Sew a straight stitch along the shoulder strap to attach it to the end of the shoulder seam.
Step 12
SIDE SEAM SLITS
- Note: If you’re making the dress, this step is not necessary because the dress does not have a slit.
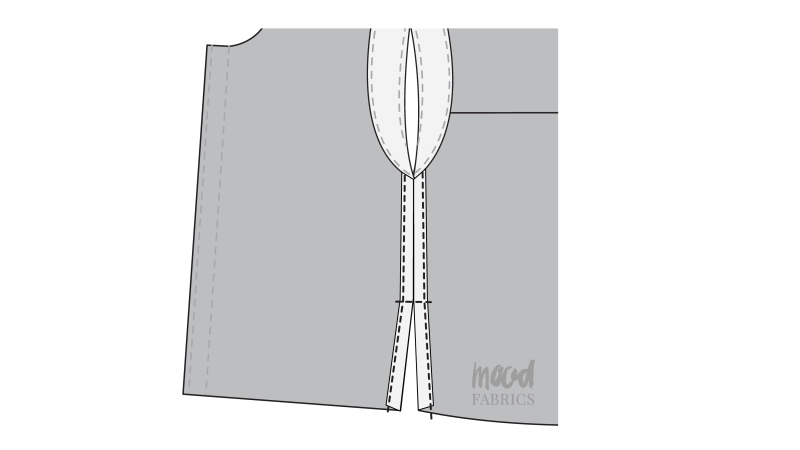
- Sew a bartack at the top of the side seam slit where the fabric splits.
- Topstitch over both seam allowances on either side of each side seam to secure the raw edges to the inside of the top, including the slits.
Step 13
HEM
- Note: If you’re making the dress, skip this step. You’re not going to hem the dress until you finish the skirt portion.
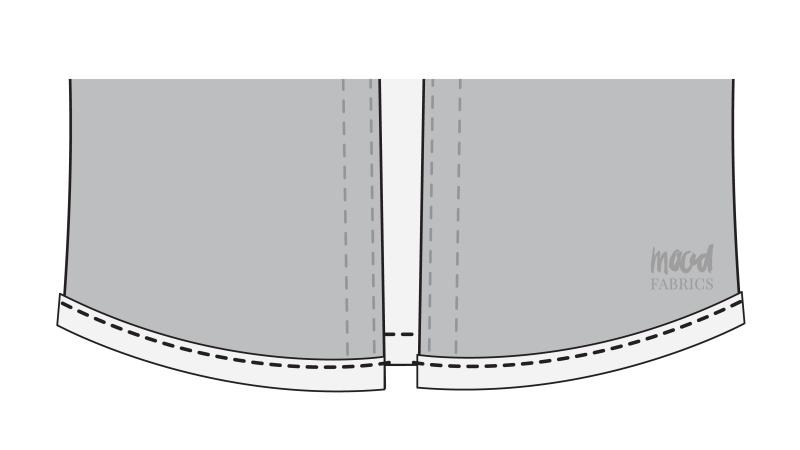
- Press a double rolled ½ inch fold into the front and back hem of the top.
- Topstitch over the folded hem.
Step 14
BUTTONS & BUTTON HOLES
- Note: If you’re making the dress instead of the skirt, save this step for when you’re done with the skirt portion.
- Mark the locations of the buttonholes and buttons evenly along both button plackets at the center front of the top/dress using tailor’s chalk.
- Mark the locations of the buttonholes and buttons at the very end of the shoulder strap and the shoulder seam under it.
- Use the buttonhole foot attachment on your sewing to sew buttonholes into the wearer’s right side of the center front button placket on each chalk marking.
- Sew buttonholes into the ends of the shoulder straps.
- Sew buttons opposite to the buttonholes on the opposite side of the button placket.
- Sew buttons to the shoulders of the top under the shoulder strap.
Step 15
SKIRT SIDE SEAMS
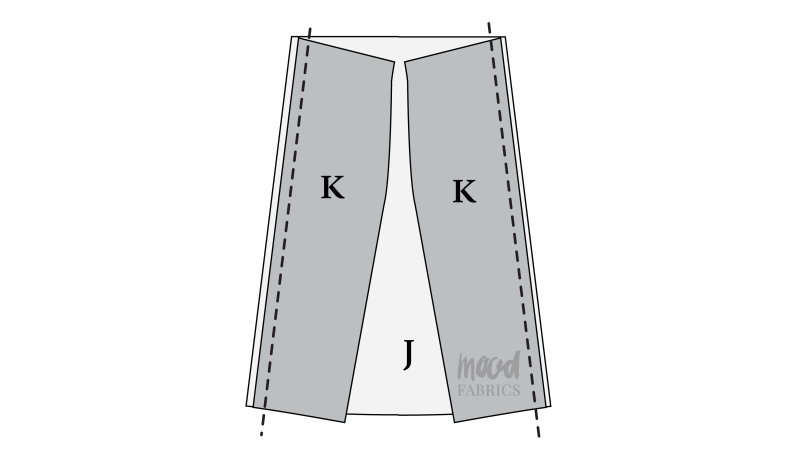
- Note: If you are making the skirt, cut the skirt pieces along the inner curved side seam line. If you are making the dress, cut the skirt on the wider outer line. The dress has a wider side seam than the skirt.
- Place the back side skirt pieces right sides together on top of the skirt center back piece with the side seams lined up.
- Pin and sew the back side seams.
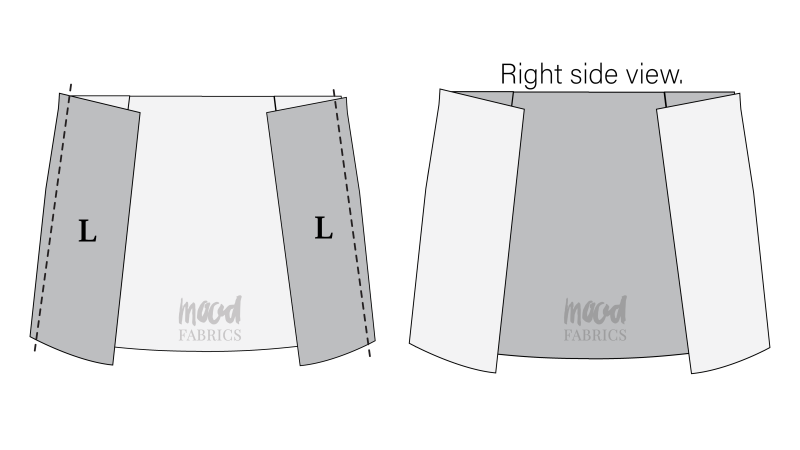
- Place the front side skirt pieces right sides together on top of the back side skirt pieces.
- Pin and sew the skirt side seams.
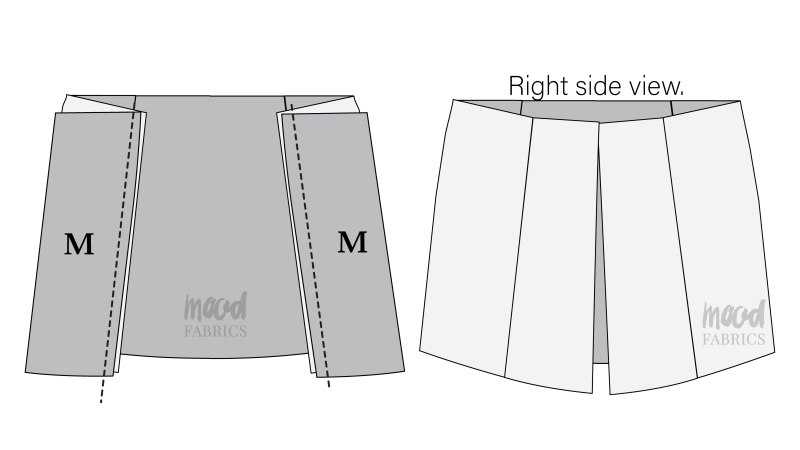
- Pin and sew the front center skirt pieces to the front side skirt pieces, right sides together.
Step 16
SKIRT PLACKET
- Locate the notches on the front center skirt that indicate the fold locations for the button placket.
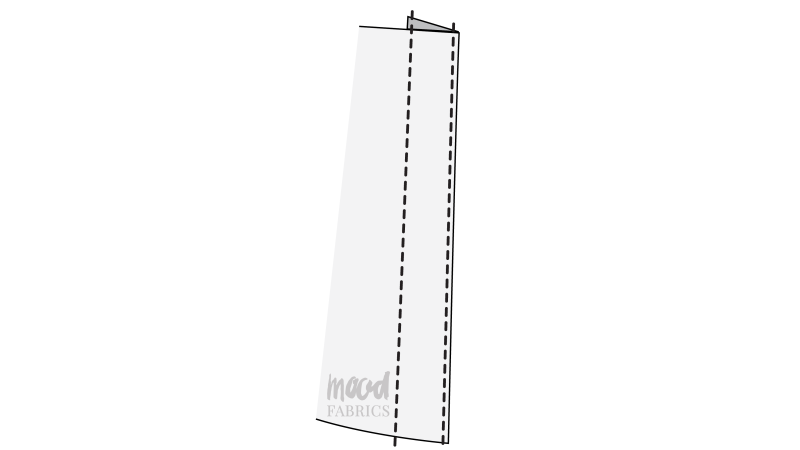
- Press a ½ inch fold into the center front opening of the skirt with the fabric folded toward the wrong side of the garment. This is the seam allowance for your button placket.
- Press a 1 inch fold into the center front opening of the skirt with the fabric folded toward the wrong side of the garment. This is the back of the button placket.
- Sew a straight stitch from the waistline to the hem of the skirt over the seam allowance of the button placket. I sewed this with a ⅞ inch seam allowance front the center front of the top.
- Repeat these steps for both sides of the center front opening of the skirt.
Step 17
SKIRT WAISTBAND
- Note: If you’re making the dress, skip this step.
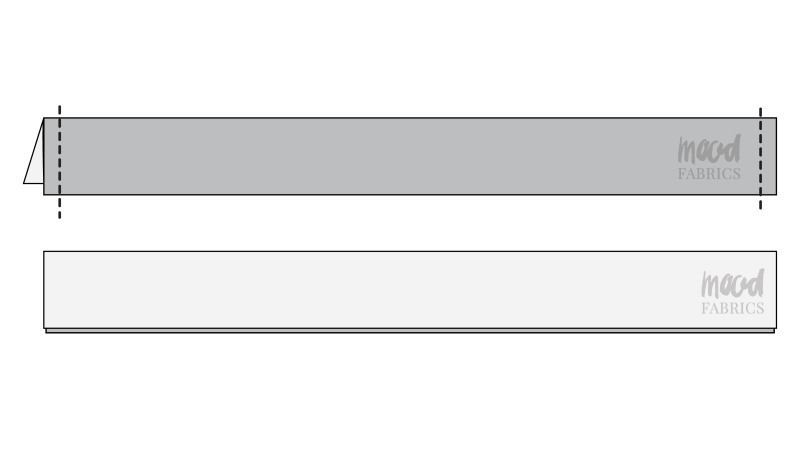
- Fold the waistband in half longways, right sides together.
- Pin and sew the short ends of the waistband.
- Clip the corners of the waistband and flip it right sides out.
- Press the waistband in half and the seams flat.
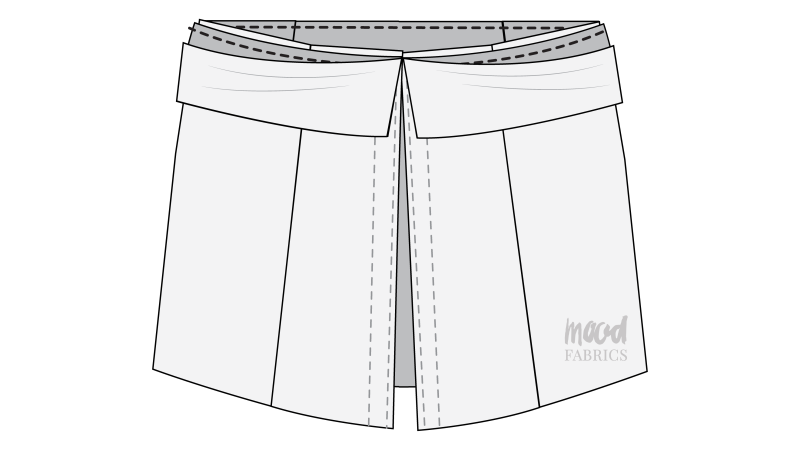
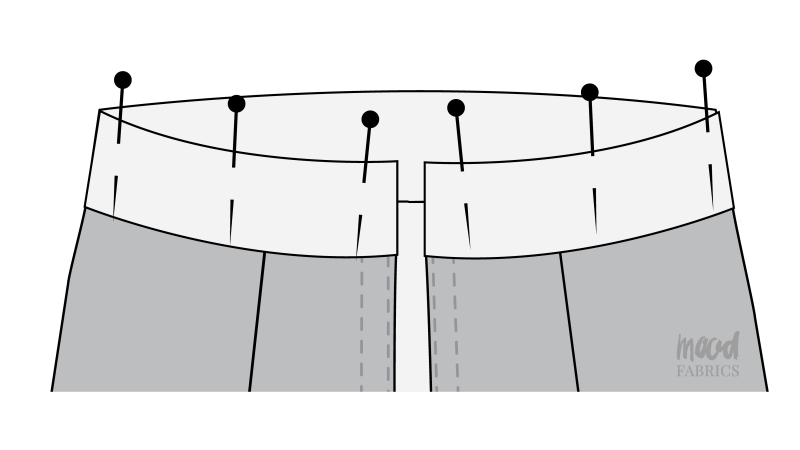
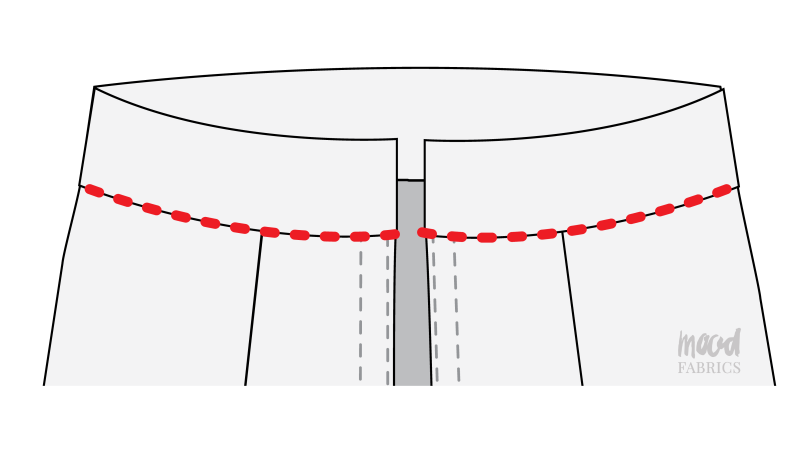
- Pin one of the raw edges of the waistband to the raw edge of the skirt waistline, right sides together.
- Sew the waistband to the waistline of the skirt.
- Fold the inner layer of the waistband into itself by ½ inch to hide the raw edge.
- Pin the folded inner layer of the waistband right on top of the seam you just sewed.
- Sew a stitch in the ditch to attach the inner waistband to the waistline of the skirt.
- Sew 5 parallel straight stitches along the entire waistband. They should each be ¼ inch away from each other.
Step 18
BELT LOOPS
- Note: If you’re making the dress instead of the skirt, the belt loops are attached directly to the waistline seam instead of the waistband.
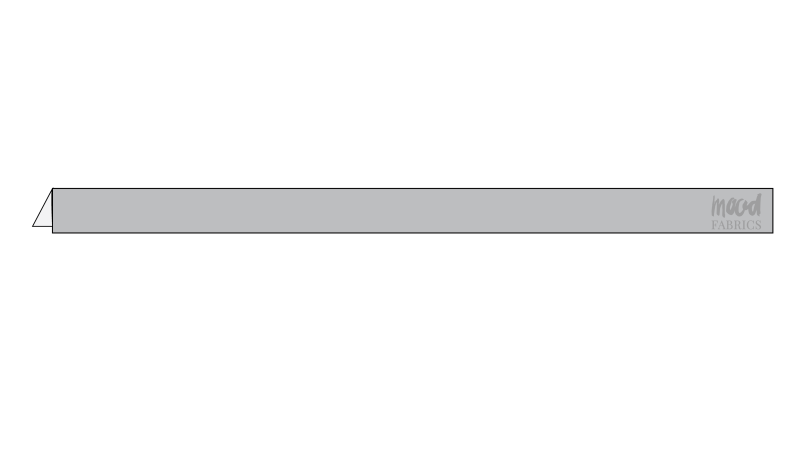
- Fold the belt loop piece longways right sides together.
- Pin and sew along the raw edge of the belt loop piece to make a closed tube.
- Flip the tube right sides out with a loop turner and press flat.
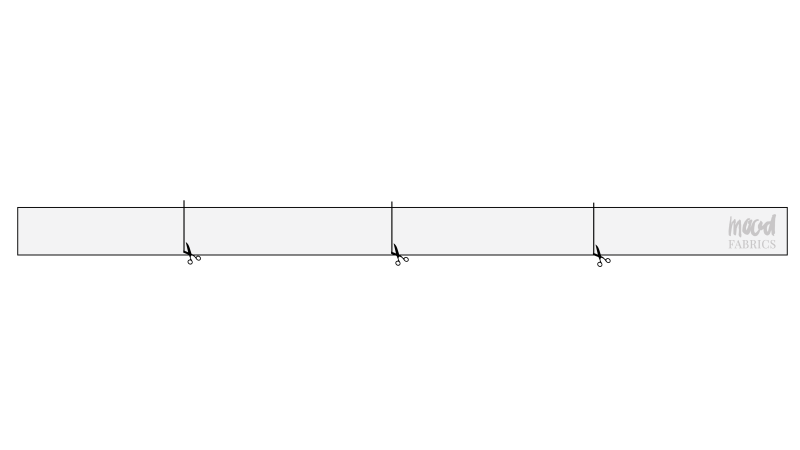
- Cut the tube up into 4 equal pieces.
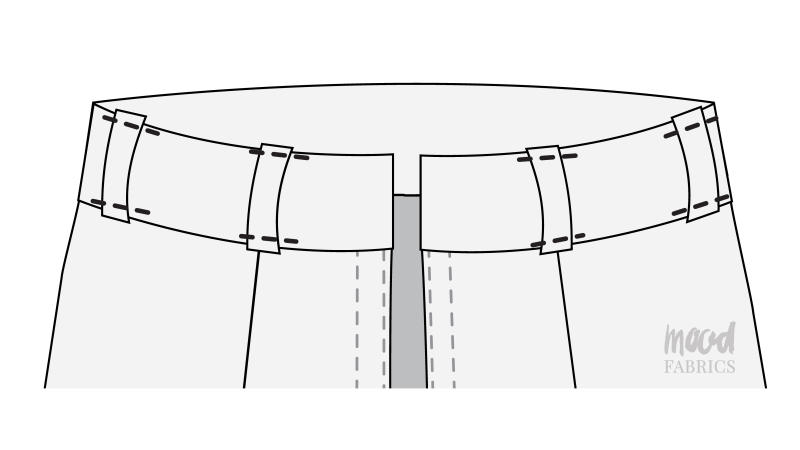
- Fold the raw ends of the belt loops inside of themselves so that they’re hidden and tucked away.
- Pin the belt loops so that two of them are directly above the front side seam and two of them are positioned 1 inch in from the true side seams (toward the front of the skirt).
- Topstitch over each belt loop on both the top and bottom.
Step 19
SKIRT POCKETS
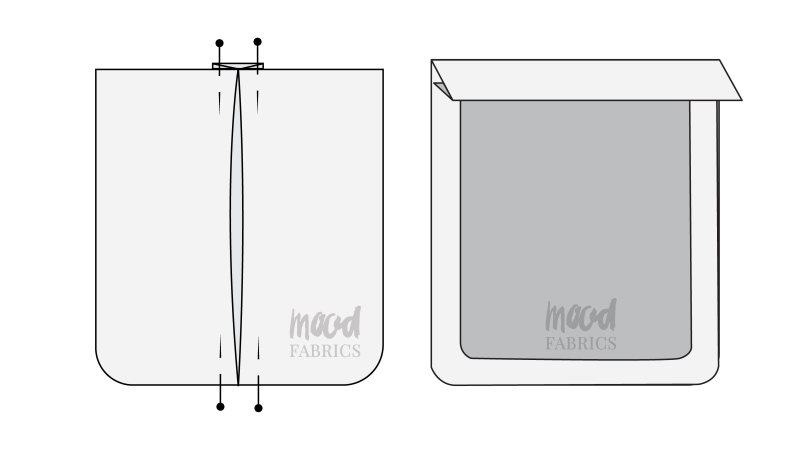
- Pin the box pleats into the skirt pockets the same way you did in the first step. The box pleat should be on both the top and bottom of the pocket.
- Secure the box pleats with a basting stitch and press them into place.
- Fold and press the top and sides of the skirt pocket the same way you did for the shirt pockets in step 10.
- Topstitch over the top of the pocket the same way you did in step 10.
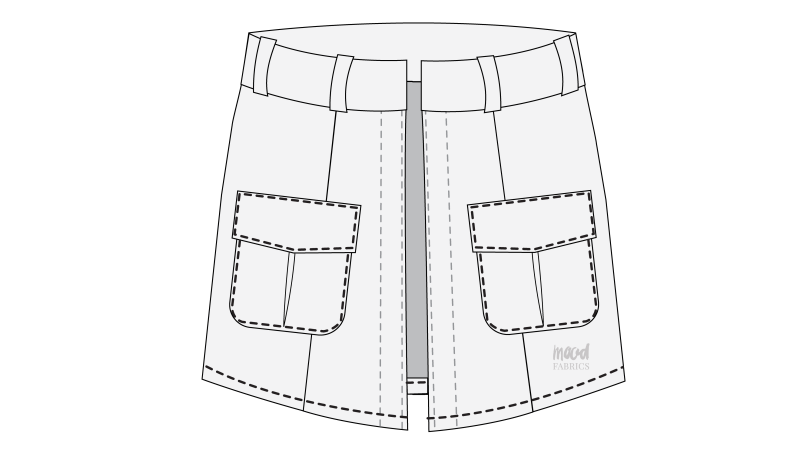
- Place the pockets wrong sides down onto the front of the skirt on both sides.
- Pin and sew the sides and bottoms of the pockets to the front of the skirt.
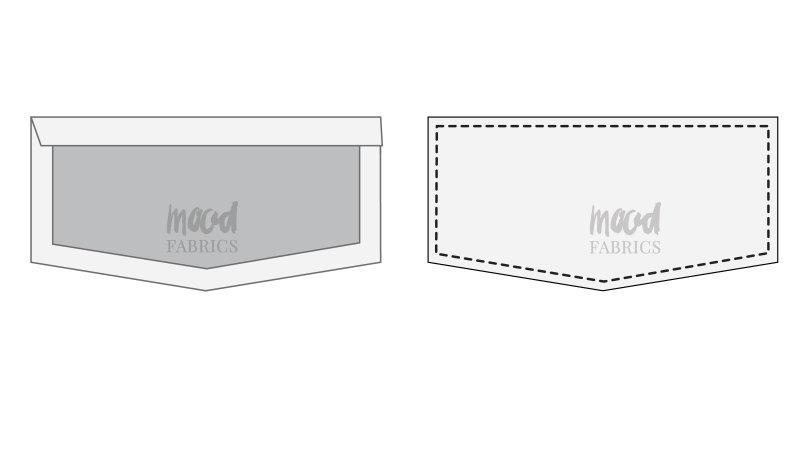
- Fold and press a ½ inch fold into all the edges of the skirt pocket flaps toward the wrong side of the fabric.
- Topstitch over all the folds.
- Topstitch the pocket flaps directly ABOVE the skirt pockets, making sure not to accidentally close the pocket.
- Sew buttons and buttonholes to the skirt pocket and pocket flap to keep them closed.
Step 20
WAISTLINE
- Note: This step is only if you’re making the dress.
- If you’re making the dress, place the waistline of the skirt right sides together with the hem of the top.
- Pin and sew the waistline of the skirt to the hem of the top, making sure the side seams are lined up on both sides.
- Open up the seam and press it open and flat.
- You can now add the belt loops since it was skipped in step 18.
- You can also now add the buttons and button holes as stated in step 14, making sure that the buttons and button holes go all the way from the neckline of the top to the hem of the skirt.
- You can FINALLY hem the skirt now whether you’re making the dress or just the skirt. Hem it the same way the shirt was hemmed in step 13.
Step 21
BELT
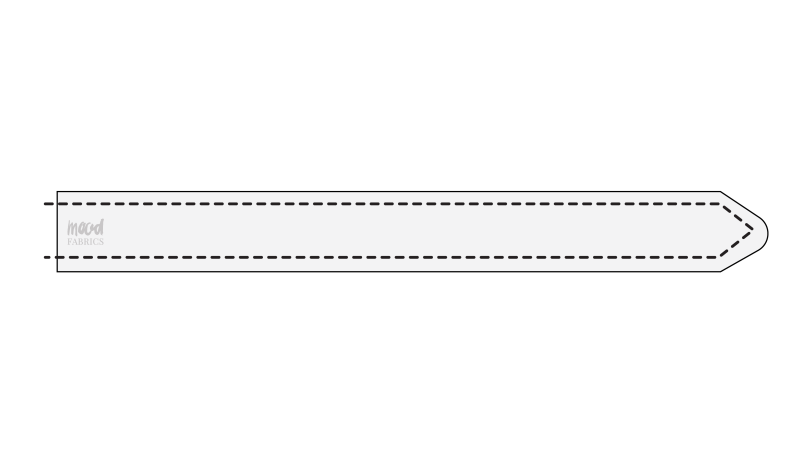
- Place the belt pieces right sides together.
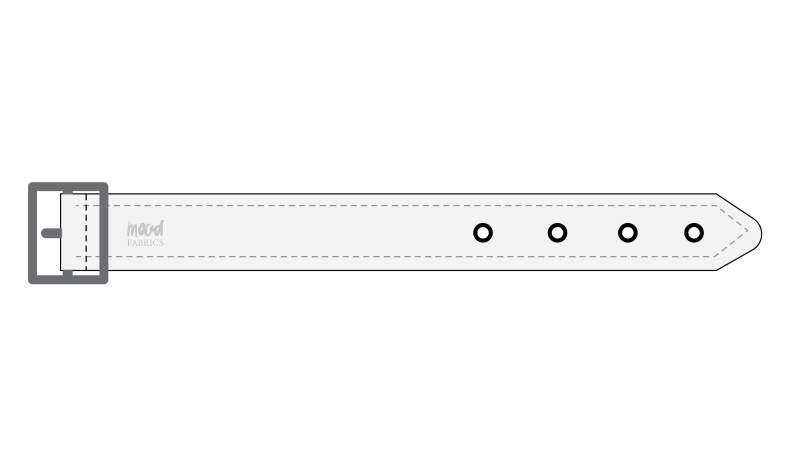
- Pin and sew around the long sides and pointed edge of the belt, leaving the short flat end open.
- Clip the corners of the seam allowance and flip the belt right sides out.
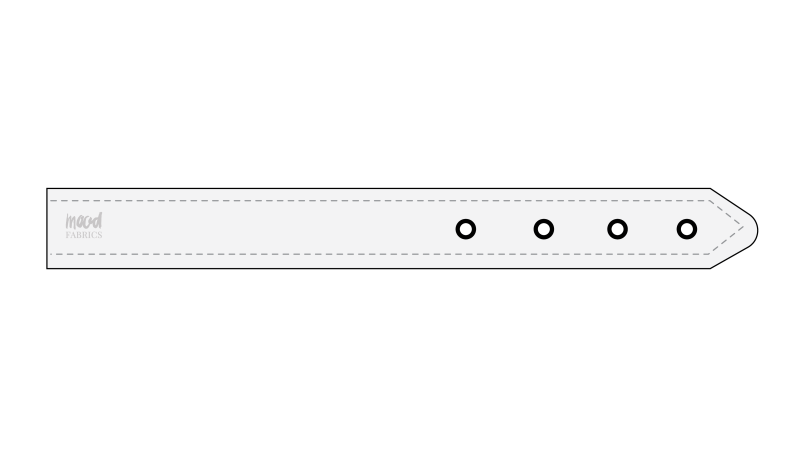
- Topstitch around the perimeter of the belt.
- Install the eyelets, centered and evenly spaced at one end of the belt.
- Follow the instructions for covering the belt buckle with the buckle cover kit.
- Install the buckle to the other end of the belt.
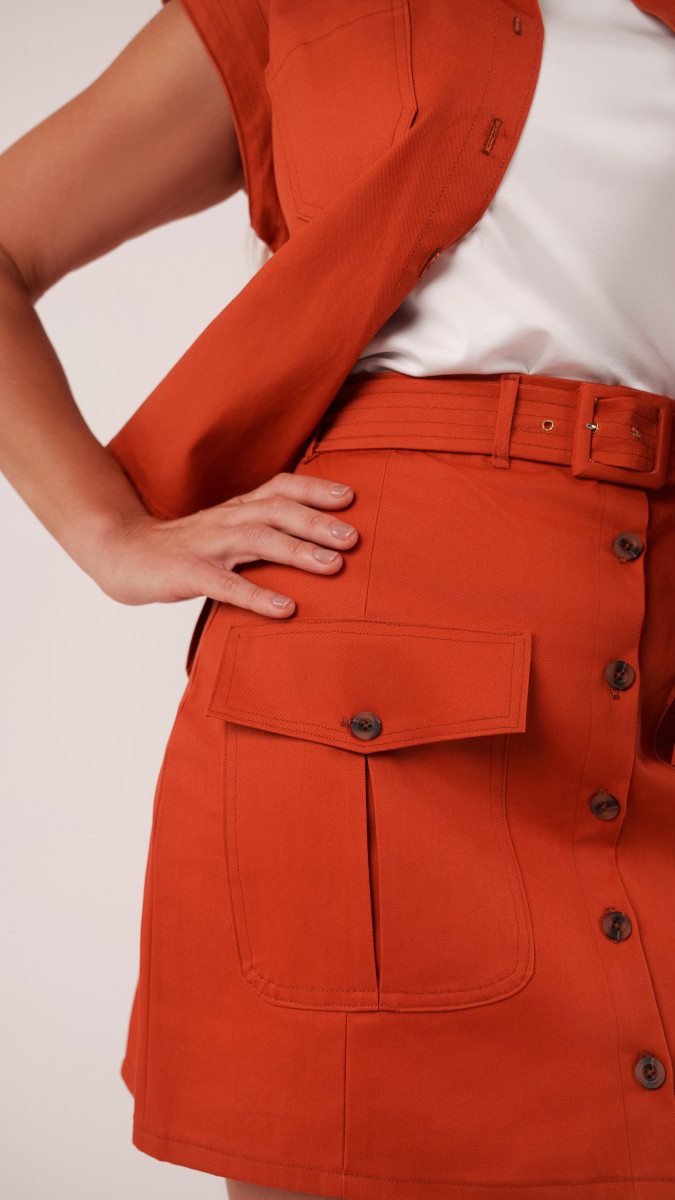
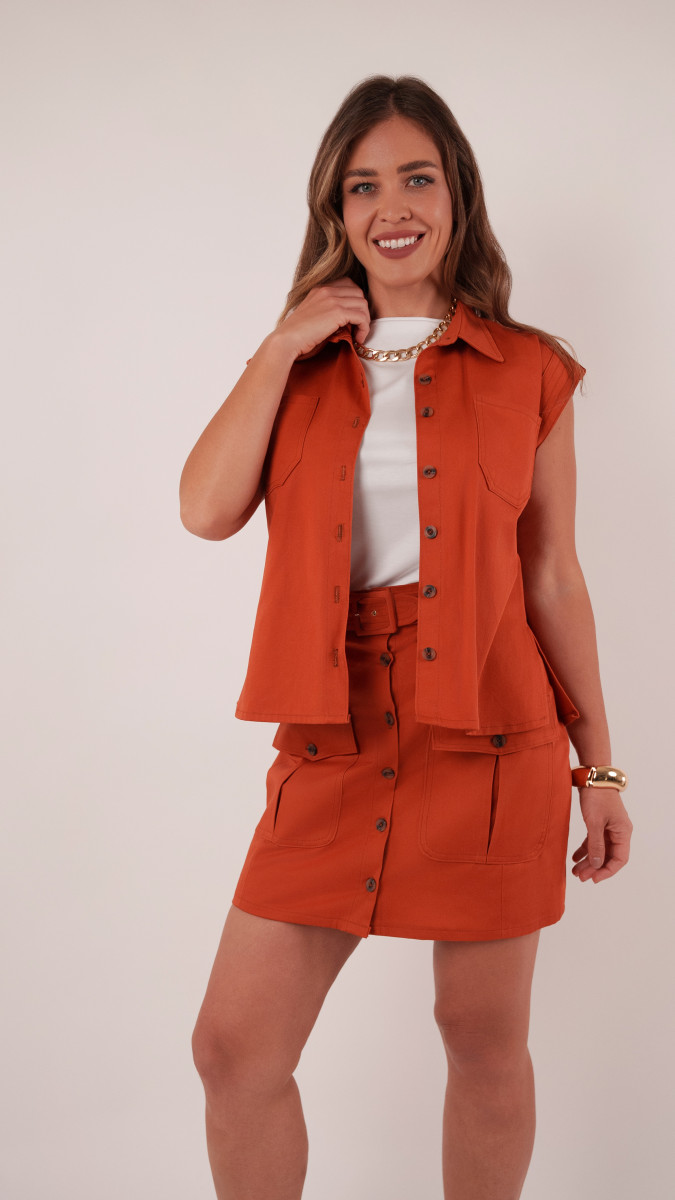
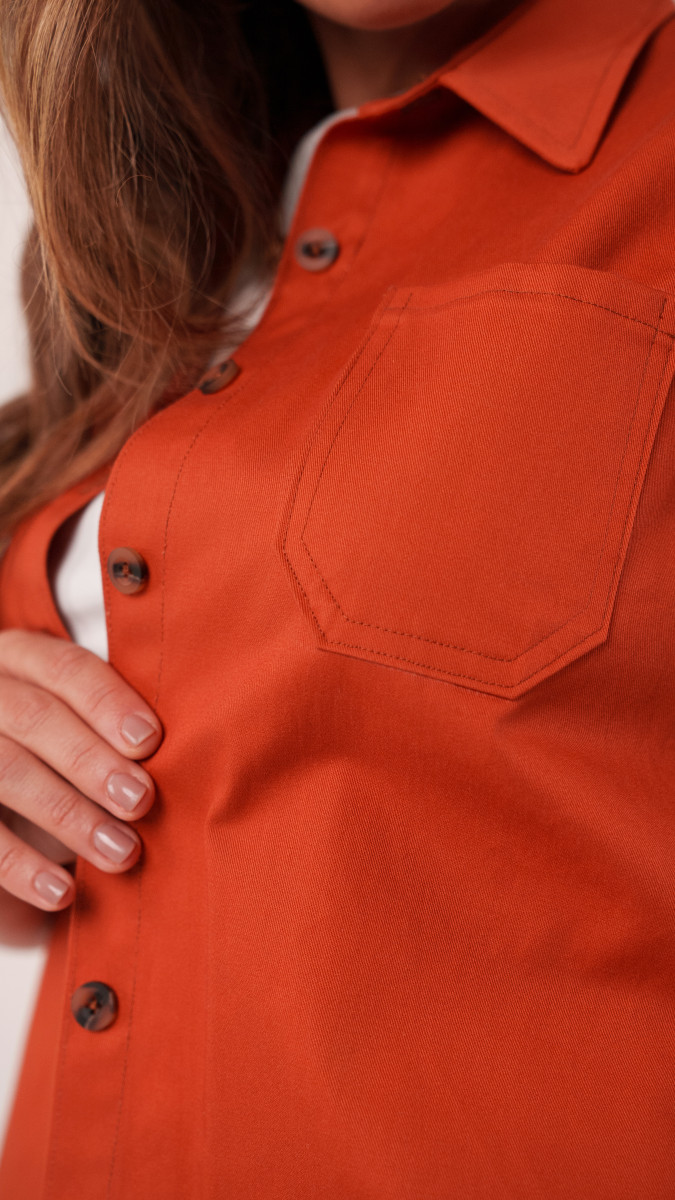
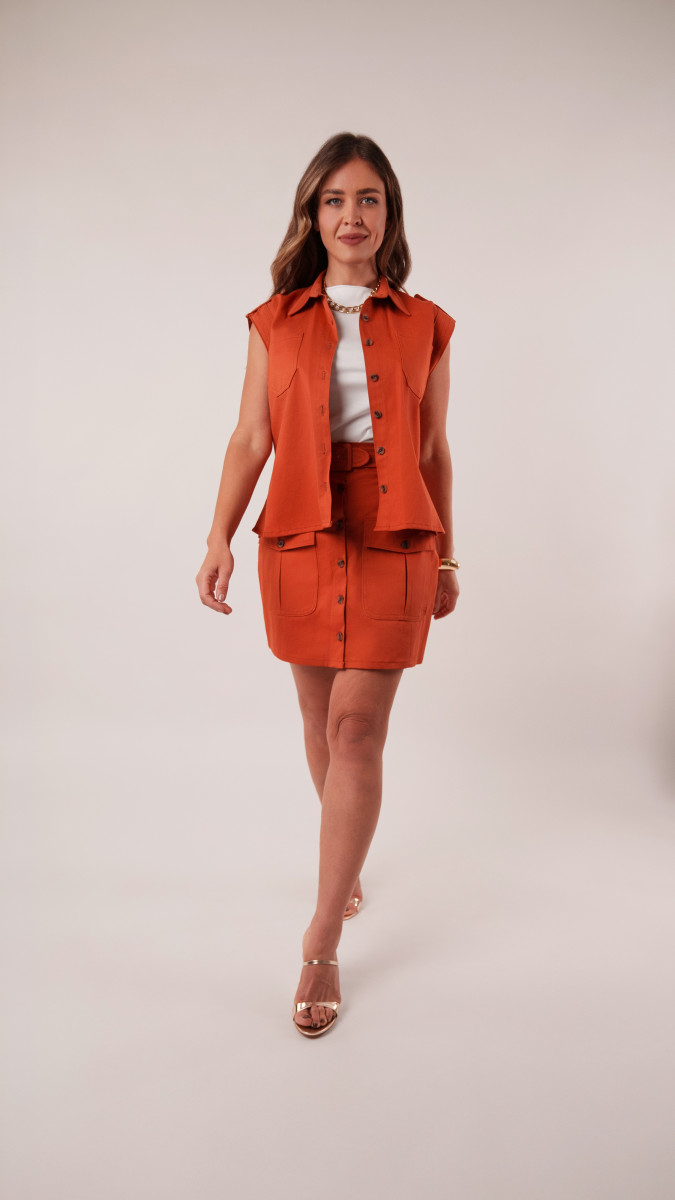
Sewing Success: The Finished Kalla Ensemble
Share this post with a friend (or two!), download the Kalla Ensemble free sewing pattern, and show us which fabrics and colors you choose, using the hashtags #MoodKallaPattern & #MadeWithMood—and don’t forget to tag us @MoodFabrics, too.
Free Sewing Pattern Inspiration for Your Next Project
With 540+ free sewing patterns and counting, your opportunities for sewing with Mood are endless!
We hope you had as much fun sewing this ensemble pattern as we did! As always, we want to hear from you—share your thoughts and comments below and let us know where you’ll be wearing the Kalla Ensemble free sewing pattern!
Can’t get enough sewing with Mood? Browse your next make with our latest free sewing patterns.
