
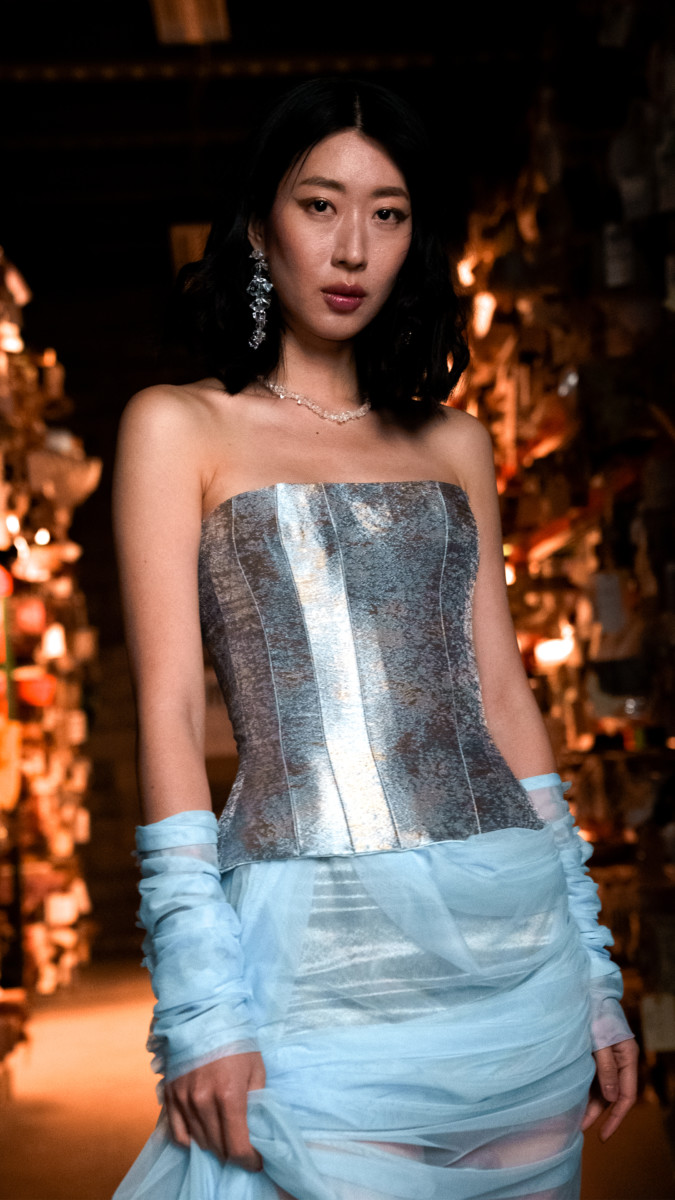
Based on a look from Helen Castillo’s Fall 2022 Collection in collaboration with Mood Fabrics, the Cerise Corset sewing pattern is gorgeously flattering and can be made in a variety of fabrics. Try yours in a stunning brocade as easily as a casual sateen, or pair it with our Cerise Corset Sewing Kit to make things easy!


Purchase Materials Used Below:
- 1 yard Gold and Pale Blue Mottled Luxury Brocade
- 1 yard White Cotton Buckram Stiffener
- 1 yard Stratton White Solid Organic Cotton Twill
- 3 pkg Dritz Nickel Grommets Size 3/8″ – 8ct
- 1 pair Foam Shoulder Pads Covered with White Polyester – 6″ x 3.5″ x .5″
- 5 yards White Rigilene – 12mm/0.5″
- MDF290 – The Cerise Corset Sewing Pattern (free download below!)
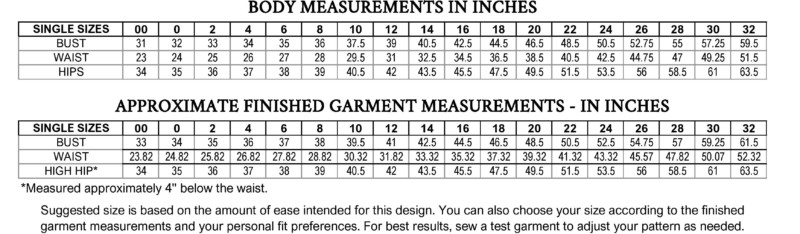
If you are between sizes or concerned with grading, you should consider adding to Center Back by cutting a second set of those panels or adding extra seam allowance to your side seams. This is an advanced pattern and we recommend that you make a fit sample in muslin first.
All seam allowances are 3/8″ unless otherwise indicated (Side seams are 5/8″)
Panels are numbers to help coordinate with the assembly process.
Note: If you would like to raise the neckline when trying on your fit sample, you can add height to the top edge by extending your pattern another 1/4″-1/2″ for modesty.
Corset Sewing Instructions:
Cut 1 set of all patterns on straight grain from your self-fabric, 1 set from the lining, and 1 set from your interfacing or stiffener.
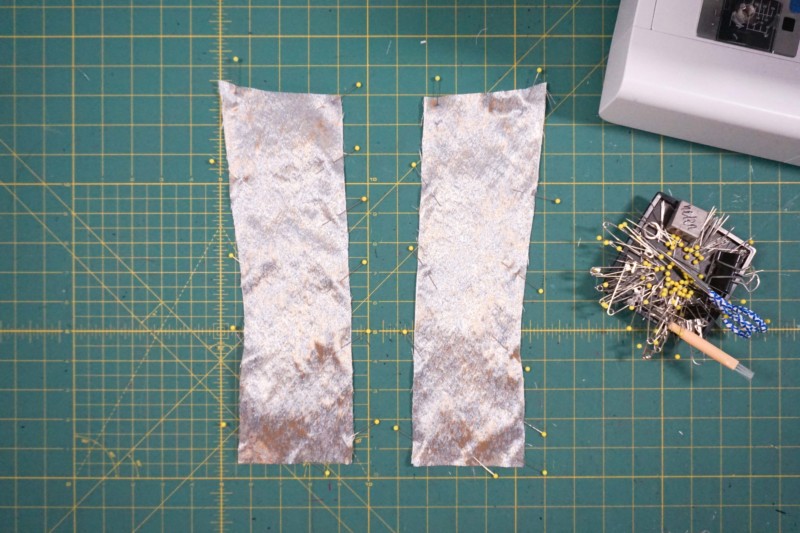
Traditionally speaking, and what helps keep all of your layers aligned and reduces bulkiness or uneven layering of your panels – consider a ‘frame stitch’ by joining your SELF pieces individually to each of their corresponding interfacing pieces. You can do this layering technique with your lining and your interfacing pieces instead, but consider the impact that may have against your self-fabric when viewing the garment when finished.
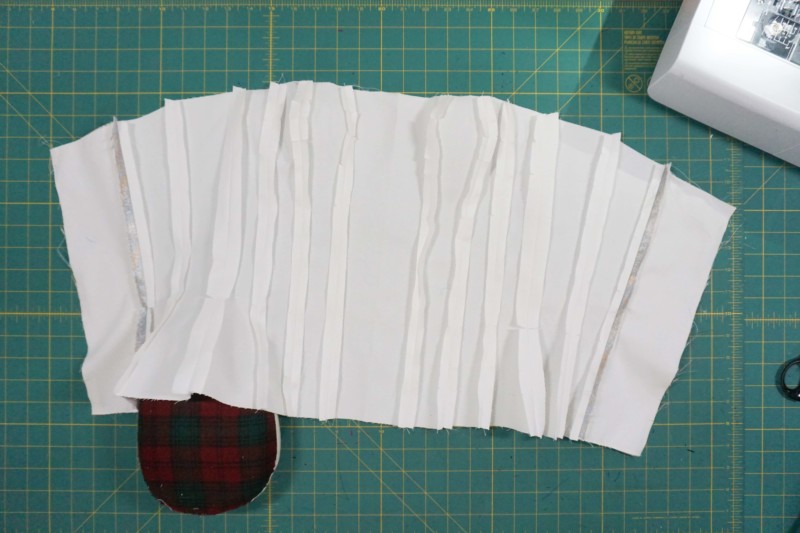
Then assemble all of your panels aligning each by the notches. This would be a good place to consider trying on for any fit adjustments so you know what changes are necessary for your self-fabric.

Press your seam allowances open or press them toward the back and topstitch them to use as bone channels. Considering how small the sean allowances are you may want to consider using bias tape as bone channels and lay them on top of each seam. This also reinforces them.
When pressing your seam allowances, use a tailor’s ham. This helps with areas that are very curvy – along the bust seam lines and hip areas.
For my corset, I used rigilene boning and topstitched either side along with the tape at each of my seams. This also reinforces the shape or the overall piece by running along each seamline. Worth considering when doing strapless or corset-style garments to enhance the curves of the piece when it’s worn.
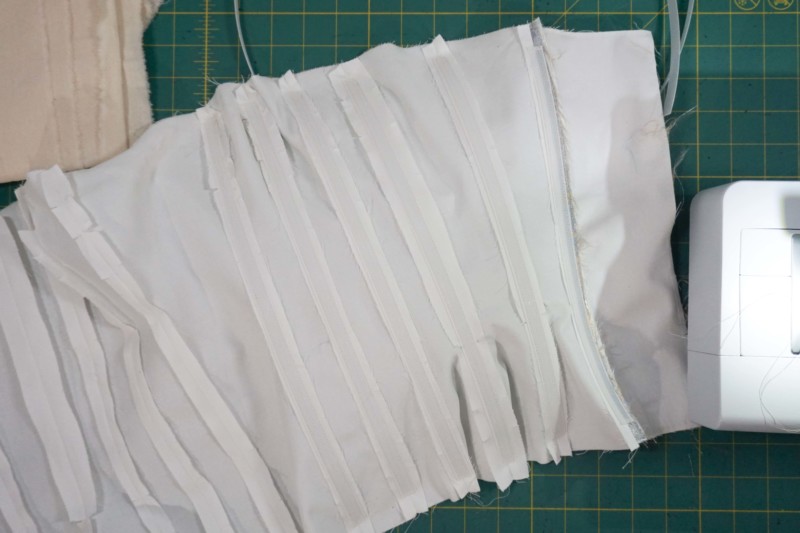
With both my lining and self/interfacing sets sewn, I attach them to one another along the center back, up along the top edge, and down along the other center back area – leaving the hem edge open to hand tack closed. Note: I used a set of self-fabric pieces for my last panels on the inside of the garment so my lining did not become visible when I lace up the corset.
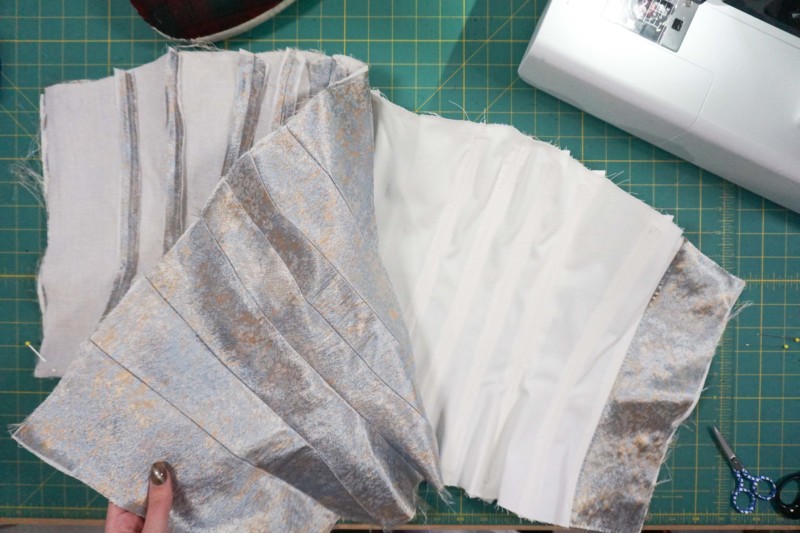
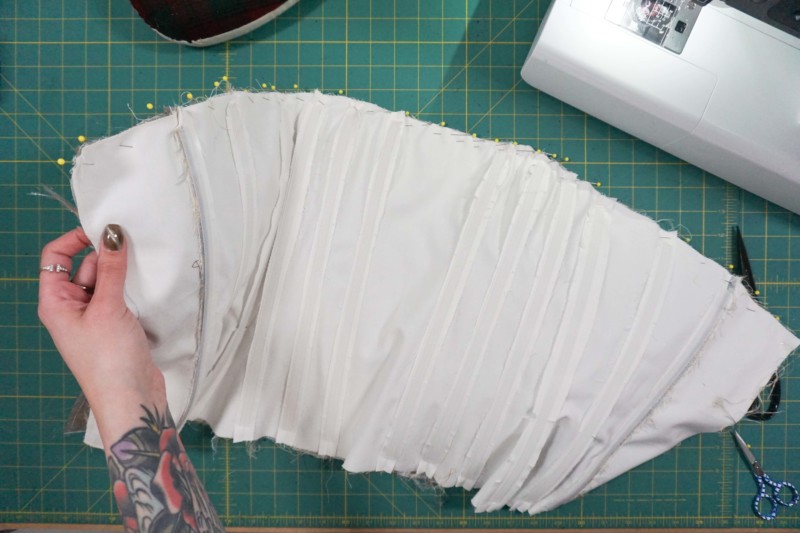
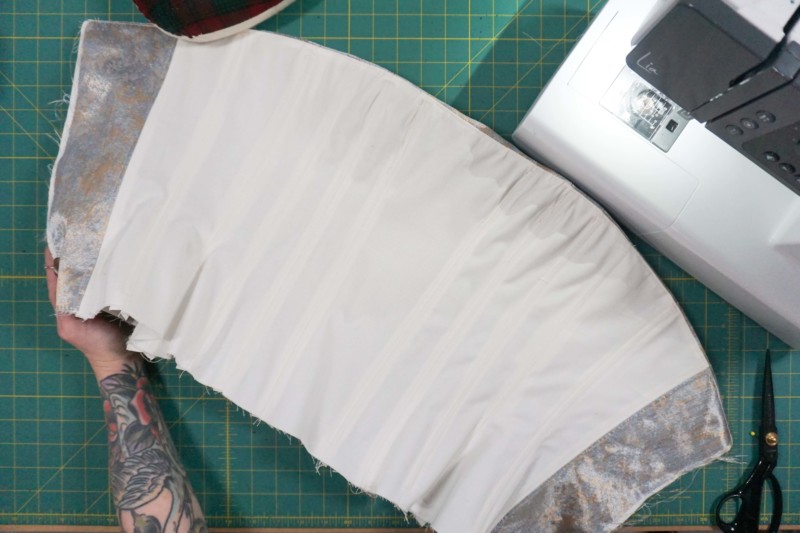
I did an understitch along the top edge of my neckline which helped to keep that edge very clean, you would do this before closing up your center back seams.
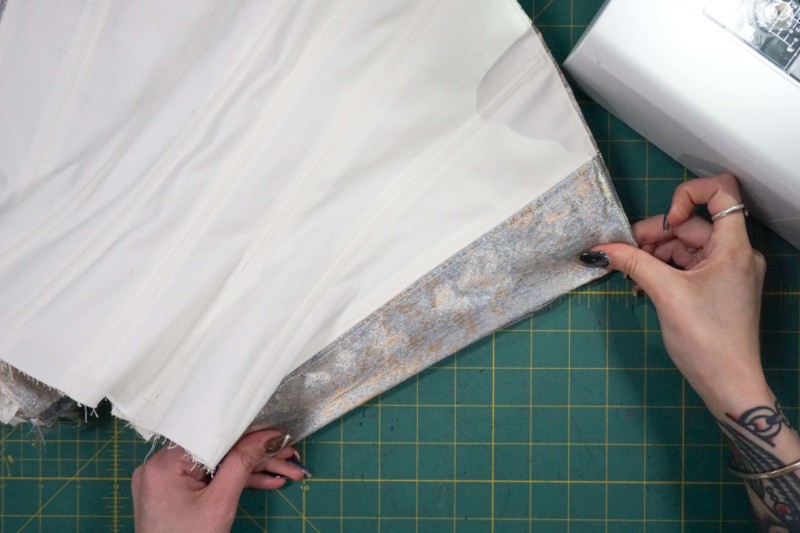
After closing center back on the machine, clip your corners to within 1/8″ of your sewing to reduce bulk before flipping the piece right side out. Use a point turner to gently push out those corners.
Turn up and press your hem allowance 3/8″ and slip stitch by hand or topstitch by machine. You can also consider using a contrasting double-fold bias tape as a pop or color along the hem edge. I used twenty 3/8″ grommets, ten down either center back side, and made a ribbon of self-fabric for the lace-up detail!

Are the shoulder pads in the materials list used as padded bra cups? When / how do those get added in? Love this pattern!
Those are put at the hips along the side seam to emphasize the flared shape! 🙂
Would you sew those in between the lining and interface?
Hi Brooke! We tacked them onto the lining, but you can also sew them in-between the lining and the fashion fabric if you prefer. Just keep in mind that it can possibly interfere with the boning. 😀
Hi!
I have downloaded and printed this pattern to my size, but I was wondering if you think it would be okay to alter the neckline? I was thinking of slightly curving it in the center and making the front panel into 2 pieces, so as to make it a ‘Sweetheart’ neckline. Zi think I then would iron the seam allow open and sew the biased tape across it, as you suggested in the instructions. Would this adjustment throw off the tension and/or shape of the corset too much? And, should I consider some type of curved wire to keep the curved shape, or should the interfacing be stiff enough?
i curved the neckline in almost the exact way you were describing and it turned out fantastically!
It looks lovely. Thanks for the detailed instructions. It will be an interesting build.
Thank you Thomas! Let us know how your make turns out using this pattern!
What a gorgeous pattern again! Would it be possible to use a zipper or hooks and bars for back closure? BAck lacing and I have never been the best of friends xD
Hi Anna! I think a zipper would work well for this pattern – but keep in mind that a zipper will not provide the “cinched” look of a back lacing. It’s all a matter of personal preference! 😀
What does split for torso mean in the pattern?
Hi Aly, this is where you can make adjustments to the length if you’re short or long waisted.
Video tutorials for this?
Hello, unfortunately we do not have a video tutorial for this pattern at the moment, but you can check out all of our other tutorials here!
Heyy! I am having a problem with the pattern. I cut the pieces and assembled them together but I can’t figure out what’s wrong but piece 5 and 7 seem much smaller than 6 so I am a little bit confused. Can you help me, please?
This was the hardest construct I’ve ever attempted and def above my skill level!Now that I’ve had my hand on it once tho, I think I might actuallyhave a decfent attempt on it in the future…thanks for the detailed instuctions =)
Thanks for the pattern! I wish the tutorial/instructions were more elaborate for us beginners.
When cutting fabric, you need TWO pieces for each pattern except piece 1 (cut it on a fold). The order of the corset pieces (by their labeled number) from left to right is : 7 — 5 — 6 — 4 — 3 — 2 — 1 — 2 — 3 — 4 — 6 — 5 — 7.
I also found the construction for this pattern was simple unlike what other comments suggested!! It’s straight lines! I guess the complicated part is getting it to fit right but the best beginner tip is to cut larger size and adjust to your body proportions.
To me the most difficult part was figuring out how to piece together the pattern pieces! It took a while to figure it out on my own. Good luck if you are attempting this 😉
What order am I supposed to assemble the corset
Hi Charlie, the assembly instructions for the corset are listed above 🙂
I think you are mistaken. The order of the pieces is: 7 – 6 – 5 – 4 – 3 – 2 – 1 – 2 – 3 – 4 – 5 – 6 – 7. On the sides of each pattern piece it will tell you what piece it attaches to. SF1 with SF1 ect.
Adding to this for others – I mocked this up in muslin and interfacing this morning, and it seems the pattern pieces themselves are labeled incorrectly, but the visual order of the pieces on page 2 is correct.: A5/B5 is the the sixth panel sewn (second to the last panel). A/B 6 is the fifth piece sewn to the corset.
So the sewing order of the *pattern* is A7-A5-A6-A4-A3-A2-A1-A2-A3-A4-A6-A5-A7 due to what I suspect is a typo. Mohammed is correct above, at least from my experience!
LOVEEEEEEED this patter, definitely very easy for intermediate sewers, i made a matching skirt and it exudes elegance, thanks for blessing us with this free pattern
Are the seam allowances included in this pattern or do we have to measure our own?
Hi Christina! The seam allowances are included in the pattern! They are 3/8″ unless otherwise indicated (Side seams are 5/8″) 🙂
I’m a little confused when actually sewing the pieces together. Is it better to sew all of the pieces (self fabric, lining and interfacing) first and than sew all the panels together?
Hi, I don’t quite understand the ‘frame stitch’ method… Are there any other terms I can use to search for instructions on this?
I have everything I need, just need the pattern! I hope downloading is not going to include an order for the materials and notions!
Hi Ruth! So glad you have everything you need and are ready to go! You can rest assured – downloading the pattern will not include an order for anything from Mood Fabrics!
If like to start of by saying that this is a nice pattern but from a logical stand point please address these issues!!
All I can say is wow your pattern is missing so much instruction there is no way you could make this if you weren’t already experienced!
You’ve left out key point’s on the assembly! There is no step by step no pictures of said steps you 1st mention doing a frame stitch but don’t address how to do this or what this is!! Your measurements are beyond off unless you’re only aiming it at females with fake boobs; but real woman don’t have a tini tiny waist with huge boobs! Not to mention you don’t say or show where grommets are ment to go for lacing nor if that’s the case where is your modesty panel?… or is that the centre back panel that you say you sew in with the whole garment?…
Hi Alisha! As I said in my previous comment, I’m sorry you’re experiencing difficulty with this. The Cerise Corset states in the very beginning that it is an advanced pattern. It contains a lot of panels with curves, and that can leave a lot of room for error and fit issues. Corsets also require pretty exact sewing, especially when you’re adding so many panels! If you’re looking for a more beginner to intermediate friendly corset pattern, I recommend our Spearmint Corset. You can easily omit the straps for a look that more closely resembles the cerise corset.
A frame stitch is used to secure two layers together, so they don’t shift out of place. Place the self on top of its corresponding interfacing piece, and sew them together around the edges, creating a frame.
Your previous comment says that the waist is too big, but you don’t mention the bust measurement being off. In this comment you’re saying the bust to waist ratio is too extreme, and so we’re a little confused. If the waist is 10″ too big, then wouldn’t the bust have also been extremely off? Perhaps you’re trying on the corset upside down? Our sample here (the same garment pictured in this post) in the studio shows the hips flair out quite a bit, whereas the bust really doesn’t. So, the hips could easily be mistaken for the bust! Let us know, and we can try to troubleshoot this!
The instructions clearly state that this is an advanced pattern. If you somehow missed that, no wonder you can’t make this. You probably scrolled past most of the instructions. Stop blaming your laziness on others.
Your pattern & measurements are so far wrong that I cut out size 8 which by your calculations it should be 38-bust 28.82-waist 39-hips finished garment size! Well I’ve just made it & the waist is measuring at 39 Inchs!! That’s like 10 Inchs difference
Hi Alisha, I’m sorry you’re experiencing some trouble with this pattern. No one else has said the waist is 10″ too big, so in order to help troubleshoot, let’s address a few common errors:
Did you sew with the correct seam allowance? This corset has a lot of panels, and that leaves a lot of room for sizing issues if the proper SA isn’t used.
Did you cut the correct size? On those sections where all the size lines are tightly packed together, it can be easy to cut the wrong size.
Also, how are you measuring your garment? Did you measure the paper pattern pieces, or are you laying the pattern flat? This will help pinpoint whether it’s a sewing problem or pattern problem.
Adorei meu primeiro molde!!
First, let me say thank you!!
I have sewn a corset / bustier before, yet still beginner adjacent. So here’s my embarrassing question … Why when I print, just one size, are there still two lines being printed? I understand that there is a seam allowance built-in; however, this cannot be that because it’s roughly only a 3 cm gap between the size I am interested in printing and the other interior lines (and the seam allowance is much larger @ 3/8 th in). For clarification, even when I deselect all sizes, there is still a pattern/lines showing. I hope that’s clear enough.
thank you again for the pattern and any clarification!!!
Hi Jay! Unfortunately, in order to keep our patterns free, we do not offer size layered patterns. The download you have is ALL sizes in one document. This can be very confusing at times when all the sizes are overlapping at certain points. I’m actually sewing this corset right now so I feel your pain! I find that using a highlighter to trace over the size is incredibly helpful. On those points where everything is merging together (particularly piece 2), take a look at the pattern layout on page 3 to get a feel for what the piece is supposed to be shaped like, and then cut accordingly. I hope this helps! Good luck 🙂
Hey there, I found this too on adobe, I can get rid of the other sizes, but the size I want to keep and size 00 stays, so you will just be cutting the one that isnt 00. It’s not a seam allowance, it is just the size that doesnt have an option to remove it….I guess I am a bit late in replying though now, as I have just seen that you asked this over a year ago!! 🙂
I’m a little confused with some of the instructions. I’ve made corsets before, but never one with buckram as the interfacing. Reading through the instructions, I still feel like I want to include steps from other corsets I’ve made like using a fusible interfacing for the face fabric (I’m using cotton sateen), in addition to the frame stitching. I just feel like the face fabric will sag without it, but maybe this is cause I’ve never used buckram in a corset before?
Also, I may have missed this, but is the lining layer floating/separate from the buckram/interfacing layer or are they sewn together through the boning channels? Like, it is Face + Interfacing + Lining(w/boning), or, Face + Interfacing&Lining (sewn together).
Hi Chrissie! The buckram is incredibly stiff and has zero give, so as long as the sateen is laying flat against the buckram while sewing the frame stitching, you should be fine! But also, if your method is tried and true and you feel confident with it, then you can do it that way!
The lining is sewn separately, with the boning sewn to the wrong side. The lining is then sewn to the buckram + face layer, right sides together. The boning channels won’t be visible from the face. 🙂
Hello! Thank you so much for the pattern.
So i was planning to make it a reversible denim corset. Two different washes of denim
Do you think that could work or would it be too thick?. I won’t be using any boning, interfacing or lining. Please let me know
Hello, I think it should work fine and would look great, what a great idea!
Hi! How long was your ribbon of self-fabric for the lace-up detai? I am getting my materials now and would like to have an estimate of how much ribbon I should get 🙂 Thank you for the pattern! I’m so excited for this project!
Hi Gilby! It really all depends on your size. I suggest looking up a corset lacing calculator to get the best estimation for your measurements!
Hi there! Working on a toile of this pattern. Is the seam between piece 2 and piece 3 supposed to lie over the bust apex, or should the apex hit the middle of a panel? Thank you!
Hello! The seam should be centered on the bust apex. 🙂
Do you have pattern without seam allowance?
Hi Nastya, all of our patterns include the seam allowance.
Very nice. I really like the hip flare-outs. I had to do minor fit/shape adjustments around my bust but otherwise it’s lovely. Thank you for the pattern!
Hey I’m sorry if this is a silly question I’m super beginner. I’m having trouble with panels 3 & 4. I’m not sure if I’m supposed to do a princess seam or if I messed up somehow? There’s a lot more fabric in the middle of panel 3 than there is 4
Hi Lucy, we’re sorry for the delay in responding to your question! We get dozens of comments and questions each day, and so many questions get buried and, unfortunately, unanswered. We’re having some trouble understanding your question, can you email info@moodfabrics.com a picture of your panels so we can better help! Since there are lots of layers and panels to sew, the Cerise Corset is an advanced pattern. We do recommend theHC Corset as a beginner friendly corset pattern.
hi im a begginer at sewing corsets and the instructions i this is amzing and went so quick making this corset.
i will defently use more of the patters from this website (there might be spelling mistakes English is not my first language)
Hello!
We’re so glad you enjoyed this pattern! 🙂
Love this pattern! Is there a way I can make it without the boning? I’m not looking for much support
Hello, you can use a stiff fabric or add buckram for structure.
como se que talla tengo si soy de españa
Hola, nos puede dejar su email con sus medidas de busto, cintura y cadera y nosotros le recomendamos la talla que sea mejor.
Hi, I was wondering, which layer did you sew your boning to? (the SELF fabric, the buckram, or the lining) Does it matter which one you attach it to?
Thank you for the pattern! I’m having fun making it so far!
Hi Katelyn, the best option would be to sew the boning onto the buckram, this way it will get sandwiched between the self and the lining.
Thank you!
What do the notches look like? I am only used to the notches that are basically triangles.
Hello, the notches for this pattern are the small dashes that almost look like the letter T
Hola, tengo dudas sobre los márgenes de costura, todos los márgenes laterales son de 5/8″? O solo los de las piezas 5,6 y 7?
¡Hola! El margen de costura para todas las piezas es de 3/8″, a menos que se indique lo contrario. ¡Gracias! ¡Nos encantaría saber cómo disfrutaste haciendo este patrón!
Hello! The seam allowance for all pieces is 3/8″, unless otherwise noted. Thank you! We’d love to hear how you enjoyed making this pattern!
I’ve been eyeing this pattern for years and I finally have an excuse to make it! It’ll be a part of a summer evening gown I’m working on. I’m also glad I’m making a mockup. The number of panels is daunting, but the extra seams let me take it in precisely to my figure. I feel like I’ll have to make one in every color.
We are glad to hear and we hope you continue to enjoy our free sewing patterns. 🙂 Happy sewing!
La explicación de como se colocan las varillas, me a dejado algo confundida, no se a que canal se refiere o si tengo que hacer una costura inglesa para hacer los canales y que la varilla entre en estos , al igual que no se a que tela se le coloca al brocado metalico
Hola, las varillas se cosen a las costuras de la capa de bucarán, que irá entre la tela principal y la tela del forro.
Cutting this out now and excited to start! Would fusible buckram work? I’ve never frame stitched but have made other boned corsets – I’ve use mid-weight fusible interfacing attached to the fashion fabric. I suspect the buckram is needed here to keep the shapes and top lines sharp.
Would fusible buckram work?
Hey Aly! Fusible buckram is a great idea. It would probably save you some time and make the corset even more stiff/sturdy.
I’d like to make a corset with the outfacing fabric as 100% polyester. What would you recommend my lining fabric to be? I was planning to look for a cotton fabric but want to make sure I don’t mess up!
I was also wondering if I need the stiffener or could survive without it! Thank you!
You can definitely use polyester for the outer fabric. Honestly, you could use the same fabric for the outside as you do for the inside if its soft enough on your skin. I definitely recommend using the stiffener.
Are there alternatives to the White Cotton Buckram stiffener that are washable?
You can always use a lighter weight interfacing/stiffener like this one.
I have been trying to find the right corset to make. I finally found one that is what I have been looking for. I love Mood’s fabric! I will continue to order from you! Thank you!
How do I know which piece of fabric to put together? this is my first corset
The question and answers here are extremely valuable. I purchased the kit for this pattern. I’ve been a garment sewist for years but have never taken on a corset. So this is my very first time. My thanks to all who proposed a question and my appreciation to those who offered the answers