
Making garments is a process that can be confusing and even frustrating at times. Once you have found the perfect design and fabric and gathered all the necessary tools to complete your project, then it’s time to start construction. If you’re drafting your patterns, knowing the right order is important, so here’s a guide that’ll help,
- Techniques like darts, tucks, and pleats are needed for shaping and defining the garment.
- Add any style lines which give garments a unique look. Don’t forget interfacing to avoid any unwanted stretching, especially at stress points.
- Add all facings, pockets, and zippers (excluding dress zippers). Adding these features before creating the main seams makes the construction process go a lot more smoothly.
- For tops, add shoulder seams, and for pants, add side seams to get the main seams in place. Press open seams as you work.
- Next, add all other side seams and inseams once the main seams are established.
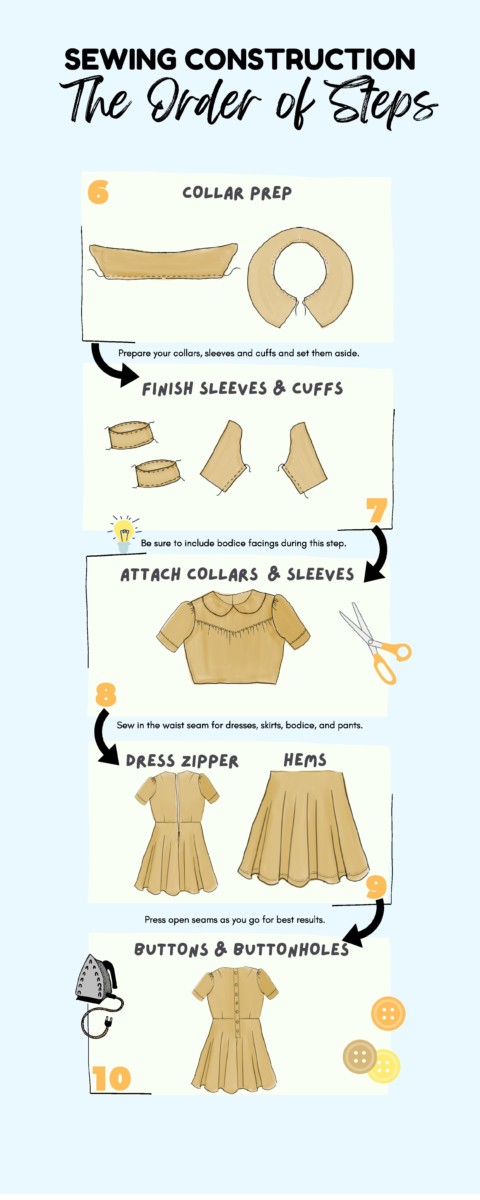
- Prepare collars, sleeves, and cuffs and set them aside by creating the shapes and cutting them out.
- Then finish pieces by applying any needed stitches, and don’t forget to include bodice facings for extra support and stability.
- Attach finished collars and sleeves and sew the waist seam for dresses, skirts, bodices, and pants.
- Create hems and attach dress zippers to complete some of the final touches.
- Lastly, add buttons and buttonholes or similar closures), carefully opening buttonholes with a seam ripper to complete construction.

Making a garment just got a whole lot easier, and we’re happy to share these steps with you to make the sewing process more enjoyable. Sewing with an easy-to-follow guide helps eliminate a lot of fuss and room for errors, and that makes for a much more successful result.
Which areas of garment construction do you struggle with or have you struggled with in the past?
Thanks for sharing this! I think it is wealthy information!!! Thanks again for all your Team do to assist and enhance our creativity … FIESTA 🙂
This is wonderful! I have printed off to keep as a handy reference. I am returning to clothing sewing after many many years away. For past 25 years I mostly just did decorative and home project sewing but am just so bored with most off the rack clothing and want to create my own. Just discovered this site and look forward to spending time here!
Great checklist to have on hand
Nice
Thx
This is excellent! Thank you so much for sharing this Stephanie. This is just what I was looking for.
Thank you so much for this information. It is super helpful
I think this is a great list to have. One thing though, you usually have to have a neckline before you can add a neckline facing, so that would mean you would have to sew the shoulder seams before you attach the facings at the neckline.
Hello Ev
Thanks for your comment! You can also attach the facings to the front and back necklines first and then sew the shoulders, to make sure the facings don’t shift when the garment is worn. Or you can do it the way you suggest to get a neater finish on the wrong side of the facings. It depends on the needs of each garment. Thanks so much for mentioning it!