
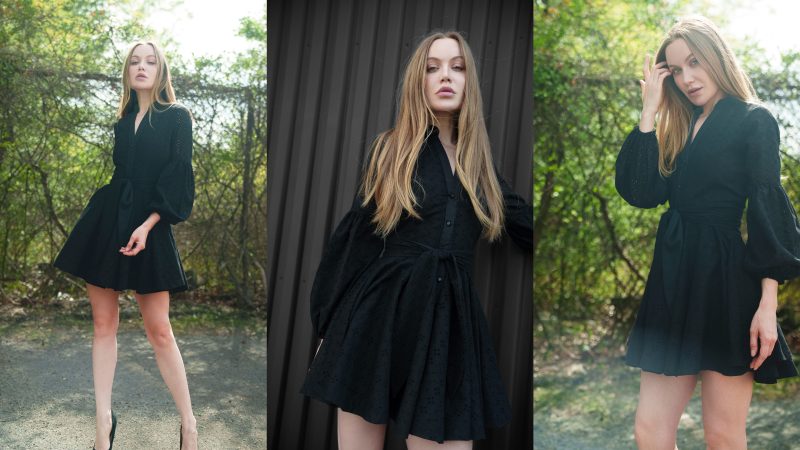
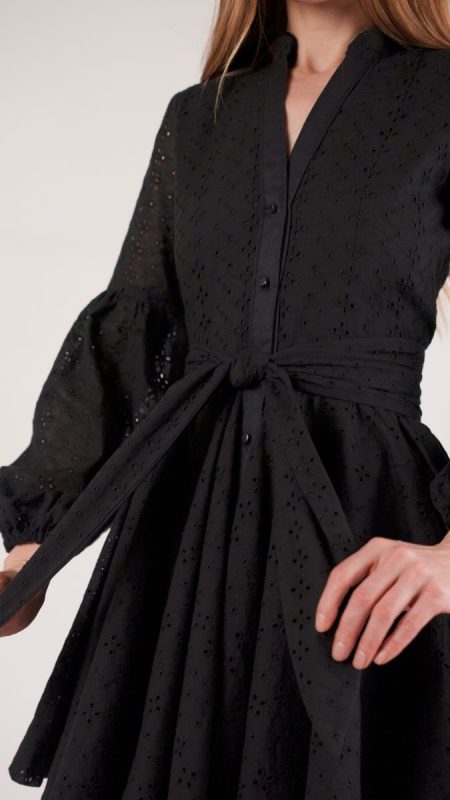
Romantic, refined, and refreshingly wearable—the Taos Dress Free Sewing Pattern is your next must-make wardrobe staple! Designed with timeless charm and thoughtful detail, this dress brings classic tailoring and feminine flair into perfect harmony.
Made from delicate embroidered eyelet cotton voile, the Taos Dress celebrates lightness and texture with its airy, semi-sheer beauty. A full lining in mercerized organic Egyptian cotton voile adds comfort and structure. This free sewing pattern features a V-neck framed by a crisp stand collar, leading into clean button plackets, and a belt that cinches the waist. The full skirt flows with ease and movement, while gathered two-piece sleeves strike a perfect balance between drama and delicacy.
Stitch it, wear it, and make it your own! This dress transitions effortlessly from day to night, whether you opt for crisp black, pastel tones, or bold embroidered fabrics. Pair it with woven flats and a straw tote for casual days, or add heels and bold earrings to elevate your evening look. The Taos Dress is more than just a sewing project; it’s a piece you’ll love to live in!
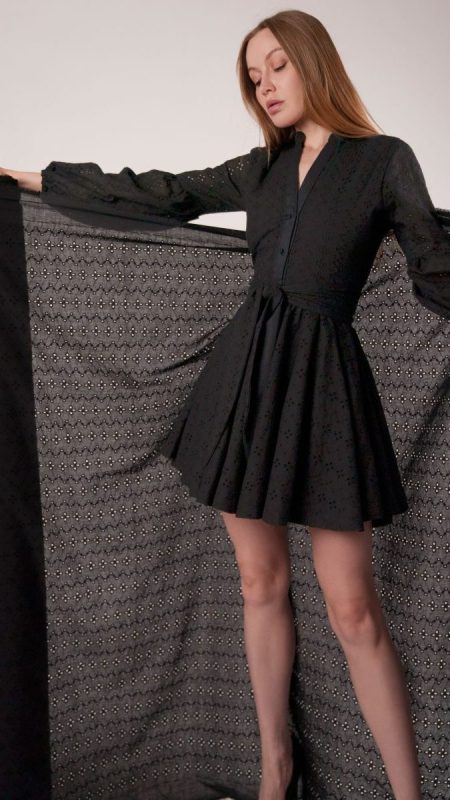
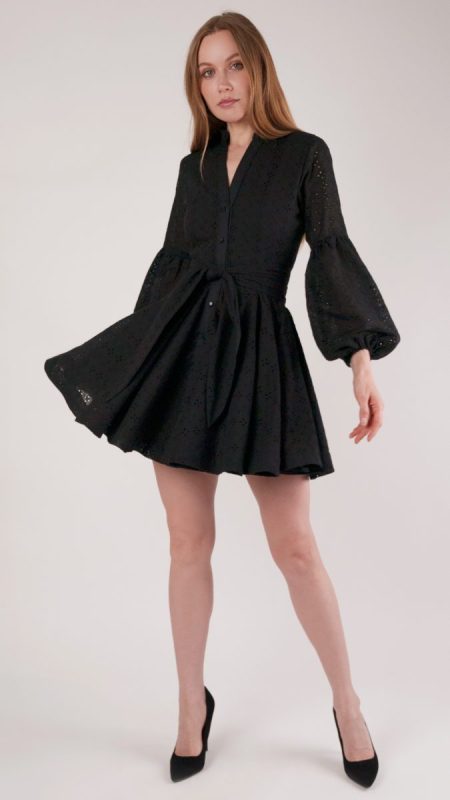
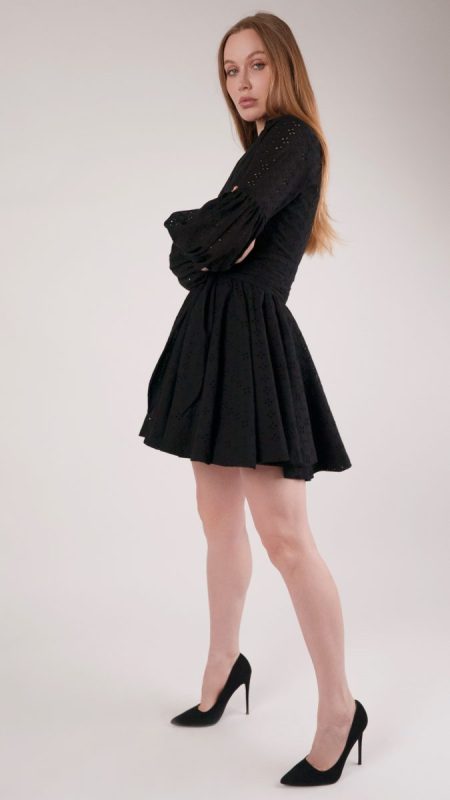
Essential Materials & Sizing Guide for The Taos Dress
Here is the breakdown of what knowledge and materials you need for creating your very own dress! We’ve got you covered with the recommended materials we used—if you want to follow along exactly—as well as a curated list of alternative fabric recommendations if you want to customize your own version. The Taos Dress Free Sewing Pattern download includes technical drawings for seam and silhouette visibility, plus a size chart to help you find your perfect fit!
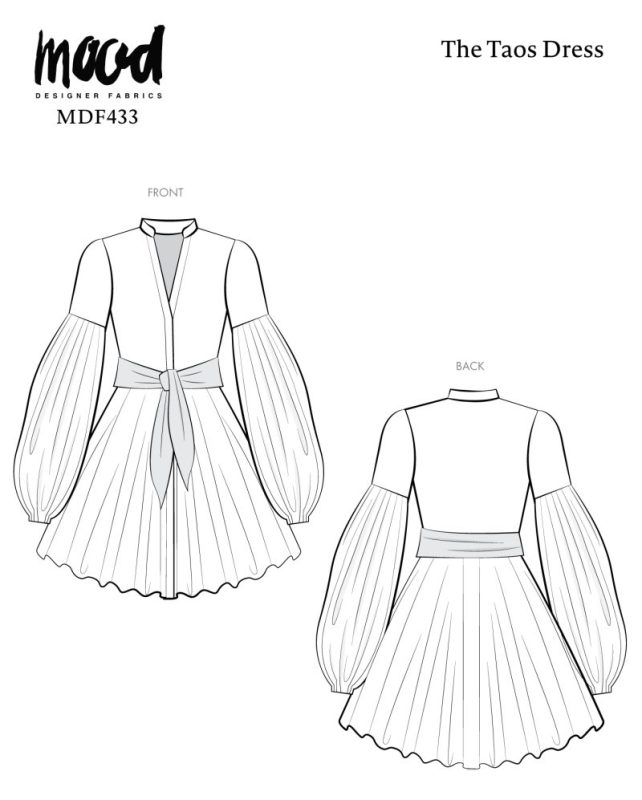
Purchase Products Used Below:
Quantities indicated are for sewing a size small dress. Toggle the ‘SHOP THIS LOOK’ box to find quantities for other sizes.
- 4 yards of Embroidered Eyelet Cotton Voile – Black Floral Zig Zags and Stripes
- 3 yards of Mercerized Organic Egyptian Cotton Voile – Black – Toulouse Collection
- 1 yard of Black Elastic – 0.25″
- 7 each of Italian Black Matte Shank Back Button – 16L/10mm
- MDF433 – Taos Dress Sewing Pattern (Free download below!)
Alternative Fabric Recommendations:
The Taos Dress is best suited for lightweight fashion fabrics.
Download Your Free Sewing Pattern
Submit your name and email in the form below to receive the Taos Dress Free Sewing Pattern directly in your inbox. Mood Sewciety Patterns will send your free download via email with the subject line: ‘Your Free Download from Mood Sewciety’ (in PDF format for A4 and letter-size printing).
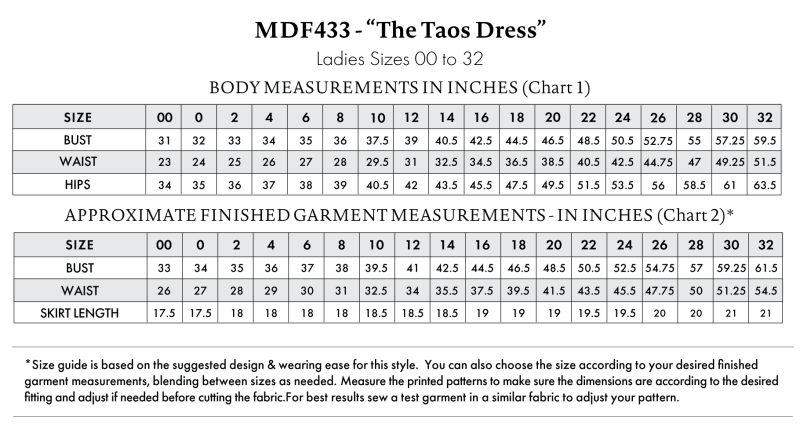
Find Your Perfect Fit
The size guide below is based on the suggested design & wearing ease for this style. You can choose the size according to your desired finished garment measurements, blending between sizes as needed. Measure the printed patterns to make sure the dimensions are according to the desired fitting and adjust—if needed—before cutting the fabric. For best results, sew a test garment in a similar fabric to adjust your pattern.
Note: Measurements may vary after adjustments. If using non-stretch fabrics, reference the approximate finished garment measurements chart to choose your size.
How To Sew The Taos Dress
The instructions provided are designed to guide you through sewing the main fabric and the lining fabric for the Taos Dress simultaneously.
Sew with a 1/2″ seam allowance for all seams unless otherwise specified.
Step 1
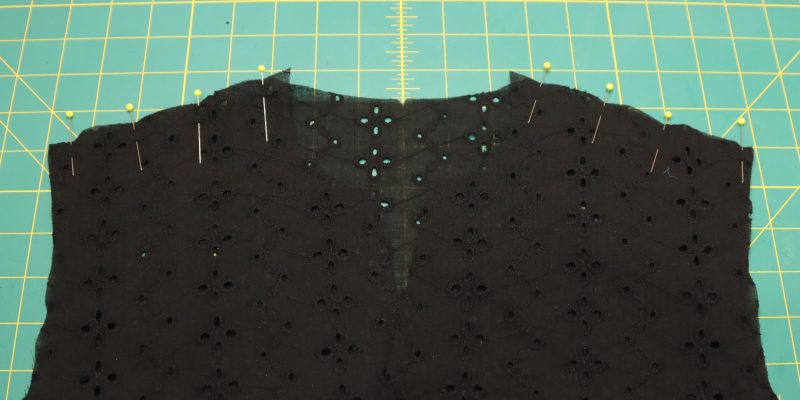
SHOULDER SEAMS
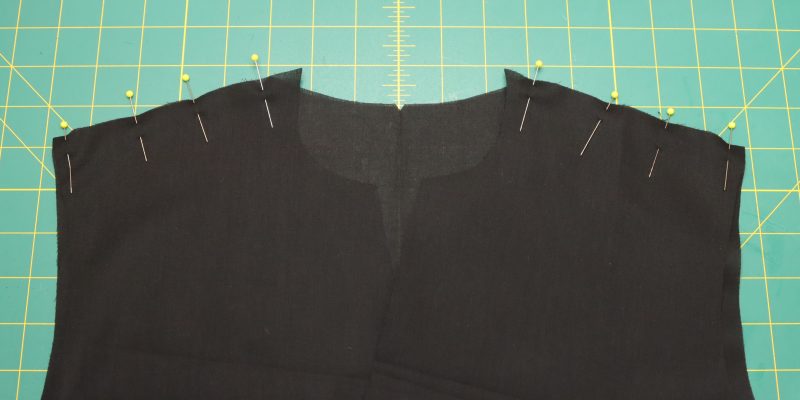
Sew front and back at the shoulder seams.
(Repeat this step for the lining)
Step 2
SIDE SEAMS
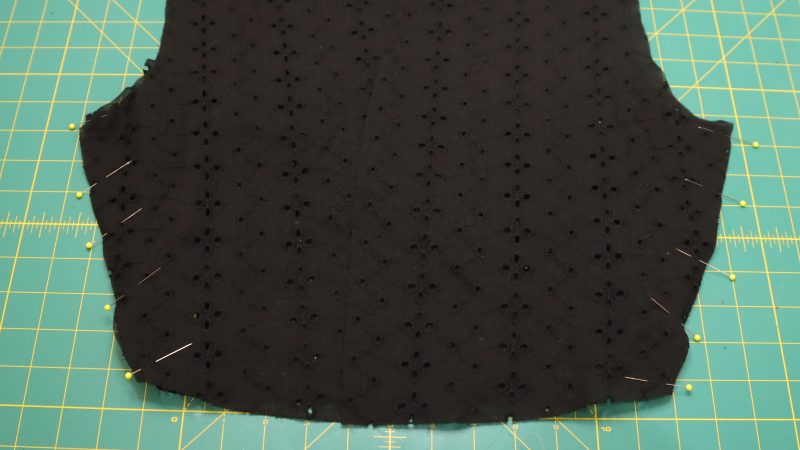
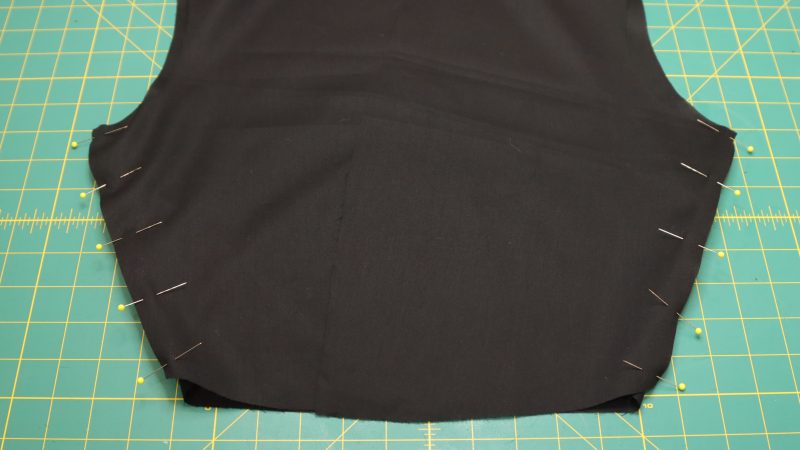
Sew front and back at the side seams.
(Repeat this step for the lining)
Step 3
SKIRT CENTER BACK
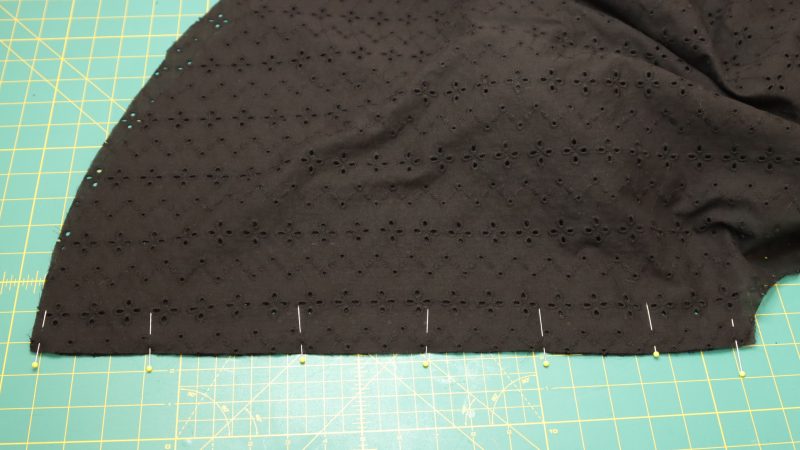
Sew the outer skirt together at center back.
Step 4
JOIN TOP & BOTTOM
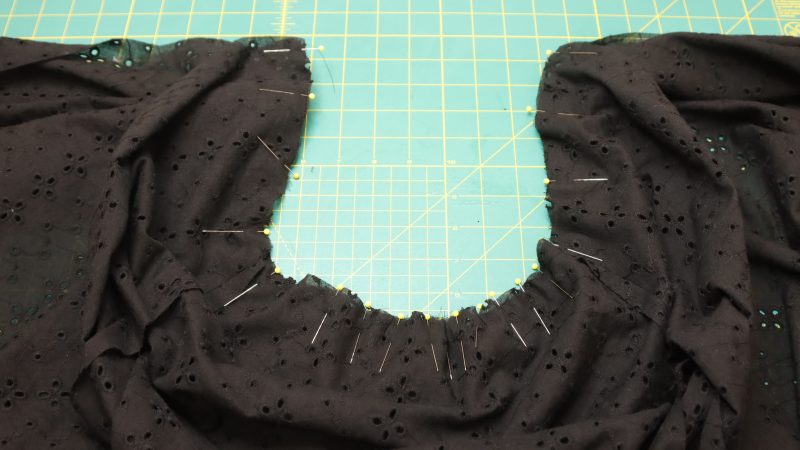
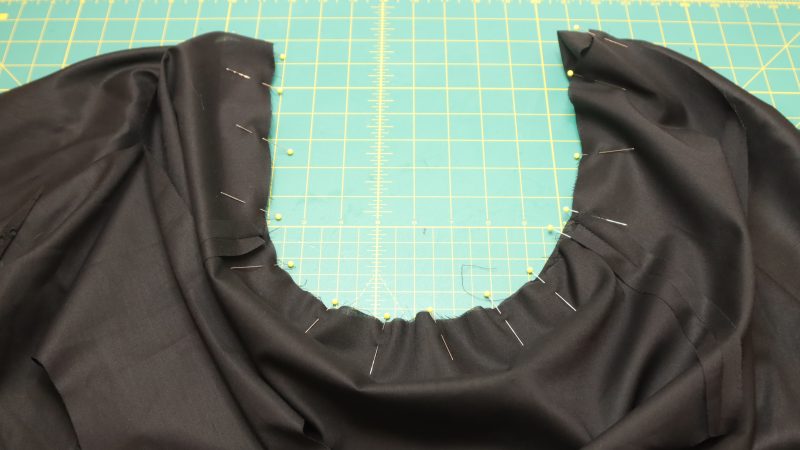
Sew the bodice and the skirt together at the waistline.
(Repeat this step for the lining)
Step 5
BUTTON PLACKET
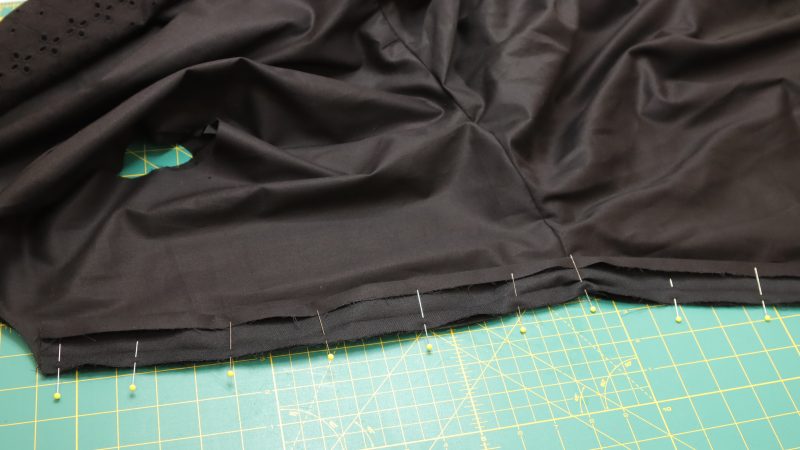
Attach the button plackets to each side of the front.
- Add interlining to each button placket.
- Press the 1/2“ seam allowance on each side of the placket.
- Pin one side of the seam allowance to the edge on the inside of the front opening.
- Sew the right side of the placket to the wrong side of the dress.
- Repeat this step for the other side.

Step 6
FINISH BUTTON PLACKET
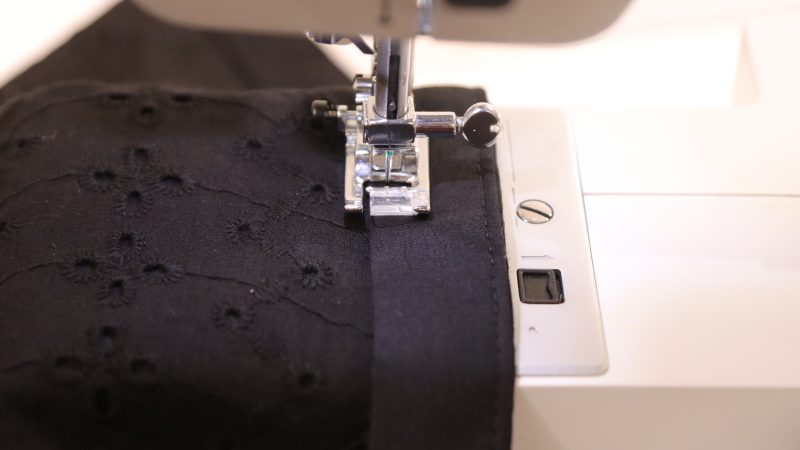
Top stitch the button placket to the front.
- Flip the button placket to the outside of the dress and press.
- Edge stitch on each side of the placket.
Step 7
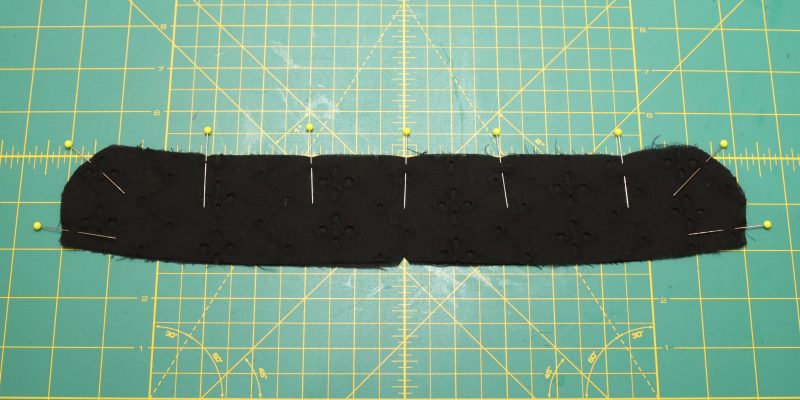
COLLAR
Sew the collar pieces together.
- Interface one of the collar pieces,
- Sew around the sides and across the top.
- Leave the bottom open to turn it right side out.
Step 8
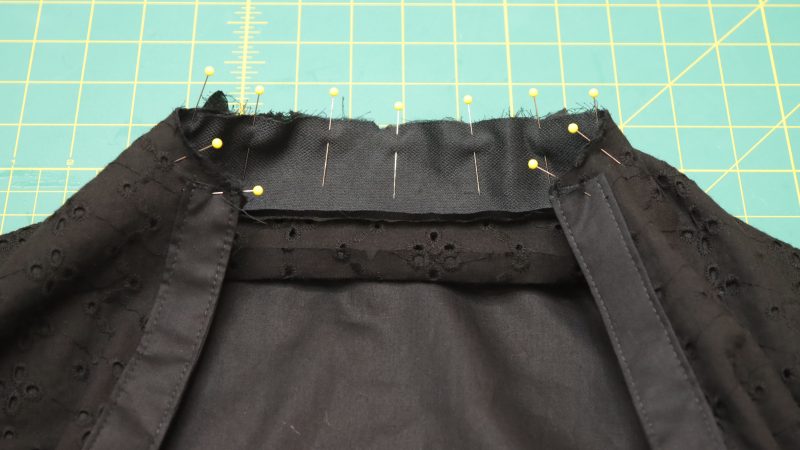
ATTACH COLLAR
Sew one side of the collar to the inside of the neckline.
Step 9
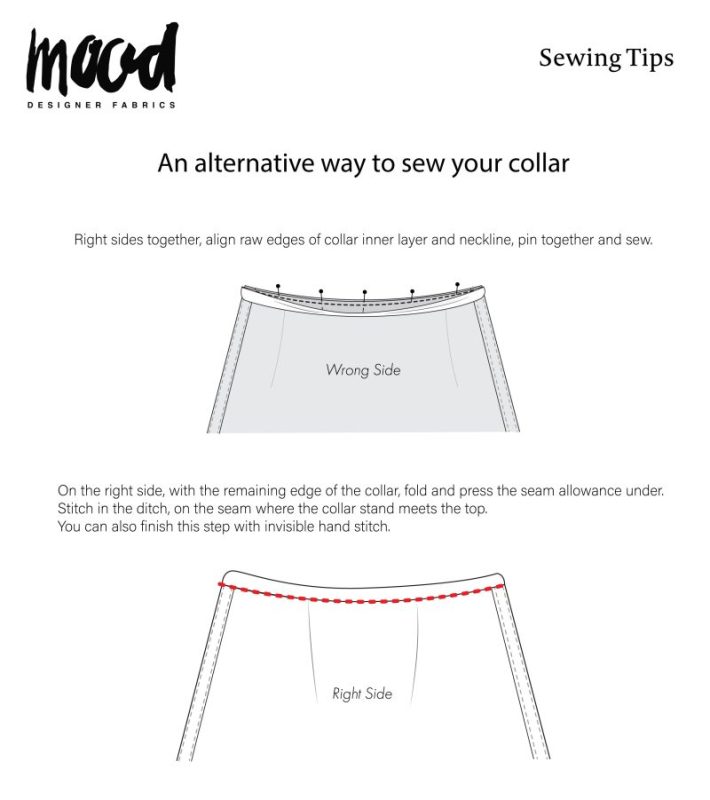
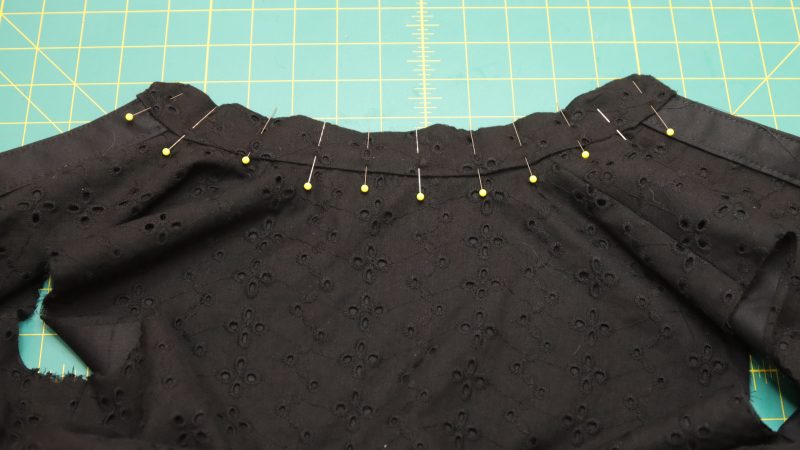
FINISH COLLAR
Sew the other side of the collar to the neckline.
- Press the seam allowance on the other side of the collar.
- Pin the outside of the collar to the outside of the neckline.
- Top stitch along the edge or stitch in the ditch.
Step 10
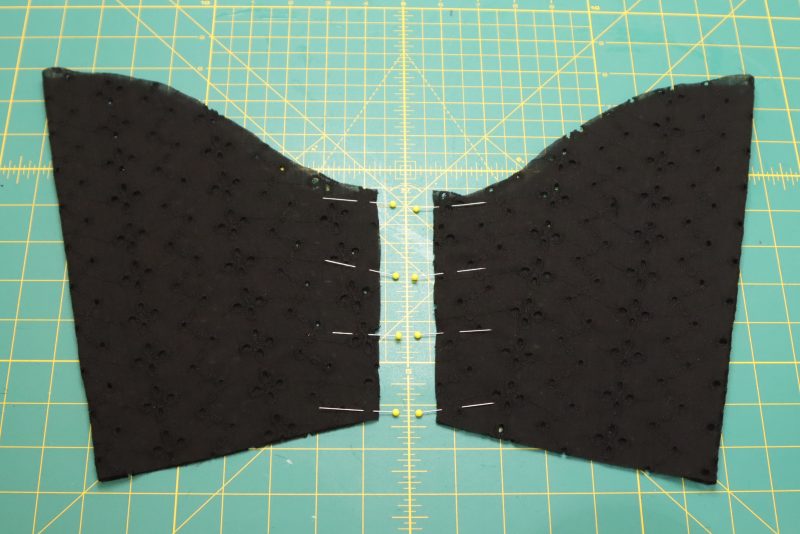
UPPER SLEEVE INSEAM
Sew the inseam of the upper sleeve.
Step 11
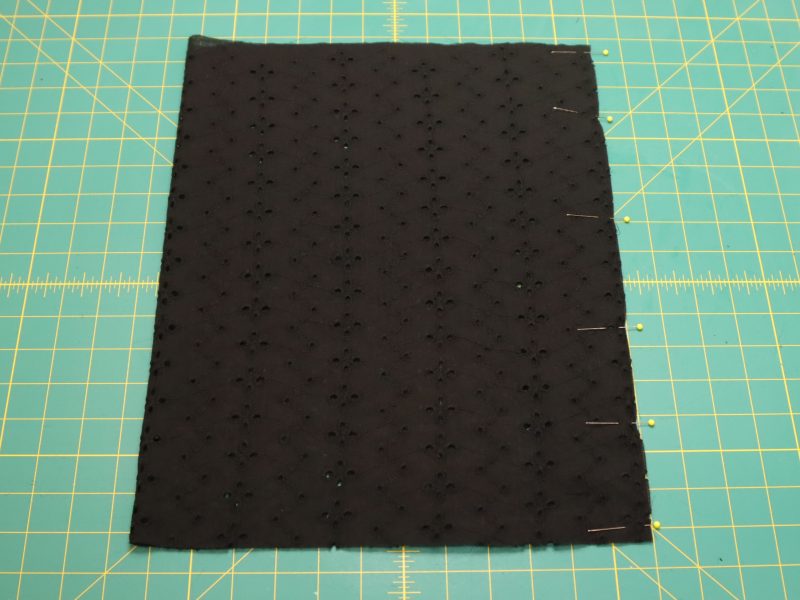
LOWER SLEEVE INSEAM
Sew the inseam of the lower sleeve.
Step 12
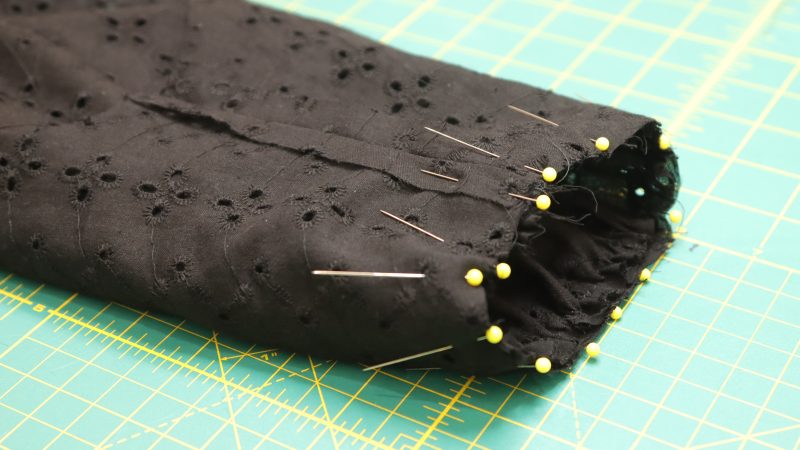
JOIN UPPER & LOWER SLEEVES
Attach the upper sleeve to the lower sleeve.
- Sew bastings to the top edge of the lower sleeve.
- Gather the top edge of the lower sleeve.
- Pin and sew the upper sleeve to the gathered lower sleeve.
Step 13
FINISH EDGES
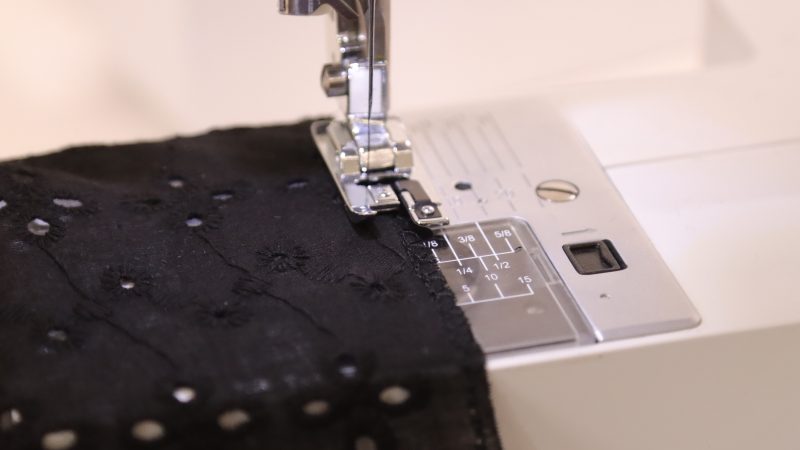
Sew an overcast stitch to finish all the raw edges:
- Bottom edge of lower sleeve
- Upper & lower sleeve seam
- Both armhole seams
- Skirt center back seam
- Bottom edge of outer skirt
- Bottom edge of lining skirt
Step 14
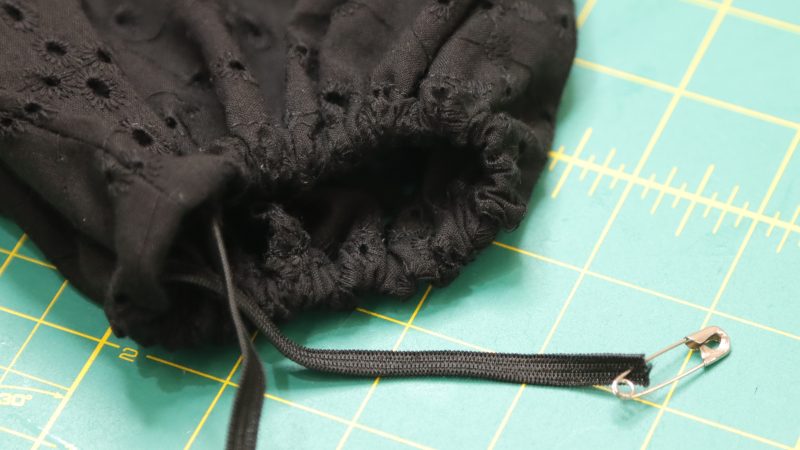
ELASTIC CUFFS
Add elastic to the bottom of the lower sleeves.
- Sew 1/2“ casing at the bottom of the lower sleeve.
- Leave an opening by the inseam of the sleeve.
- Use a safety pin to insert the elastic through the casing.
- Sew the ends of the elastic together with a zig-zag stitch.
- Close the opening of the casing once the elastic is inside.
Step 15
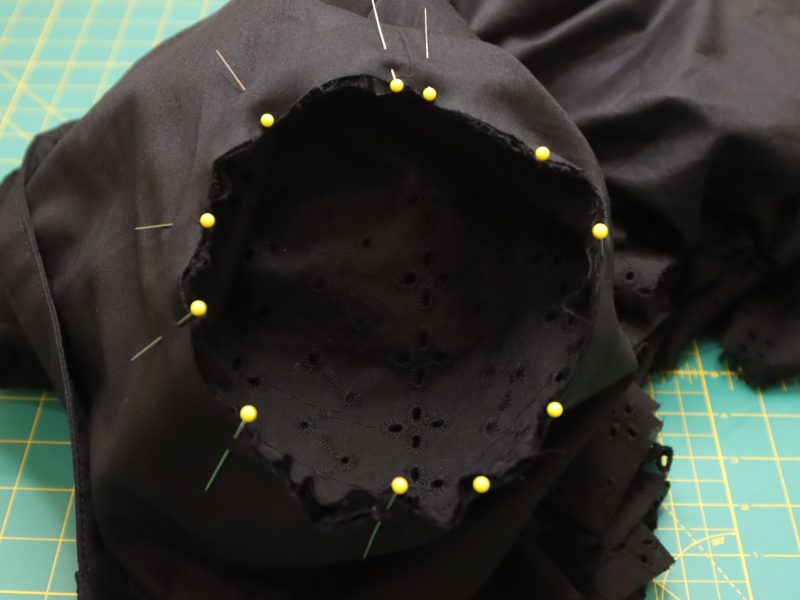
ATTACH SLEEVES
Join the sleeves to the bodice.
- Sew a basting stitch around the top of the sleeve.
- Ease the sleeve cap and set in the sleeve.
- Sew the sleeve all around the armhole.
- Finish the armhole seam with binding tape or an overlock stitch.
Step 16
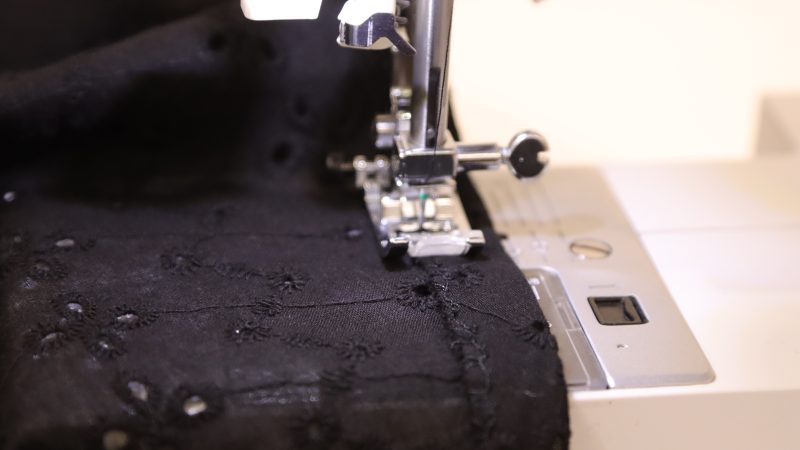
1/2″ HEM
Finish the bottom edge of each skirt with a regular hem or a 1/4 “ double-folded hem.
Step 17
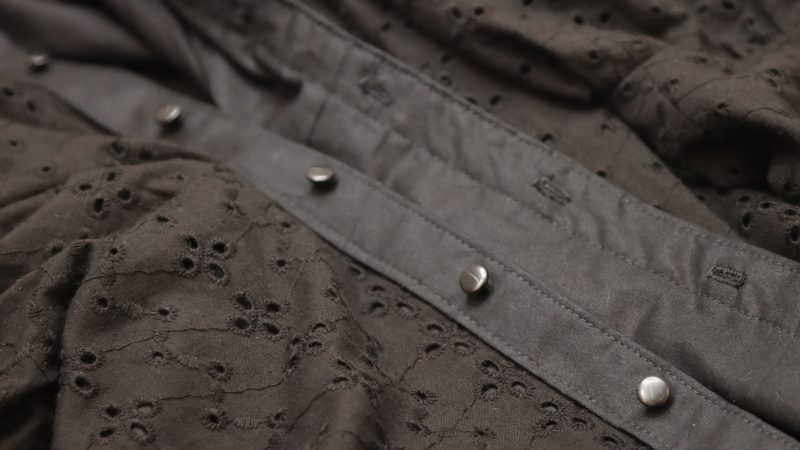
BUTTONS & BUTTONHOLES
Complete the closure at the front opening of the dress.
- Use tailor’s chalk to mark the placement of each button.
- Sew the buttons on the left placket.
- Sew the buttonholes on the right placket.
Step 18
WAIST BELT
Sew the belt pieces together.
- Pin the belt pieces right sides together.
- Leave a gap open on one side of the center.
- Turn the belt right side out through the opening.
- Press the edges neatly.
- Pin and sew the opening with a top stitch.
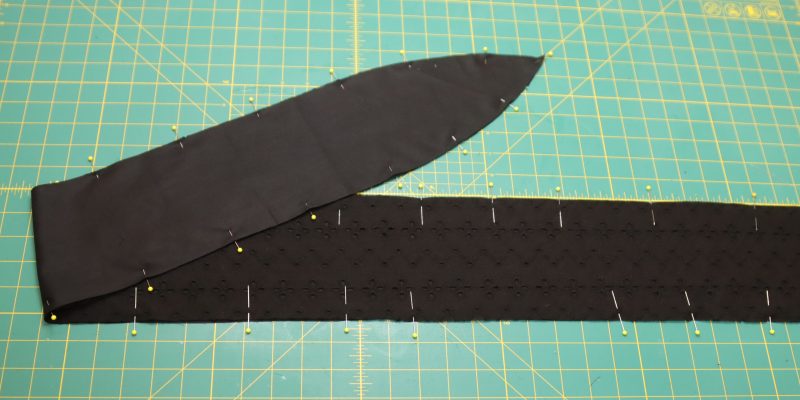
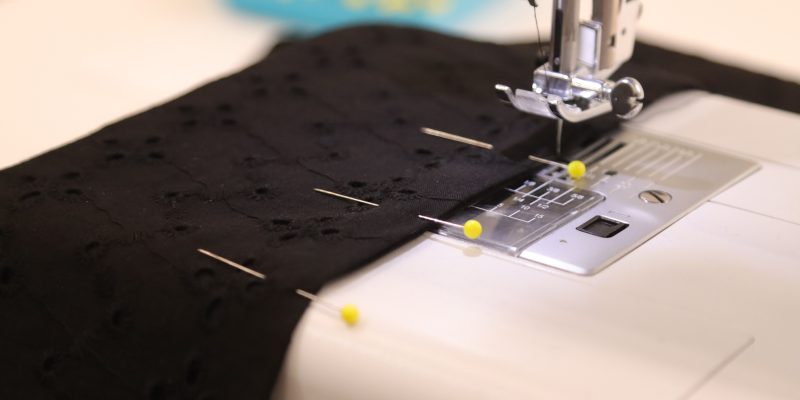
The Completed Taos Dress Free Sewing Pattern by Mood Fabrics
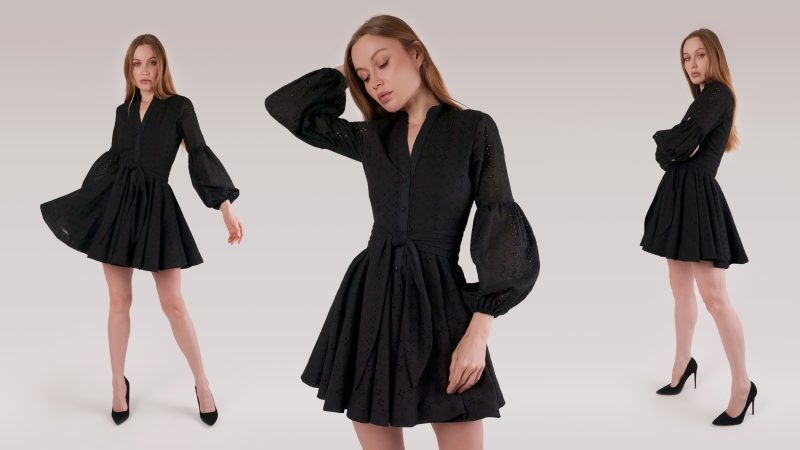
We can’t wait to see your version of the Taos Dress! Whether you choose cotton poplin, pima cotton, or a shirting fabric, this pattern is the perfect canvas for your creativity and sewing skills.
Share this post with a friend (or two!), download The Taos Dress Free Sewing Pattern, and show us which fabrics and colors you choose, using the hashtags #MoodTaosPattern & #MadeWithMood.

I am unsure when and how you attach the lining to the dress
Hello, the lining and the main fabric get attached together when sewing the button plackets as well as the collar.
I loooooove this dress. Thank you. I need to get back to sewing with all this good inspirational stuff
We are so happy to hear and we hope you return to sewing soon!
I am a little confused on the button placket. In the instructions is states: “ Attach the button plackets to each side of the front.
1. Add interlining to each button placket.
2. Press the 1/2“ seam allowance on each side of the placket.
3. Pin one side of the seam allowance to the edge on the inside of the front opening.
4. Sew the right side of the placket to the wrong side of the dress.
5. Repeat this step for the other side.”
On the pattern it only states to cut out 1 button placket of the lining fabric. Could i get some clarification on how this is part is supposed to be assembled?
Hello, we apologize for the confusion. The pattern for the button placket must be cut 2, one for each side of the front.
I’m in the middle of making this and I’m confused too. I’ve cut 2 placket pieces in my main dress fabric, they are 2 inches wide as per the pattern, with a 1/2 inch seam allowance the placket will end up 1/2 inch wide. It looks wider in the photos. Is this correct?
Hi Samantha
That’s correct, the placket measures 2″, which already includes a ½” seam allowance. The final placket width is 1″ because it’s not folded in half; it’s first sewn to the wrong side of the fabric, then the entire placket is folded over to the right side and secured with a topstitch. Please refer to the photos in steps 5 and 6.
This is so cute, I love it! Looking forward to making this. Thank you for sharing.
Thank you very much and happy sewing! 🙂
Is there a reason you chose to forego bust and waist darts? It makes for a simpler sew but with anyone B cup or larger would end up with some pulling and puckering. Do you have any recommendations for the more well endowed among us?
The Taos dress has a boxy-straight cut that meant to fit well regardless of your size. When you tie the belt, it gathers the fabric, giving you a relaxed fit. If you want to add darts or need to make adjustments, you can definitely do that too! We suggest adding a bust dart only. To do that, trace the dart on the pattern and add the dart width to the side length of the top.
Please send free TAOS DRESS pattern to my email address. Thanks.
Please reach out to us at patterns@moodfabrics.com and we’ll make sure you get your free download. ✨
Hello, why there are no notched on the sleeves and body pieces? I think they would be very useful. Same on the button placket, to be sure the alignment is done well.
We don’t usually add notches on sleeves when they’re meant to be sewn in as set-in sleeves—since the fabric gets slightly gathered, the notches would end up shifting anyway. In this case, the side seam and the seam line of the sleeve are meant to align to help you position it correctly in the armhole.
In general, we only include notches when they’re really needed . For example, the button placket will naturally line up with the opening edge in the front, since it matches with the neckline and the hem corners,
Plus, we’ve got you covered! Our blog instructions walk you visually through each step of the sewing process to make things as clear and easy as possible.
Hello, i don’t really understand for the skirt. I print the pattern and for the skirt the waist is really really tiny, whereas for the skirt’s lining the pattern’s waist size seams okey. Moreover i don’t understand why it is written to cut 2 on fold, because 1 on fold makes a total circle. Thank you.
Hello, the outer skirt is meant to cut 2 and get sewn together at center back, while the lining skirt is cut 1 on fold.
So there are 2 outer skirts and 1 inner skirt correct? And you sew the 2 outer skirts together and there will be a seam in the front and in the back, or side and side. Is that correct? Instructions say to sew the skirt together in the back which implies 1 out skirt piece. Kind of confusing.
Hello, the outer skirt is 2 pieces (cut 2) that get sewn together at center back, while the skirt lining is cut 1 on fold. The seam will be at the back, and the front will have the button placket opening.
Hi, I don’t understand why the waist is so small in the fabric to the skirt, opposed to the lining. Is that why you’re supposed to cut two of the fabric? If that’s the case, how do I attach the two pieces together?
Yes, the outer skirt should be cut 2 and sewn together at center back.
I love this style of dress. Can it be worn without the waist belt?
Yes, you can also wear the Taos Dress without the waistbelt & it will still look beautiful!
HI! When attaching the skirt lining to the bodice, since its on fold, how do I attach the bodice to it? also since the hole in the middle is so small and there’s no split?
Thank you!
The skirt lining must be cut on fold and sewn onto the waistline of the bodice lining. The outer skirt is cut 2 instead, which will get sewn together with a center back seam, then it will be sewn to the waistline of the main fabric bodice. Once the lining and the main fabric are sewn separately, they will get joined together at the neckline with the collar and at the front openings with the button plackets.
Is it possible to lenghten to a midi length?
Thank you for all the hard work that is poured out into making these patterns available to the community and for free!
Of course! Just extend the skirt pattern so that it’s longer but still just as full.
Hi, if you didn’t have enough fabric – could you use the lining fabric as the main one for the skirt? So basically two pieces for the lining and the main but of the lining pattern. It wouldn’t have as much of a gather, but the waist would work. I am using upcycled vintage lace and only have a certain amount. Thanks!
Hi Philli! Yes you can definitely do that, I’ve done it with other patterns that have a gathered outer skirt but straight cut lining skirt. It will work, it just won’t be as full of a skirt, which is totally fine!
Can I also make this dress without the lining when using a light weight cotton?
Yep! The lining is optional if your outer fabric is opaque enough.
Hi – is it possible to use the lining skirt pattern instead of the main one? I don’t have enough fabric, so wondering if this hack will work. Thanks
Yes this is definitely an option if you don’t quite have enough fabric!
Hello, do you have guidance on the spacing of the buttons?
Buttonholes shoulder generally be between 2.5 and 3.5 inches apart from each other. If your clothes have a tendency to gape open around the bust, you can use smaller spacing. If it’s a loose fitting blouse or dress, you can use bigger spacing.
I’m so obsessed with this pattern, it takes some trial and error but I’m 100% fine with wearing a dress that’s not perfect. The sleeves for my size were too small so I had to adjust for my second dress. The first dress I just did little ruffles at the sleeves because I ran out of fabric. The second dress I added 2 inches all around the top sleeve pattern(except for the bottom). I’m just now starting to sew the sleeves but I think they will be perfect! I’m so excited. I didn’t end up using the skirt pattern though I just did a double circle skirt for both dresses.
Is an A0 pattern available?
Also, would this work well with a knit fabric?
You can use a knit fabric, but I would recommend using something that has very little stretch. Also, we do not offer A0 patterns at this time, but thank you for the feedback! We will consider it in the future.
Beautiful dress. I’m a beginner to sewing, and I’d like to make this dress, however, embroidered fabric is not my style, is there an alternative you can suggest for a more dressy dress for Christmas dinner?
Thank you,
Hi Cynthia
Thank you! We’re so glad you like the pattern. I’d recommend using sateen, mercerized cotton, or even silk taffeta. We’d love to hear which one you choose and how your dress turns out. Let us know if there’s anything else we can help with. Happy Sewing <3
The dress is so beautiful. But it could be difficult to understand by reading. To avoid the confusion, it is better to show each step with the video. Thank you.
Hey Muay! Thank you for this feedback! We like to know which of our patterns are most popular and could benefit from a video tutorial. In the meantime, I highly highly HIGHLY recommend searching the name of this sewing pattern (or any of our sewing patterns) on youtube. There are tons of extremely talented creators who put a lot of time and effort into making videos that document every step of their sewing process. Usually our patterns that have been out for at least a couple of years will have a video somewhere on youtube from another creator.
I am sewing the bodice to the skirt and have hit a snag. I seem to have way more bodice waist than skirt circumference. I don’t think it is supposed to have any gathers, especially on the bodice waist. I have double checked my pattern cuts and have cut the size ten for both bodice and skirt. Can you think of what I might be overlooking?
In step 4, it actually kind of looks like the waist of the skirt is longer than the waist of the top, and they have it pinned in place so that the skirt is evenly spaced on the top. You might have to gather it a tiny bit or at least use stay stitches to keep it from stretching, since the waist of the skirt is curved so it can become mishapen.
I made this out of a silk/poly blend (top, lining, underskirt, belt) and a sequined mesh (skirt). It fits perfectly. I am a street wear size 12, and I cut out a 16 and it’s just right. I was planning on doing bust darts but totally spaced it as I was cutting out the pattern. It would be crisper with bust darts, but it’s fine without. Things I did slightly differently: I cut out 4 of the plackets. I sewed 2 RST long ways, then sewed one side to the front of the dress, opened up, pressed a seam allowance on the raw edge of the placket, then folded the placket on the first placket to placket seam, and pinned, including the lining inside the placket. Then top stitched. And repeated on the other side. This made for a more robust placket and nicer finish. For the bottom hem, since it was mesh and sequins I did a rolled hem on my serger. I also made cuffs for the sleeves to give it a more polished look. I hated it and scrapped it for the regular elastic sleeves. They look great and fit the dress well.
I love this pattern and I cant wait to make another version. This was my 51st bday dress and it came out amazing!!!