

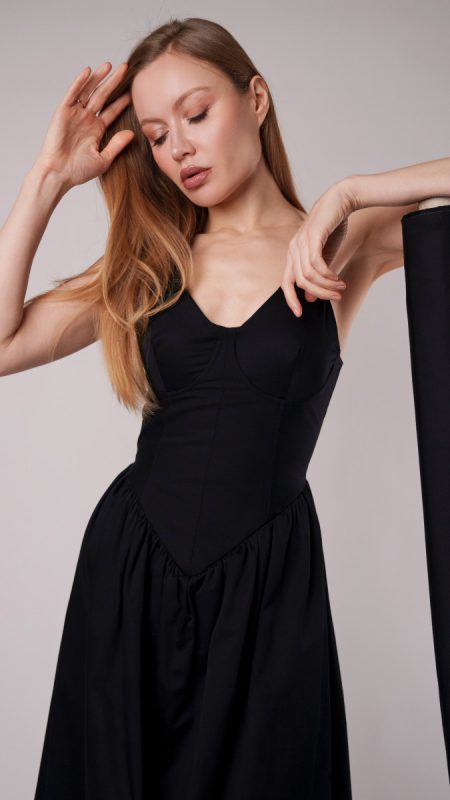
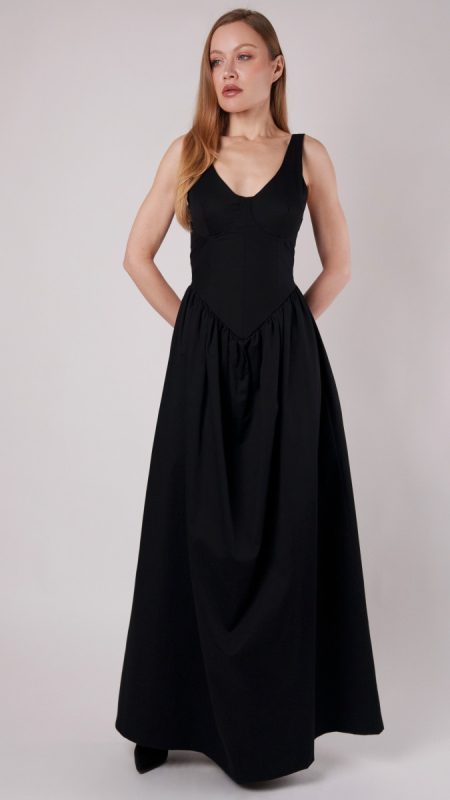
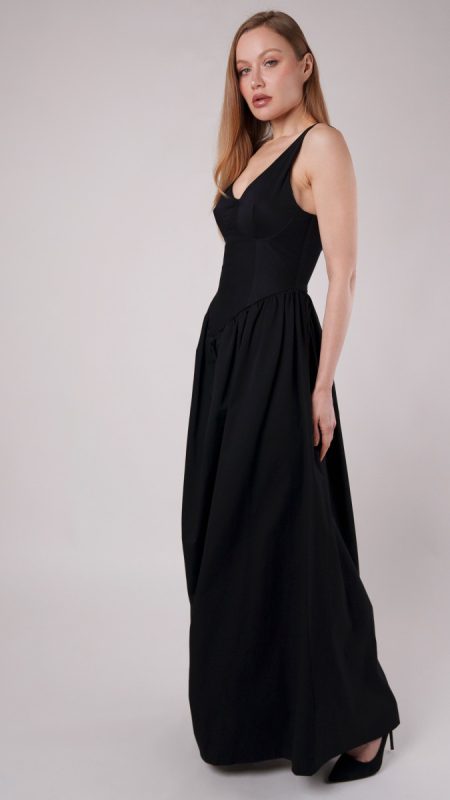
Turn heads with The Valentina V-Waist Dress Free Sewing Pattern, a chic and versatile addition to your handmade wardrobe. Sewn with stretch cotton sateen fashion fabric from the Mood Fabrics Carlos Collection, this dress boasts a flattering V-waistline and structured support utilizing metal underwire and triangle bra cups. Designed for sewists of all skill levels, this polished silhouette offers the perfect blend of style and comfort.
Stretch cotton sateen provides a smooth finish and subtle structure while benefitting from key properties of cotton fibers, including breathability, softness, and durability. Courtesy of the satin weave and natural fiber composition, the final result is both wrinkle-resistant and carries a dull luster which is characteristic of sateen and perfect for effortless wear! Looking for alternatives? Fabrics like sateen offer a subtle but eye-catching sheen, while crepe provides a soft drape, cotton poplin adds crispness, and shantung or taffeta bring luxurious texture.
This free sewing pattern is a special product of our “We’re Putting You in the Designer’s Seat” campaign, where the Mood community collaborated to shape every detail, from fabric recommendations to design elements. Your creativity and votes made this dress possible—a testament to the vibrant talent of sewists like you!
Style the Valentina V-Waist Dress with heels and bold accessories for a cocktail party, or dress it down with ballet flats for a daytime outing. An essential dress for all seasons, imagine light-colored fabrics for summer, pastel-colored fabrics for spring, earth-toned fabrics for autumn, and jewel-toned fabrics for winter! Whether you’re heading to a night out, a celebratory dinner, or a special occasion, this pattern will have you looking and feeling your best while proudly sporting your Me Made look.
Essentials for Sewing The Valentina V-Waist Dress
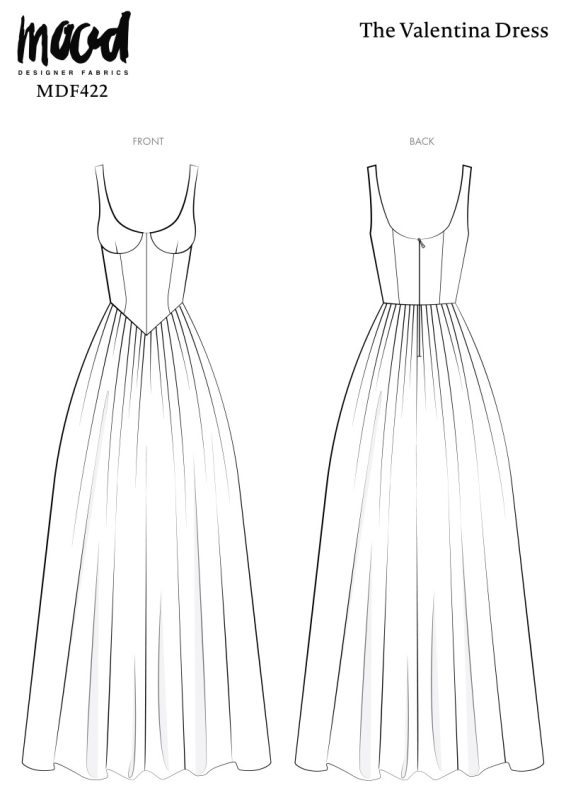
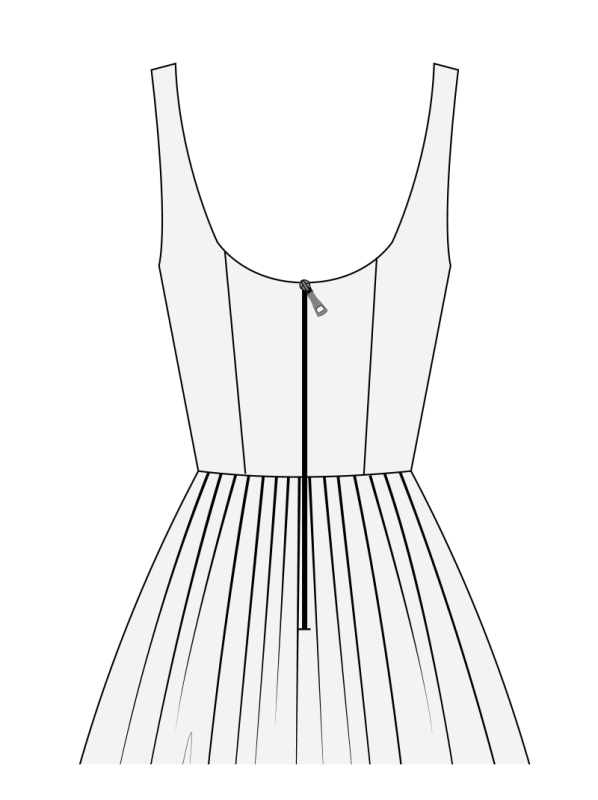
Here is the breakdown of what knowledge and materials you need for creating your very own v-waist dress! We’ve got you covered with the recommended materials we used—if you want to follow along exactly—as well as a curated list of alternative fabric recommendations if you want to customize your own version. Technical drawings for simple seam and silhouette visibility plus a size chart accompany the Valentina V-Waist Dress free sewing pattern download to help you find your perfect fit!
Purchase Products Used Below:
Quantities indicated are for sewing a size small V-waist dress. Toggle the ‘SHOP THIS LOOK’ box to find quantities for other sizes.
- 4.5 yards of Stretch Cotton Sateen – Black – Mood Exclusive Carlos Collection
- 1 pair of Metal Bra Underwire – Size 32
- 1 pair of Triangle Bra Cups – Black
- 1 spool of Sew All Thread – 250m – Black
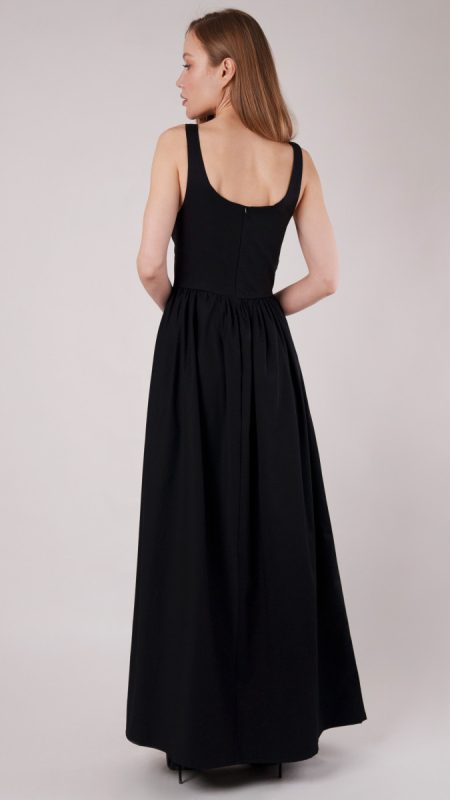
- 1 each of Invisible Zipper – 24” by YKK – Black
- MDF422 – Valentina V-Waist Sewing Pattern (Free download below!)
Alternative Fabric Recommendations:
The Valentina V-Waist Dress is best suited for lightweight and medium weight fashion fabrics with about 10% stretch through the weft.
Download Your Free Sewing Pattern
Submit your name and email in the form below to receive the Valentina V-Waist Dress free sewing pattern directly in your inbox. Mood Sewciety Patterns will send your free download via email with the subject line: ‘Your Free Download from Mood Sewciety’ (in PDF format for A4 and letter-size printing).
Find Your Perfect Fit
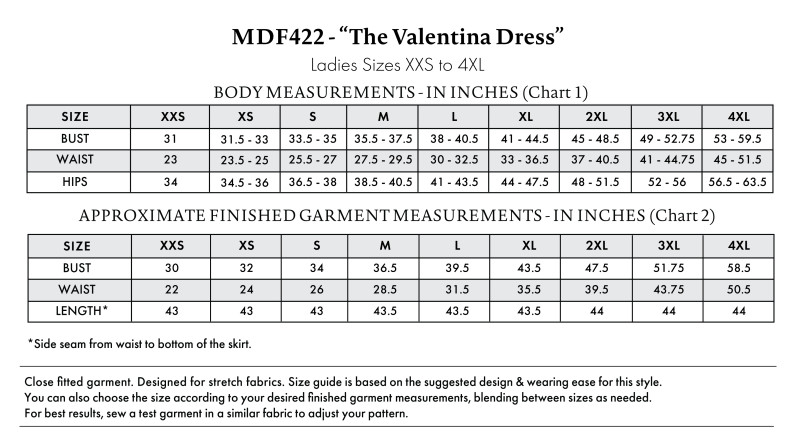
Our Valentina V-Waist Dress is a close fitted garment, designed for stretch fabrics; the size guide below is based on the suggested design & wearing ease for this style. You can choose the size according to your desired finished garment measurements, blending between sizes as needed. And/or measure the printed patterns to make sure the dimensions are according to the desired fitting and adjust—if needed—before cutting the fabric. For best results, sew a test garment in a similar fabric to adjust your pattern.
Note: if using non-stretch fabrics, reference the approximate finished garment measurements chart to choose your size.
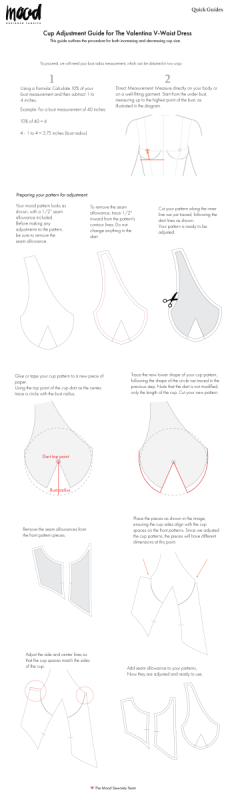
Looking for a perfect fit? Follow the steps outlined in the image below for both increasing and decreasing the cup size as needed.
How To Sew The Valentina V-Waist Dress
The instructions provided are designed to guide you through sewing the main fabric and the self-lining fabric for the Valentina V-Waist Dress simultaneously.
Sew with a 1/2″ seam allowance for all seams unless otherwise specified.
Step 1
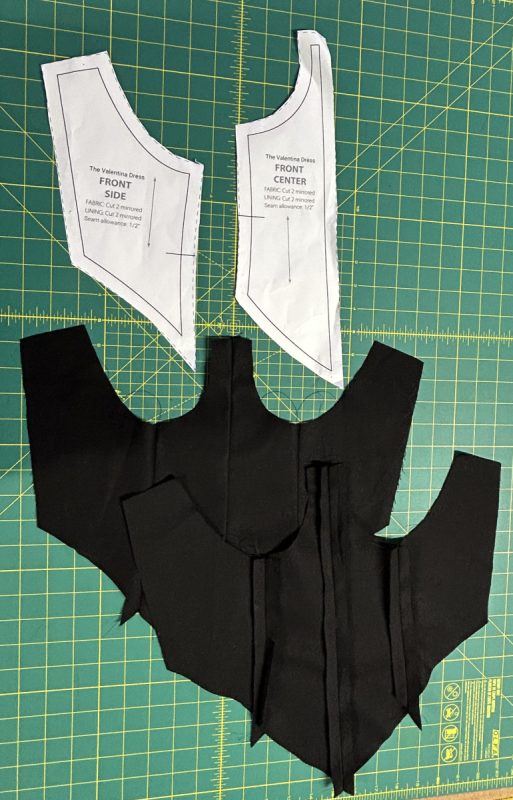
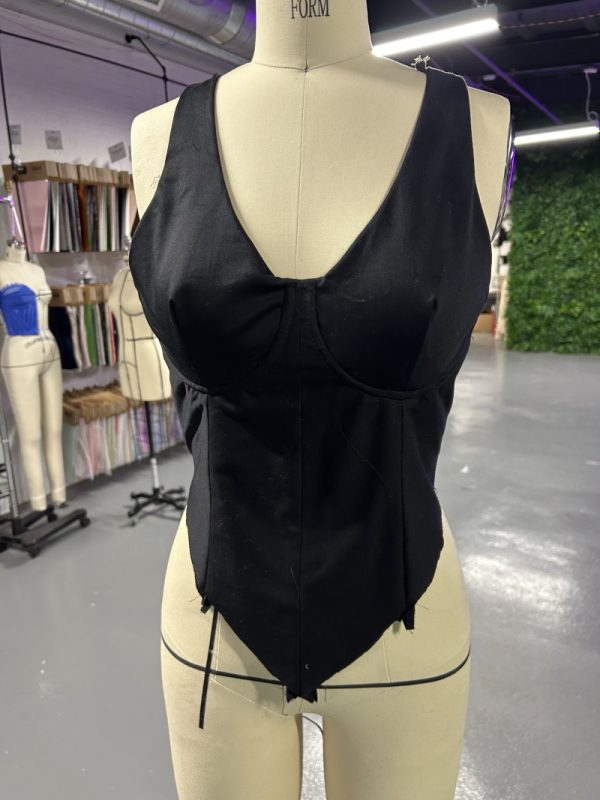
TOP FRONT
Pin and sew a Front Side piece to each Front Center piece (right sides together) while matching corners and notches. Use a straight stitch, about 3mm stitch length. Next, sew the front pieces together at center front.
Repeat step 1 for lining pieces.
Step 2
TOP BACK
Similar to step 1, pin and sew a Back Side piece to each Back Center piece.
Repeat step 2 for lining pieces.
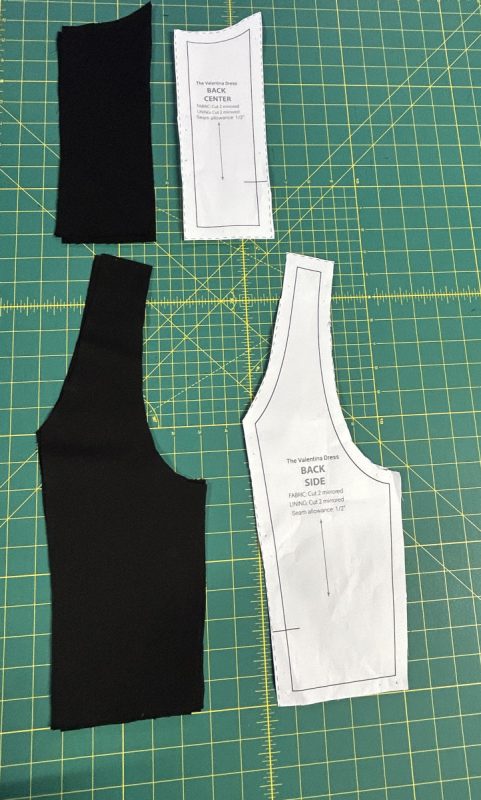
Open and press all seams flat.
Step 3
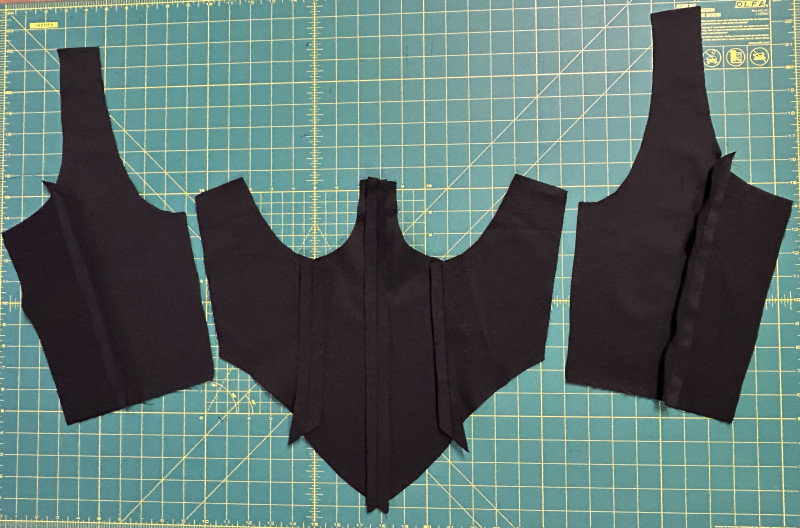
PREPARING THE CUPS
Sew the darts in each of the cup pieces, back-tacking at both ends, to complete 2 mirrored pairs—1 pair in main fabric and 1 pair in lining or self-lining fabric (for a total of 4 cups pieces).

Step 4
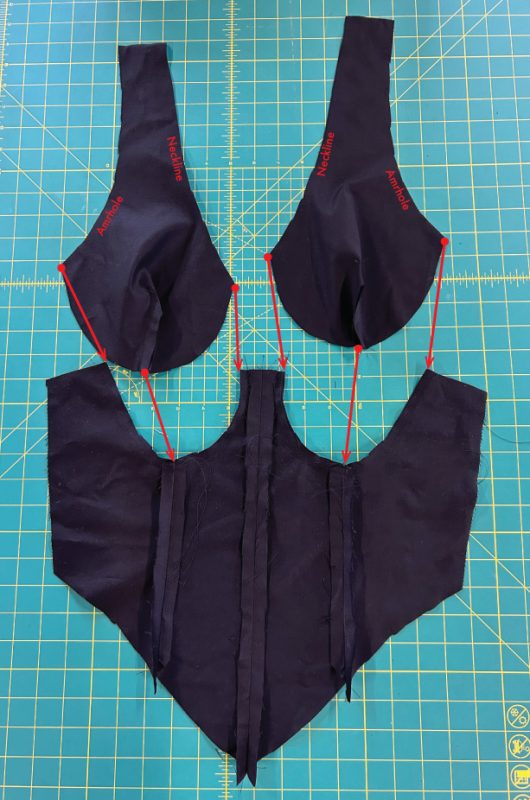
ATTACHING THE CUPS TO THE BODICE
Using two mirrored cup pieces: with right sides together, match the cup dart to the center seam at the bottom of the cup placement in the bodice, while matching the corners too. Pin and sew the cups in place.
Repeat for the lining pieces.
Step 5
MAIN FABRIC ONLY
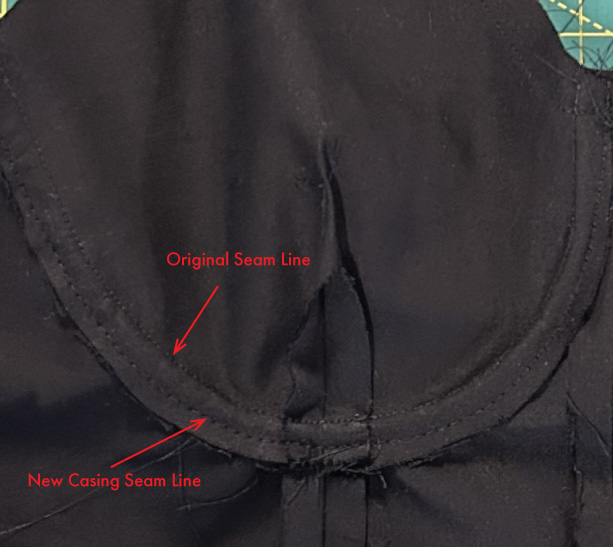
UNDERWIRE CASING
Press the seam allowance of the cups down.
Stitch the seam allowance down at ⅜ of an inch under the original seam line to create the underwire casing. DO NOT insert the underwire into the casing yet.
Step 6
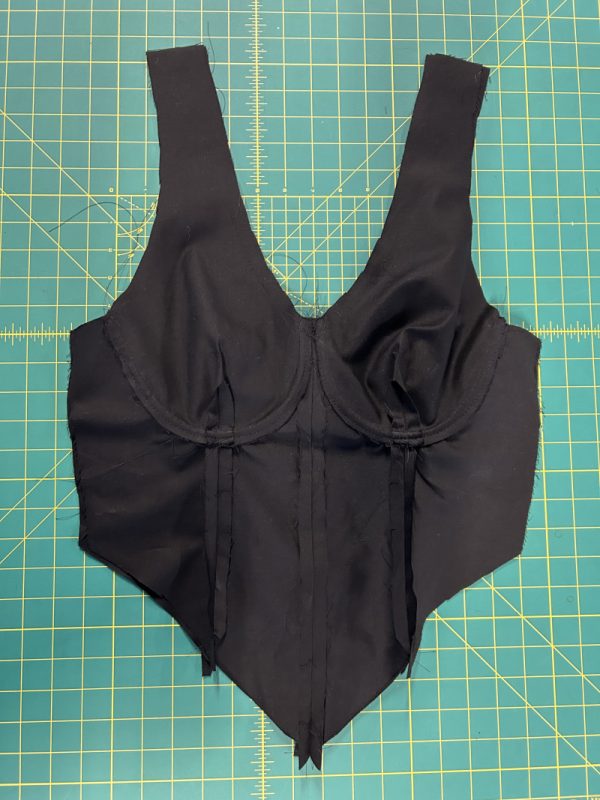
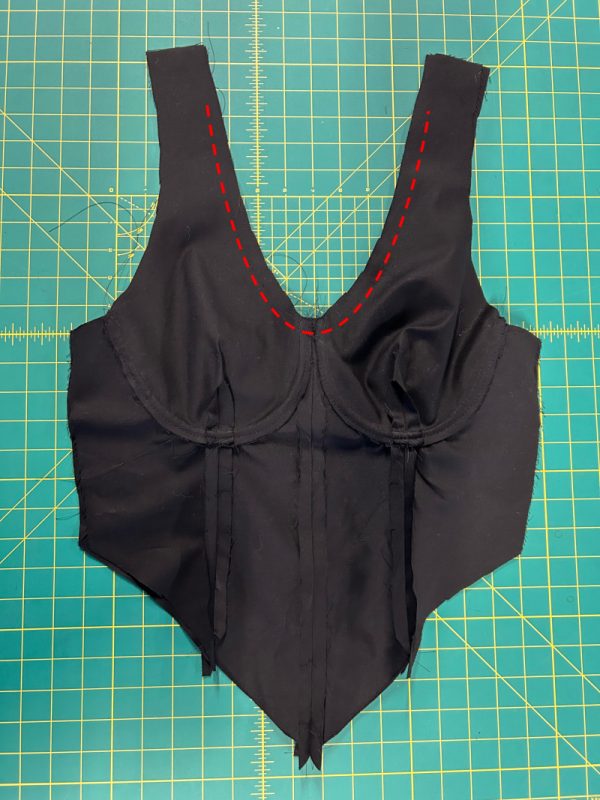
FRONT NECKLINE
Place and pin the main fabric and lining right sides together. Sew the neckline only, leaving 1.5-2 inches open at the top of the shoulder straps.
After sewing the neckline, insert the underwire in the casing.
Step 7
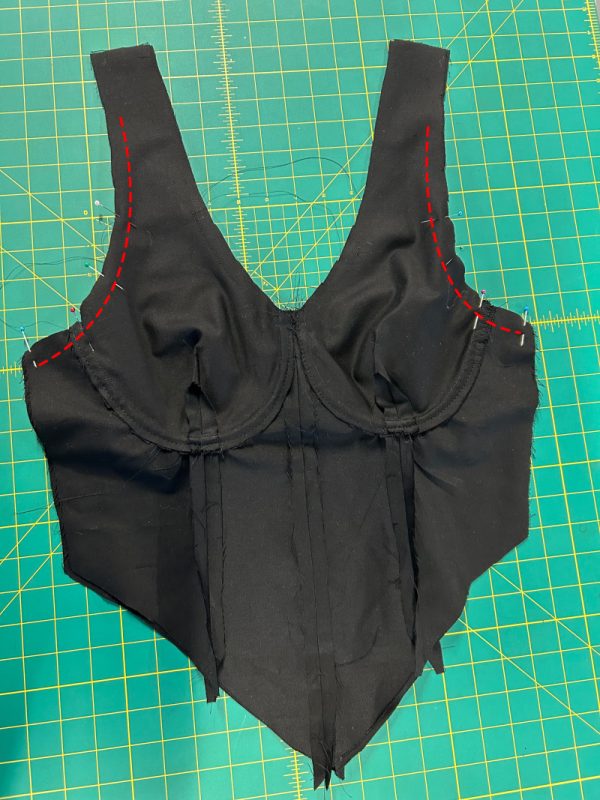
FRONT ARMHOLES
After inserting the underwire, once again line up the main fabric and lining with right sides together. Sew the armholes, leaving 1.5 – 2 inches open at the top of the shoulder straps.
Step 8
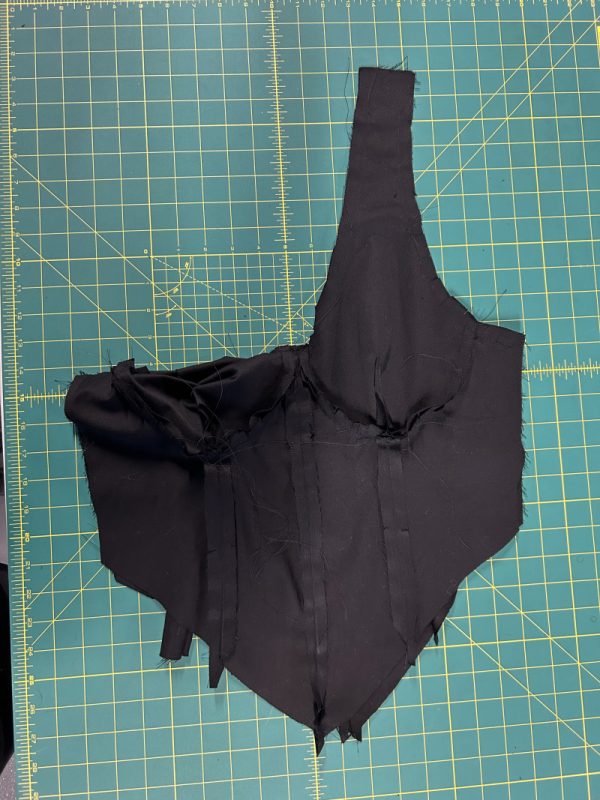
BRA CUP PADS
Open the lining and align the bra cup pads with the main fabric cups. Tack in the bra cup pads at the bottom corners to the underwire casing.
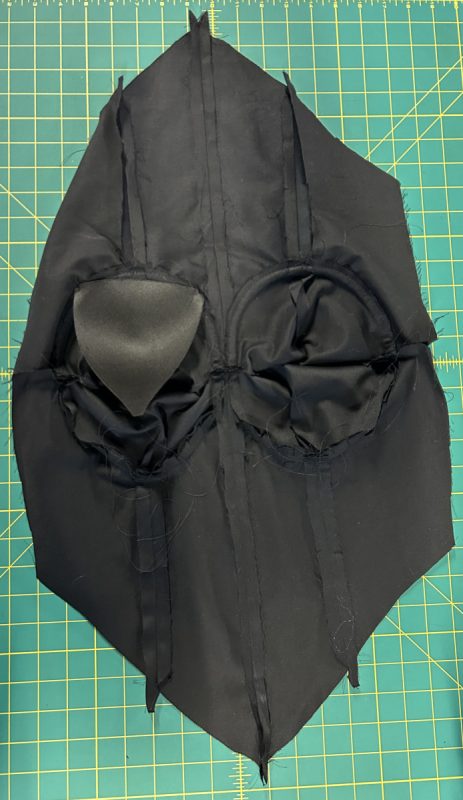
Turn the front bodice right side out.
Step 9
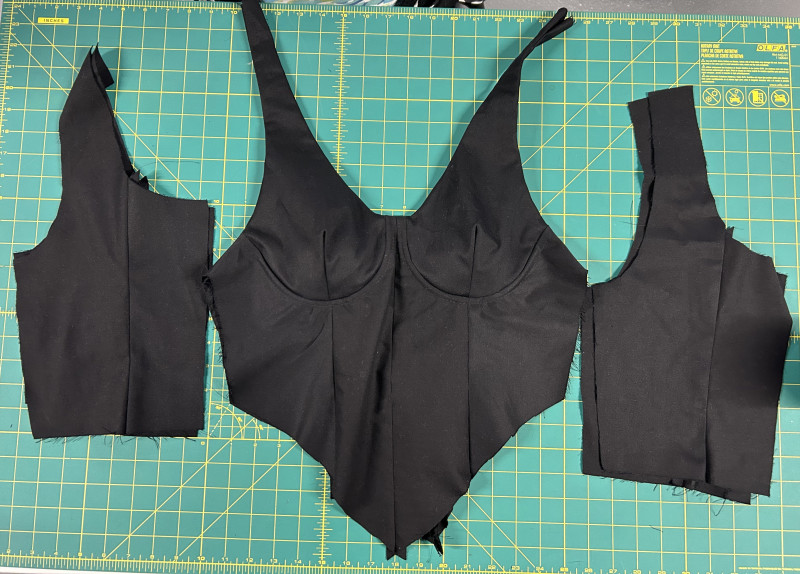
JOINING BACK AND FRONT PIECES
Work with the main fabric and lining pieces separately. With the main fabric pieces only, join the back bodice to the front bodice at the side seams.
Repeat for the lining pieces.
Step 10
BACK NECKLINE AND ARMHOLES
Turn the bodice so that it’s wrong side out again. Sew the armholes and necklines of the back pieces, attaching the main fabric and lining together. Leave 1.5 – 2 inches open at the top of the shoulder straps.

Step 11
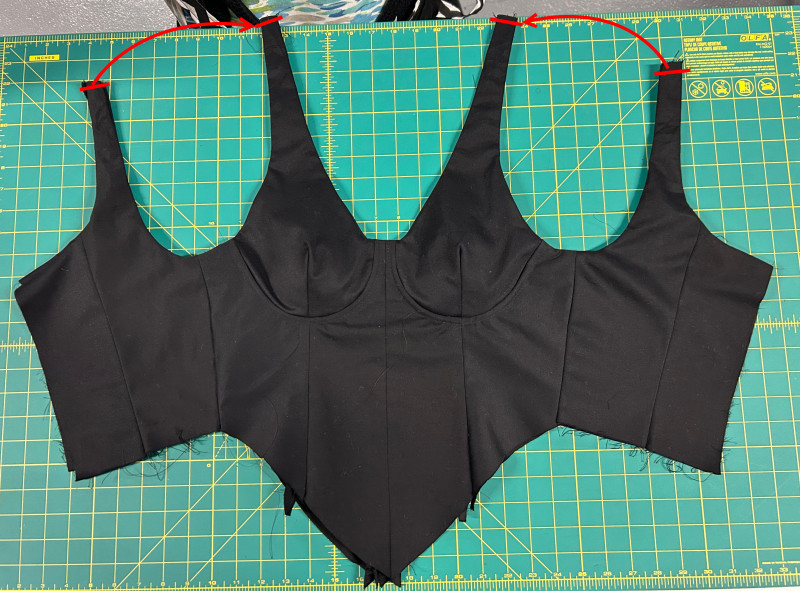
SHOULDER STRAPS
With right sides together, connect the tops of the shoulder straps of the main fabric only. Carefully repeat with the lining fabric only, making sure to not twist anything.
Turn everything right side out and finish the straps by either top stitching along the edge of the tops of the shoulder straps OR by hand stitching the open sides of the straps with a ladder stitch.
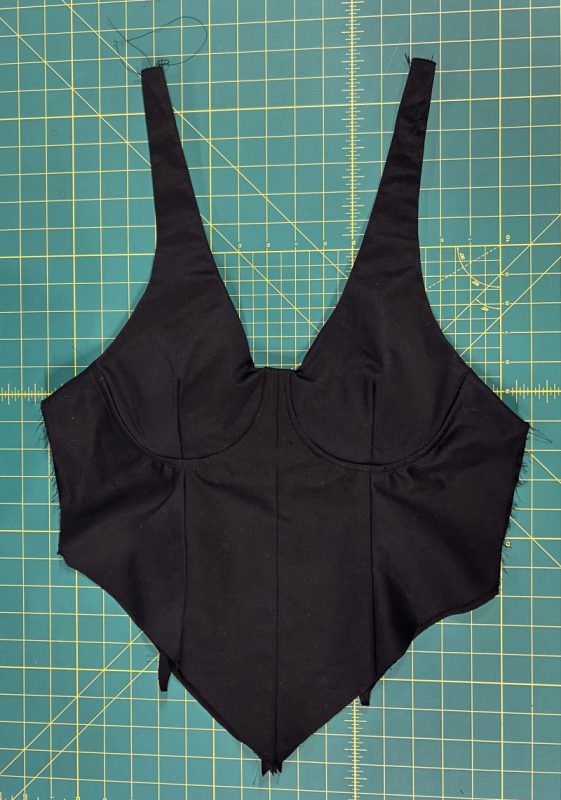
THE TOP IS COMPLETE
Step 12
JOINING FRONT AND BACK SKIRT
With right sides together, sew the front and back skirt pieces at the sides.
Step 13
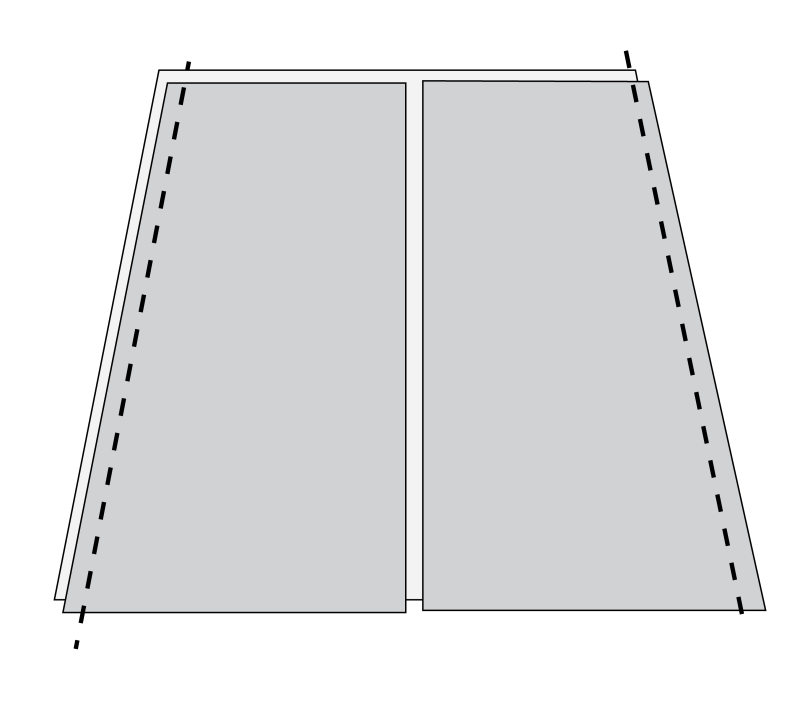
GATHERING THE SKIRT
Fold the front panel in half and mark the center point.
Sew a line of gathering stitches across the top of the skirt, leaving long tails at both sides. (To sew gathering stitches, set your machine to a tension of 0 and at the highest stitch length, sew with a straight stitch.)
Pull the threads to gather the fabric so that the waistline of the skirt is the same size as the waistline of the bodice. Do not tie off the threads so that you can keep adjusting the waist size if necessary.

Step 14
ATTACHING THE SKIRT
With right sides together, align the center front of the skirt to the bottom of the bodice V-shape. Pin and sew the skirt to the bodice.
You can sew both layers of the bodice to the skirt at the same time, leaving the edges raw or finishing them with a serger or zig zag stitch.
OR
Sew the skirt to only the main fabric of the bodice, then fold the bottom edge of the lining under by slightly less than ½ inch and either stitch in the ditch from the front or hand sew the lining down to the skirt and bodice seam allowance, covering the raw edges.

Step 15
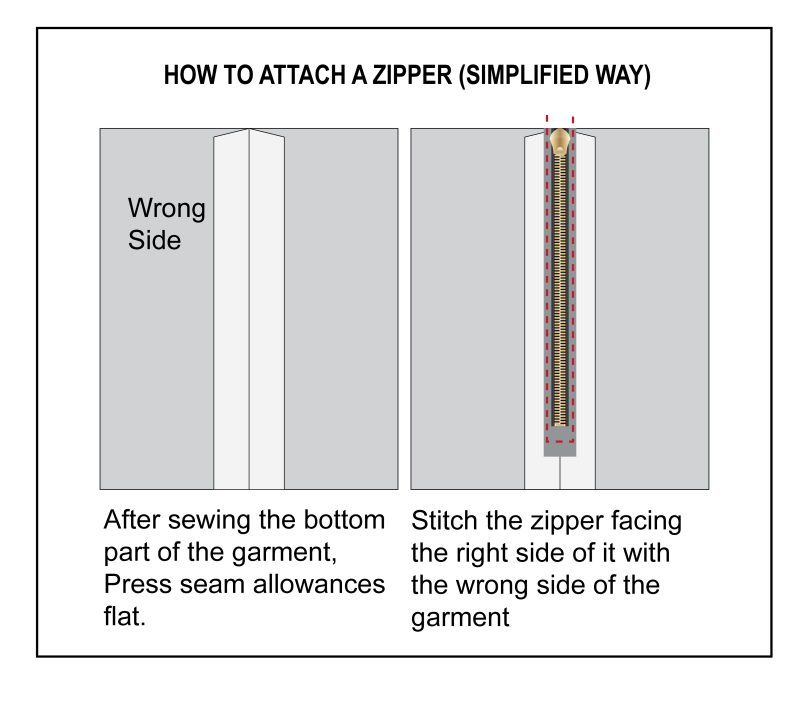
ZIPPER
With right sides together, attach the zipper and finish the back seam of the dress. You can use one of the two methods described below:

Step 16
Finish the bottom of the skirt with a rolled hem.
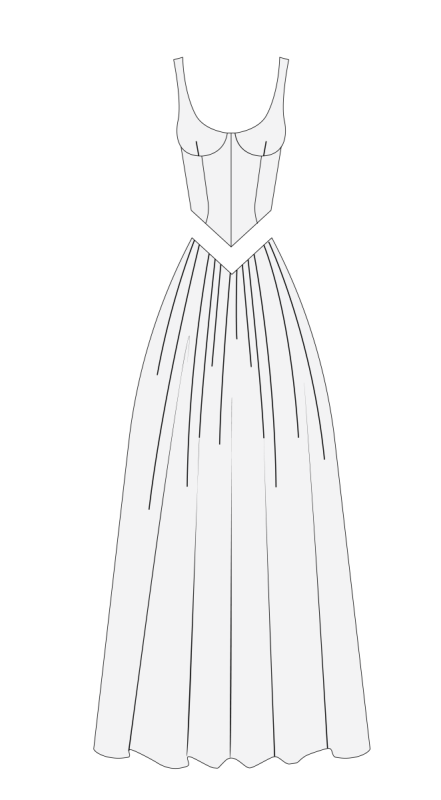
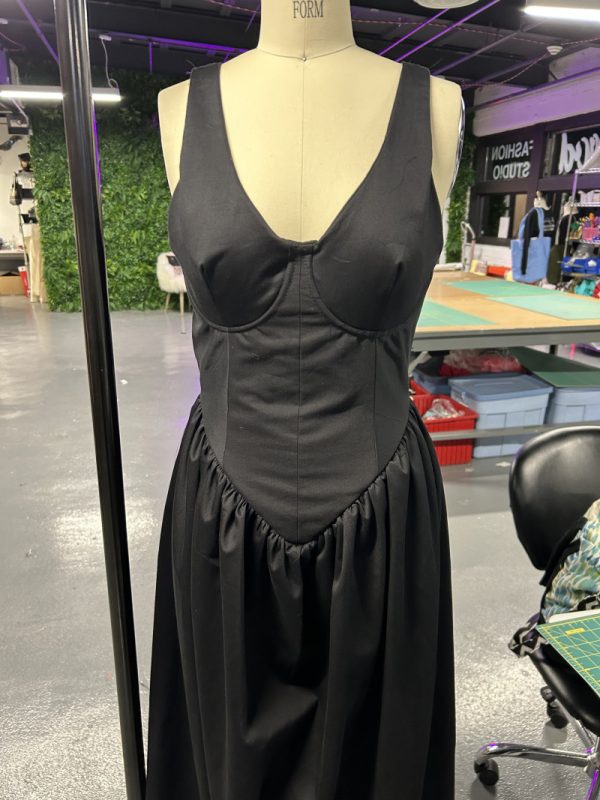
The Completed Valentina V-Waist Dress Free Sewing Pattern by Mood Fabrics
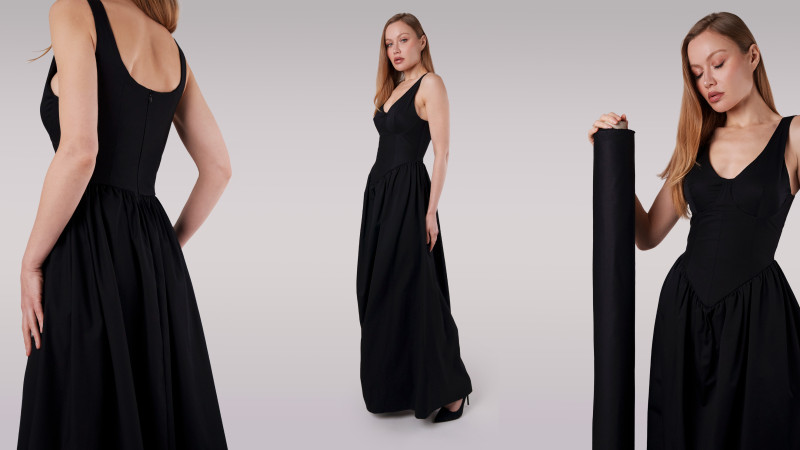
We can’t wait to see your version of the Valentina V-Waist Dress! Whether you choose stretch cotton sateen, luxurious taffeta, or a breezy crepe, this pattern is the perfect canvas for your creativity and sewing skills.
Share this post with a friend (or two!), download The Valentina V-Waist Dress Free Sewing Pattern, and show us which fabrics and colors you choose, using the hashtags #MoodValentinaPattern & #MadeWithMood.
Thank you to our incredible community for being part of this journey. Your input and enthusiasm are what make projects like this so special. If you loved designing with us, let us know—we’d love to do it again soon!
Are there instructions for adjusting the pattern for a larger bust? I’m trying to expand the cup size, though not necessarily the band size.
Thank you so much for your interest in this pattern! We’re thrilled to let you know that we’ve just updated our blog with a detailed guide on adjusting the bust cup fit. You can find it in the “Find Your Perfect Fit” section, right below the body measurement guide, under the title “How to Adjust Bust Cup Fit.” We hope this new resource makes your project even more enjoyable and helps you achieve the perfect fit!
Thank you! 🙂
Thank you for the pattern, iv been struggling to make one.
Thank you for choosing us for your pattern needs! We’d love to hear your experience with this pattern and what other patterns you are interested in using!
Wow this pattern is stunning!!! Greetings from Poland!
Greetings! Thank you! We strive to provide the best patterns for you to create beautiful garments. Let us know what else you would like to see!
I love the new direction format. They’re a little more detailed.
We’re so glad to hear that! We’re dedicated to providing you with the best resources to help you create amazing additions to your closet. Feel free to share what you’d like to see from us next!
Oh, I’m so making this!!! Thank you!!!!
Thank you! We would love for you to share the finished result with us and hear about how much you enjoyed using the pattern!
Stunning! Way to go and thank you for all the free patterns!
Thank you! We’re thrilled to hear that you’re enjoying them! We’d love to know which pattern you’re interested in trying next!
Hoe leuk dit gratis patroon ,dank jullie wel .
Dat is geweldig om te horen! Hartelijk dank voor het delen van uw feedback met ons. We horen graag meer over uw ervaring en hoe leuk u het vond om het patroon te maken!
That’s great to hear! Thank you so much for sharing your feedback with us. We’d love to hear more about your experience and how much you enjoyed making the pattern!
Can this be large format printed or can it only be printed by us letter and A4?
Hello, in order for our patterns to remain free, they must be printed in A4 and letter sizes.
Absolutely stunning!! So thankful you guys give free patterns so we can learn ❤️❤️
Thank you for your feedback! We’re dedicated to creating patterns that inspire and bring creativity to life. We’d love to hear what else you’d like to see from us!
Super excited to make this one! Would it be possible to do without the bra wire and cup insert? and any necessary adjustments that you would need to make to do so??
Hi Mia
We’re also excited that you’re going to make the dress. Thank you for using our patterns! It’s possible to make it without cups and without underwire; the steps would be the same except for the one where you sew the casing for the wire. I just recommend using a medium to medium-heavy weight fabric for the cup area to prevent it from being see-through.
Best regards
Sandy
Mood Sewciety
Hi. I love love love this pattern but the front neckline and v waist doesn’t suit my body type, would it be possible to change it to a square neckline and straight across waistline? how would i go about it?
Hi Joy
Of course! You can do it. You can use our Beaufort Peplum Ensemble pattern, using the blouse without the peplum—just adjust the length so it reaches your waist. For the skirt, use the Valentina Dress pattern; simply raise the sides of the skirt by 3 inches from the hem upward. Let us know how it turns out!
Best Regards
Mood Sewciety
Could this be done in satin? I found sateen, but didn’t like the feel of the fabric..
Yes, this dress can also be made with Satin fabric as well 🙂
This looks so good in the pictues with the model, but I think I’d sew the darts in the cups with a curve because they look pointy in the better lit pictures with the dress form.
Hi Stella
Yes, you can definitely do that! And if you have experience working with darts, you can also turn the cup dart into a princess seam if that gives you a better fit.
Thank you for your comment!
I’m making this. I bought fabric that in the description said it was stretch fabric. Received it an it is not stretch. What do you recommend I do to make the fabric still work even if it doesn’t have the needed stretch
No worries, since this pattern has a zipper at the back, it can also be made with fabrics that have no stretch.
Does the 4.5 yards include lining and main fabric or is that just for the main fabric? I’m planning on using a patterned main and a plain lining, so I’m trying to figure out the yards of wash that I would need! This pattern is beautiful btw!
Thank you! 4.5 yards is recommended to make a size small with lining included, since only the top is lined and the skirt is unlined.
Hello, do you guys offer these patterns in A0 printing format? I find it easier to cut them out! Thank you so much.
Hello, in order for our patterns to remain free, they must be printed in A4 and letter sizes.
Hi,
Just wondering if you’d recommend interfacing the bodice pieces apart from the cup part, if working with rather lightweight satin-like fabric. Thank you in advance and thanks for the gorgeous pattern, can’t wait to wear it:))
Yes, we recommend to interface or use a layer of buckram for added structure.
Hello,
I have a stretch satin. I’ve already completed steps one and two and didn’t realize i should add interfacing. Should I go ahead and use it on the cups before I sew those and cut out strips to fit between the seams I’ve already done or will it be okay without?
Thank you
Honestly I think the cups might be more flattering without interfacing because they’ll shape more naturally around your bust. I don’t think you need interfacing.
I love this pattern and will be using some excess fabric I have to make it! Supposing I do not want to use cups or underwires, could this dress still be pulled off? I know I will pair it with blouses underneath, so I’m thinking underwire and cups won’t be necessary.
Hello, you can definitely make this dress without the underwire or bra cups, but we do suggest adding underwire for the smaller sizes of this dress.
okay, awesome! I will add underwire to the smaller sizes. I appreciate the response :)!
Gorgeous dress! How would I go about adding a lining in the bodice of this dress if I wanted to?
Hello, this dress was also made with a lining from the same fabric. You can view how the main fabric and the lining are sewn together in steps 6-10.
Bonjour, pour quelle stature, ce patron a été créé ? Je mesure 1,75m et je voudrais savoir si je dois rallonger le buste. Merci par avance.
Hello! Thank you for your question. Our patterns are typically drafted for a model height of 5’10” (approximately 1.78m). Given your height of 1.75m, you may find that you need to make slight adjustments to the bust or overall length for your perfect fit. We always recommend sewing a muslin or test garment first to check any necessary alterations! Happy Sewing!
Bonjour ! Merci pour votre question. Nos patrons sont généralement conçus pour une stature de modèle de 1,78m (environ 5’10”). Étant donné que vous mesurez 1,75m, il est possible que vous ayez besoin d’apporter de légers ajustements au buste ou à la longueur totale pour une coupe parfaite. Nous recommandons toujours de coudre une toile ou un vêtement test au préalable pour vérifier les modifications nécessaires !
Hola, este vestido tiene forma en V en el delantero, pero la parte de la falda viene toda recta. Como hacerlo para que el bajo no quede mucho más largo en el delantero que baja en V? Gracias
Hola Ana
En general cuando hacemos una falda con amplitud en el ruedo, se suben unas pulgadas a los lados, si esto no se hace, los lados de la falda cuelgan de forma triangular. Para esta falda aplica el efecto contrario, es recta de abajo, de manera que al coserla en forma de V a la cintura, sube a los lados y ya queda bien. De todas formas si gustas puedes cortarla con largo extra para despues ajustar el largo y la forma a tu gusto.
Gracias por usar nuestros patrones! Avísame si tienes alguna otra duda. Saludos!
Hello! Do you think this pattern would work with a light weight denim? If not chambray?
Yes, those fabrics can also work! As long as you include the zipper, you should be fine.
Puedo agregarle mangas a este patrón?
Sí, puedes descargar un patrón de manga de cualquiera de nuestros patrones de costura gratuitos y agregarlo a este vestido.
Hello I love this pattern and was hoping to make it, how much fabric would you recommend to make a size L?
Hi Sienna
If you’re using our Stretch Cotton Sateen, which is 59″ wide, for size L you’ll need 3.6 yards for the main fabric and 1 yard for the lining. So I recommend 5 yards if you’re going to use the same fabric to line the garment, or 4 yards and 1 yard of a different fabric of your choice for the lining if you prefer something other than the main fabric.
I’m sending the cutting layout I recommend to your email.
Best regards
Sandy
Mood Sewciety
I was so excited about this dress! It launched just in time for me to make it for my friends wedding. I’m still fairly new to sewing so I made some changes. I had to modify the top so rather than darts I simply gathered the underbust. This gave a bit more room. I also avoided the underwire but overall the dress fit great and I was thrilled with how it turned out. Wish I could share a pic.
Tag us on social media with the hashtag #MadeWithMood to share your creations!
Could this be done in a jacquard? Or would that have too little stretch?
Cheers in advance
This would be gorgeous in jacquard. Just make sure if it has some stretch that you use the finished garment measurements to choose which size to make.
Can you please please please please please provide me the free pattern of begonia dress I really want to make one dress but I don’t know how can you please share the pattern please ma’am
You can download the pattern for free by entering your name and email address into the field under “Download Your Free Sewing Pattern”. Then, check your email inbox (and your spam, just in case) for an email from Mood Sewciety Patterns with the subject line “Your Free Download from Mood Sewciety”. Scroll down to the blue link under the title of the email and click on that. It will bring you to a web browser page where you have to scroll down and find the orange button that says “click here to download your free sewing pattern”. That button will redirect you to the webpage with the PDF of the pattern, which can be printed on 8.5×11 paper on your printer at home. Let me know if you need any additional help accessing the pattern!
Hi. Whenever I try to get a pattern, I never seem to receive the email to retrieve it. Can someone please help me. Thank you
Hi Celeste! Check your spam folder and if you’re still not seeing it, send us an email at patterns@moodfabrics.com and we’ll help you out there.
Someone is selling your patterns on Etsy.
Thank you for watching out for us Rosalie! We were able to reach out to the etsy seller to get the pattern listing taken down.
Can these be printed in A4 or is it only for regular home printers?
As of right now, our patterns can only be printed on 8.5×11 printer paper, but stay tuned for future pattern drops as this may change in the future!
Hello Mood Fabrics team,
I’m writing to report an Etsy shop that appears to be copying and reselling your sewing patterns without authorization (or in a highly confusing way).
Several listings seem to closely replicate Mood patterns (from Mood Sewciety) in terms of presentation, visuals, and instructions. Since your patterns are intended for personal use unless expressly licensed, I wanted to flag this for your review.
Hi Bigan, good catch! These are definitely our patterns being sold. We were able to get the etsy seller to take them down. Thank you for watching out for us!
Absolutely LOVED this pattern. I would highly recommend making it. The dress was everything I hoped it would be. I did have to make a few alterations. I took the shoulder seam in about 2 inches so the underwire hit my breast properly and the waist hit my true waist. My skirt also had an odd bubble at the front point of the drop waist. Next time I would maybe pleat the skirt at the front point. Because the side waist to center front drop of the bodice is so extreme, I also had to hand cut the skirt to be the same length before hemming. But in all this pattern was easy to follow and turned out beautifully.
Hello,
I discovered your wonderful website today, while I was looking for a dress pattern for a wedding. I found this dress so wonderful, and I downloaded the pattern. But I have a question. What is the recommended length of fabric to make it in the 4XL size please ?
Thank you so much
Hi Liliane! I recommend 8 yards of fabric for a 4XL since the skirt is so full and long.
Hello,
I discovered your wonderful website yesterday. I was looking for a dress.
What is the fabric length needed to sew this dress in 4XL size please ?
Thank you so much !
Hi Liliane! According to our “Shop This Look” widget, a size XL requires at least 6 yards of fabric. I would recommend at least 8 for a size 4XL because the skirt is so long and full. Let us know how it turns out!
Hello, I’m wanting to make this a midilength. Is it just a case of shortening the skirt from the bottom?
Yep, pretty much. I would honestly cut the skirt the full length then try it on when it’s done and just hem it to the length you want, that way you don’t cut it too short and have to lengthen it in the end.
Hello, great dress, but could I change the skirt to a full circle? And if yes, how would I go about with the front triangle in the bodice?
Yeah! You could totally do a full circle. What I would recommend for the V waist front is to cut a matching V shape into one of the sides of the circle skirt waistline. That way when you gather it and attach it, the skirt will fall naturally with the shape of the bodice.
Love this pattern! I’ve adjusted it to make a square neckline and a full-length pannel dress with full sleeves for an upcoming event, used a recyled curtain for the fabric and feel so gorgous in it! The tutorial was so helpful as someone still figuring out all the little things
I am really struggling with joining the straps together. Is there any more information on how to do it?
The best way I can explain it is like this: Take a look at the first photo in step 11. Once you get to this point in the pattern, you’re going to flip the back straps inside out (only the back straps, not the front ones, and not the whole back bodice, only the straps). Once the back straps are inside out, you’re going to stuff the front straps INTO the inside out back ones until their raw edges line up. Now just sew a stitch across the raw edges to connect the front and back and flip the straps right sides out again. Let me know if that helps answer your question!
I’m a little confused on how to do the skirt. Are there any actual pictures to follow?
Hey Julia, check out the tutorial for the Venice V Waist Dress for a more in depth tutorial for attaching the skirt.
In making this for my friend at school right now!! 😀
Hello! Thanks for this AMAZING pattern! I was just wondering if I wanted the skirt to be a little fuller could I just size up on the skirt and then gather it more?
This will be my first time working with a pattern and I’m super excited. Thanks!!
Hey Sarah, yes this is how you would make the skirt fuller.
Hello! When sizing up, do we keep the bra cups and underwire the same? When “shopping the look”, it doesn’t adjust those things. I would be making around a size M (32D). Thank you!
Hey Whitney! I recommend getting bra cup inserts that are the same as the bra size you wear. If you end up having to trim them down OR blend sizes in the dress pattern to make the bust larger, that’s totally ok.
Thank you for the free pattern.